Knowledgebase [EN]
GEMO knowledge base, general How-Tos, manualy and similar things.
- Ticket system: Instructions for use [osTicket]
- Add mail account to Mobilephone
- Internet Explorer Mode (IE mode) in Edge Browser
- Configure ZW3D license [CAD]
- Delete The Teams Cash
- Using a Shared Mailbox [Shared Mailbox]
- MS Teams Planner App [Teams]
Ticket system: Instructions for use [osTicket]
Introduction
In order to improve user support when problems with IT hardware and software occur in the GEMO Group, a notification system called HelpDesk has been introduced. A system is used that can be accessed via a web browser.
New problems, error messages or even questions are created as a ticket in the HelpDesk. There are two ways to create a new ticket:
- The user sends an e-mail to it-support@gemo.de.
- The user surfs the HelpDesk website and opens a new ticket. (Login is optional).
All employees who have a GEMO Group domain account also automatically have an account in the HelpDesk system. In practice, these are usually those who have access to corporate email or a corporate computer.
To log in to the website, the same login information must be entered that is used to log in to the computer. Typically, the user name consists of the first letter of the first name and the last name. So the account of Max Mustermann should be M.Mustermann (case insensitive). The password is usually chosen by the user.
This manual describes how to register new requests and check the status of existing requests.
Reporting a problem with an e-mail address
The simplest form of reporting is to send an email to it-support@gemo.de:
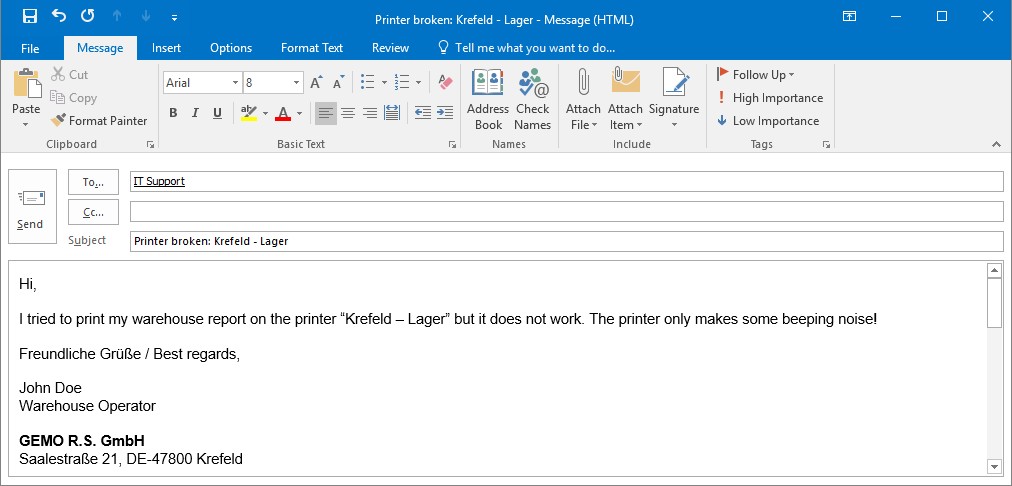
The email should have a subject that identifies where the problem is (printer, FEPA system, computer). Both the text of the e-mail and the subject line can be written in English, German or Polish at the moment. The message can contain attachments as well as images in the text (RTF or HTML format).
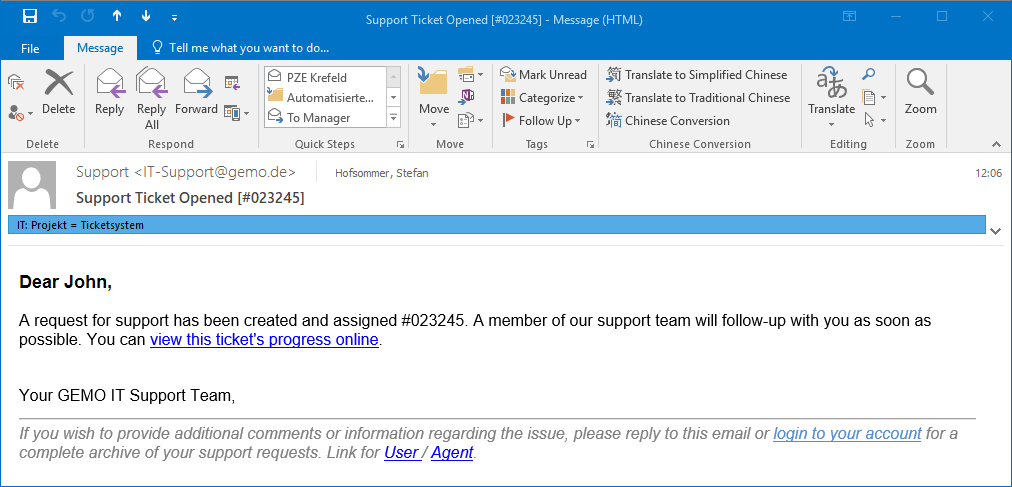
After sending your message you will receive an e-mail confirming that your message has been registered:
Reporting a problem using the website
You can also report a problem via the website. To do so, open support.gemo-group.com in your browser and log in by clicking the appropriate link at the top of the page:
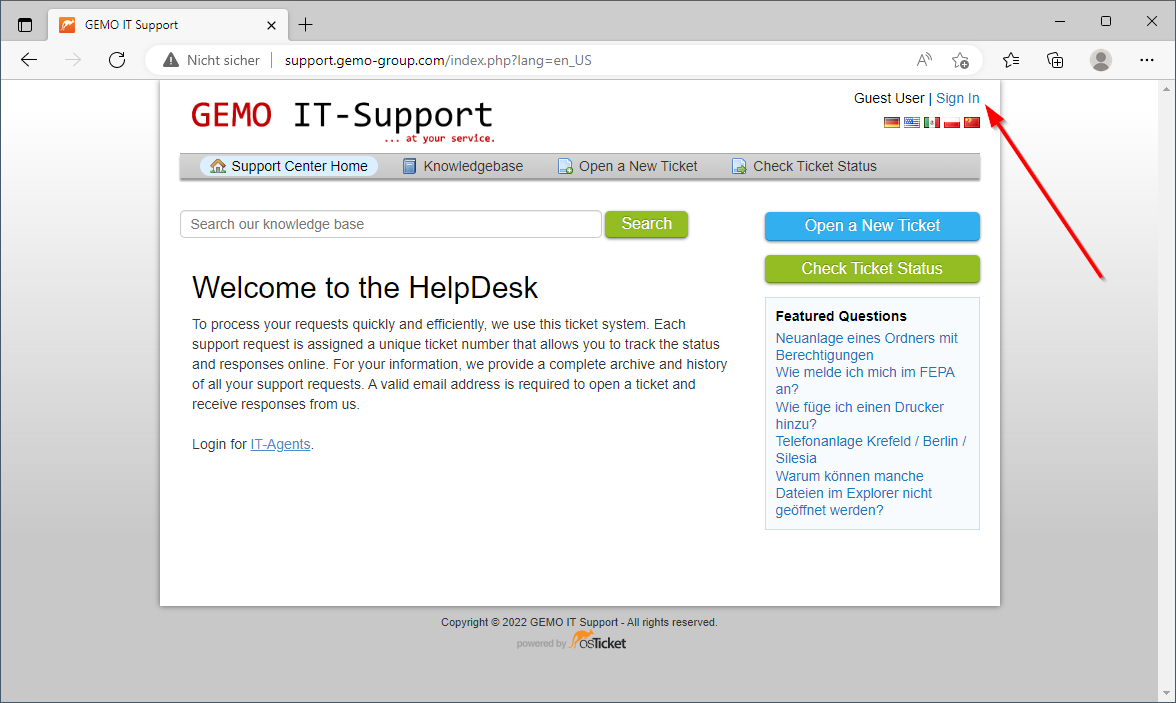
As a username and password you should enter the same data that you use to log into your domain account on your computer or on the remote server. It is possible to submit a ticket without logging in, but this is not recommended.
After logging in, click the "Create new ticket" button:

Select the appropriate topic from the "Help Topic" menu, then enter the ticket subject and details. You can also add attachments. Once you have entered your details, click the "Open Ticket" button.
A properly registered ticket will be confirmed by email shortly thereafter.
Viewing the current status of your tickets
After logging into the HelpDesk system, it is possible to view the tickets associated with the user. Just click on the "Tickets" button:

A list of open tickets will be displayed:
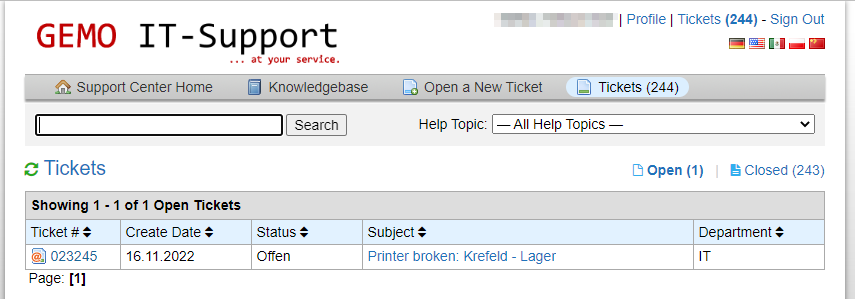
At the top of the page there is an option to filter the tickets by free text or by help topic. In the table itself, you can click on the column titles (e.g. "Ticket#" or "Creation date") to sort the list. The column "Department" stands for the IT internal assignment to a department.
By clicking on the ticket number or the subject of a ticket, the history of the ticket is displayed:
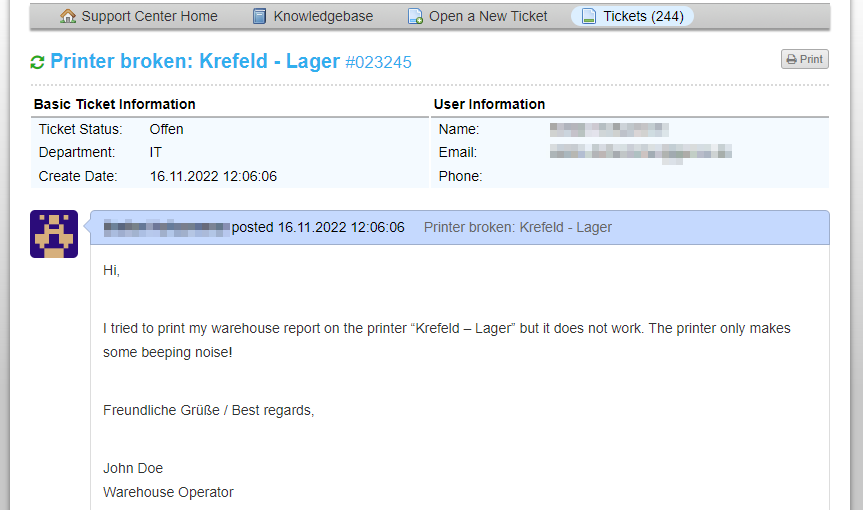
The history includes correspondence (including date and time and contact), files sent, and information about which IT agents the ticket was assigned to. The components can come from a sent email or from the messages entered via the HelpDesk web page.
The form for adding a response to a message is located at the bottom of the page:
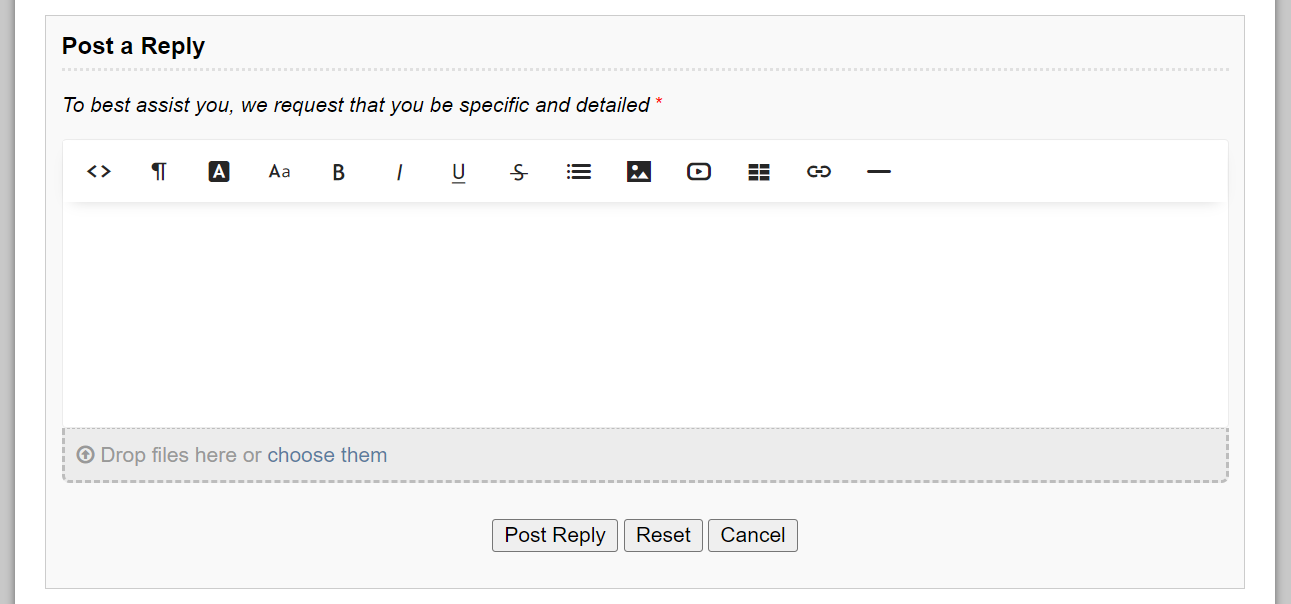
When you enter a response and click "Create Response", the new entry is added to the history and the responsible IT agent is notified. New entries can be used either to add information or to ask for status, progress, or additional information needed to complete the submission.
Add mail account to Mobilephone
This page will explain how you can add your GEMO mail address to your mobile device.
Prerequisites
First of all, make sure that you have a valid internet connection. Mobile data or WIFI will be sufficient. In order to connect to a GEMO WIFI it might be needed to inform IT before you're able to connect your mobile phone.
In some WIFI guest networks the traffic needed for the configuration might be blocked so turn off WIFI if you're in a guest network and expirience connection issues.
Connect a new mobile device
At the moment we're only providing support for Android devices. The generel steps will be similar on all devices but be aware of our screenshots might be out of date pretty fast.
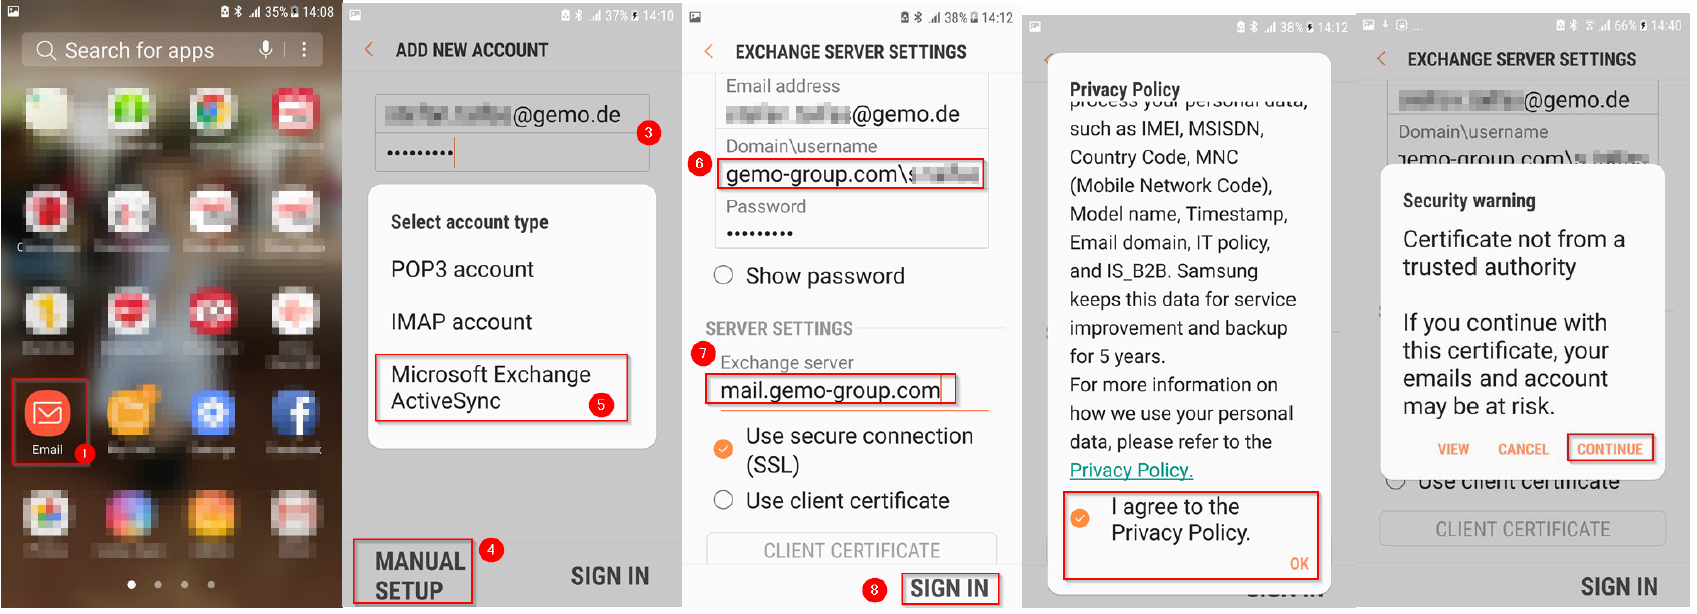
- Open the standard mail app.
- Select the option to "Setup new mail account" (not visible in the screenshots).
- Type your GEMO Email address and password (like the password you use to login to your computer).
- Select "manual setup".
- Choose "Microsoft Exchange ActiveSync".
- Remove the preentered domain name and write down our GEMO domain and your windows user ID with a “\” between them. For example: “gemo-group.com\m.mustermann”.
- Remove the preentered server name and write the correct one “mail.gemo-group.com”.
- Press, “sing in”.
- If it shows up, please accept policy warnings (not visible in the screenshots).
You need to accept the exchange server as "Device Administrator" for your device. You have to accept that in order to get the mails on your mobile device. This means that GEMO IT can remote-wipe your device in case it gets lost.
Troubleshooting
If the program gives you errors please make screenshots and send them to: it-support@gemo.de. One known issue is that you have already connected more devices than allowed (maximum 10 ) and then IT can help you removing the old devices.
Internet Explorer Mode (IE mode) in Edge Browser
Background / What happened?
On 14.02.2023 Microsoft released an update that disables the Internet Explorer and instead opens their new solution: Microsoft Edge Browser. In general this is a good step as using the Internet Explorer can be quite dangerous because it does not get any updates anymore and is based on pretty old technology.
This update will get installed on the GEMO computers step by step. This means it is possible that some colleagues can still use the Internet Explorer while others cannot.
Unfortunately there is still some websites or services where the Internet Explorer is needed as the Website will not work without it. One of this solutions is the internally used IMS.
When you're affected and try to open IMS via icon on the dekstop, the Internet Explorer will shop up shortly, close and a new information will be promted looking like the following screenshot.
Unfortunately at the moment we onlny have a German language version of that screenshot but the message is the same in every language: The Internet Explorer has been replaced with Microsoft Edge.
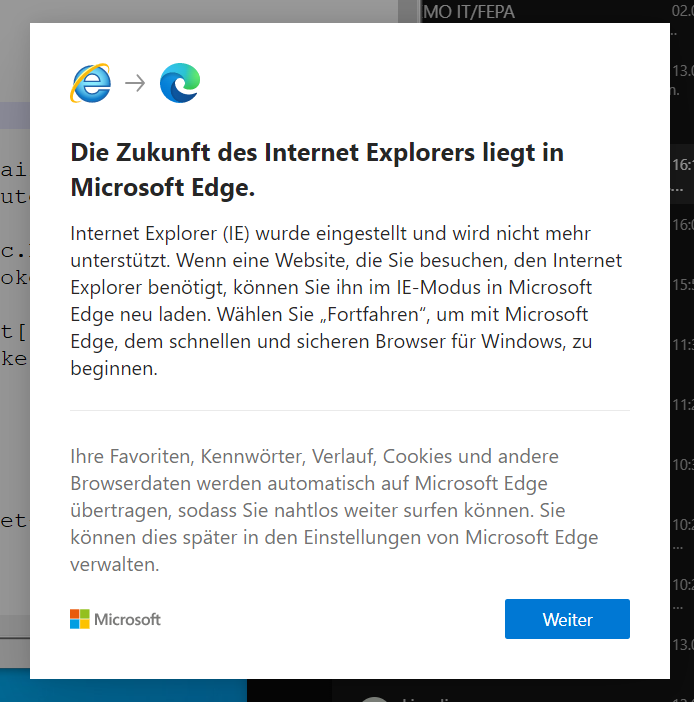
Then, Edge will start up and instead of the IMS it will display a page asking you do use "WebModel". We don't want to do this so please follow the instructions mentioned below to get it working again: Internet Explorer Mode in Edge
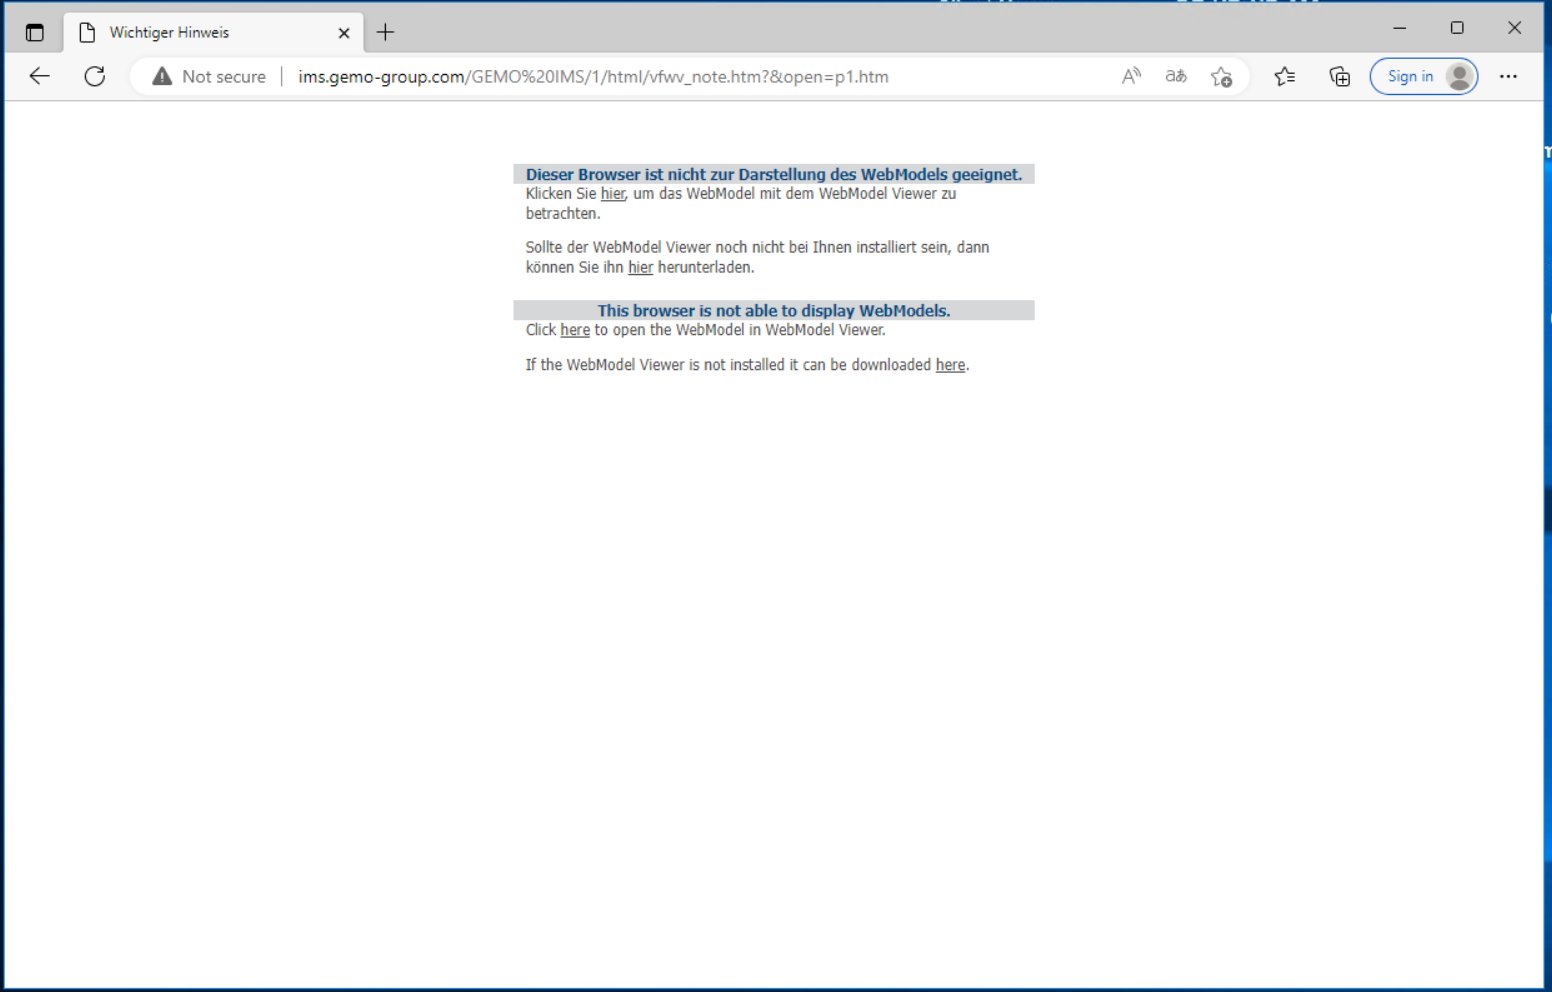
Internet Explorer Mode in Edge
The Microsoft "Edge Browser" is based on the same engine as the well known "Chrome Browser" from Goole, called "Chromium". This enables fast browsing the web, use of modern standards and pleayback of any kind of modern media from the web. The difference is that the "Edge Browser" carries some functionality from the Internet Explorer but to use it, we have to activate it first.
1. Start Edge Browser
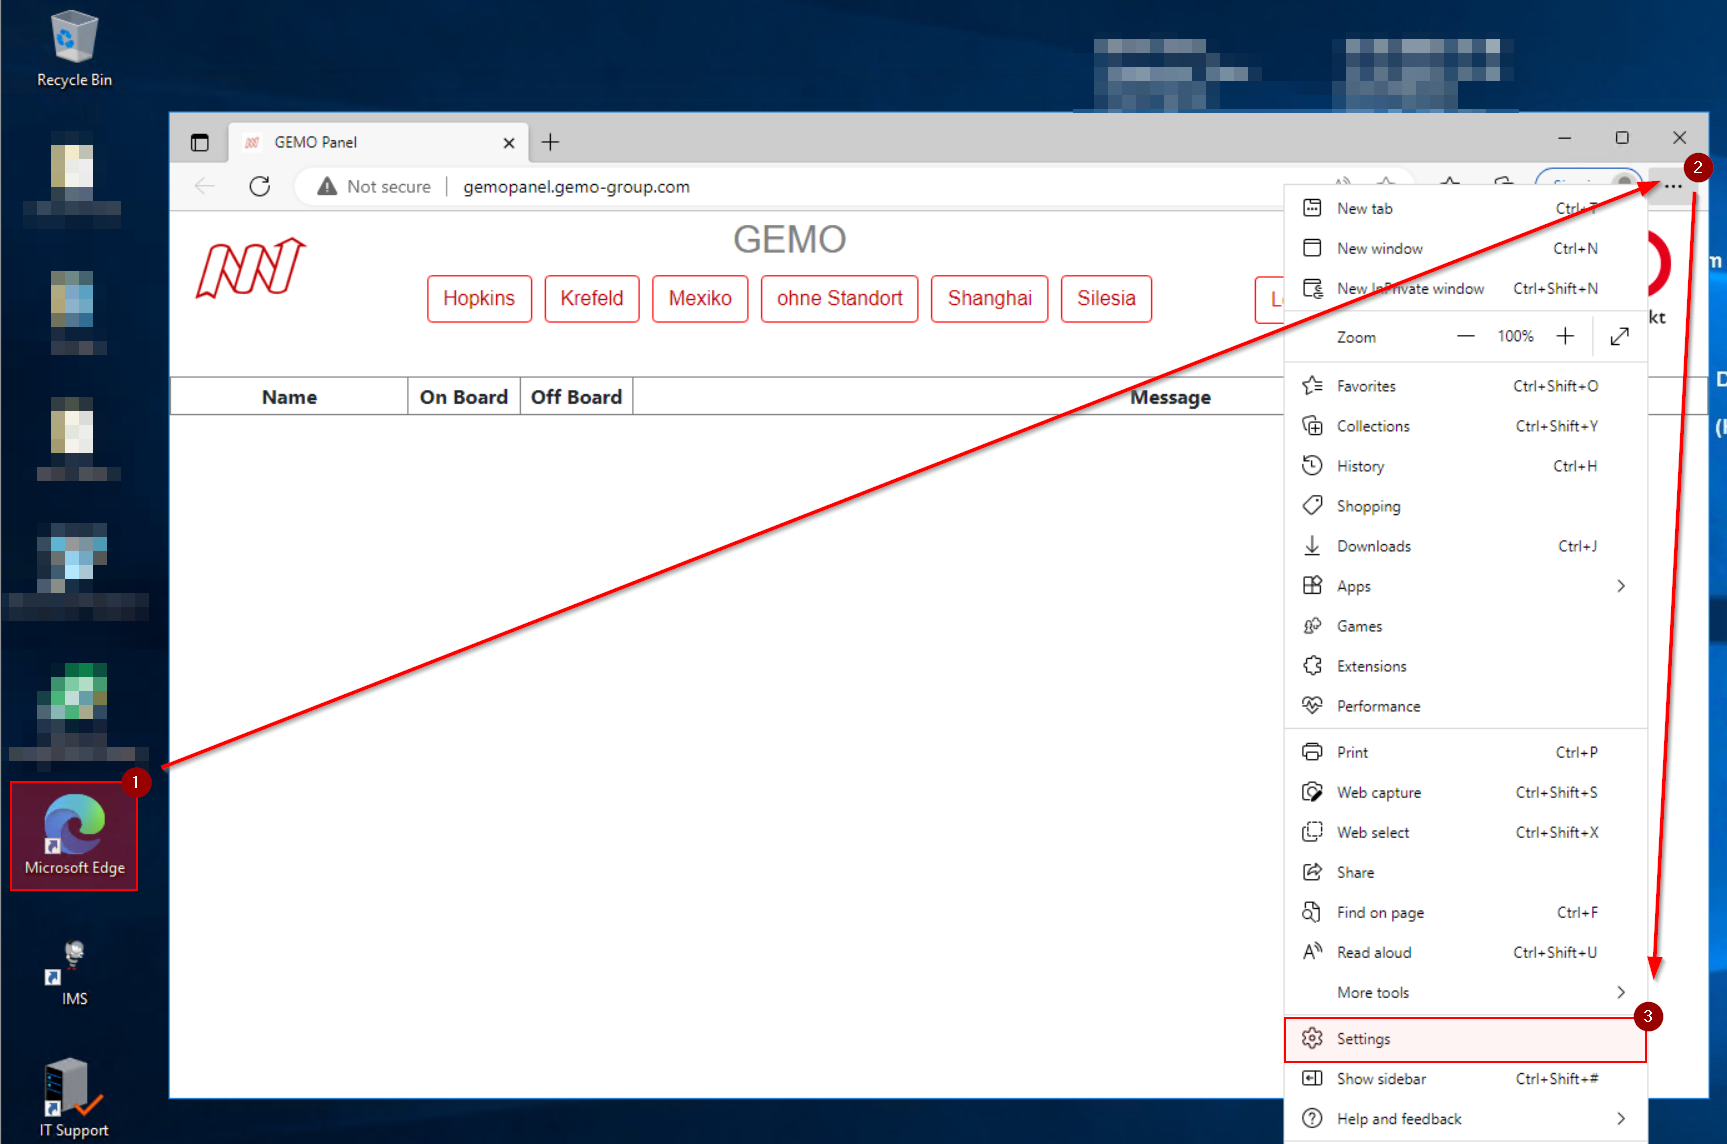
Start the Edge browser from your desktop [1] or the windows main menu, open the "More" menu [2] and navigate to "Settings" [3].
2. Allow IE mode
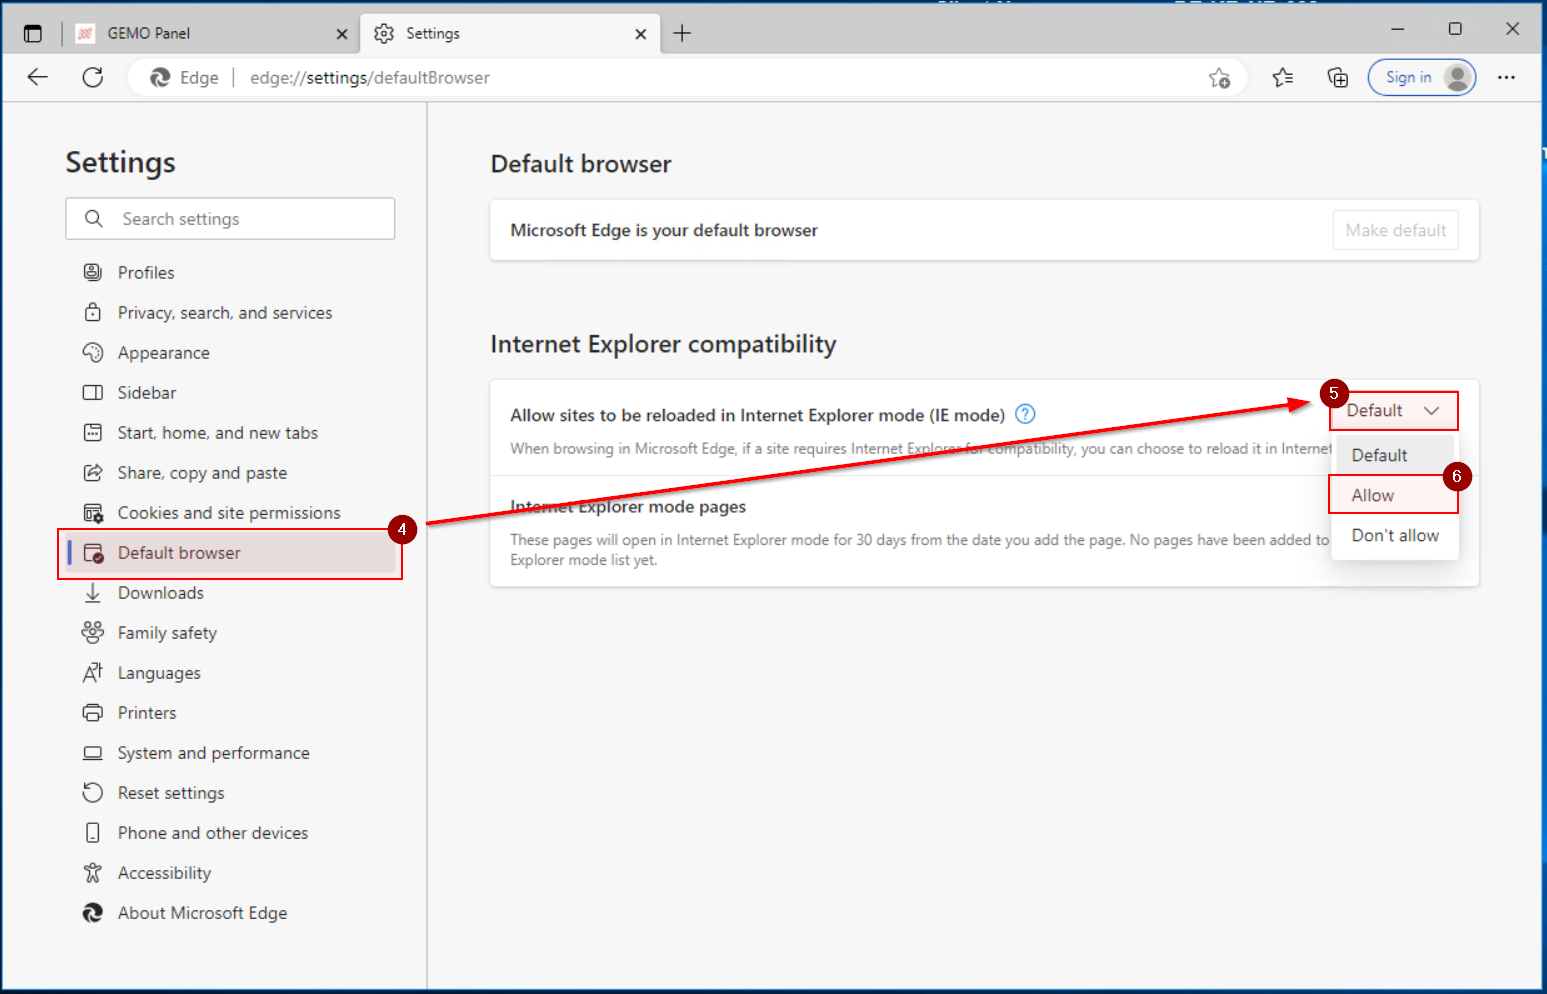
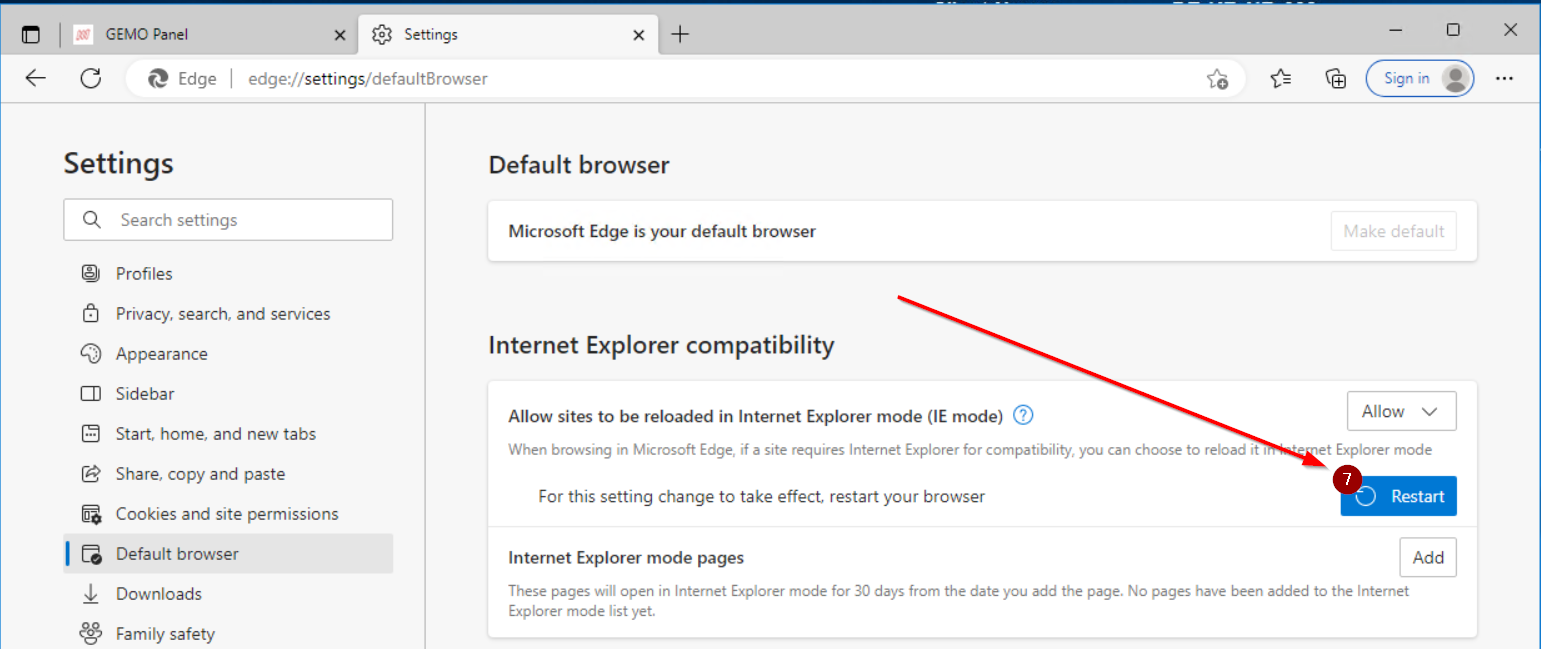
A new tab will open with all the settings. Here, select "Default browser" from the left list [4], go to the "Allow sites to be reloaded in Internet Explorer mode (IE mode)" combobox [5] and choose "Allow" [6] option.
3. Restart Edge browser
The browser will ask for a restart, click it [7].
4. Configure IE mode for IMS
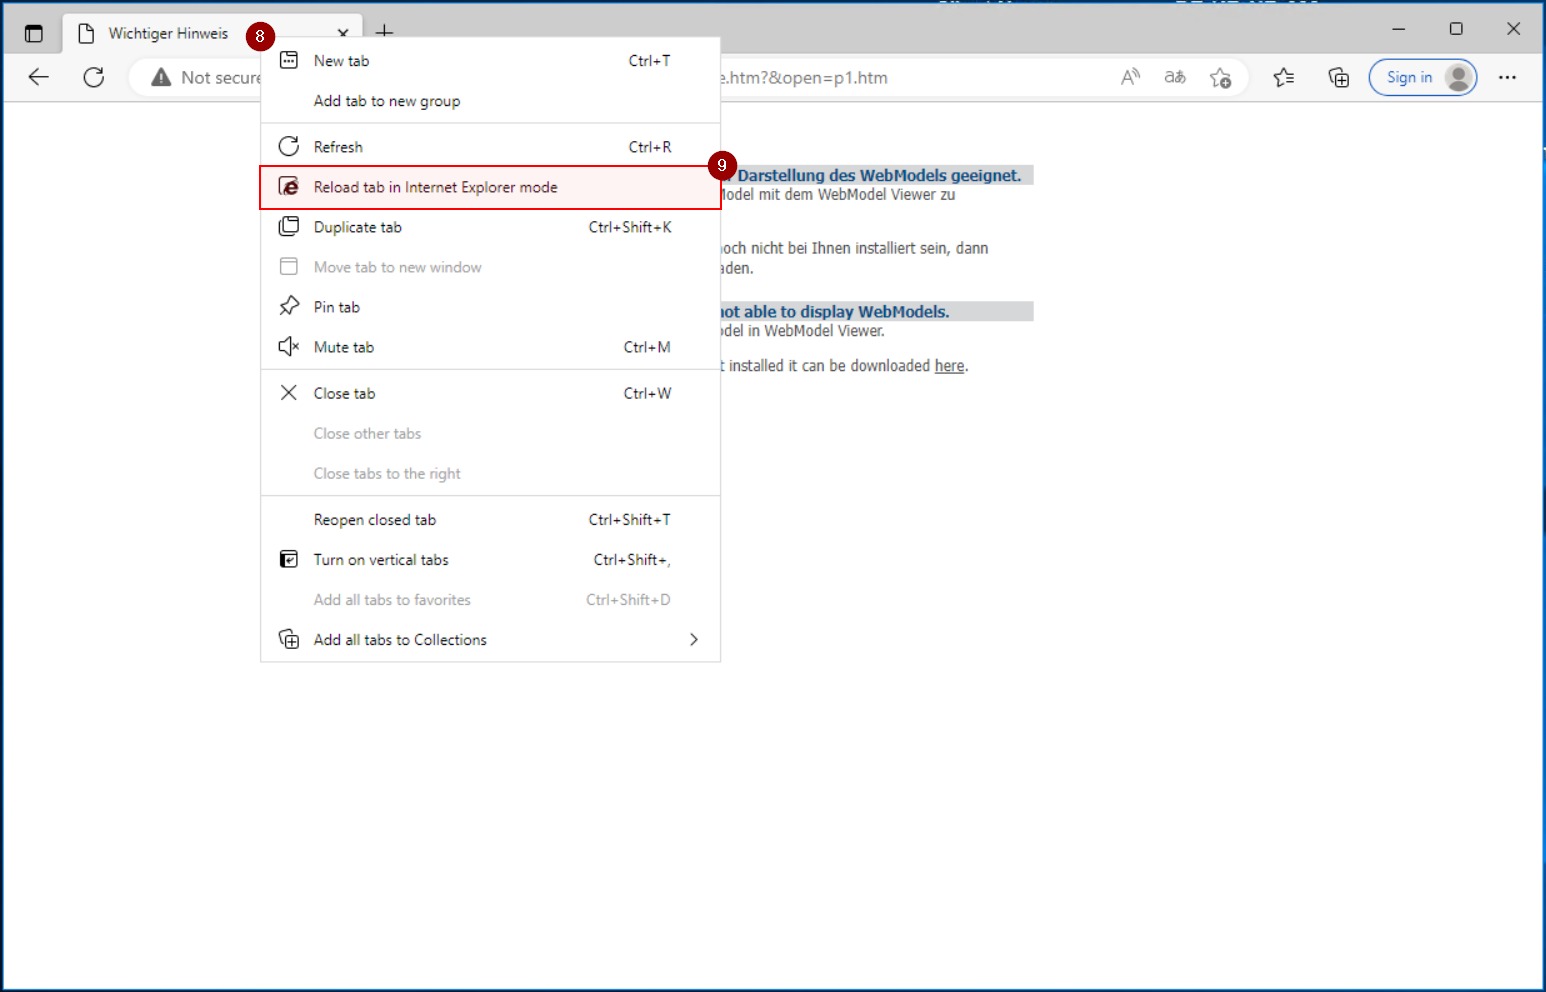
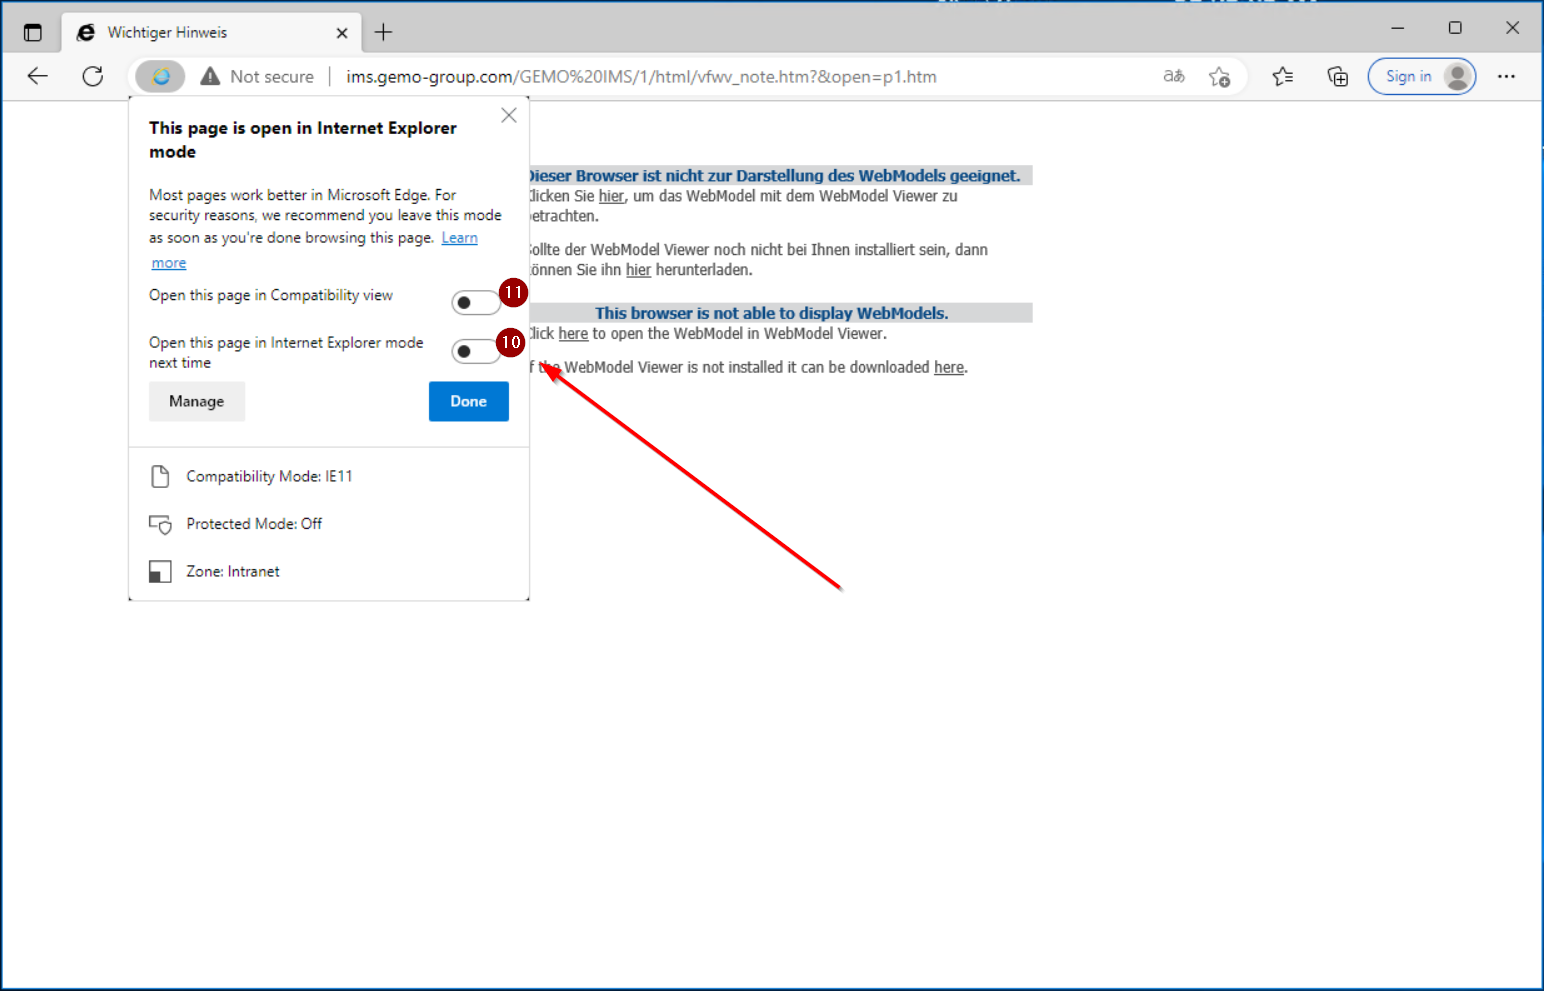
On the next screen the sequence is important. First, select "Open this page in Internet Explorer mode next time" [10] and afterwards "Open this page in Compability view" [11]. The page will be reloaded with IE mode.
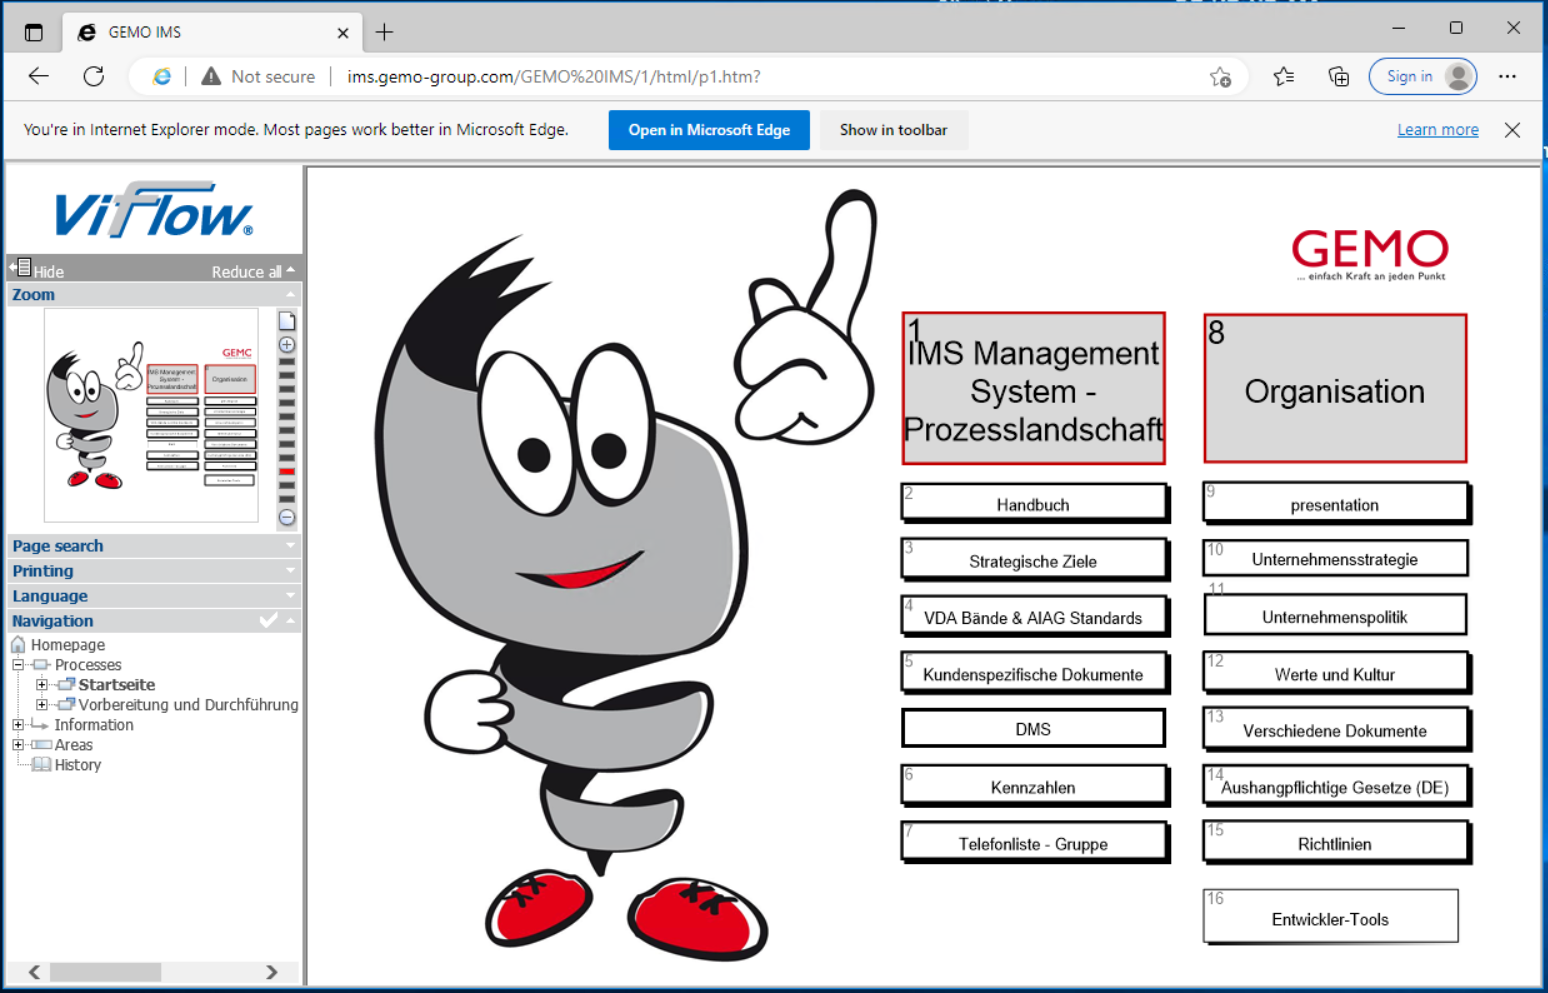
From now on this page will alwas start in "IE mode" and will always prompt you with that information with the banner above the page itself. This setting will stay active until you deactivate it.
Deactivate IE mode
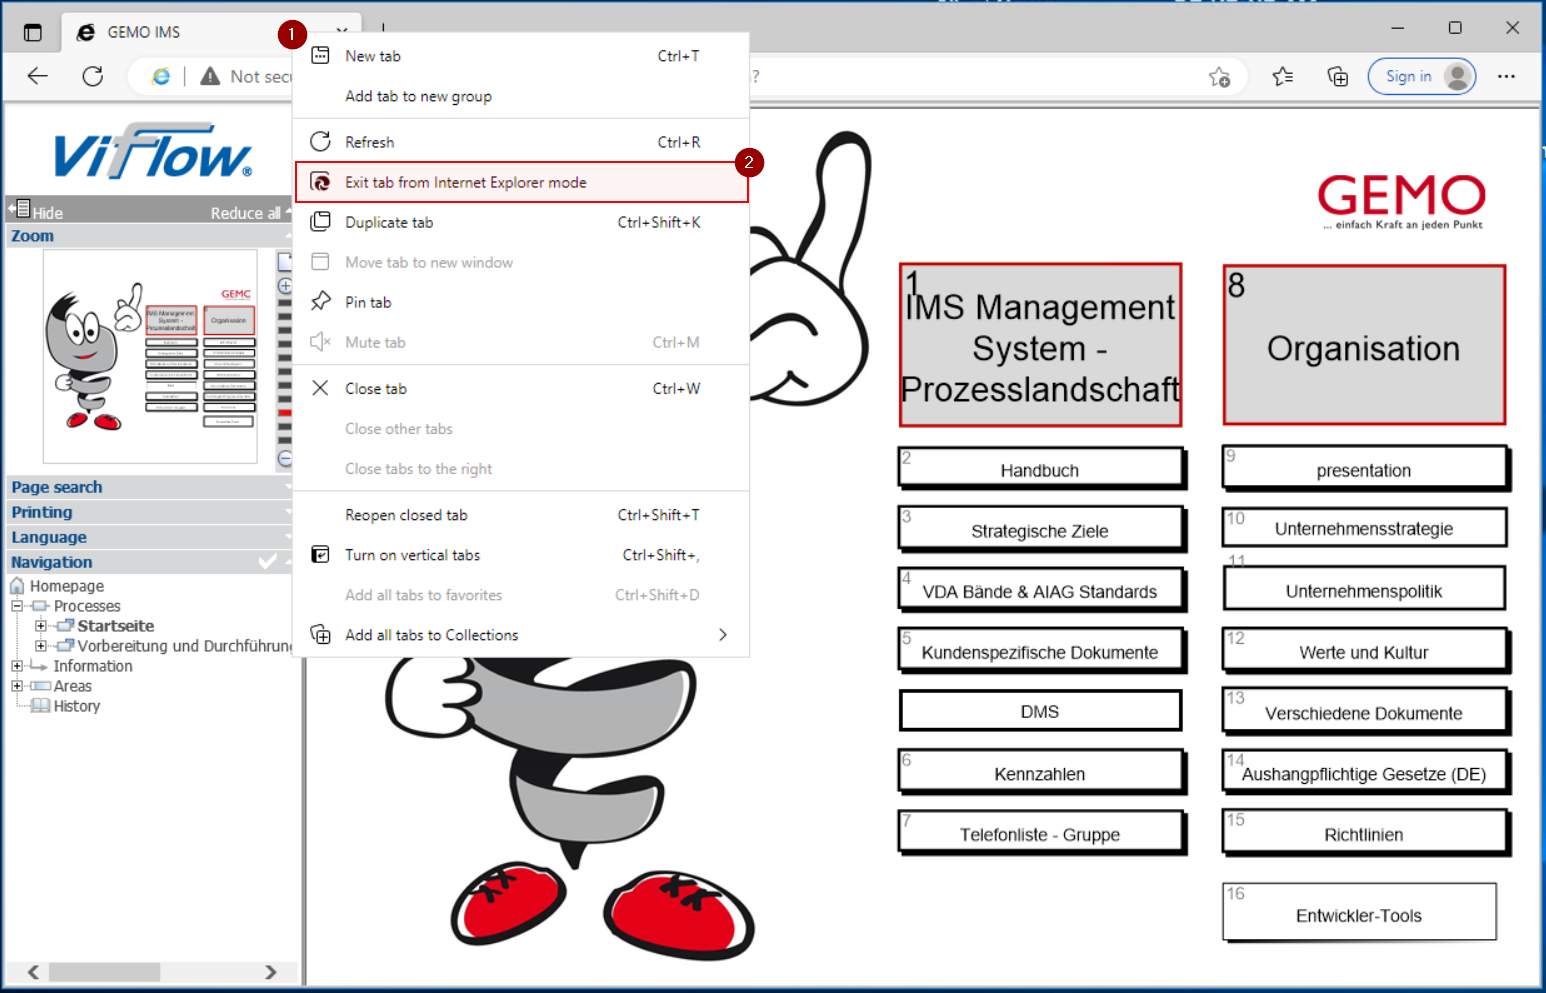
To deactivate the IE mode for a page navigate to the website, right-click on the tab [1] and select "Exit tab from Internet Explorer mode" [2].
Configure ZW3D license [CAD]
We use ZW3D in every GEMO location as CAD software. The licenses are so called floating network licenses. This means that everybody using the software is sharing the licenses with all other users. We can have more installations than licenses but there can only be as many programs open as we have licenses.
When you first start ZW3D software you've been asked to set up the license.
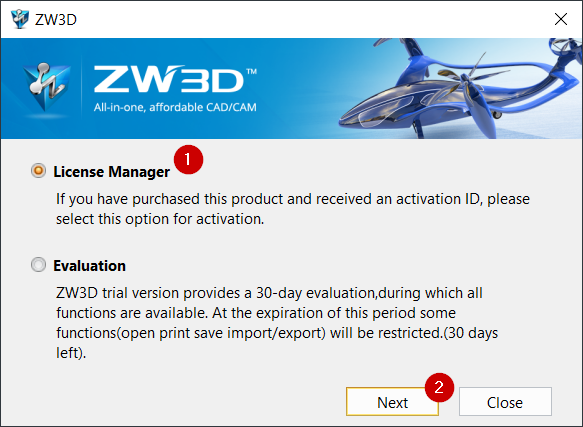
- Select "License Manager" [1].
- Click "Next" [2].
|
|
|
|
|
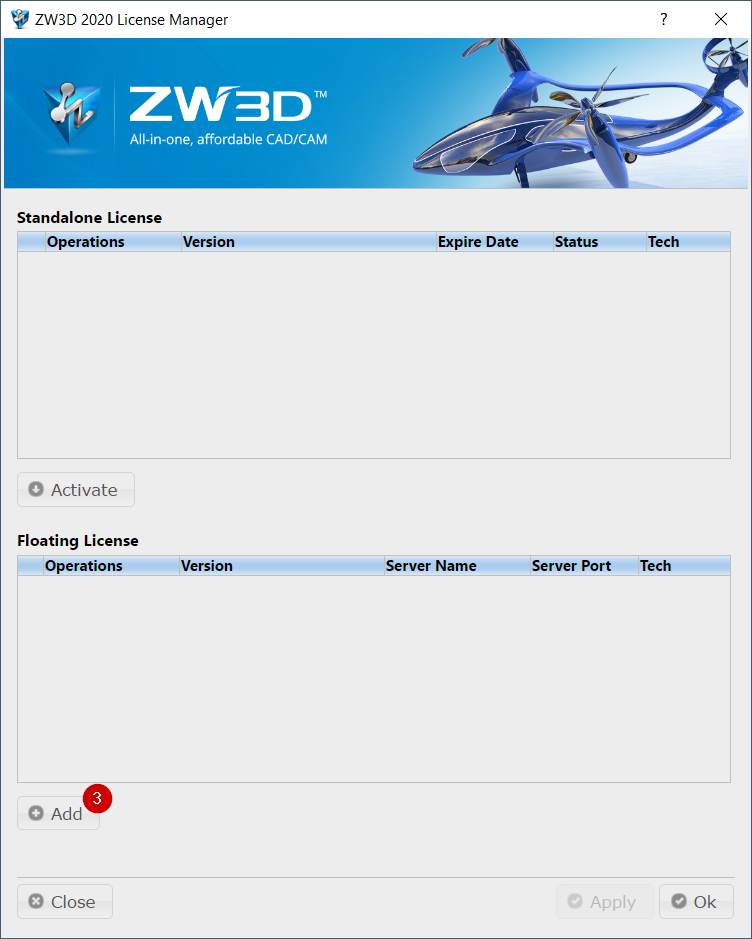
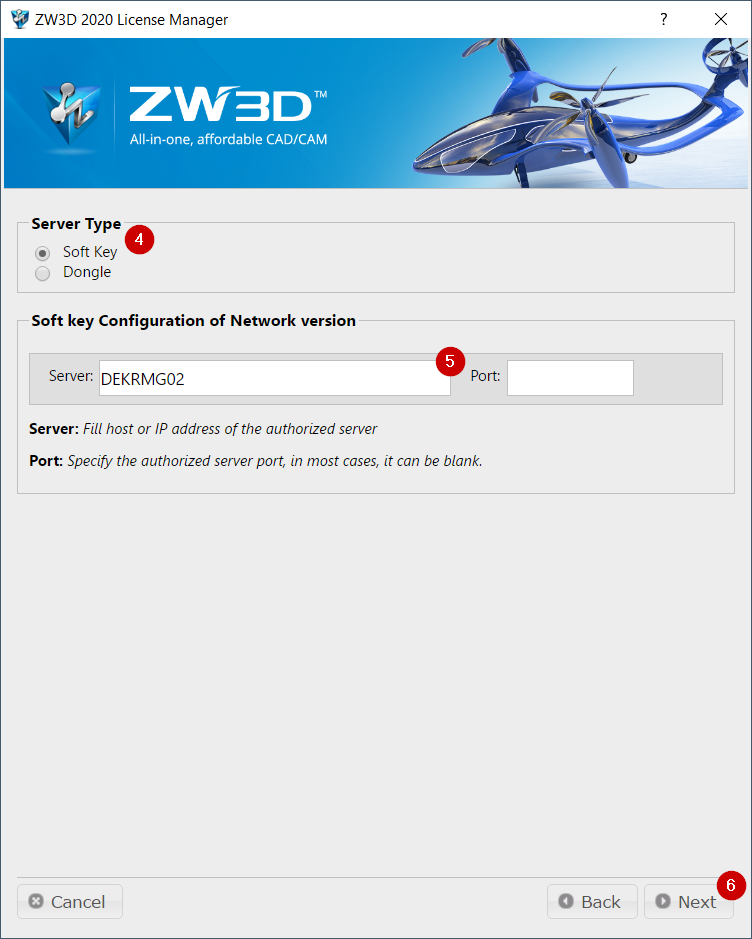
- Click on "Add" [3].
- Choose "Soft Key" [4] as Server Key.
- Enter our network license server "DEKRMG02" [5]. The field for "port" can stay empty.
- Click on "Next Step" [6].
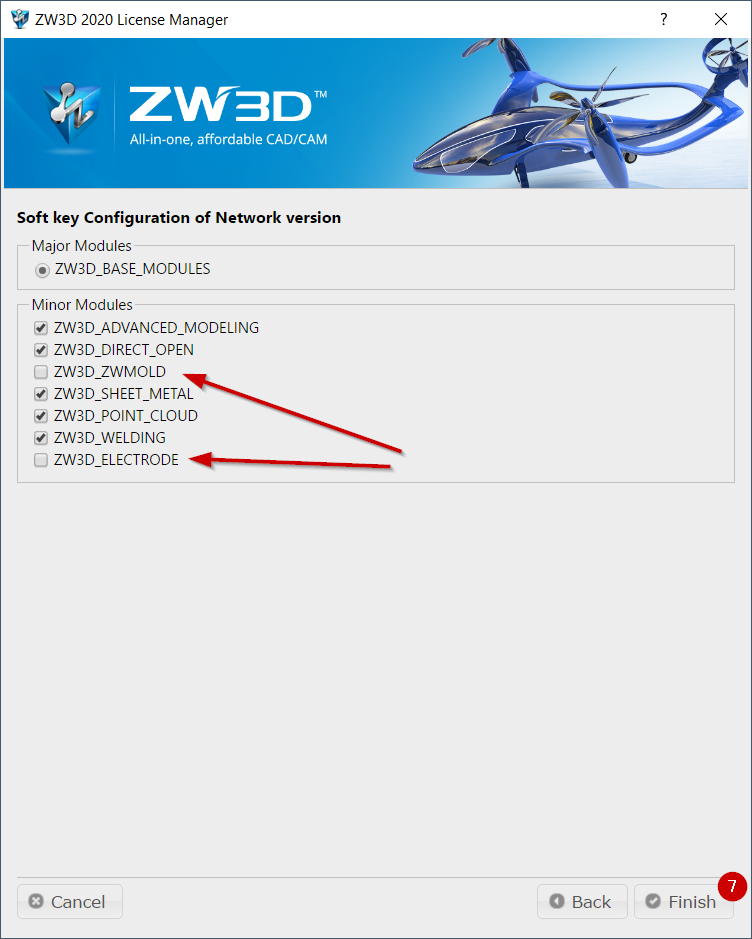
- You will see the available modules. Confirm with "Finish" [7].
Make sure to remove the two checkmarks in front of the modules ZW3D_ZWMOLD and ZW3D_ELECTRODE! For these two modules there is only one license and leaving them active leads to the fact that ZW3D can be started only once.
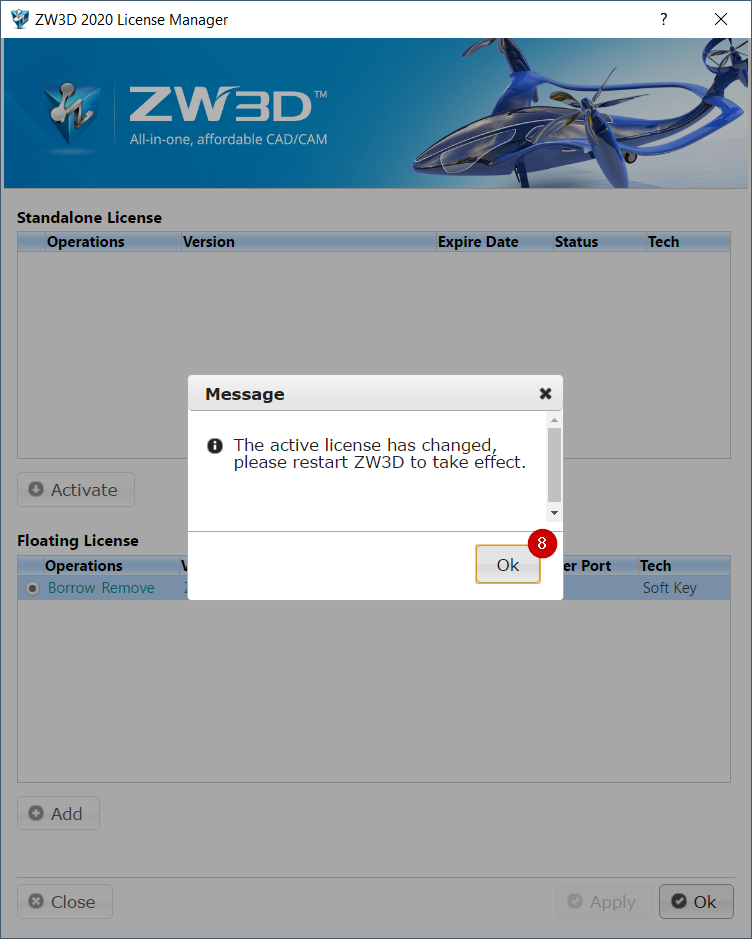
- Confirm the message with "Ok" [8] and let the program continue starting.
Now you should be able to start the program ZW3D and use it, as long as there is one unused license for you the time you start the program.
Delete The Teams Cash
If you experience issues that affect Microsoft Teams, clearing the cache on your device may help. After you clear the cache, restart Teams. Fore more information see Microsoft Learn.
You will not lose any user data by clearing the cache.
Restarting Teams after clearing the cache may take longer than usual because the Teams cache files need to be rebuilt.
1. Quit Teams
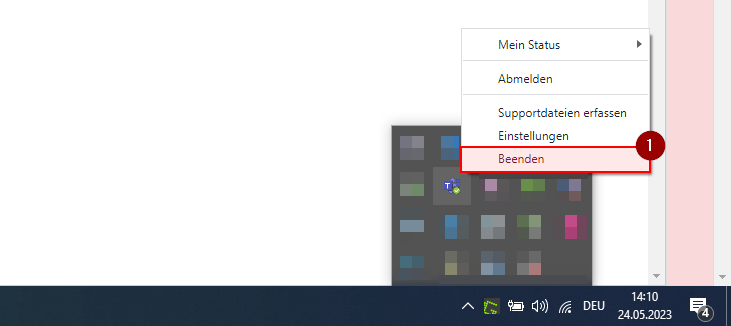
If Teams is still running, right-click the Teams icon in the taskbar, then select Quit [1].
2. open path to cash
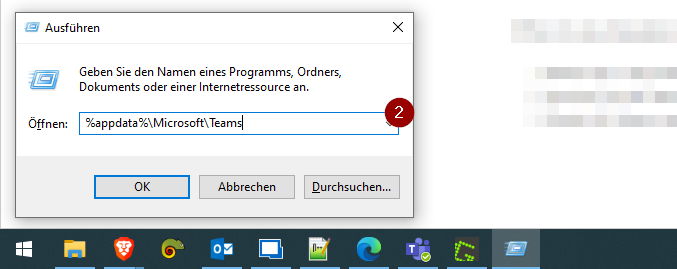
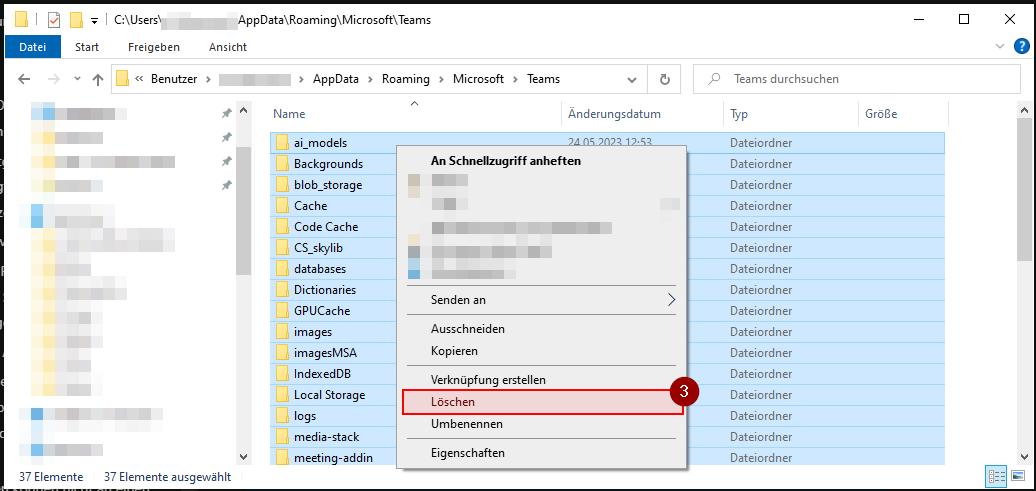
Open the Run dialog box by pressing the Windows logo key +R. In the Run dialog box, type %appdata%\Microsoft\Teams [2], and then click OK.
3. Delete Cash
Delete all files and folders in the %appdata%\Microsoft\Teams directory [3].
4. Start Teams
Now you can restart Teams.
Using a Shared Mailbox [Shared Mailbox]
There are some mailboxes in our infrastructure that are used by multiple users at the same time. There is a nice explanation about this directly from Microsoft.
Here is an incomplete list of such mailboxes:
- Atlas.Krefeld@gemo.de
This mailbox is used in Krefeld for communication with customs. - Einkauf@gemo.de
This mailbox is used by the purchasing department as a collective mailbox. - Schedules@gemo.de
This mailbox is used by the sales department to receive delivery schedules and make them available to several colleagues. - Sales.Shanghai@gemo.de
This mailbox is used in Shanghai for communication with some customers and to share this communication with several colleagues.
MS Teams Planner App [Teams]
How to change E-Mail notifications
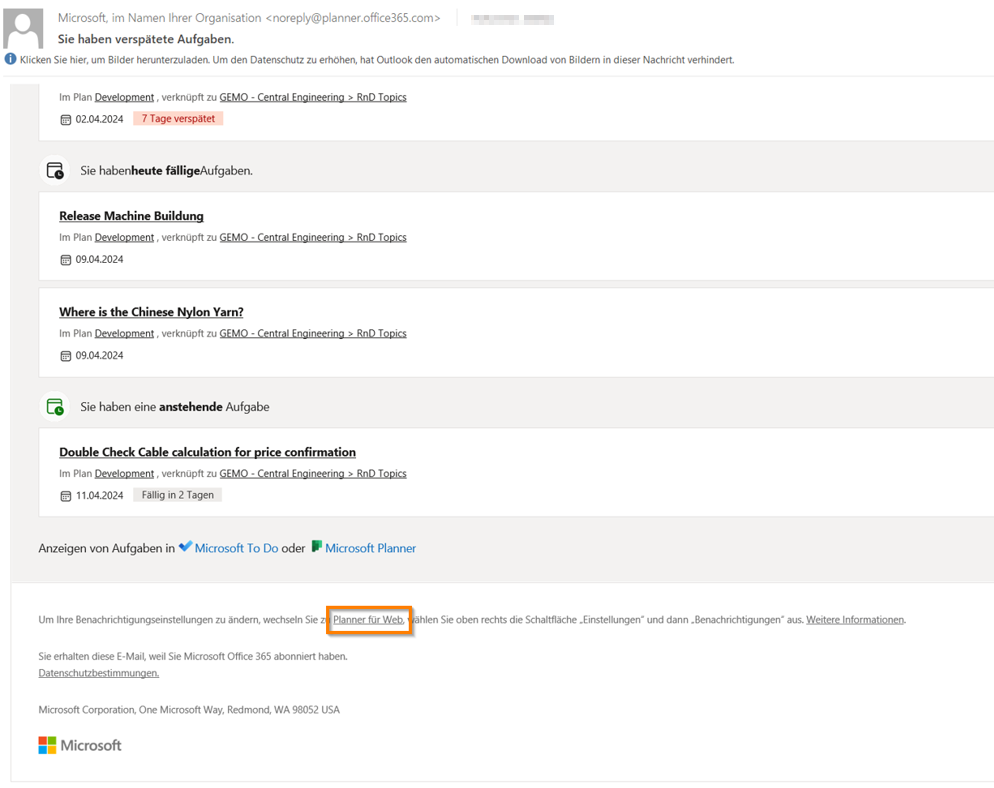
By using the Microsoft Planner App in your team it might be the case that you receive automatic mail notification from app about tasks you are assigned.
Mails look like following example:
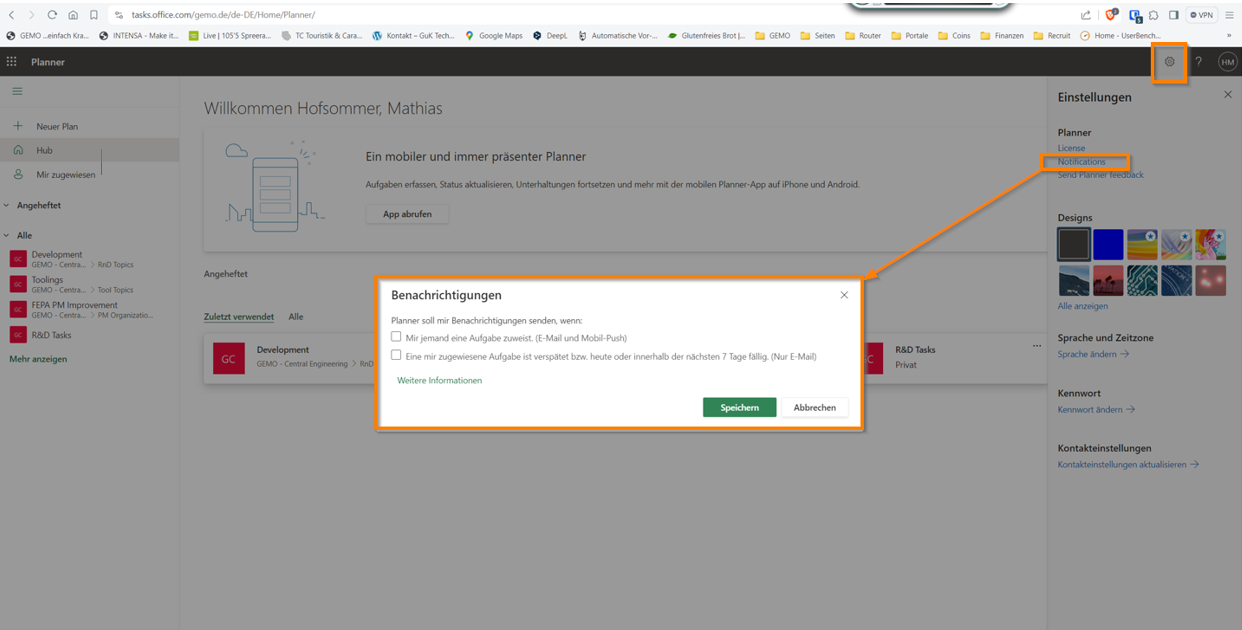
To stop or change these kind of notifications it is necessary to log in your Office Web Portal.
Just on the bottom of your notification mail you can klick on “Planner for Web” (see screenshot) and you will be guided to your Office Web Login in your internet browser.
Login works with same user name and password like your windows user access on your computer. After successful login you can change notification in your settings for Web planner.