FEPA.net [EN]
Documents, manuals and similar content connected with the group-wide used ERP system: FEPA.net
- Starting with FEPA.net
- Mandants
- Master data
- Sales
- Sales - Info
- Print shipping proposal
- Packing slip
- Delivery notes
- Invoices
- Forwarding order
- Send remote data transmission to the customer (ASN)
- Loading equipment and loading units
- Goods tag (labels)
- Confirmation of entry
- Outgoing invoice journal
- Arrange shipping documents
- Texts from operation data and master data in sales and distribution
- EDI Order with Consignment stock
- EDI
- Purchasing
- Production
- Materials Management
- MMA-Info
- Overview of total stock of an article
- Rebook inventory quantities
- Empties - Account statement ( loading equipment)
- Inventory
- Calculation
Starting with FEPA.net
This chapter is all about starting with FEPA.
Login to FEPA.net
How to get into the PLANAT ERP system named FEPA?
STEP 1: The remote servers
Our ERP system „FEPA” is installed on a group of remote servers. The first step is to connect and login to one of them. The task of choosing the right server is provided by a shortcut which should be placed to your computers desktop automatically. Users of thin-client-devices do not need this this first step because the initial login while starting the device already connects you properly.
All other users have to use the shortcut GEMO - Krefeld (Babtec, FEPA).RDP on the desktop. If the shortcut was sent to you via e-mail you have to place it at first on your desktop before using it.
STEP 2: Starting the FEPA-Login
After the login on one of the remote servers you should see some FEPA-shortcuts. The first login can take some time as the system needs to create your profile and make all resources available you might need.
- „FEPANET” starts the productive system.
- „FEPANET-Test” starts the testing system.
The language the system is starting depends on your FEPA user settings and can be changed by IT as well as on your own. To change the language settings on your own read the following page: How to change the FEPA language?
STEP 3: The credentials
Normally FEPA will be opened without asking for your FEPA username nor password because IT configured a so called “Single-Sign-On” function. FEPA will use the username you authenticated yourself starting the computer with (or loged into the remote desktop server with) and, if configured correctly, it will approve your login automatically.
But you do have a password for FEPA and you need to keep it save as every password, usually users receive that starting password with the mail when IT sets up the account. It is needed when working with the handheld scanners (stock taking) or when you need to login on a different computer, for example to give a training to somebody with your login because you have different permissions.
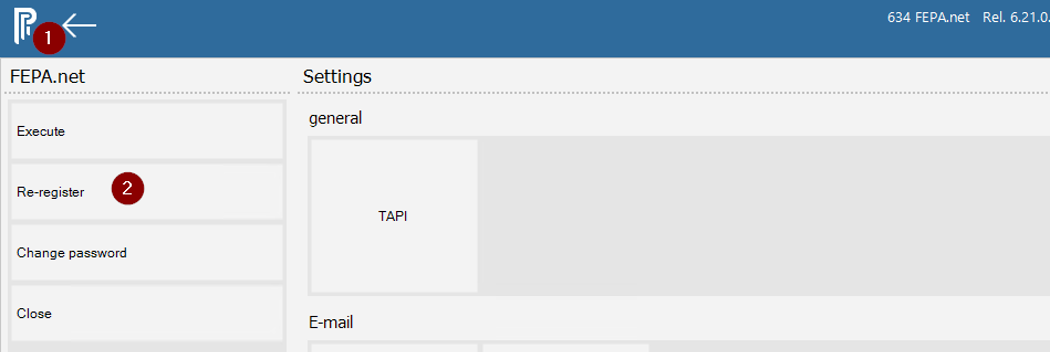
For that purpose everybody can always use the function “re-register” to login into a different FEPA user at any time. You can find the function clicking on the programs logo in the top left (1) and then start the program clicking on “Re-register” (2).
On first login: Please change your password!
When you first start with FEPA you’ll receive an email from IT with your starting credentials. Every user should change this starting password after the first login. This is a security precaution against unauthorized access. The password should never be shared - also not with the colleagues from the IT department.
If you don't know how, there is a document for that: How to change the FEPA password.
How to change the FEPA password?
You don't like your password?
As we're using the Single-Sign-On functionality you should be always able to login from your normal windows account via the remote desktop. But for using the handheld scanners (e.g. stock taking or warehouse movements) you need your password in order to login to the devices. Also you can login into other colleagues computers with your FEPA user for training purposes, if you know your password.
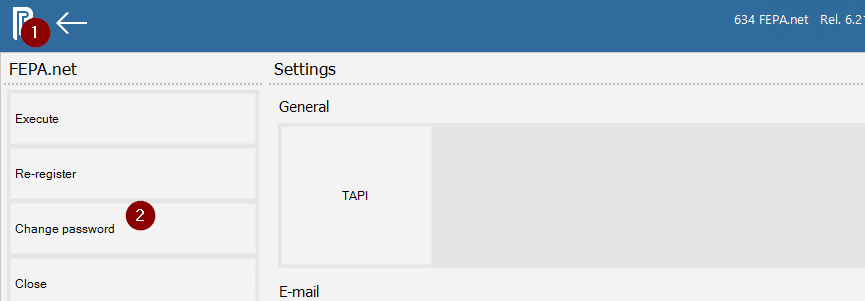
You can choose your new password directly after the login by using the function “Change password”. Click first at the programs logo or the logo text in the top left corner [1]. After you click on the button “Change password” [2] a new program will open:
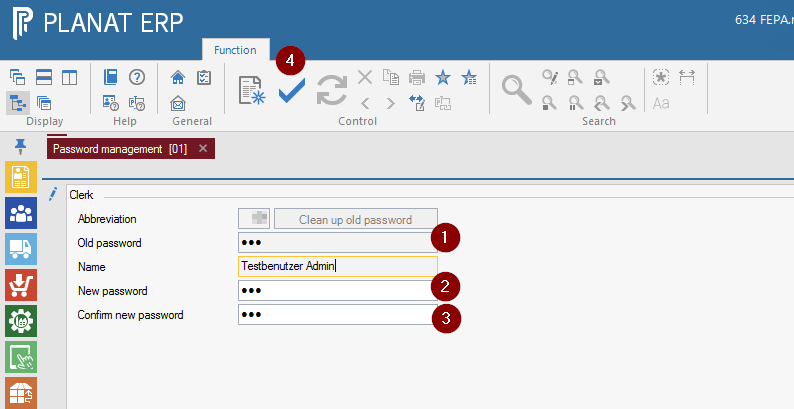
In this program your username will be filled automatically and you can only change your own password. At first enter your actual password [1] and hit return. Then you've been asked to provice a new password [2] two times for confirmation [3]. When you're finishe typing you must approve your change by pressing the OK button [4].
You lost your password?
When you lost your password the IT department can help you by setting a new password for you. Please just send an email to it-support@gemo.de to receive support.
Notes
As we’re using separate databases and infrastructures for each of our FEPA installations (FEPA testing system, FEPA productive system) the password change in one of the systems does not have any influence in the other system.
From time to time the IT department does a copy from the productive system to the testing system and under that circumstances your credentials from the productive system will become valid in the testing system automatically.
So please keep that in mind changing your password in one system and therefore it is a good idea to keep the same password in both systems.
How to change the FEPA language?
Introduction
FEPA is available in several languages (English, German, Polish and Chinese). Besides IT, you can also customize your FEPA language yourself and this page shows you how.
Open program to change the language
Path: Utility program > Settings > Change FEPA language
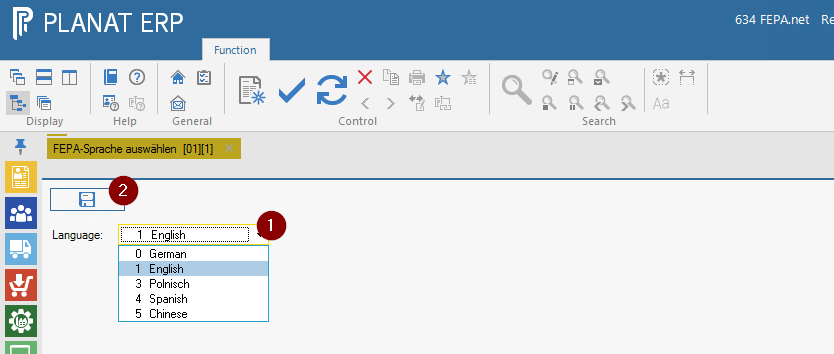
In the program, first select the language [1] and then confirm this change with the Save button [2]. The change is only valid after you have restarted your FEPA.
General
In FEPA, a standard printer and other printers can be assigned to a user. This is not done via the Windows user, but via the name of the computer (host name). This is done by IT. If there are no stored settings for the user/PC, FEPA uses the Windows default printer of the RDP session.
If forms are to be printed on certain printers, e.g. on letterhead paper, this must be set up by IT. To do this, send an email to the ticket system (it-support@gemo.de) stating the PC name/host name, the printer name and the desired forms. You will find the PC name/host name at the bottom right of your desktop.
Where can I find my computer name?
Display your desktop on the computer (not in the RDP session), at the bottom right you will find the display as shown in the picture. The "Host Name" is the name of your computer.

How do I set my Windows default printer?
Click on "Windows Start" with the mouse.
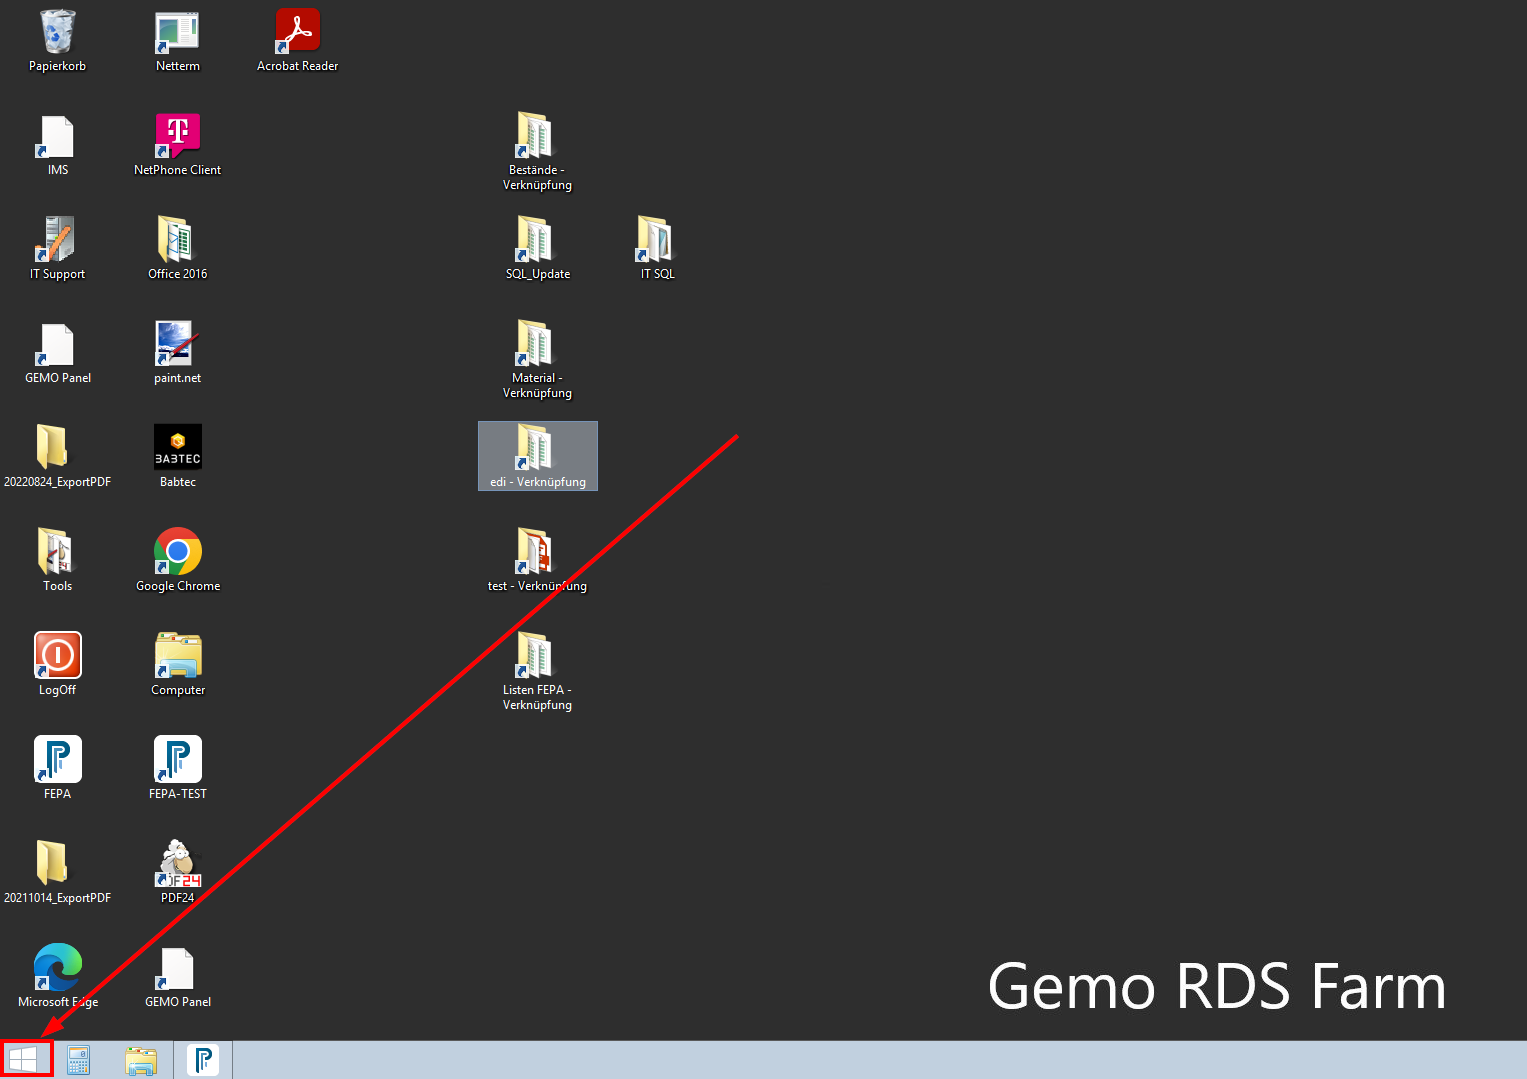
Click on the "magnifying glass" at the top right of the picture.

Enter the text "printer", then you will see a number of options to choose from, here click on "Devices and Printers".
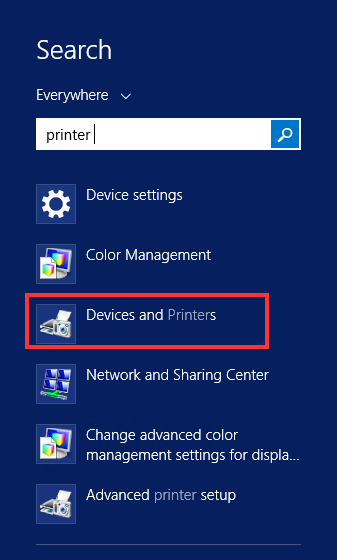
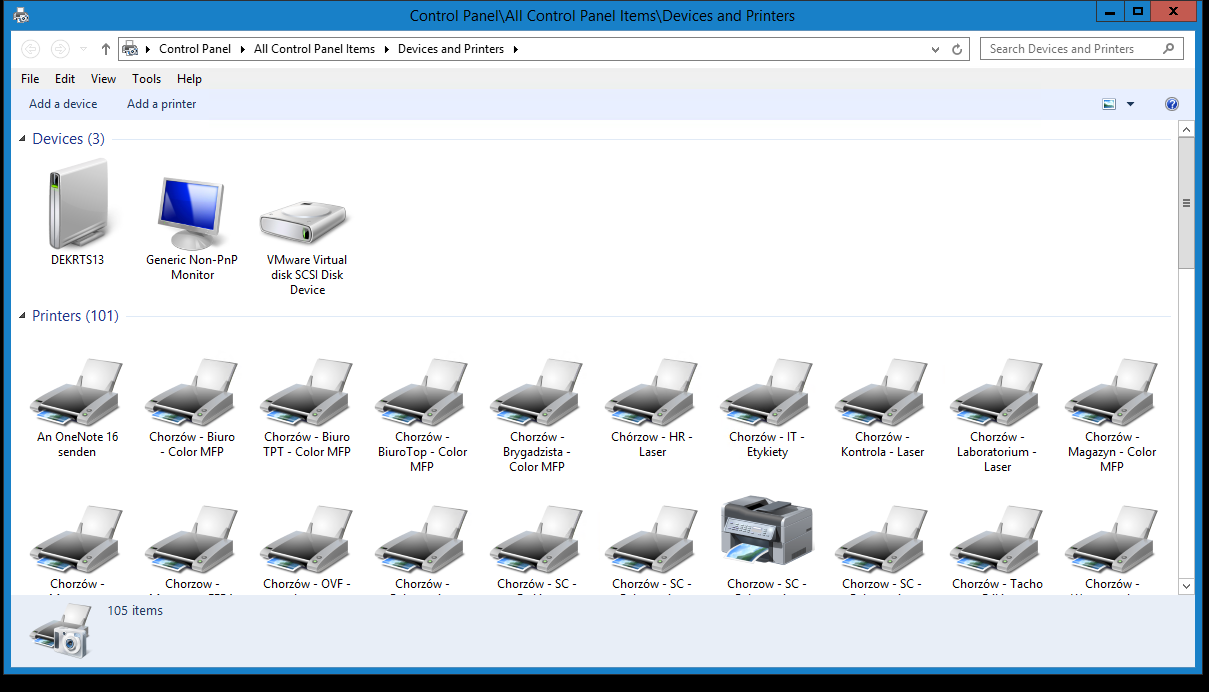
Then the list opens and you have to search for the appropriate printer.
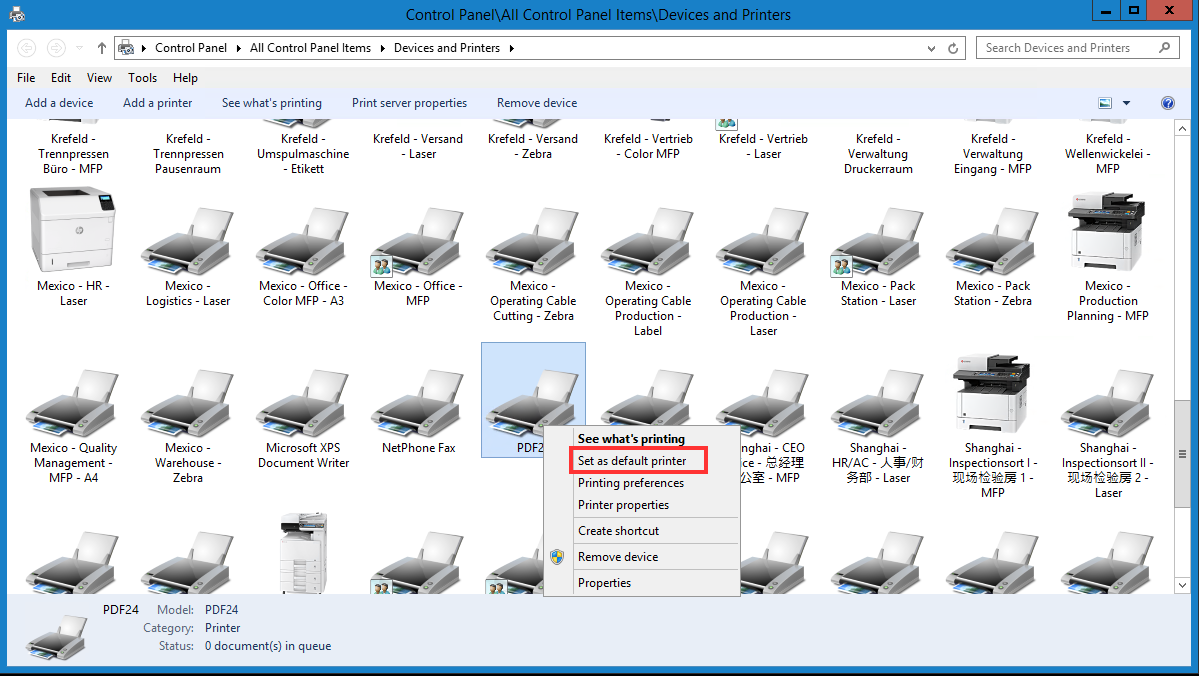
Right-click on the desired printer and click on "Set as default printer" in the context menu.
The printer is now marked with a green tick. The window can be closed.
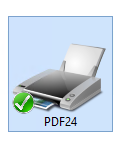
The printouts should now be printed on this device.
In the past, this setting was often changed in Windows on the terminal servers. It would be safer to at least store the default printer in FEPA for the computer name.
If the printer cannot be found in the list, a ticket must be opened (email to it-support@gemo.de) with the information which printer is missing.
Mandants
Global information
Overview Mandants in FEPA
List of the created mandators in FEPA
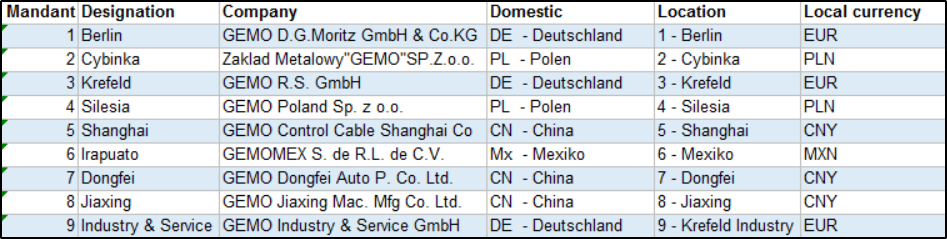
Mandants 1 (in 2021) and 2 (in 2022) have been closed. The data cannot be deleted for programming reasons.
Master data
Information on the Master data area in FEPA
Standard texts
General
Standard texts are mainly used in sales orders and purchase orders or in all areas where textual input options are available (also, for example, in the description of operations).
Standard texts make it possible to call up recurring phrases by specifying a standard text number.
"Text numbers" have been defined for certain areas. These are to be requested from the responsible heads.
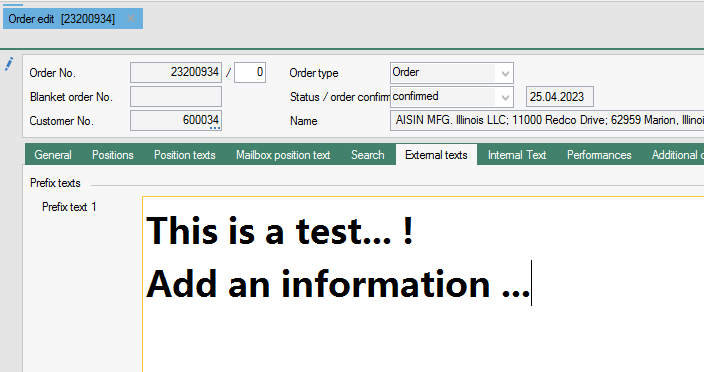
Standard texts can already be inserted in plain text in the prefix or suffix in the various functions such as Edit Order or Order via the function Text field, Insert Standard Text and the entry of the text number.
Edit standard texts
FEPA function Master data > Standard text > Edit standard text
Search Standard Texts
Open the search.
The text number has a maximum of 10 digits. The 1st line of the text in the search is always displayed as the text.
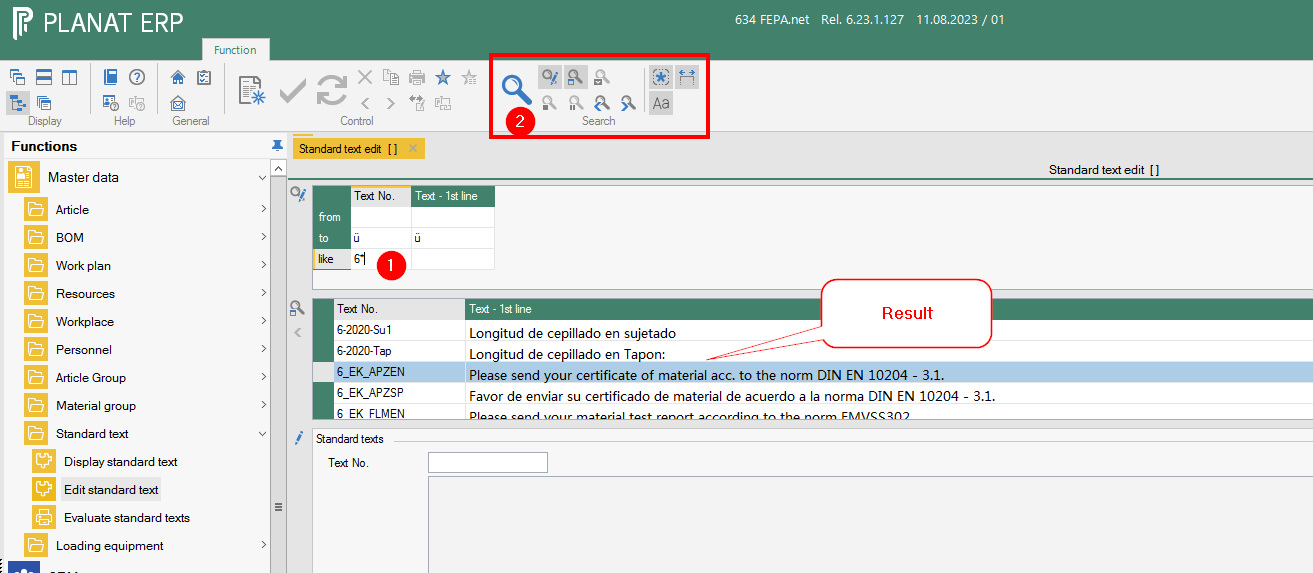
By double-clicking in a text number, text is loaded in the lower area and can be edited.
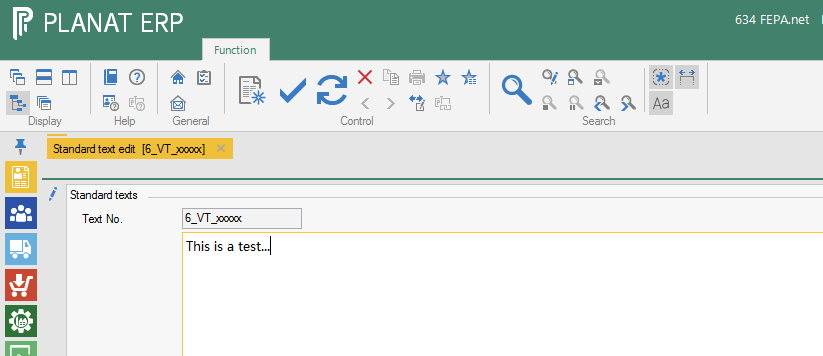
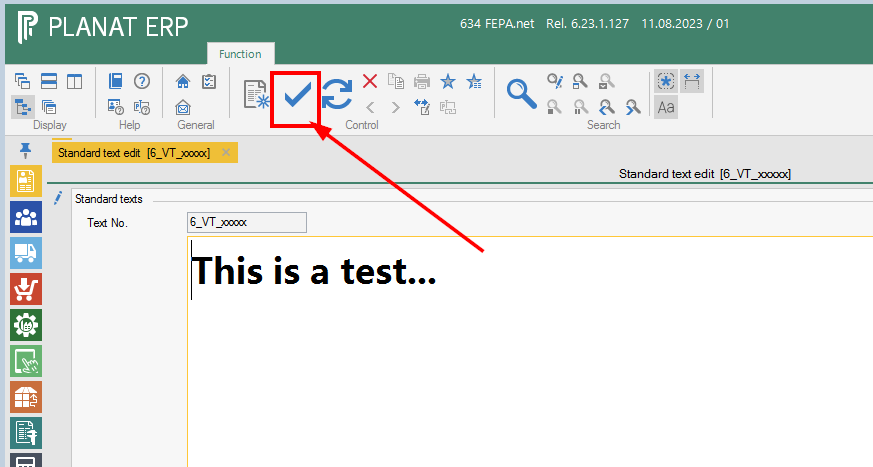
Entering new texts
- Enter a number in the Text No. field and confirm with Enter.
- This releases the text field and a text can be entered.

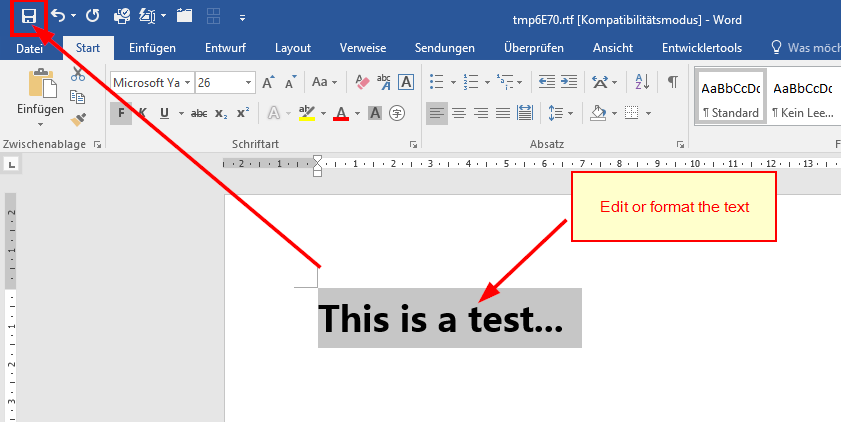
- Double-click in the text field to open Word, where the text can also be entered and formatted.
- Save in Word. Then close Word.

- Save in FEPA

Search and insert standard texts in text fields
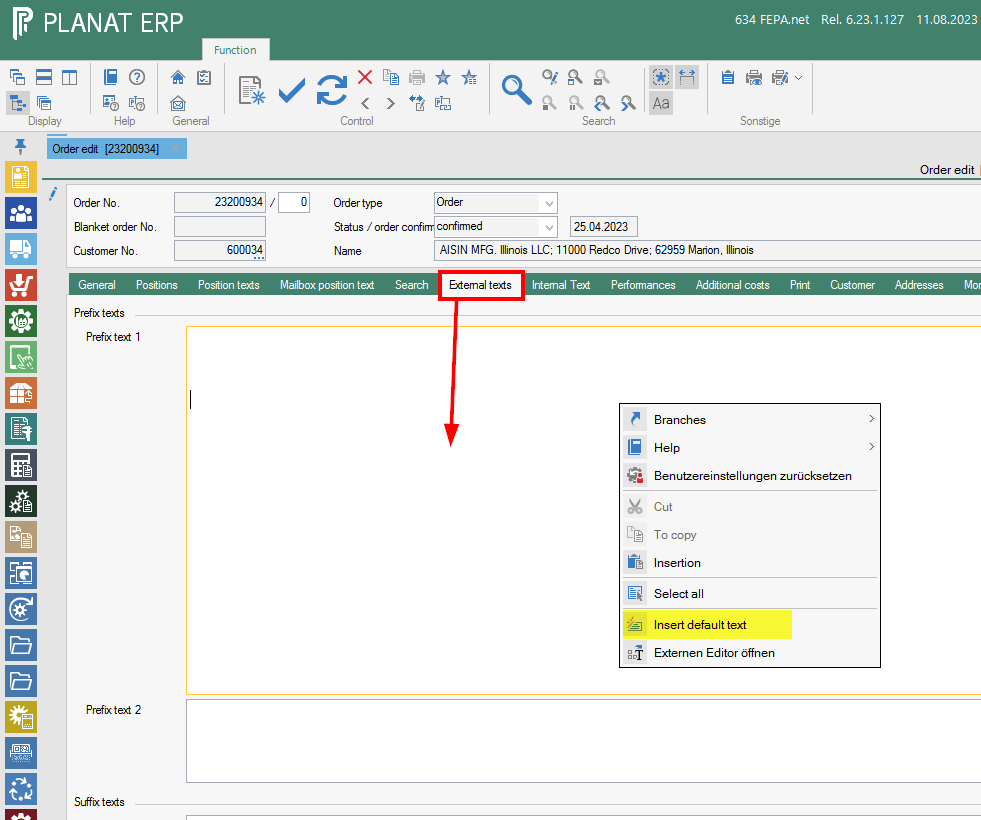
For example, in the sales order:
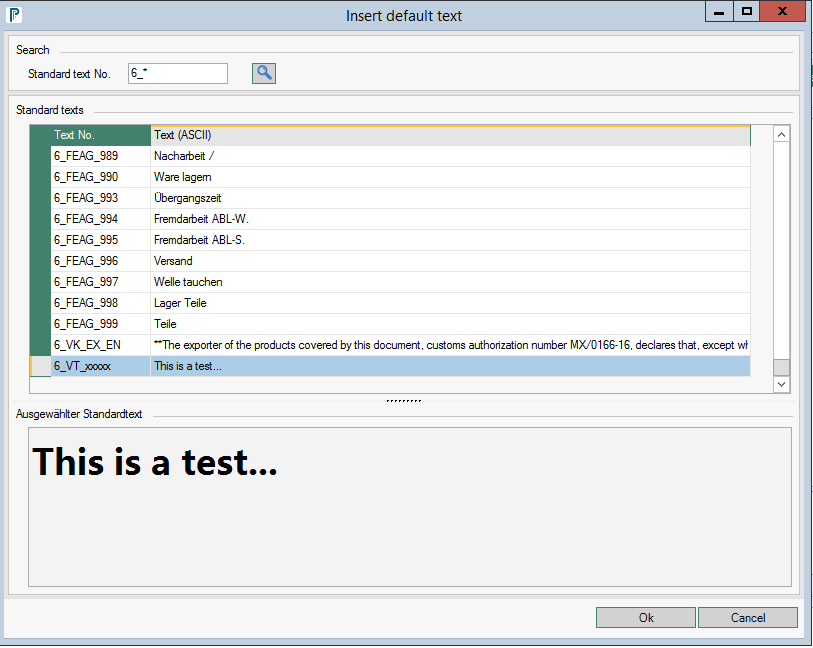
- Click in the text field where you want to add a text and press the right mouse button, click in the context menu Insert default text.

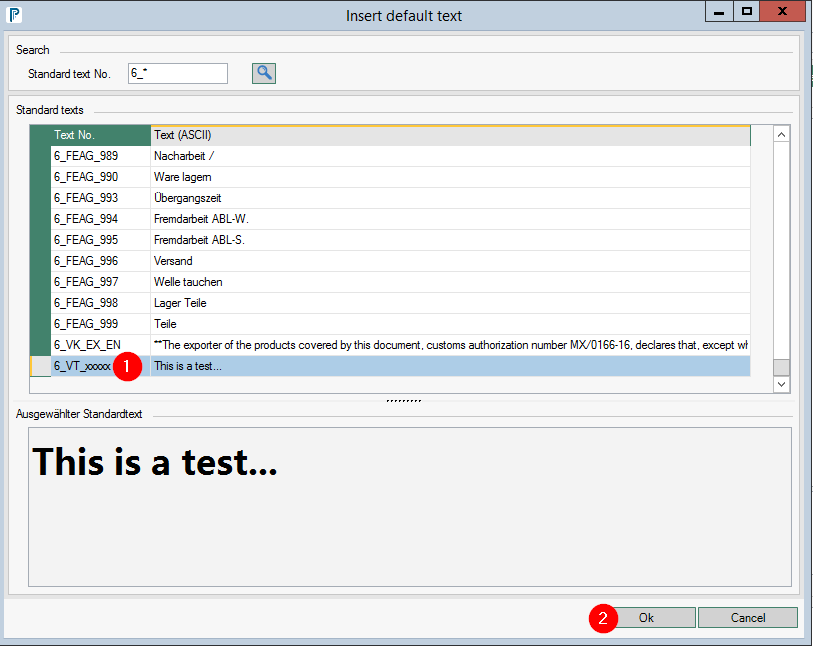
- Search for the standard text number, you can limit the search by using a '*' as a placeholder.

- Click on the text number and press OK

- the text has been inserted and can also be changed if necessary.

Personnel
General
Personnel data (employee data) is required if confirmations are to be made via a manual or optionally via an automatic production data acquisition system (PDA) for employees and employees have to make the notifications or entries in project management.
Edit personnel
Personnel for FEPA are created in the Edit personnel function.
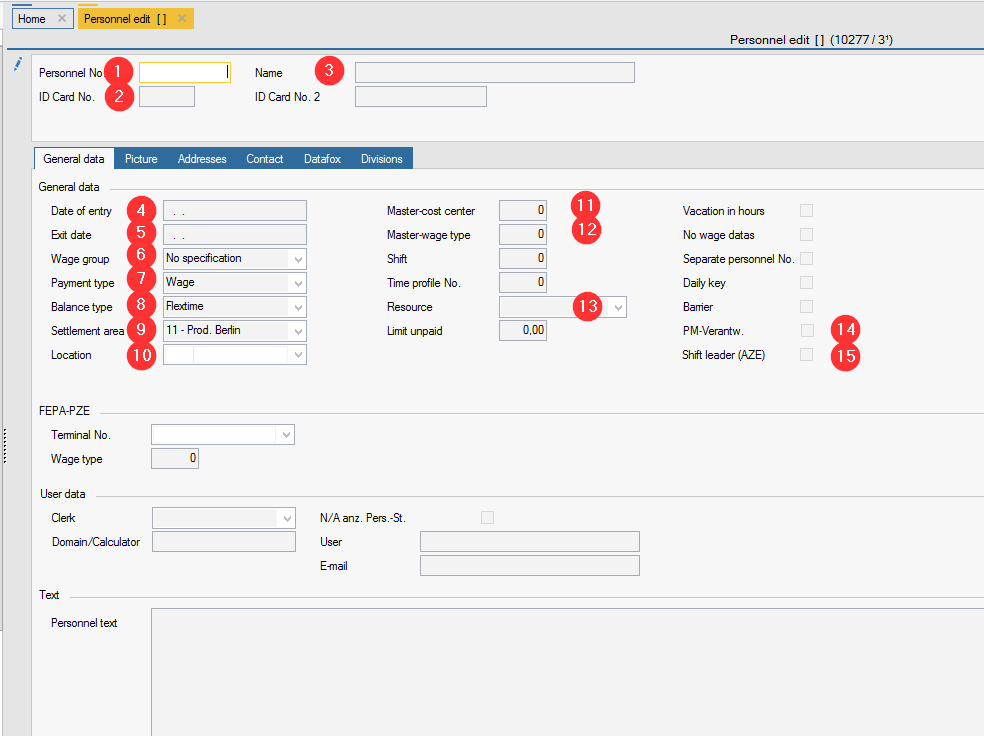
FEPA function: Master data > Personnel > Edit personnel
Personnel data for the AZE (Recording working hours)/project management
- Personnel no.: If only the AZE is made at the location, it may have a maximum of 6 digits and begins with the client.
begins with the client, the rest is freely selectable, unless there are specifications at the location. - ID card no.: must be 6 digits - for legibility when reporting via AZE for the work processes. The personnel number can be used again.
- Name: Enter the first name of the employee
- Date of entry: a date can be entered
- Exit date: a date can be entered when the employee has left the company. The employee is then no longer displayed in the personnel assignments in the PDC area.
- Wage group: can be that of the client, but does not have to be selected
- Balance type: select wage or salary
- Balance type: select flexitime
- Settlement area: is a mandatory field, select from the list the payroll area that matches the employee/location (11 is the first - it only appears in FEPA if it has also been selected) Krefeld e.g. 30
- Location: Select the location for the Mandant
- Master cost centre: Select the employee's cost centre, if known - starts with the client (note: cost centres are created in the service programmes)
- Master wage type (mandatory field): 1
- Resource, only required for employees who have to make entries in project management. Please contact Engineering to find out which one should be entered)
- PM responsible: Must be ticked for employees who have to make entries in project management
- Shift leader (AZE): enables additional functions in the GEMO AZE for responsible employees
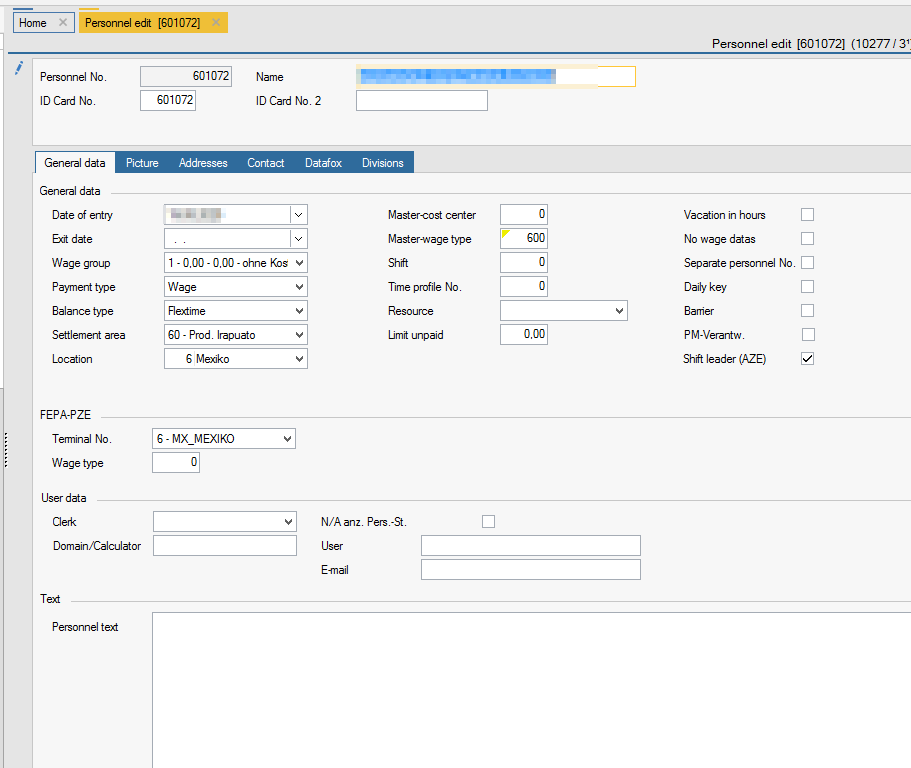
Example - Mexico Shift leader
Rest and other tabs can remain empty if only the AZE is done - would only be important if you do the personnel time recording via FEPA, then it would have to be filled in differently. Therefore, if you have authorisation to edit personnel, you must not change anything for personnel at other locations!
After recording the personnel, the personnel must still be released so that they can report working times via AZE. Continue with Instructions for release of personnel
Swap workplace
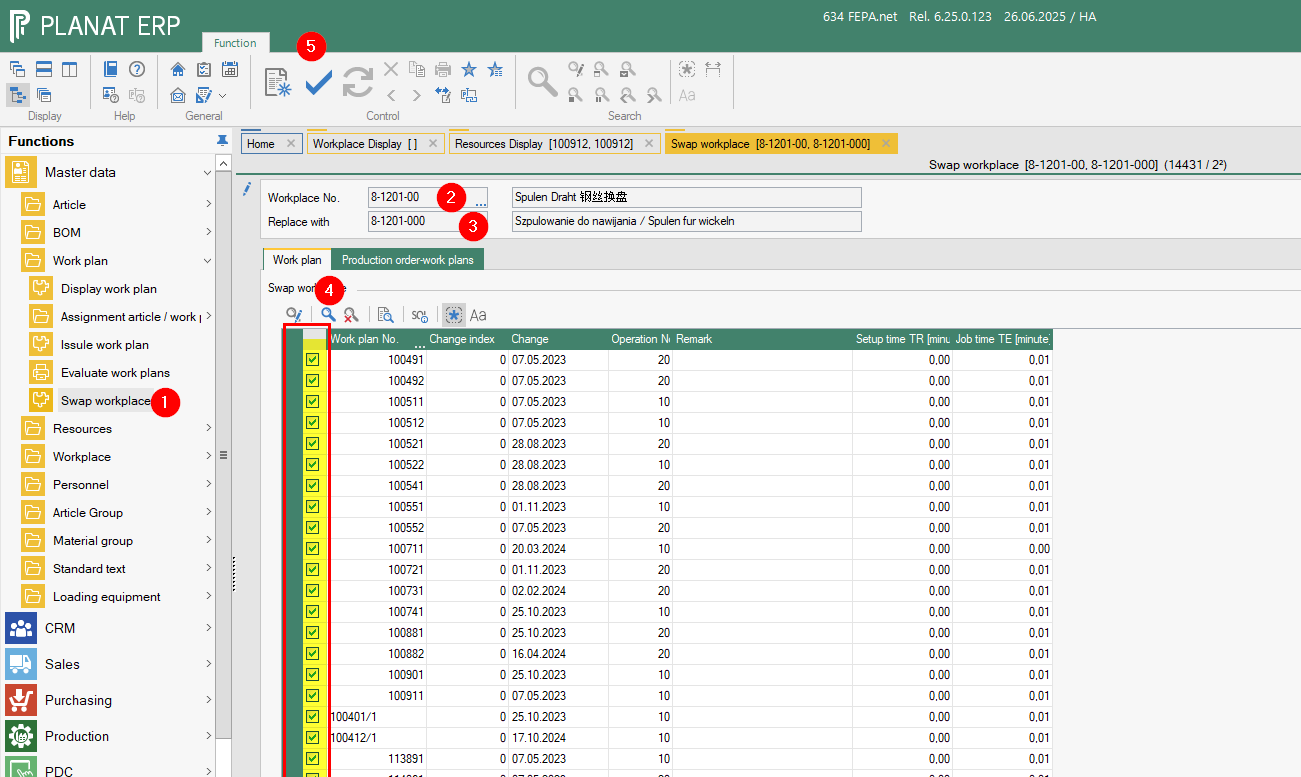
- open FEPA function
Master data > work plan > Swap workplace - enter the old workplace number currently used in the work plan
- enter the new workplace number that should replace the currently used workplace in the work plan
- press the magnificent glass of the search and FEPA load all work plans in which the work place is used - with the mark you decide which work plan will changed (Yellow mark)
- With the save button FEPA change all work plans an replace the work place.
Copy workplace
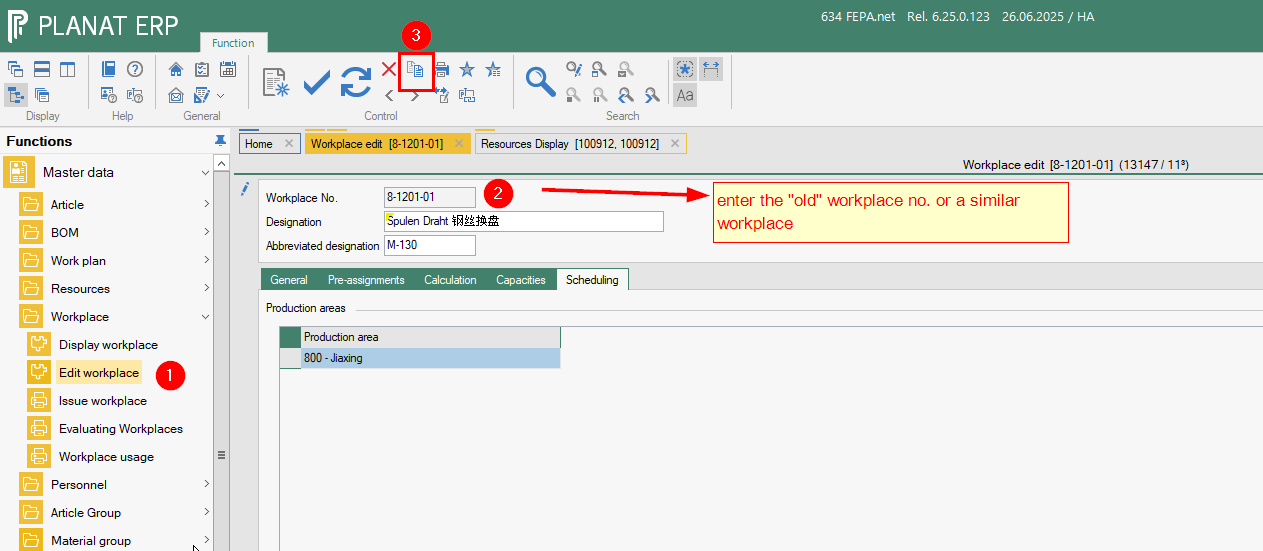
- open a workplace with function
edit workplace - enter the "old" workplace no. or a similar workplace no. and press enter
- press the copy button

-
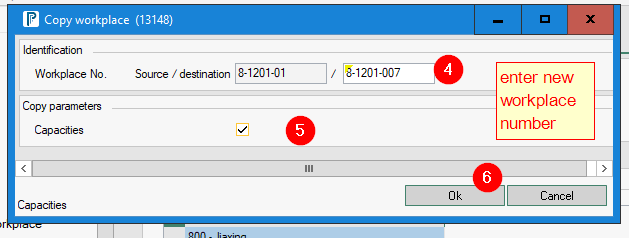
enter a new workplace number
-
press ok button and a new worplace will becreated an opended

-
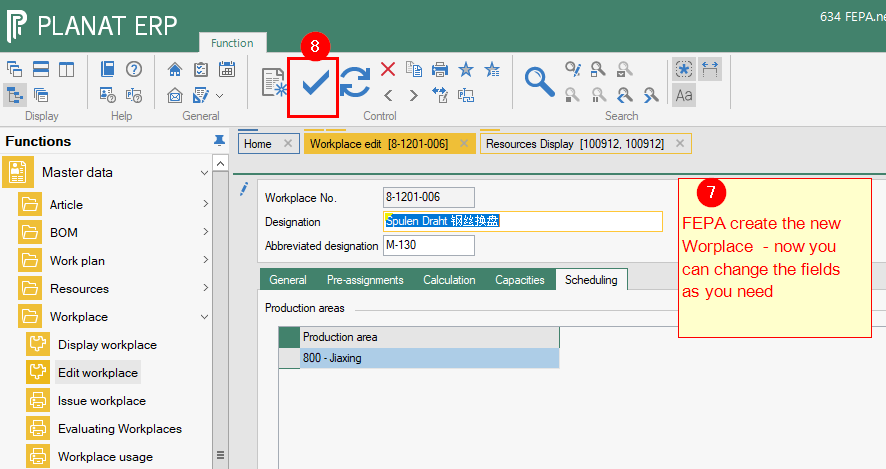
Change alle fields and in all tabs !
-
press the save button to save the new work place.

Sales
Explanation to the topic of SALES. If necessary, site-specific conditions / regulations must be taken into account.
Sales - Info
General
Here you can view comprehensive information on the entire sales area.
FEPA function: Sales > Sales Info
A field search is possible for the fields Customer No., Article No., Quot. /Order No. and the Project No. To do this, press the key combination [Ctrl]+[F] for search in the field. Alternatively, press the magnifying glass in the right footer of the window.
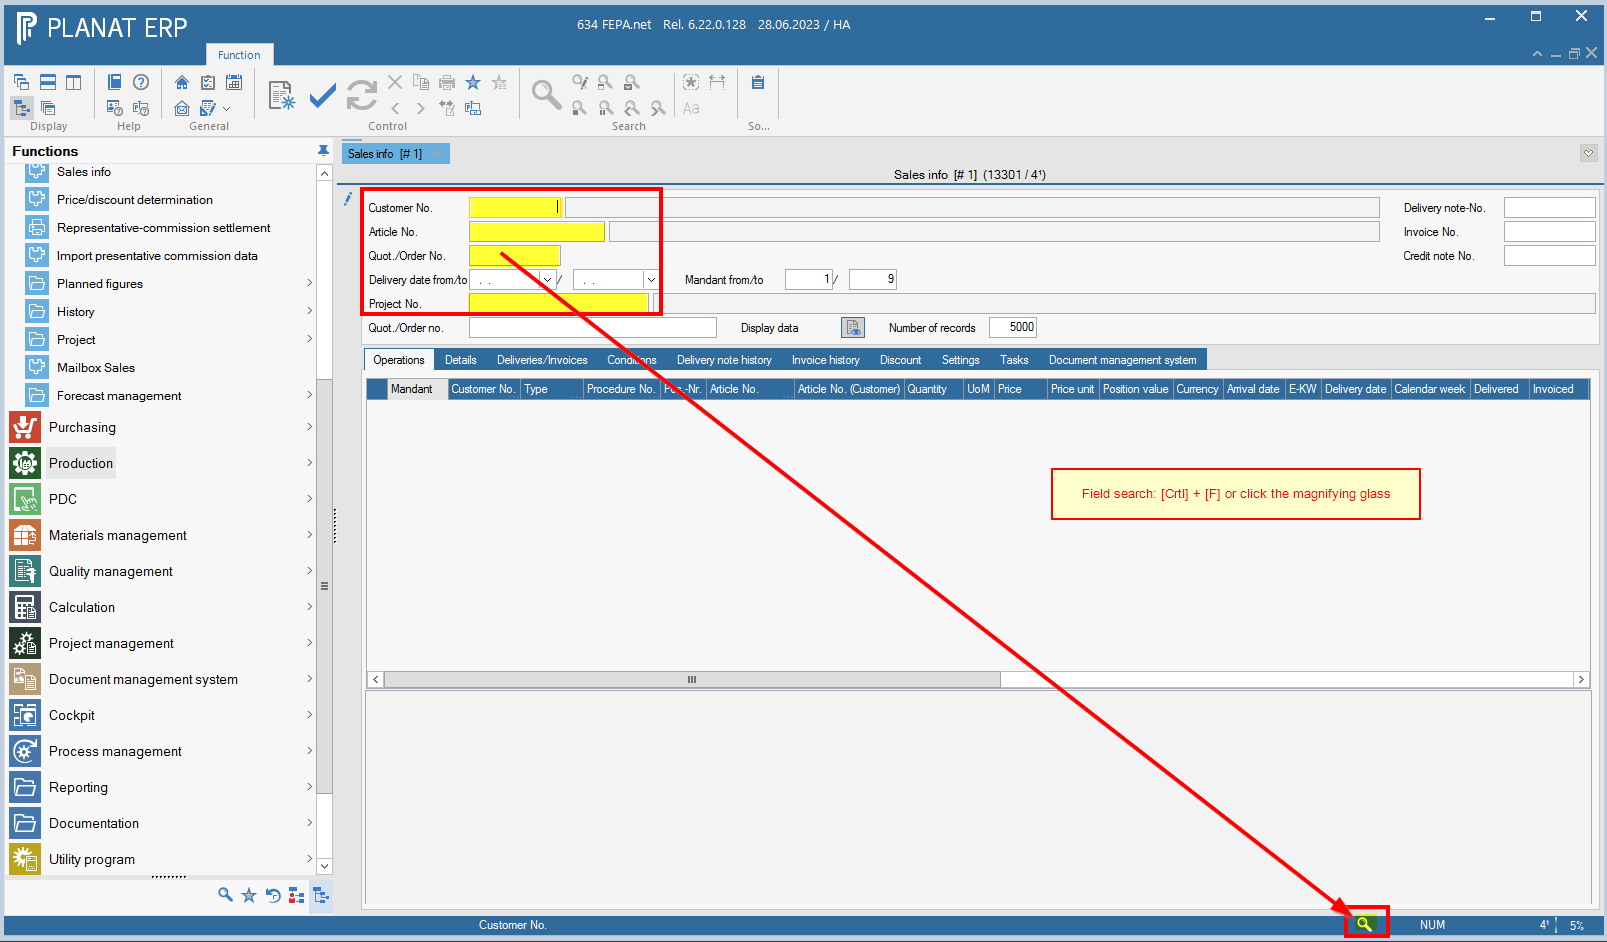
Press Display data to load the operations.
Settings
In the Settings tab, you can define your display for the type of activities and their status.
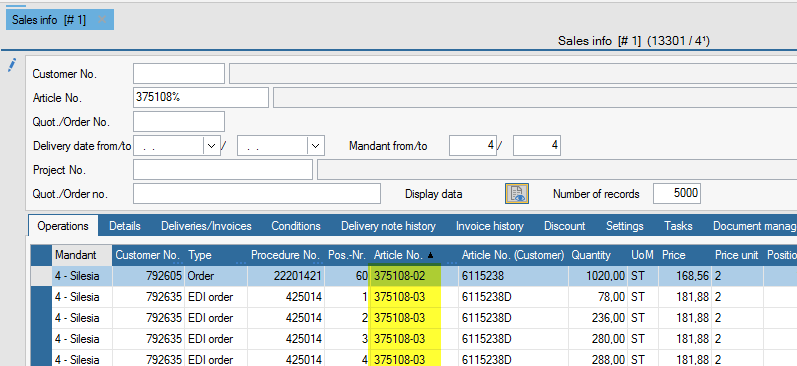
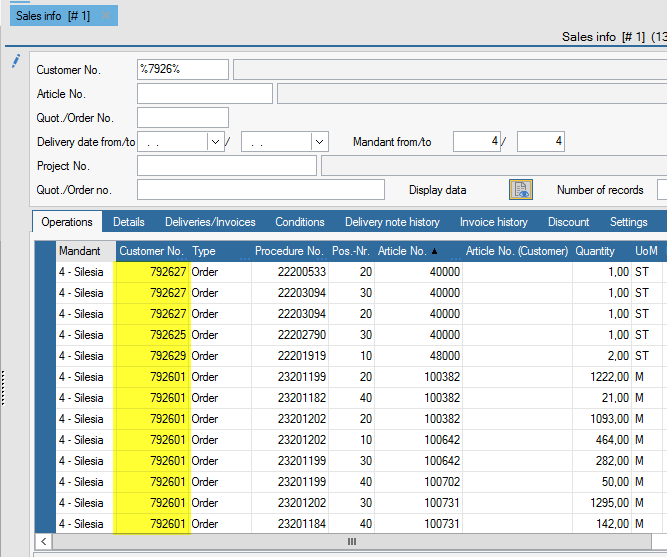
The Like setting means that you can enter % characters after the number in the ticked field, as in the search, and everything that matches this character string will be displayed in the result.
For example:
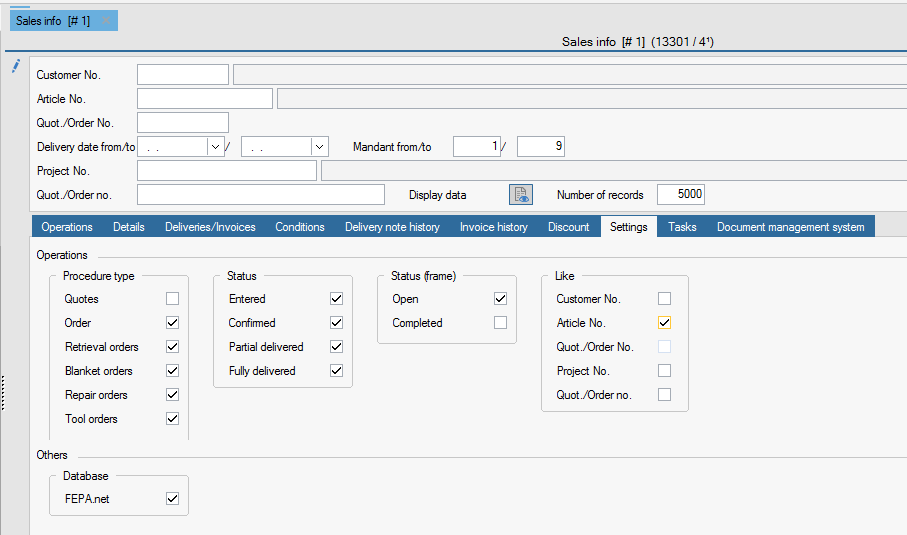
Result, all transactions except offers that have an item beginning with "375108" in the line item.
Note: When searching for a purely numeric number, the number must also be preceded by a % character! Numbers are completed with leading blanks when saving, if it is an alphanumeric field.
Overview of all sales orders
FEPA function: Sales > Sales-info
1. There determine the individual search criteria, such as customer number, article number, etc..
2. Then click on Display data
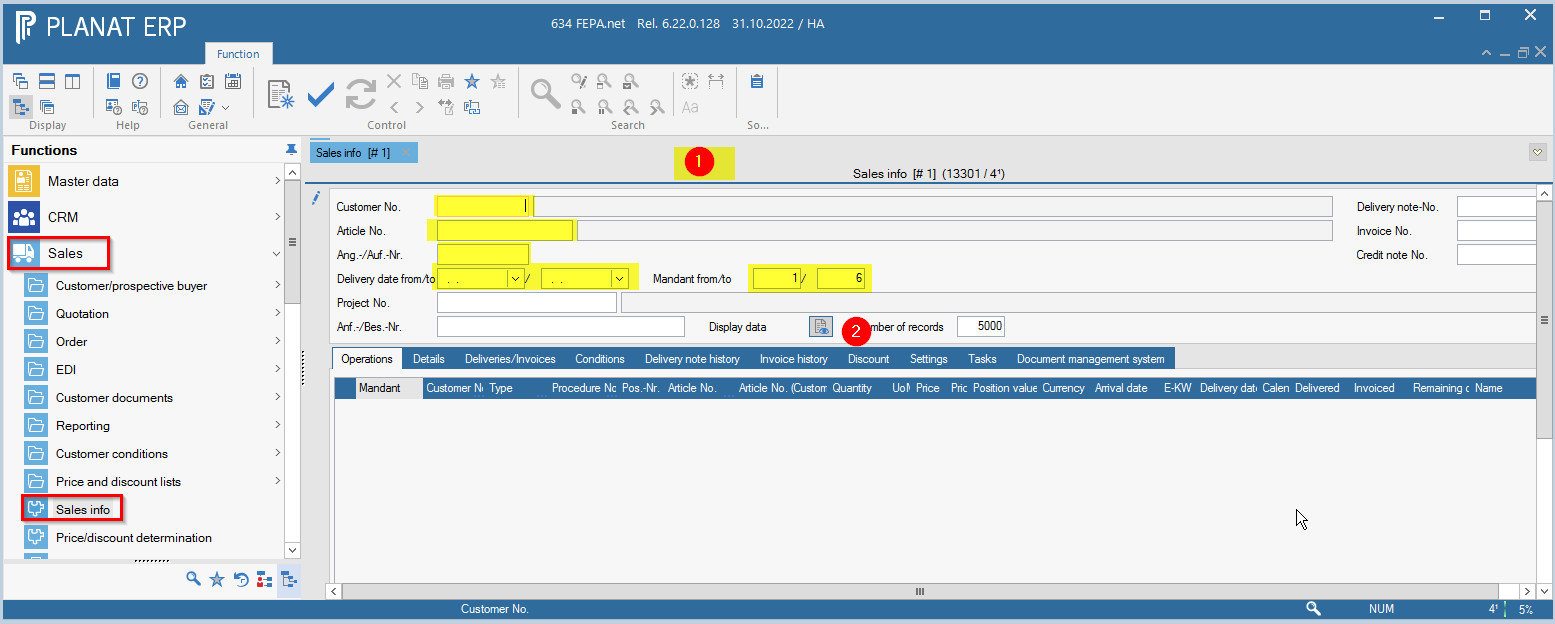
3. Under the tab Settings, you can set the following search criteria:
- Procedure type (order, blanket order, retrieval order, etc.)
- Status (entered, partially delivered, etc.)
- Example of settings to view all open orders for shipping:

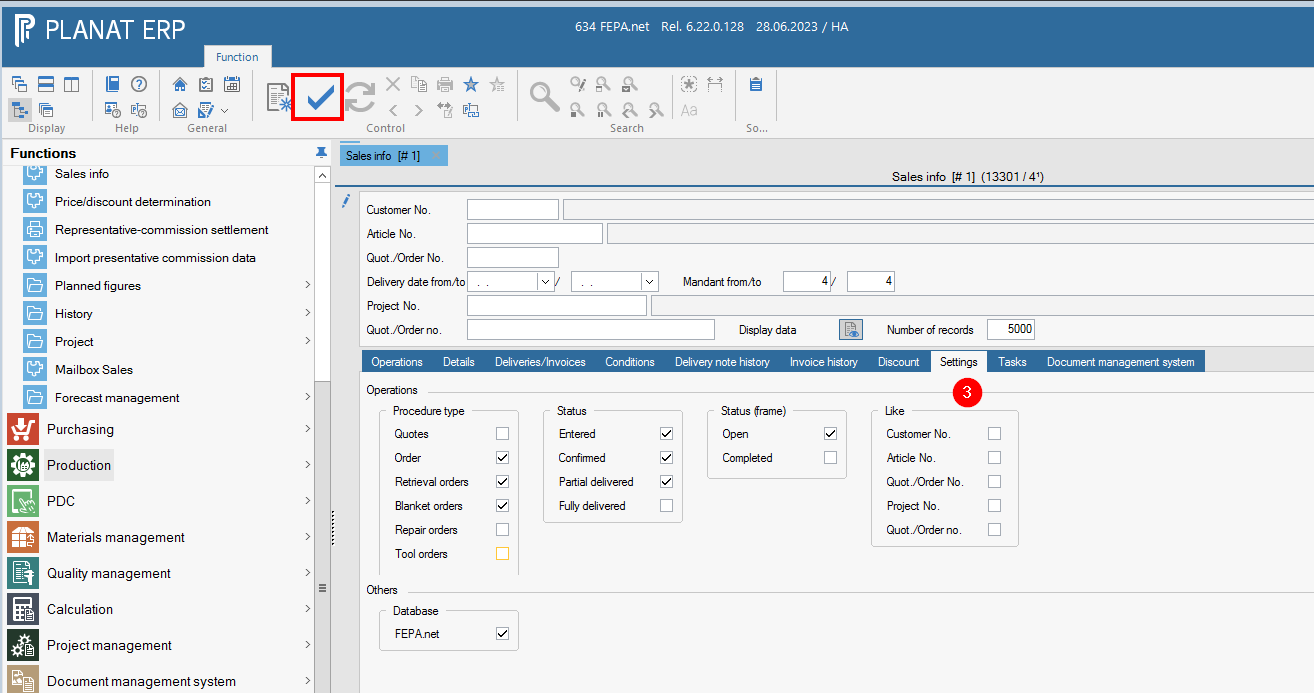
These settings can be saved with the checkmark in the ribbon toolbar.
Print shipping proposal
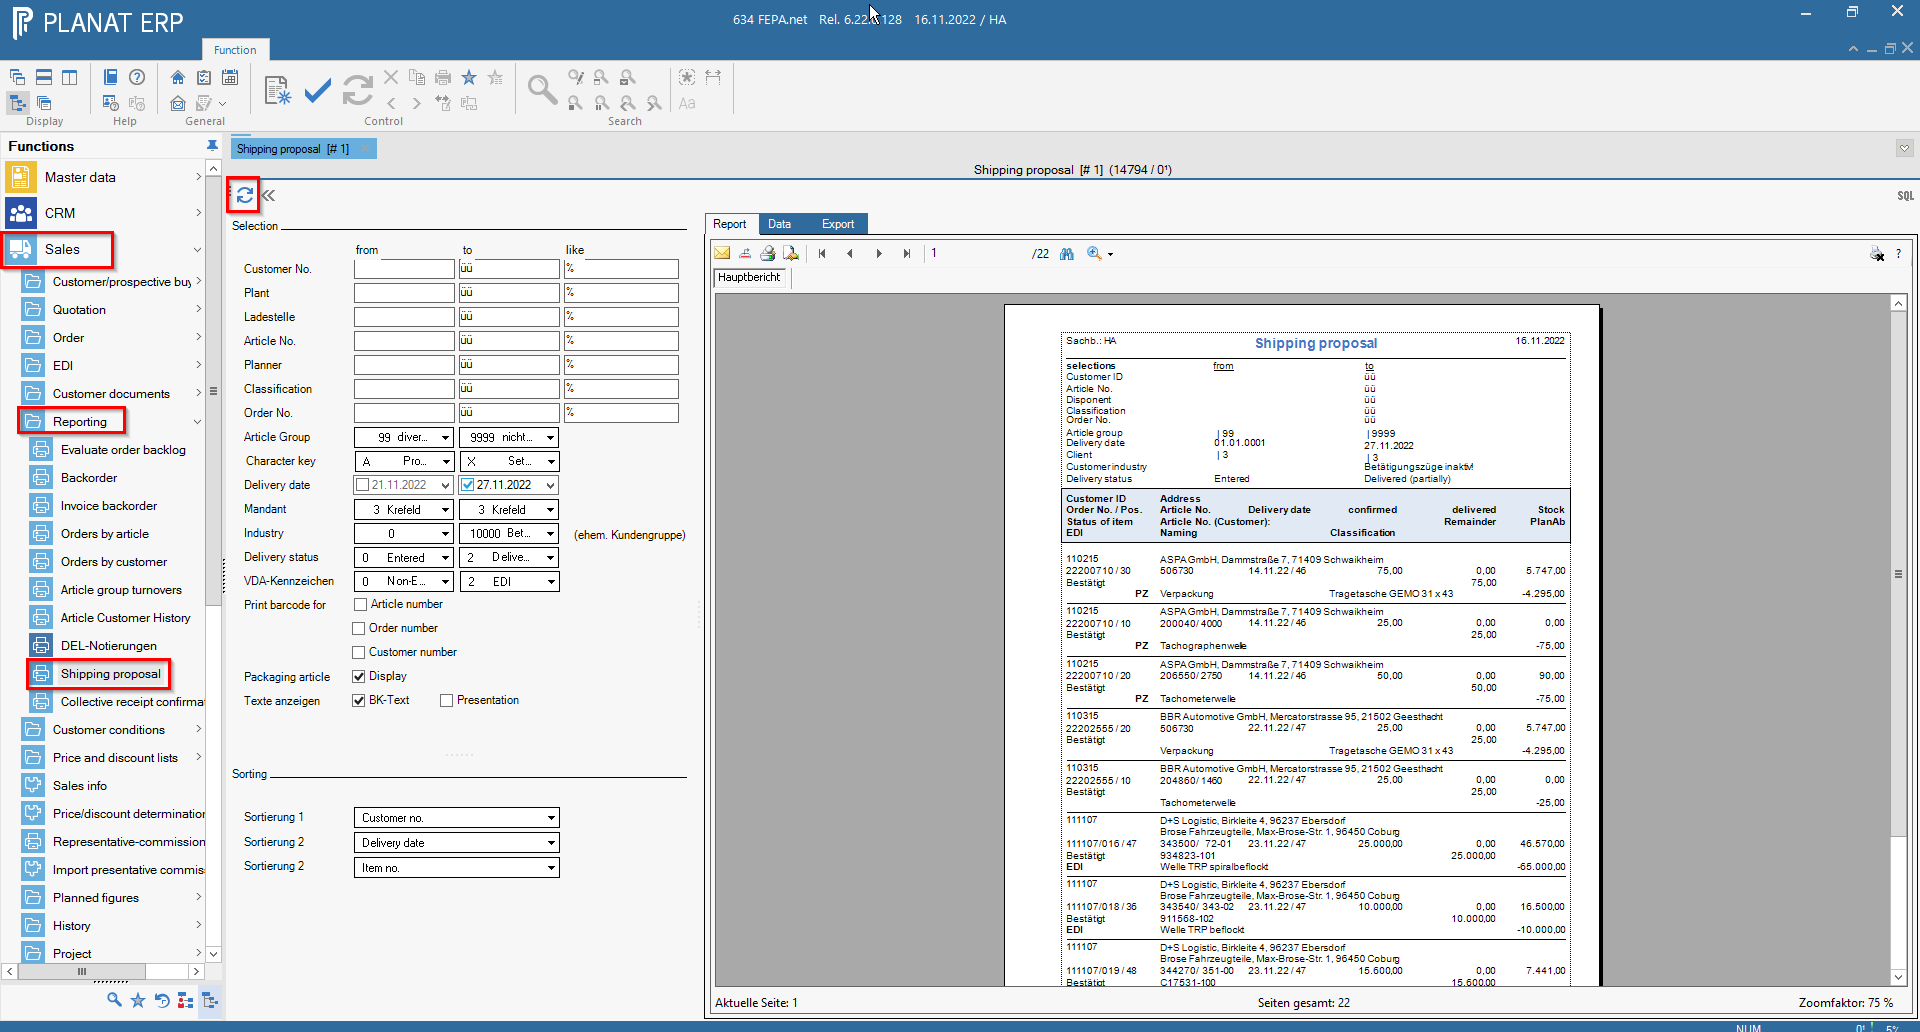
FEPA function: Sales > Reporting > Shipping proposal
If desired, enter the following search criteria, without restriction all articles/customers will appear, here are the most important ones:
- customer number
- article number
- delivery date
- order number
- enter from and to to simplify the search (delivery date)
- mandant from to
- When you have entered everything, click on the Update button, the shipping proposal will be created on the screen and you can print it by clicking on the Print button on the right above the printout.
Attention: If you only want to see the open quantities for a certain order, uncheck the date box.
By default the sorting is customer no., delivery date, article no. The sorting can be changed!
Packing slip
Deposit markings / information for packing slips
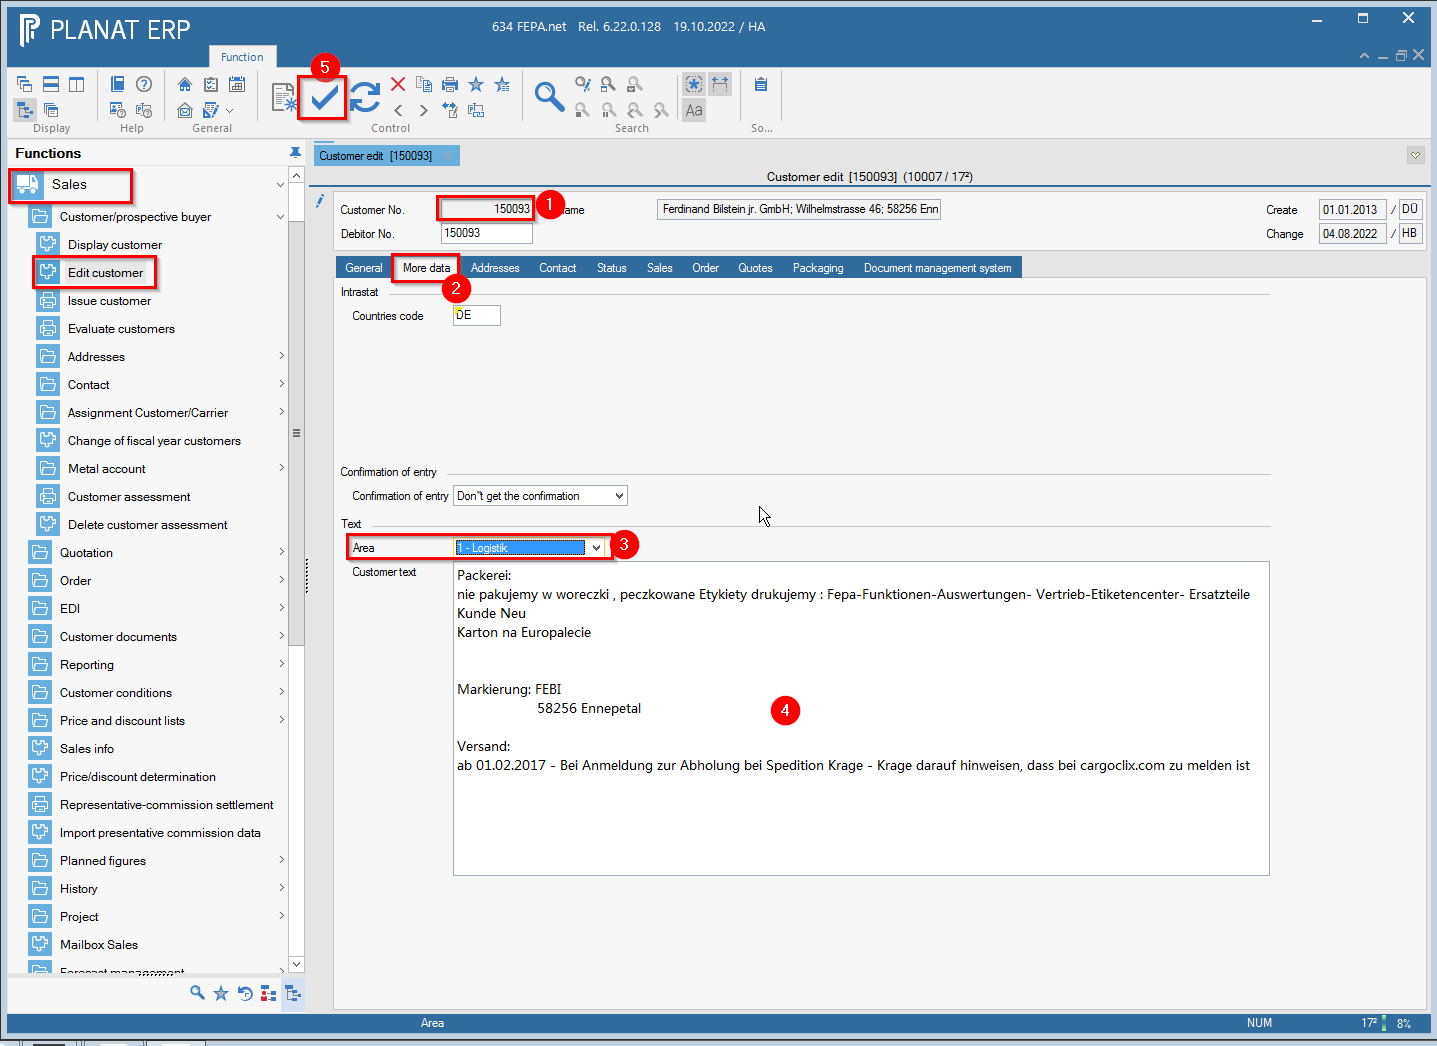
Serves to avoid having to store a marker for each new order, which means that it is only stored once for the customer. (Deposit of constant information about the customer for the shipping employees who pack the goods).
FEPA function: Sales > Customer/prospective buyer > Edit Customer
- enter customer number, press enter
- click on the tab More data
- select Logistics in the Text drop-down menu
- enter the desired marking in the field Customer text
- save

Create packing slip
FEPA Function: Sales > Customer Papers > Edit Packing Slip
- press enter at registration number (an registration number will be generated)
- enter order number or customer number, enter delivery date or confirm current date, enter
- FEPA jumps to the search tab, otherwise click on this tab.
- click on start search (magnifying glass)
- All items for this order appear
- In the box at the front, check the box take over for the positions you need. (The items marked in red have no or not enough stock to deliver the item completely in the warehouse that is also displayed here).
- Then click on ">" at the bottom right (positions are taken over).

-
Return to the Delivery positions tab and check everything, change the delivery quantity if necessary.
-
In the External Texts tab, enter the prefix text, e.g. the week in which it is to be packed and other notes, e.g. in the package
-
If everything is OK, click on Print and the packing order will be printed and saved.

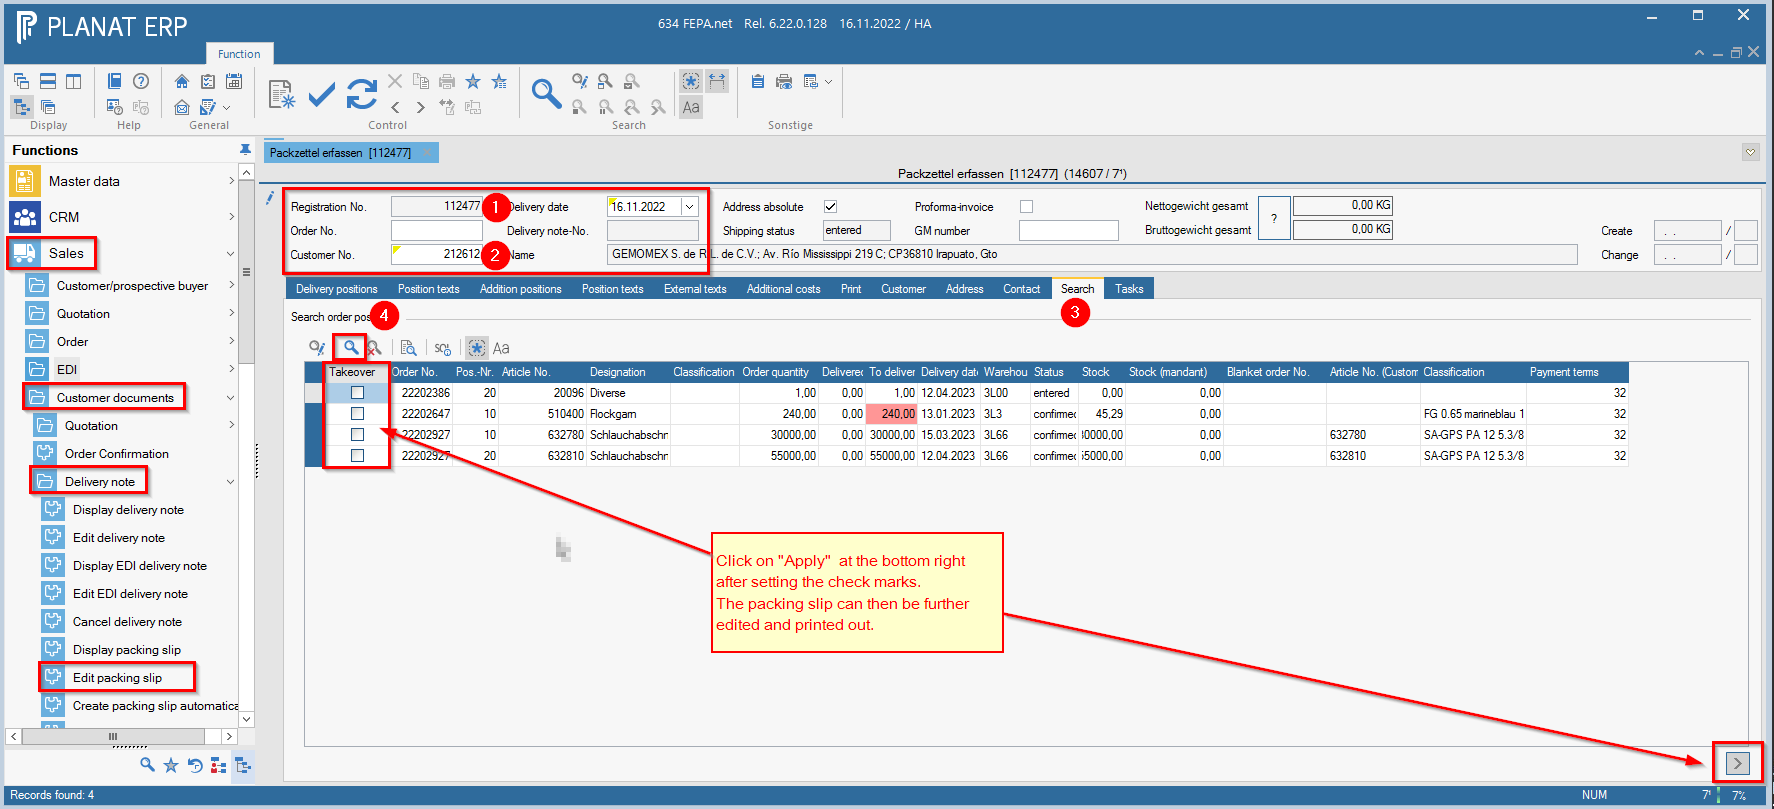
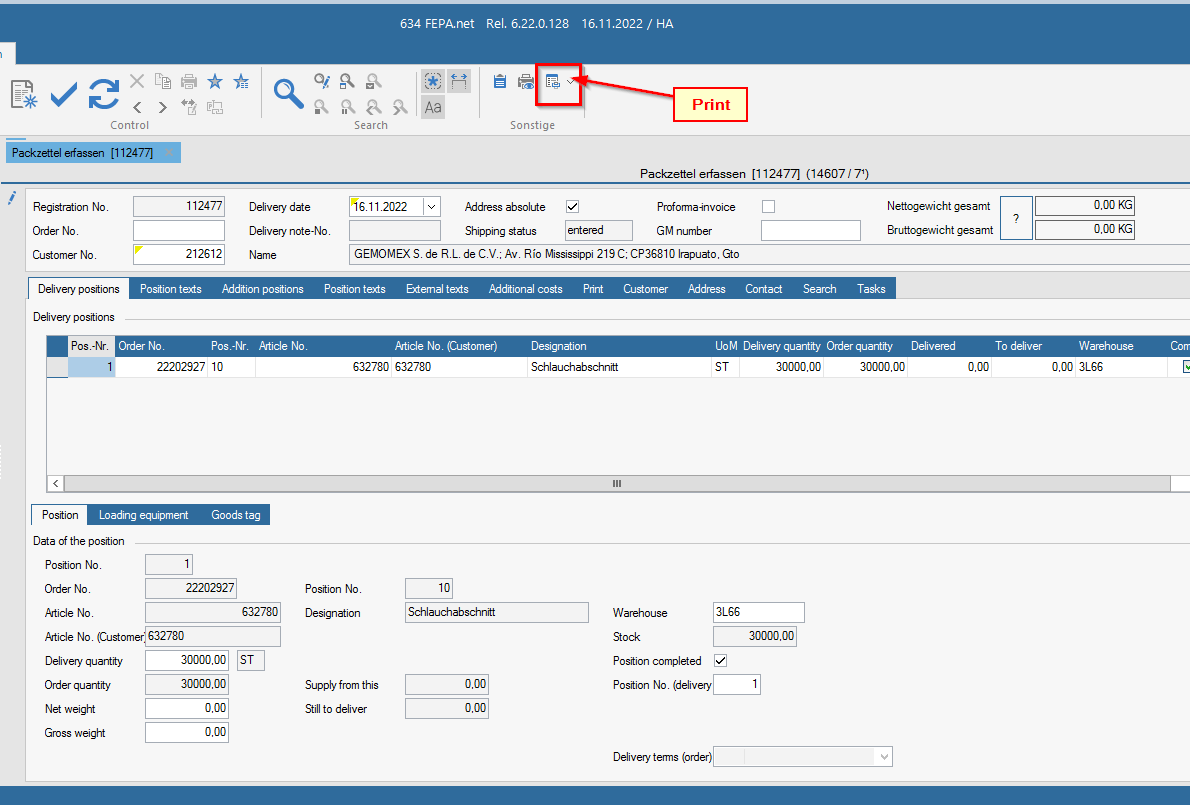
Note: If there are more customer orders to be included in one packing slip for the same customer, only start with the customer number (2)!
Create EDI packing slip
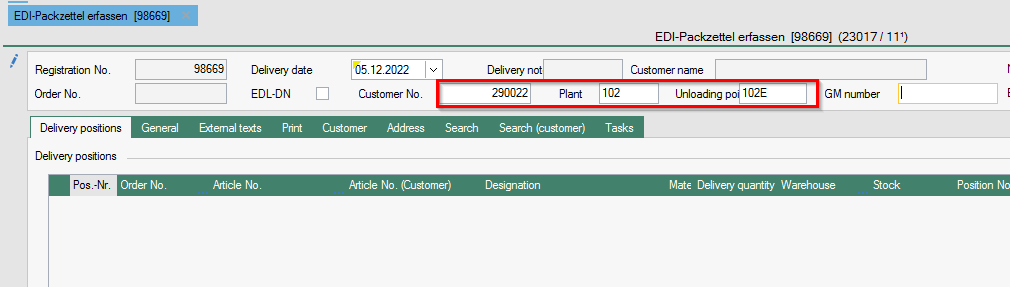
FEPA function Sales > Customer documents> Delivery note > Edit EDI packing slips
- press enter at registration number (an registration number is generated)
- enter either - order number or - customer number, plant and unloading point

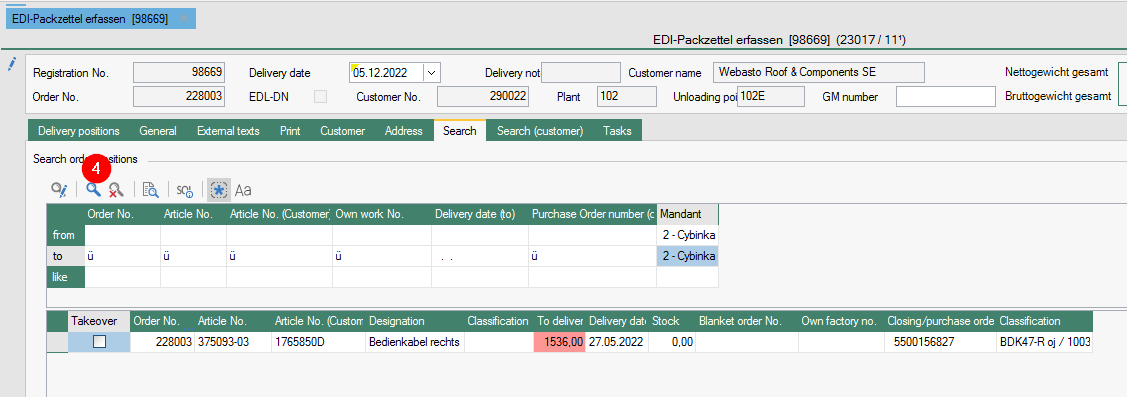
- If the next position is not automatically set as the Delivery position, then continue on the Search tab otherwise 4.4.
- click on Start search... (magnifying glass)

4.1 All items for this order or this customer are displayed up to the set delivery date of the search.
Attention !
If nothing is displayed there:
Click on the selection area of the search and check how far you have limited the delivery date.
and extend it if necessary.
Entry into the packing slip without customer order, all open delivery positions for this customer are displayed in the search result. As a rule, only one sales order is selected per delivery note. Unless mixed pallets are allowed for the customer. See note.
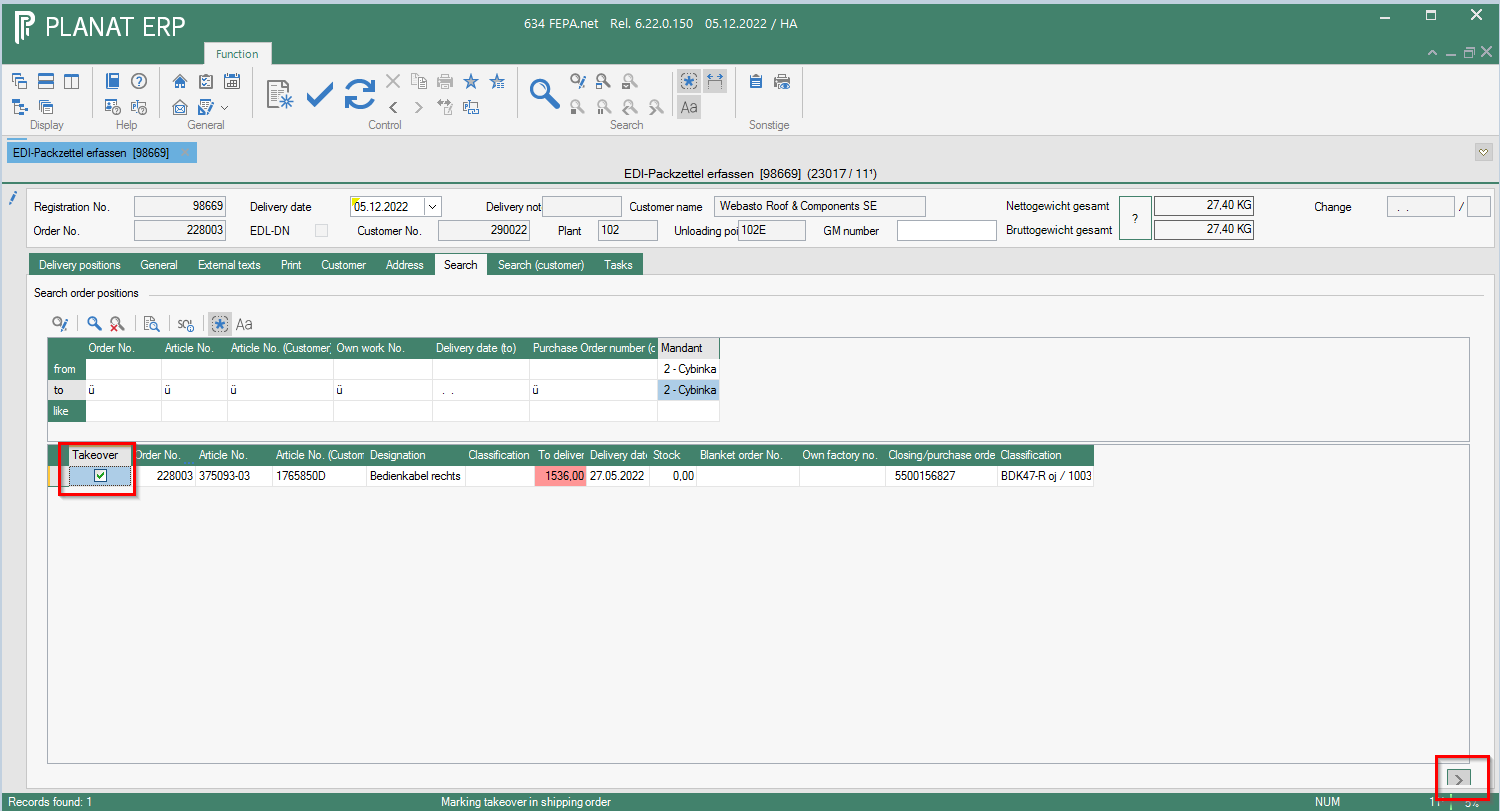
4.2 Check the box in front for the respective positions you need. (Those marked in red have no or not enough stock to deliver the position completely) -> possibly partial delivery.
4.3 Then click on the button > at the bottom right (positions are transferred to Delivery positions).
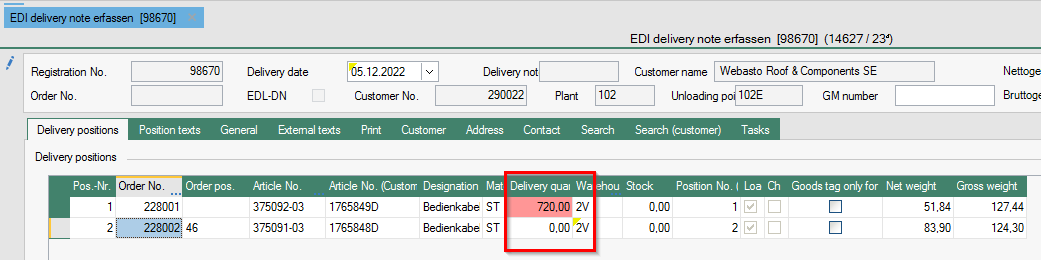
NOTE: In a packing slip, only items should be combined into mixed pallets where the customer receives the ASN according to VDA4905 and the items have the same customer order number, otherwise there will be problems when receiving the ASN, as the customer order number is only transferred for the first delivery note item!

4.4 Back to Delivery positions tab
4.4.1 Enter the desired delivery quantity for each item.
4.4.2. right click in each position and recalculate loading equipment (Fepa calculates how many pallets etc. are needed).
-
Click on the printer button and the packing order will be created.
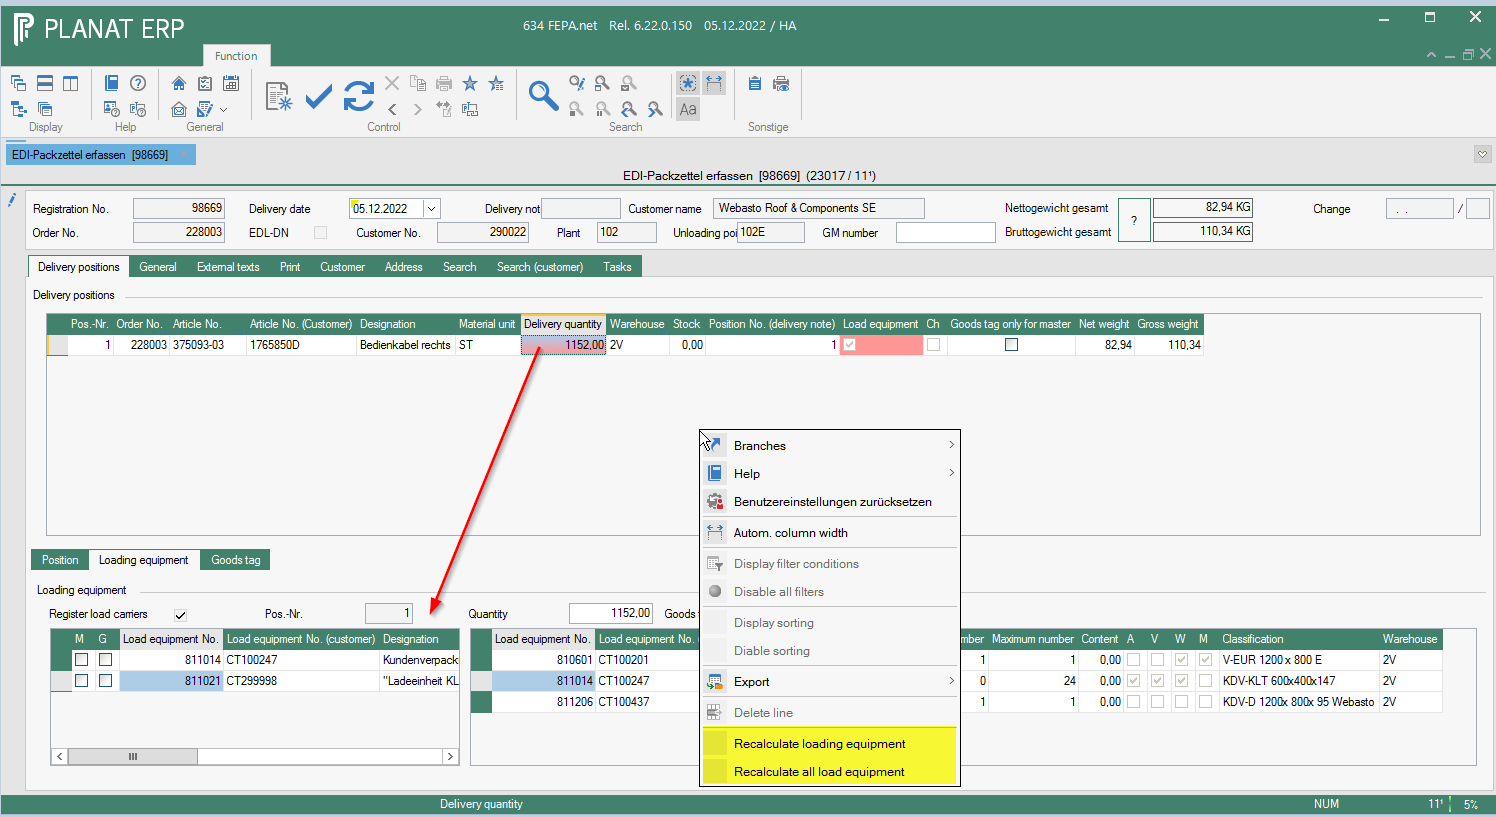
Delivery notes
Create delivery notes
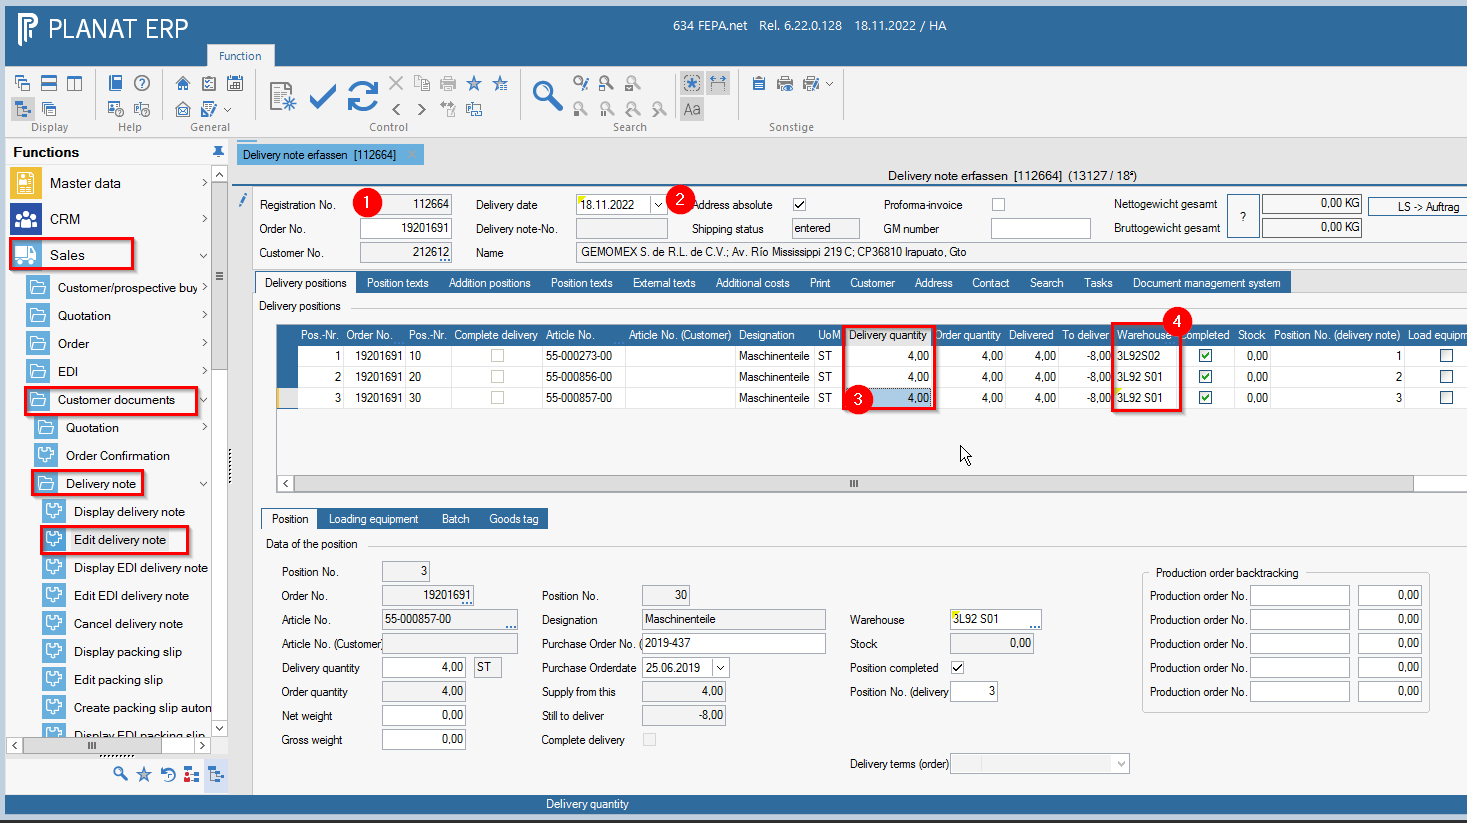
FEPA function: Sales > Customer documents > Delivery note > Edit delivery note
The basis is usually a packing order. However, you can also enter a delivery note without a packing order, in which case you start as in the packing order.
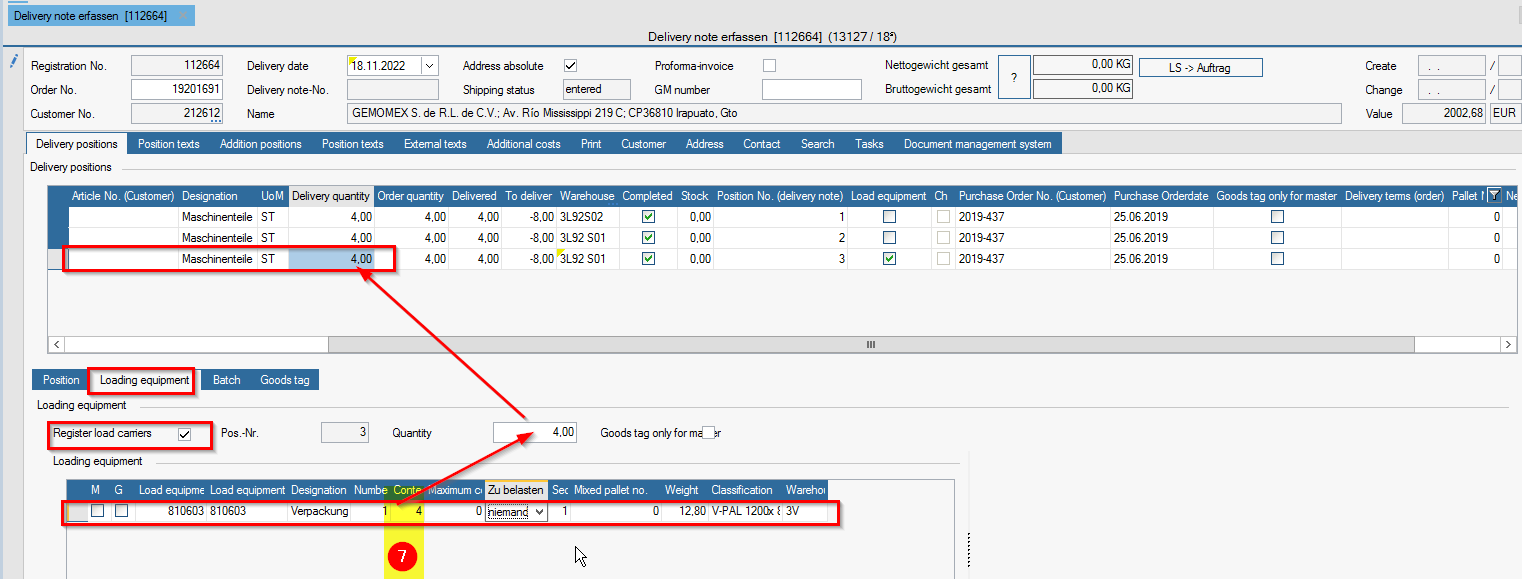
If load carriers are entered in the delivery note, the packaging is debited from the warehouse when the delivery note is processed. For non-returnable packaging, please note that "nobody" has been selected in the column to be debited. Returnable packaging is transferred to the customer account. Return deliveries of empty packaging only have to be transferred from the customer's warehouse to the customer's own warehouse.
Folder Delivery positions / Position
- Enter the entry number of the packing order
- Change the delivery date to the date of the current day, or enter the date according to the procedure valid at the location.
- Check delivery quantities again, if there are deviations from the packing order, these can be changed in the delivery quantities field.
- Check warehouse, if necessary change to the dispatch warehouse.

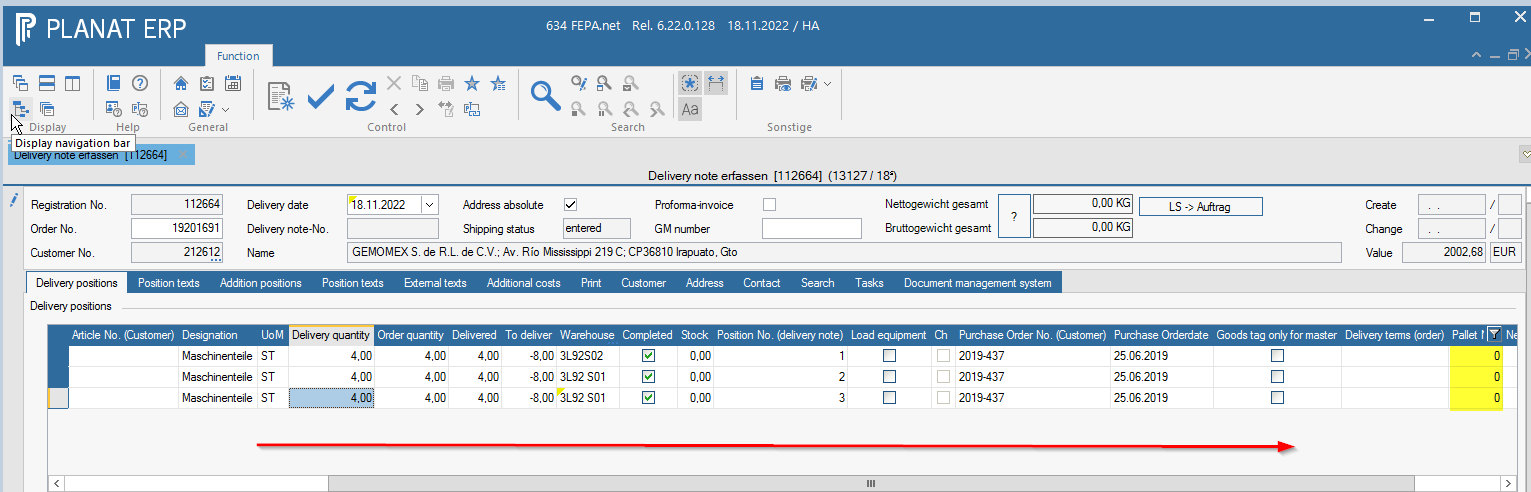
- If there are several pallets, they can be numbered at the pallet number.

Folder Delivery positions / Loading equipment
- In the spare parts business, tick the last item for loading equipment and create some, otherwise none will appear on the forwarding order - if no dummy pallet is used, the quantity (number of packaging) will be booked away from the stock, so check the stock here too and in the case of disposable packaging to debit = no one
- It is compulsory to enter the number of pieces for contents, otherwise this position will receive the value 0

Folder External texts
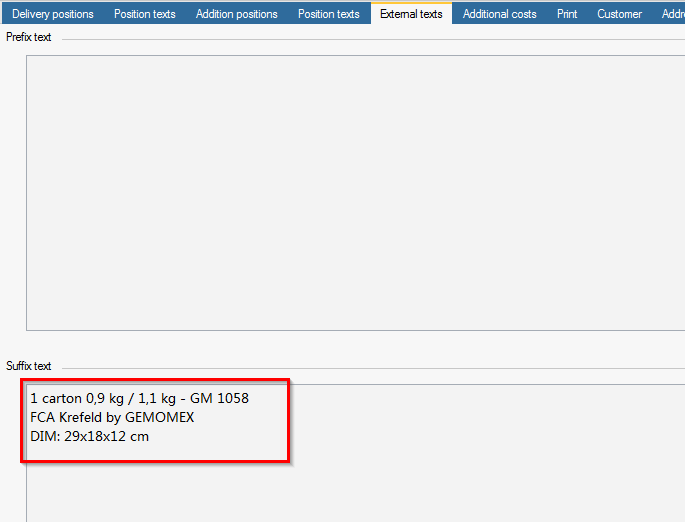
- If desired, enter the number of pallets, pallet dimensions, weights etc. on the external texts tab in the prefix / suffix text; these will then appear on the delivery note.

- If nothing is entered, delete the external texts prefix text the week etc. that were in the packing slip for the packing department.
Folder Print
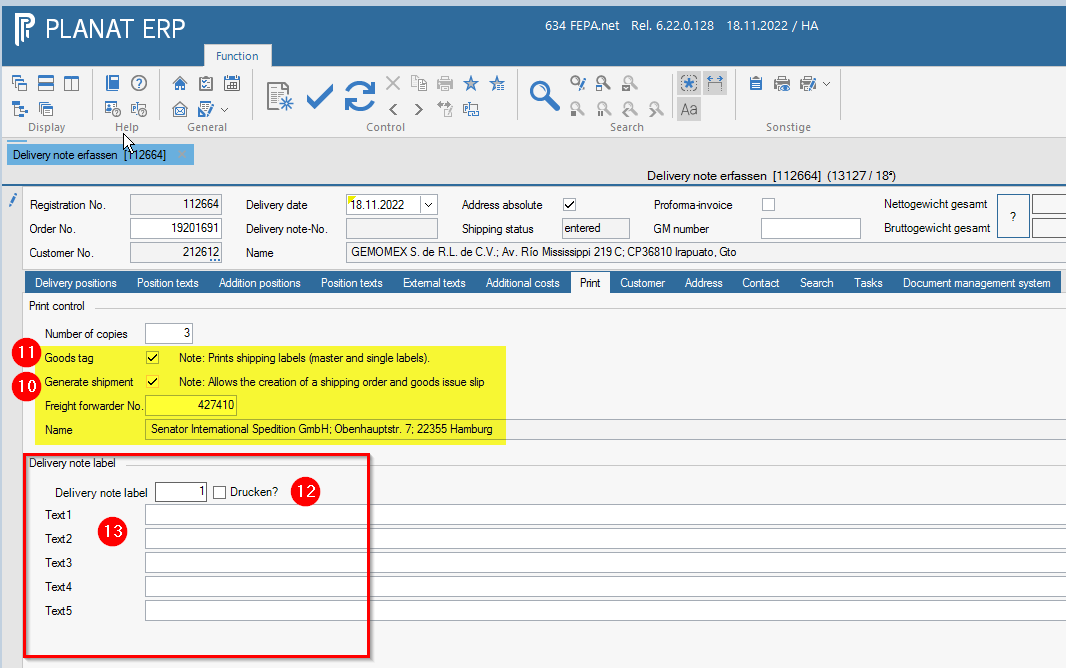
- On the Print tab, tick Shipping documents if it is to be shipped by forwarding agent (the forwarding agent no. should be entered in the field below), if it is to be shipped by DPD or Post, then remove the tick.
- If goods tags are required, also tick the box for goods tags.
- If you want to mark the carton, tick the box for the delivery note label and enter the number of pallets.
- Below this, 4 text fields appear where you can enter the desired marking

- If everything is OK, click on the printer button and the delivery note is processed and printed (and the goods tags, if selected).


Create EDI delivery note
FEPA function: Sales > Customer documents > Delivery note > Edit EDI delivery note
Note: To print goods tags and shipping documents, the checkbox must be ticked in Print tab (see point 10 under Create delivery note).
To create an ASN for an EDI delivery note, the tick for the delivery note-RDT (1) must be set in the General tab and the tick for shipping documents (2) in the Print tab. These settings are made automatically if they are set in the EDI sales order (1) and the in edit customer (2).
- enter the registration number of the packing order
- change delivery date to date of current day
- check the delivery quantities again, if there are deviations from the packing, they can be changed in the field delivery quantities
- check the warehouse of departure and change it if necessary
- if there are no mixed pallets, just click on print and the delivery note + goods tag will be created.
Mixed pallets
- if mixed pallets have resulted, please proceed as follows:
A mixed pallet consists of at least 2 articles (this does not mean the empty container, but the article that is packed).
6.1 Click on the position that is affected by the mixed pallet.
6.2 Dissolve all existing loading units (right click to remove row).
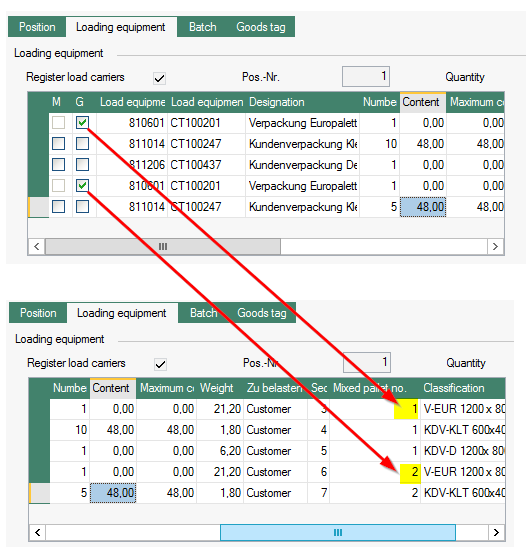
6.3. then right click, append line and enter the pallet and 1 for quantity
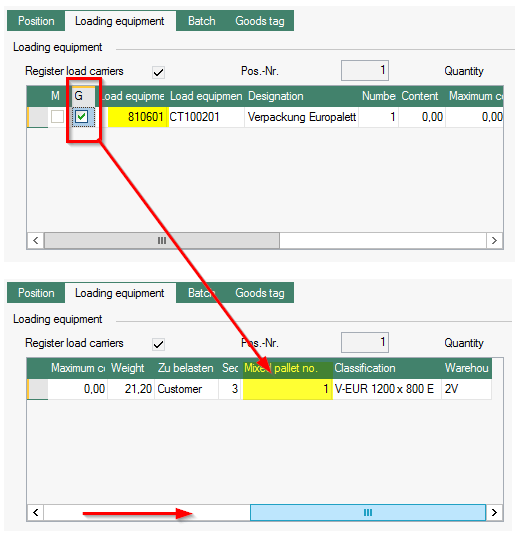
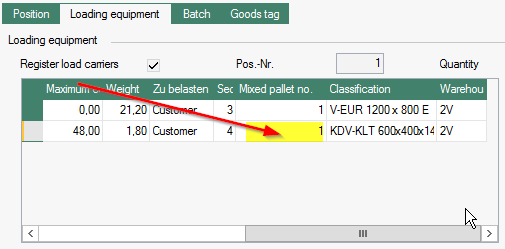
6.4. then check G (this will assign a mixed pallet number)
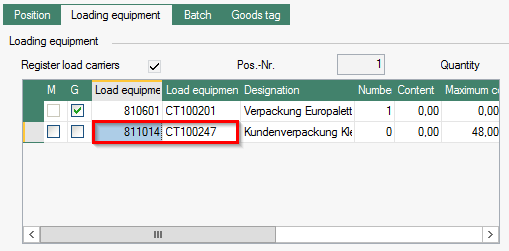
6.5. then append row again and add the KLT or carton
6.6. Make sure that the LT. no. (customer) (LT = loading equipment number) is stored, otherwise an error will occur during printing (if no loading equipment article no. is used, but the customer requests this, this may lead to complaints and charges from the customer).
6.7. Indicate the number of cartons on the pallet for each article and the number of pieces per carton for the contents. 6.8. enter the mixed pallet number at the back if it has not yet been assigned.
6.9 If there are still lids on the mixing pallet, proceed as for cartons/KLT.
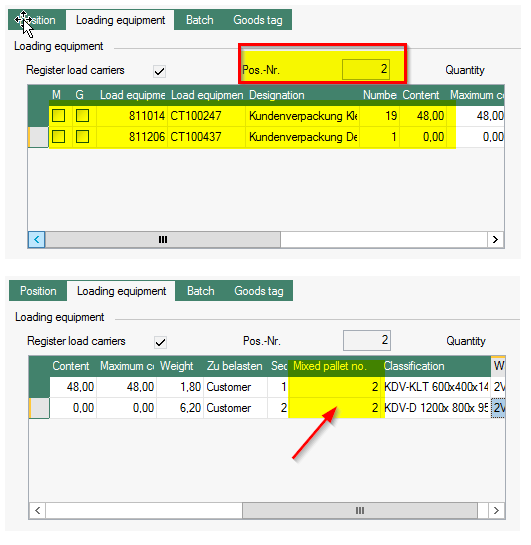
You can create as many mixed pallets as you like for each article, but you must make sure that the respective cartons with the corresponding mixing pallet number.
6.10. For self-checking, check again if the total number of pieces in the edited article matches what is to be delivered.
6.11. Then do the add the loading equipment for the 2nd article which is also packed on the same mixing pallet number. 6.12. Note, however, that we only need to specify the KLT/cartons/lids, as we have already stored the pallet as loading equipment for the 1st article.
6.13. Enter the pallet on which the goods are placed, compare the total quantity of the delivery note item with the packing slip.
6.14. In the Print tab, check whether the checkmark is set for goods tags and shipping documents ("Shipping documents" should be preset for EDI customers in the customer master, without shipping documents no ASN can be created).
6.15 When everything is done, click on print again and the delivery note is created (and the labels).
Cancel delivery note
This function is used for delivery notes and EDI delivery notes.
1. FEPA function: Sales > Customer documents > Delivery note > Cancel delivery note
2. Open search (magnifying glass with pen) enter the desired delivery note no. in the search field at like, press magnifying glass
3. Select the desired delivery note (double click), the delivery note is loaded - check for correctness. 4.
4. Cancel the delivery note by pressing the button for printing and processing, the cancellation delivery note is printed.
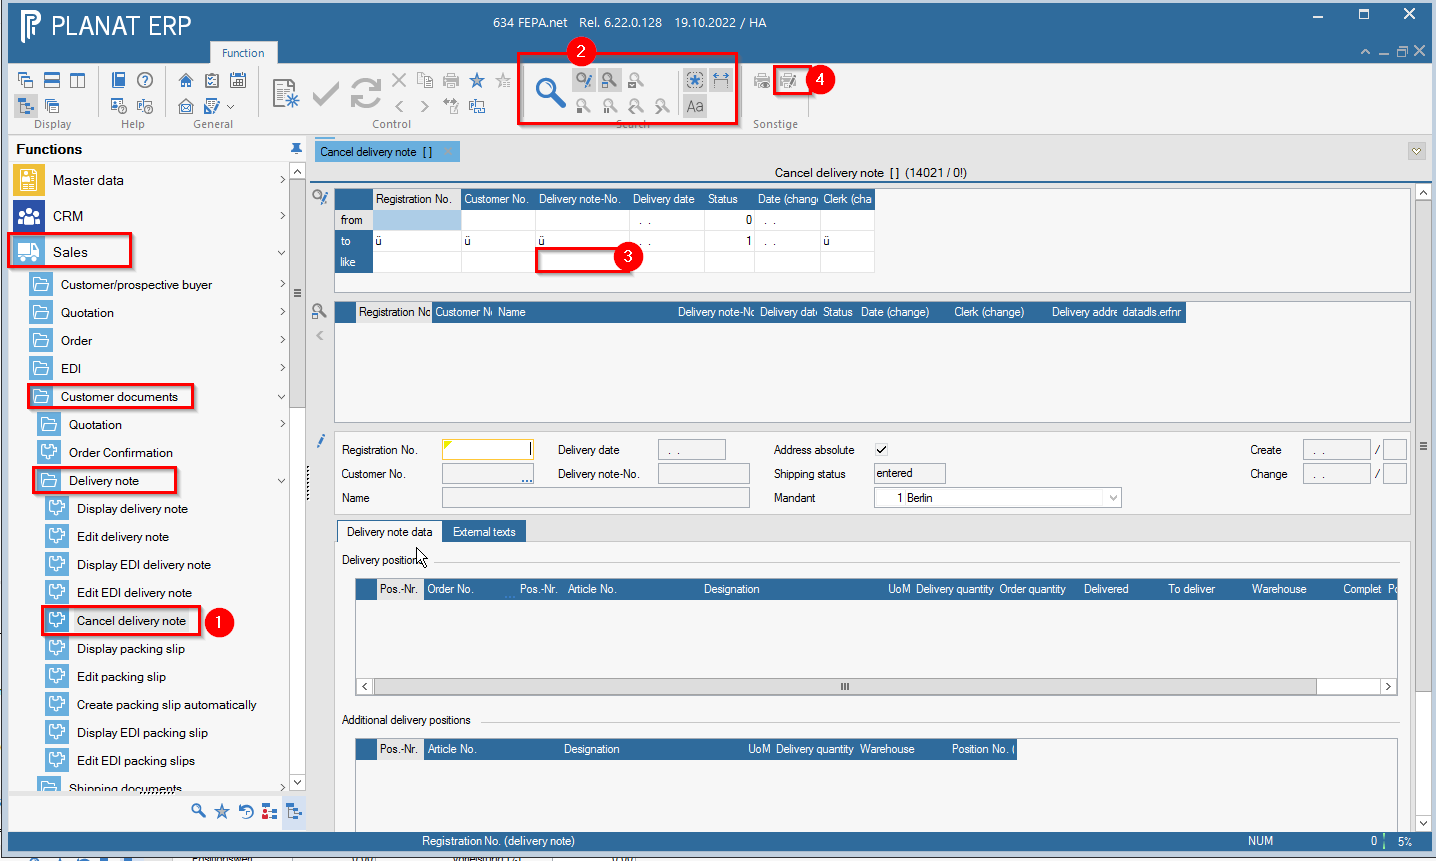
Attention: Calculated delivery notes can only be cancelled when the invoice has been cancelled.
Invoices
General
Here you will find general information on creating and cancelling invoices in FEPA. Location- or customer-specific features are not taken into account here!
Create invoices
FEPA function: Sales > Customer documents > Invoice > Edit invoice
1. press Enter ( registration number will be assigned)
2. enter the customer number in the Customer No. field
3. confirm invoice date
4. go to the search tab and start the search with the magnifying glass (click!).
5. all delivery notes not yet invoiced for the customer will be displayed, tick the desired delivery note number in the Take over field
6. click on the button ">" at the bottom right (delivery note positions are taken over into the invoice positions)
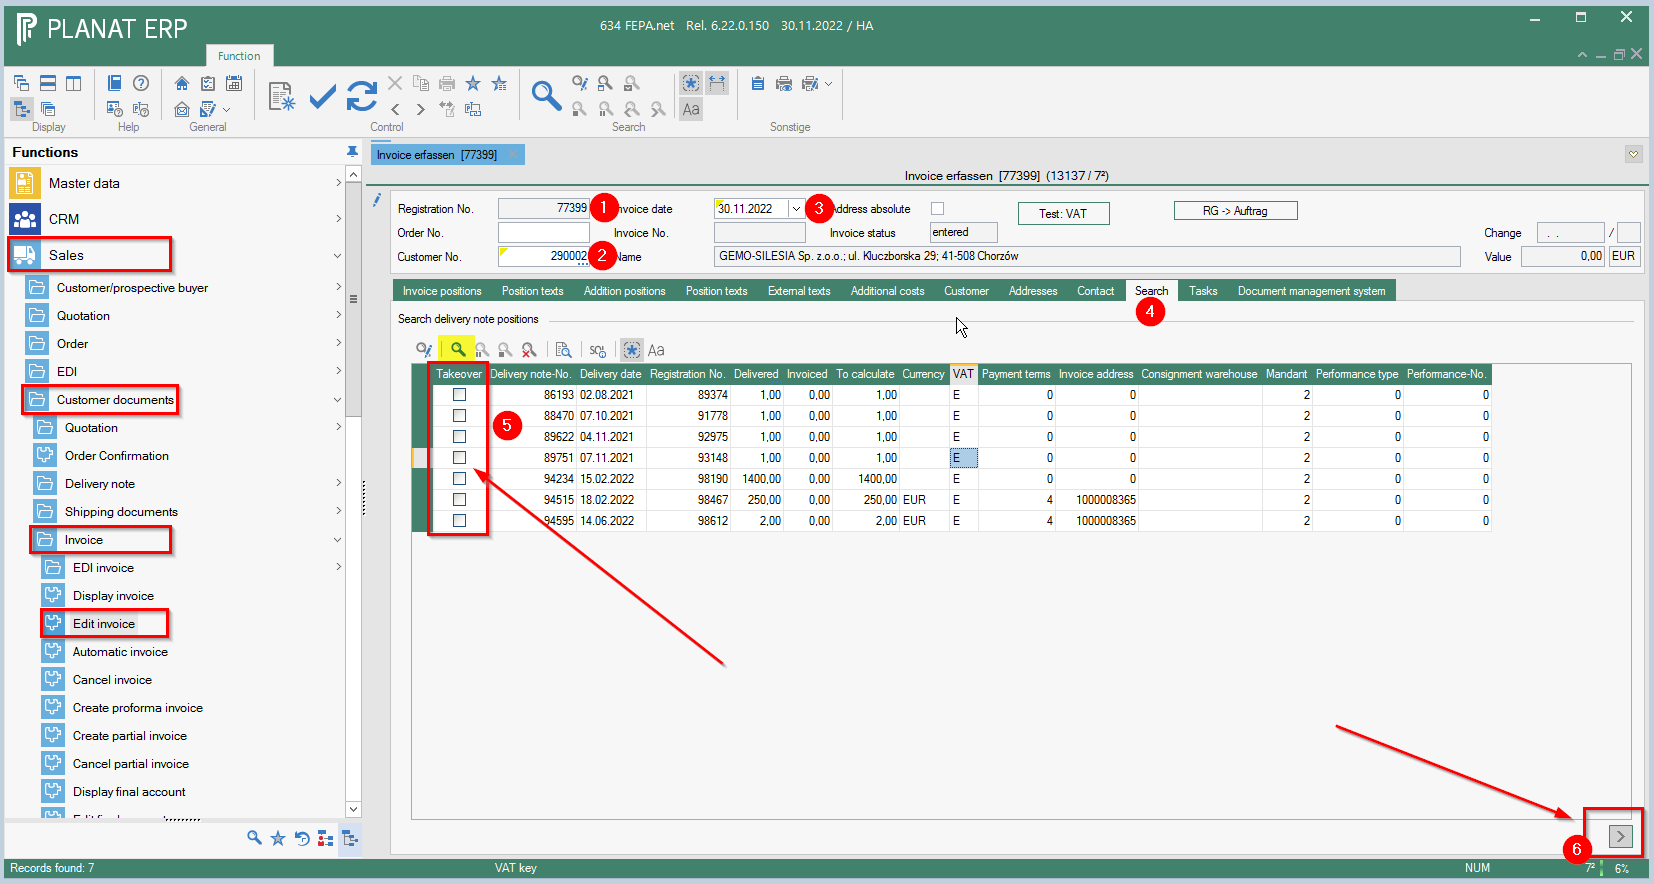
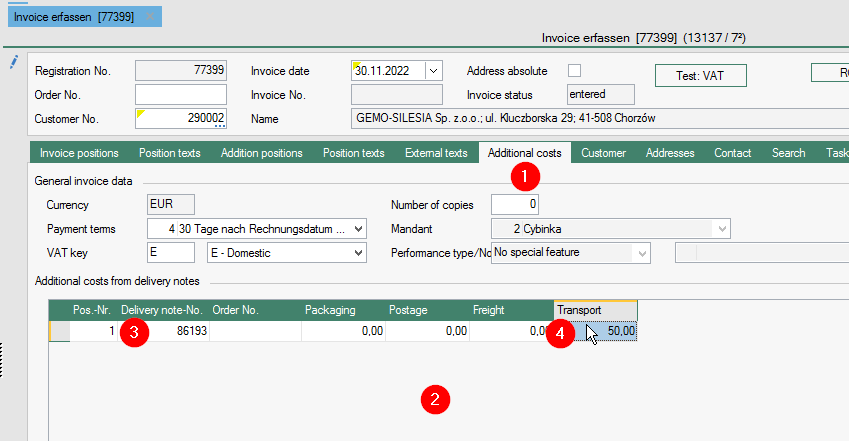
6.1 Calculate packaging costs, transport costs, etc:
6.1.1. additional costs tab
6.1.2. append line
6.1.3. enter the delivery note number
6.1.4. and enter the desired value in the respective field
7. click on the button Print and process (invoice is created)

In the External Texts tab, prefix or suffix texts can be entered for the invoice, which are then printed on the invoice.
A print preview (button Printer with eye) can be used to check the invoice before processing.
Create EDI invoice
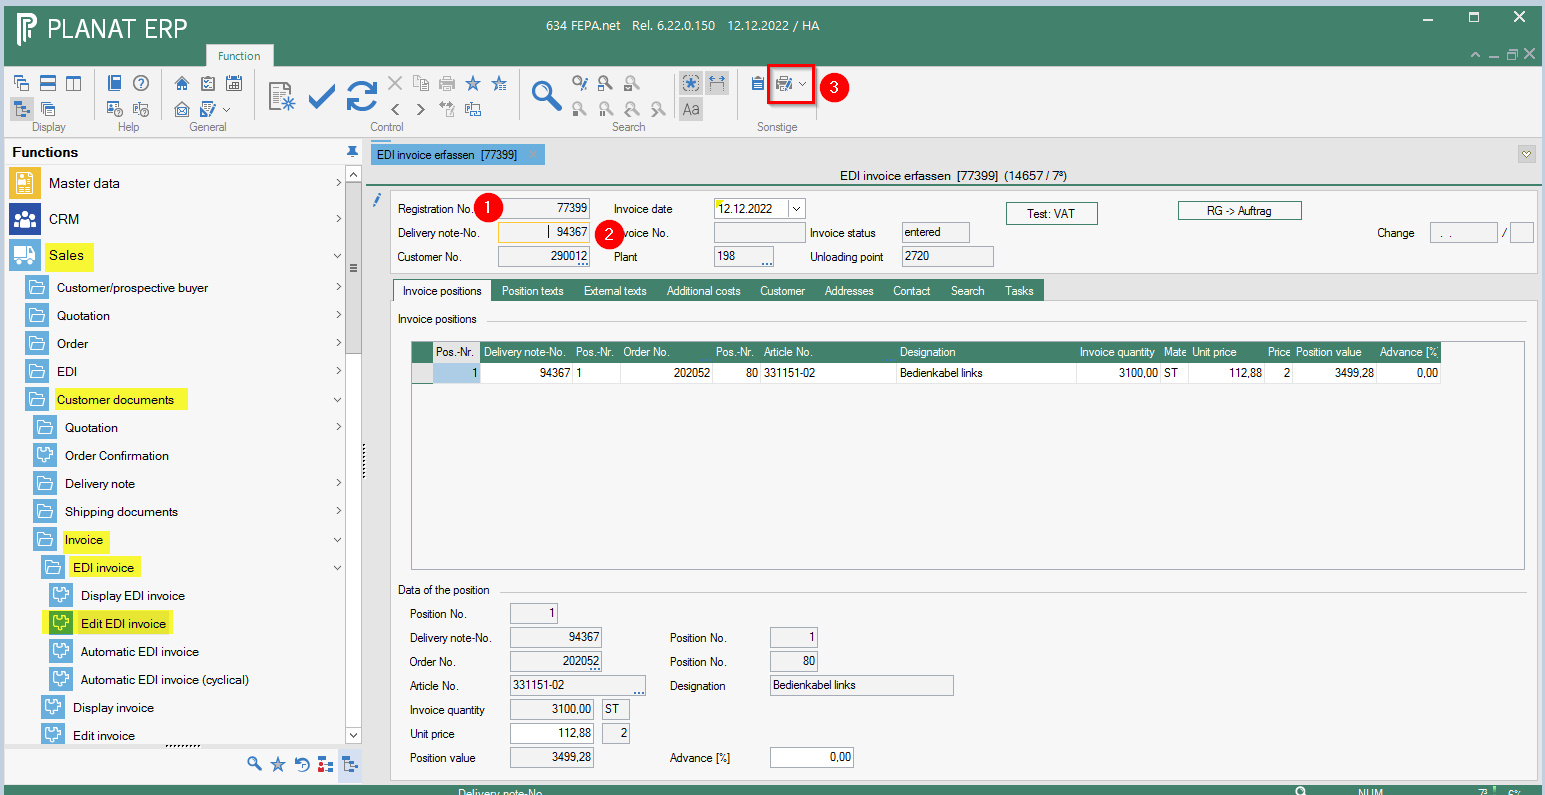
FEPA function: Sales > Customer documents> Invoice > EDI Invoice> Edit EDI Invoice
- Press Enter (Registration number is assigned).
- Enter delivery note number
- Click on the printer button and the invoice is created.
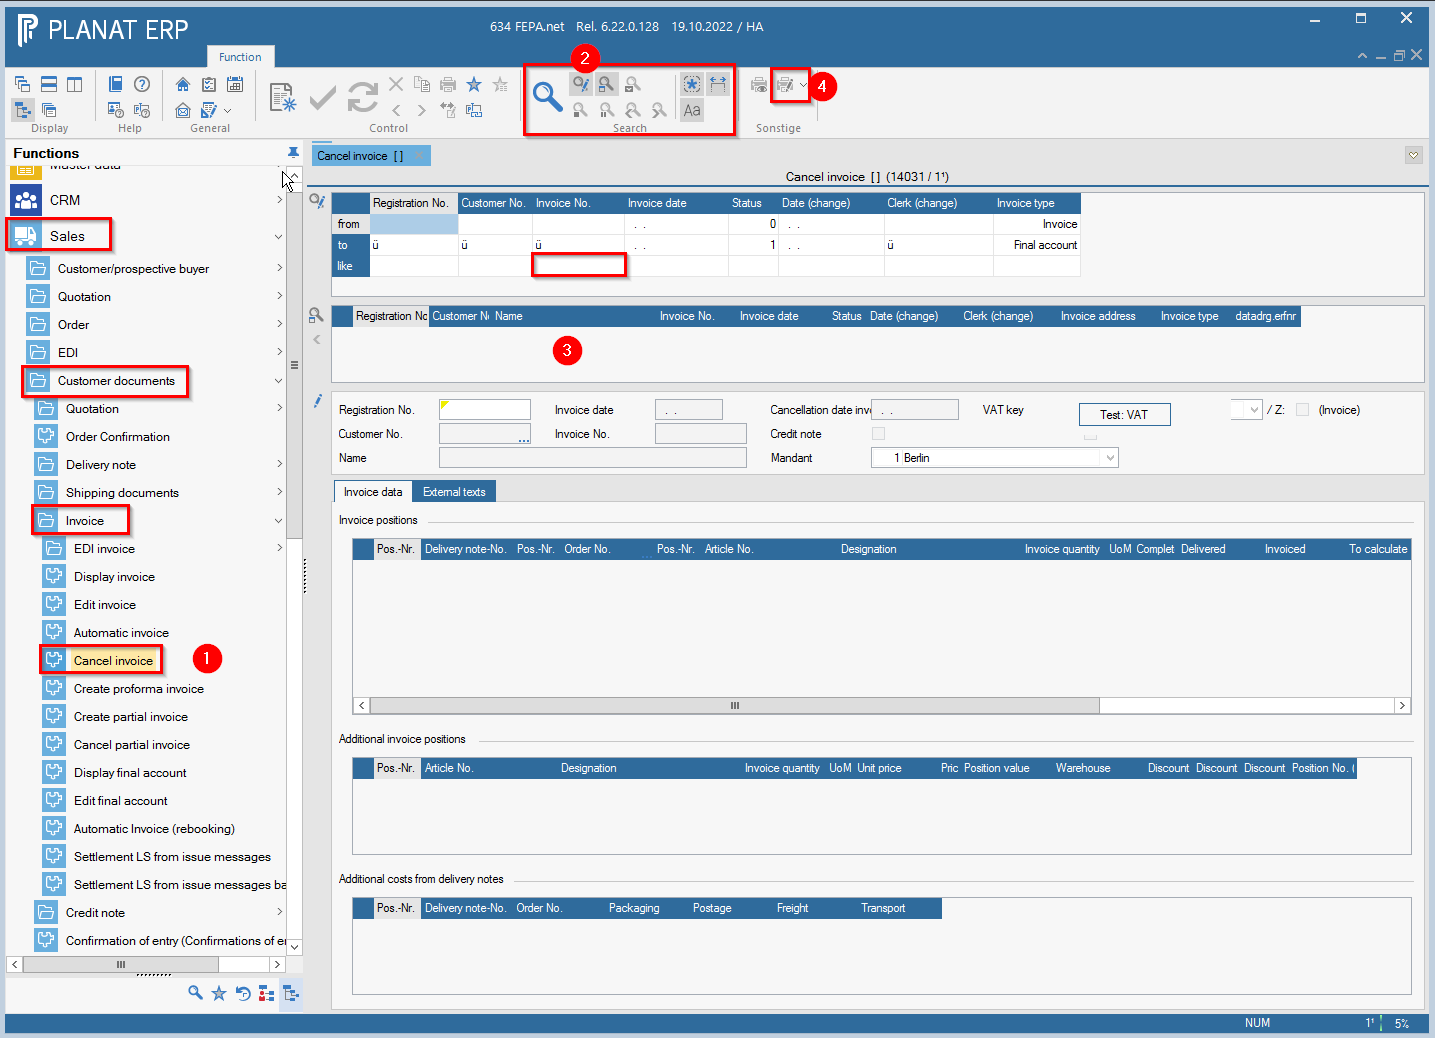
Cancel invoice
Attention: Invoices from the previous year cannot be cancelled. The year change in FEPA takes place on 01.01. of each year. Whether an invoice may be cancelled at the turn of the month depends on the regulations at the location. (If the invoice may no longer be cancelled, a credit note must be created.
- Mask under: Sales > Customer Papers > Invoice > Cancel Invoice
- Open search (magnifying glass with pen) enter the desired invoice number in the search field at like, press magnifying glass
- Select the desired invoice (double click), the invoice will be loaded - check for correctness
- Cancel the invoice with the button for printing and processing, the cancellation invoice is printed out.
Create credit note
This function can be used to create credit notes with stock chargeback and value credit notes.
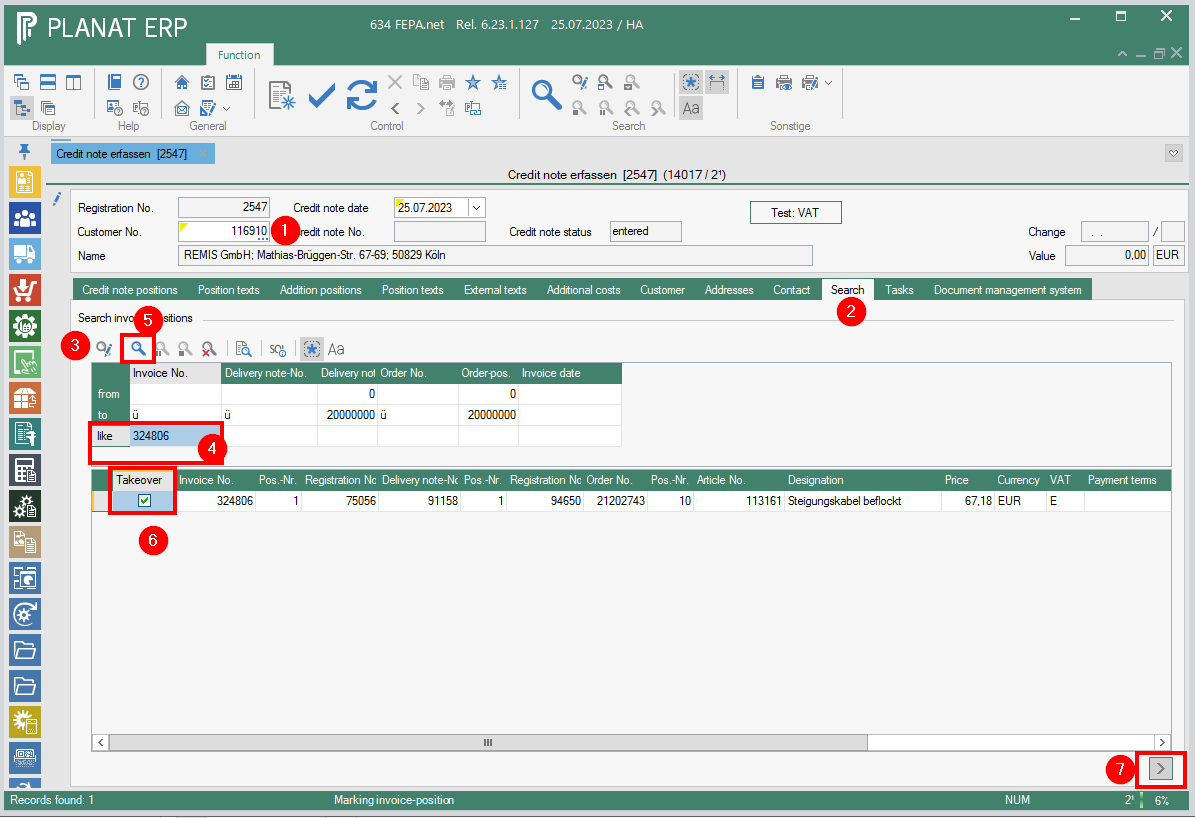
FEPA function: Sales > Customer papers > Credit note> Edit credit note.
- Press enter (entry number is assigned), Enter customer number (1), enter
- Click in tab Search
- Open search (magnifying glass with pen)
- Enter the desired invoice no. in the search field at like
- Press magnifying glass
- Search for the desired invoice and tick it in the field Take over
- Use the arrow at the bottom right to transfer to the tab Credit items.

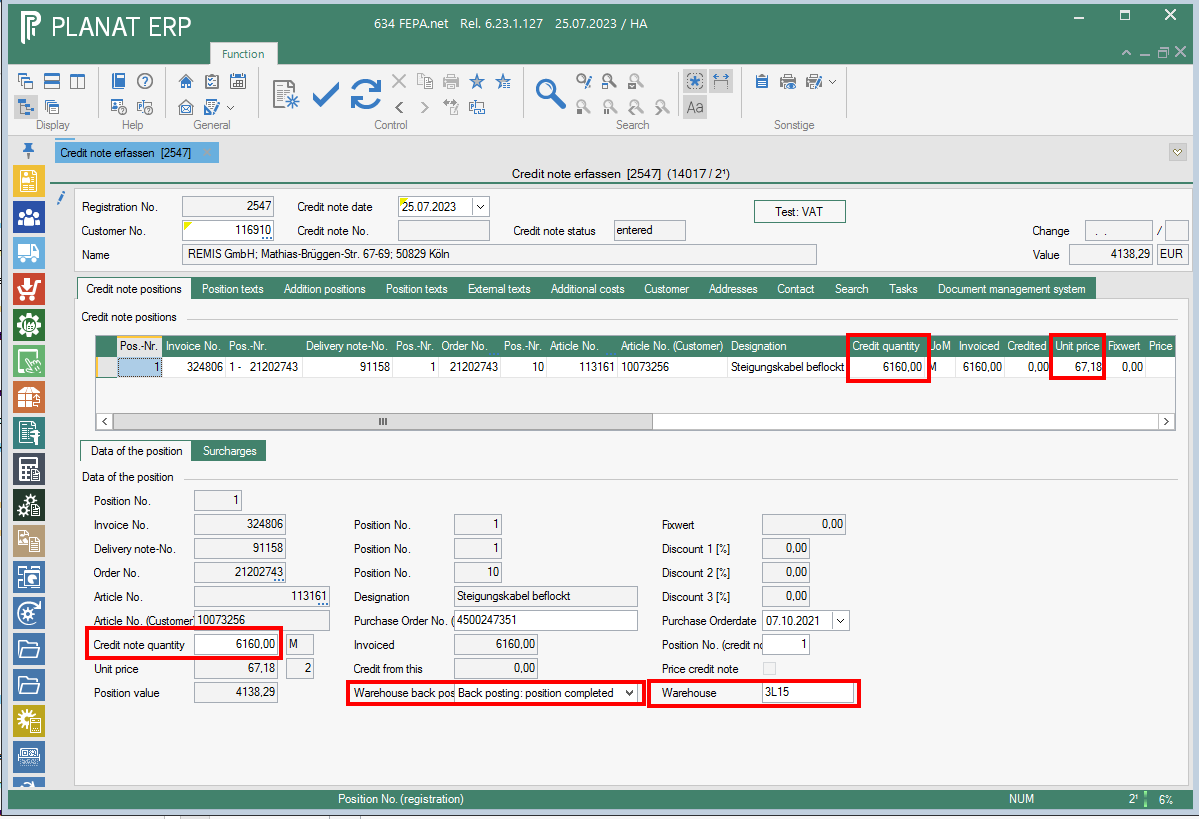
- Check quantity and price - The "price" is the difference from the calculated price to be credited.
- If a quantity is credited back, select in the item and the warehouse at yes, If it is a value credit the check mark is set at price credit.

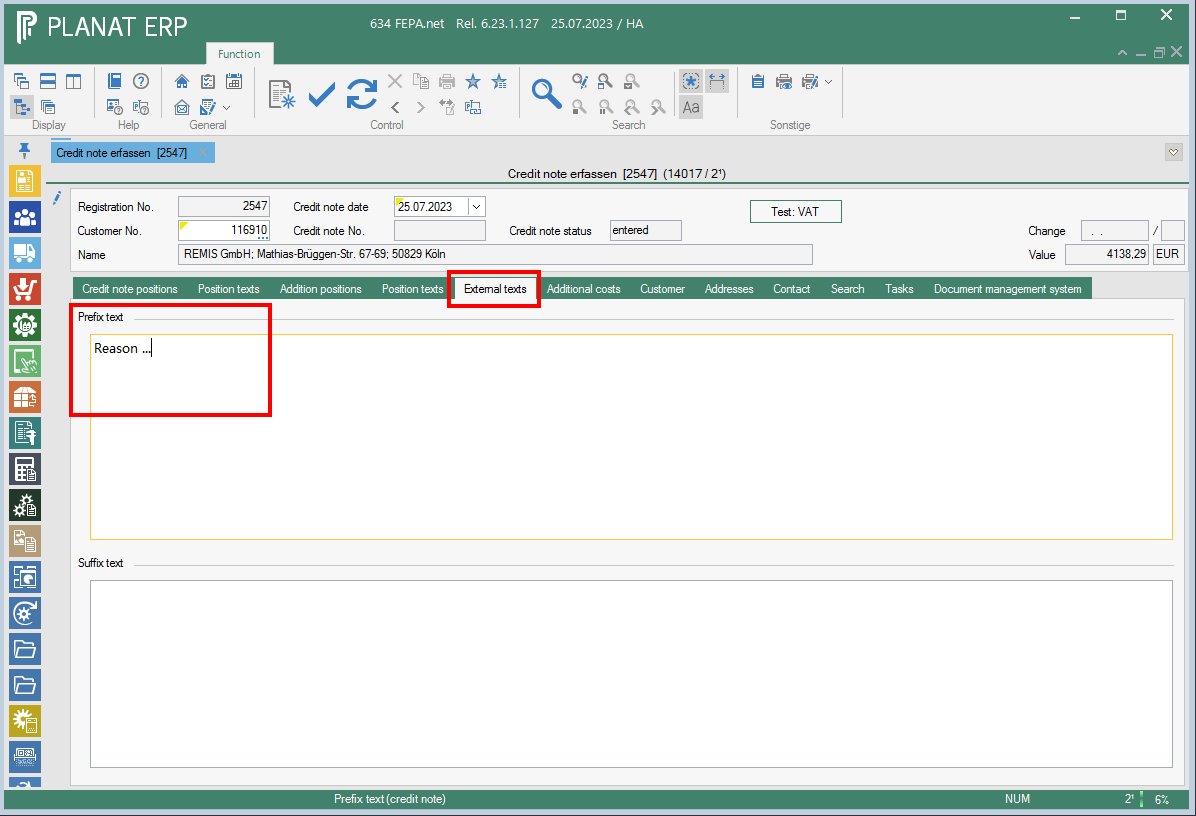
- In the external texts tab you can enter information, e.g. refer to the correspondence that leads to the credit note. It is also printed out.

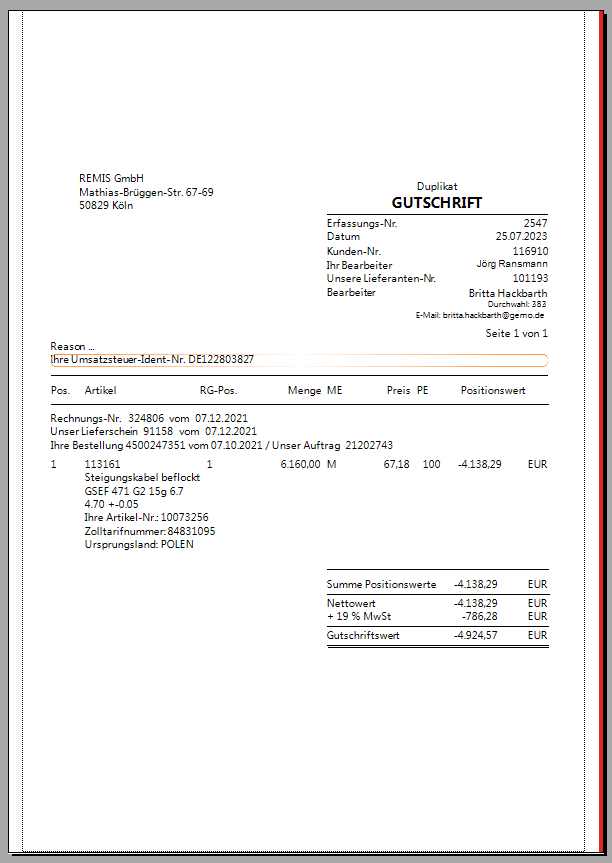
- Create print preview, check credit note for correctness


- If everthing is correct, "print and process" the credit note

Cancel Credit note
Attention: Credit notes from the previous year cannot be cancelled. The year change in FEPA takes place on 01.01. of each year. Whether a credit note may be cancelled over the turn of the month depends on the regulations at the location.
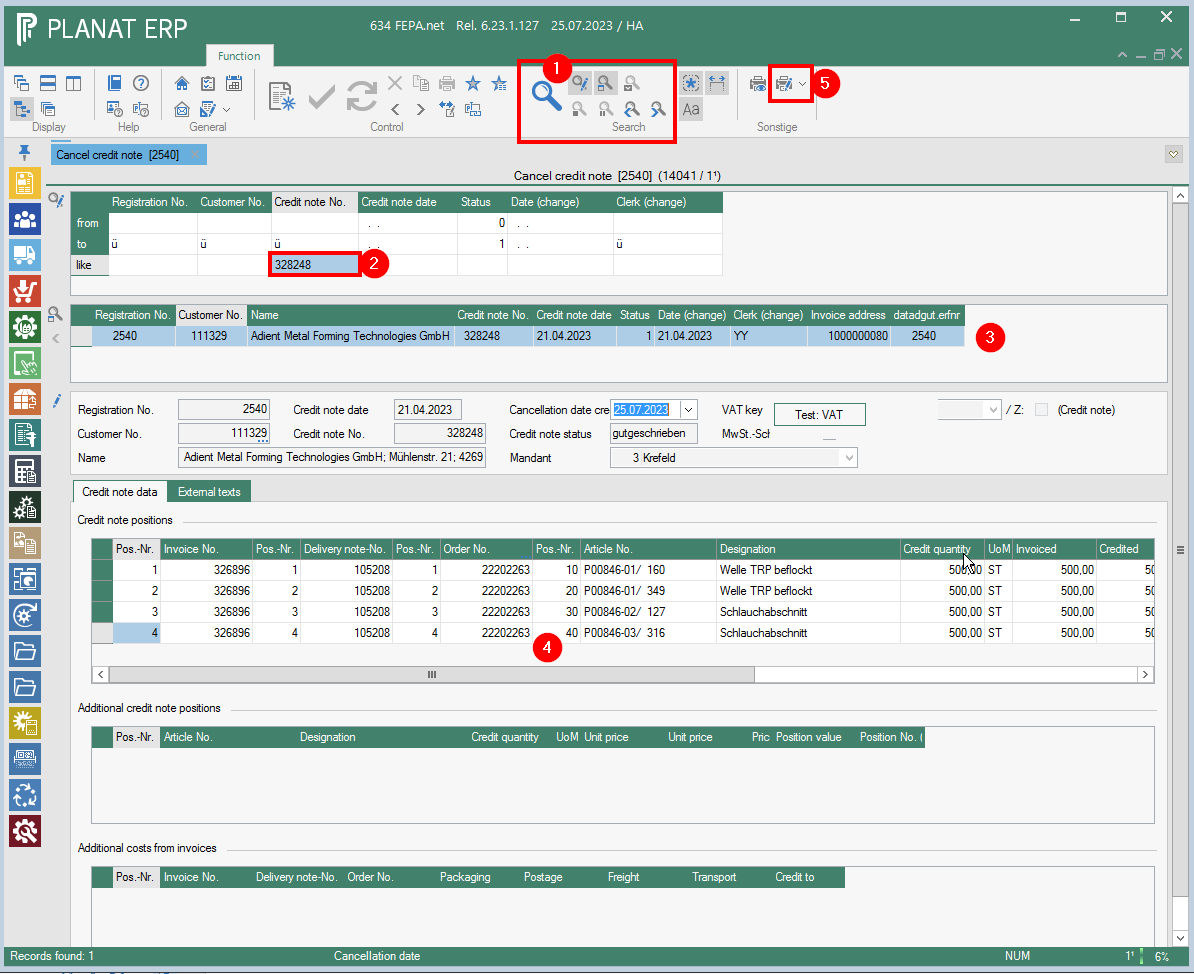
FEPA function: Sales > Customer documents > Credit note > Cancel credit note
- Open search (magnifying glass with pen)
- Enter the desired credit note number in the search field at like, press the magnifying glass.
- Select the desired credit note (double-click), credit note is loaded
- check for correctness. (a print preview is possible!)
- Press the button for printing and processing to cancel the credit note, cancellation credit note is printed out.

Forwarding order
General
Delivery notes will only be proposed in the function Arrange Shipment if the checkmark for Generate Shipment was set in the tab Print of the delivery note when processing the delivery note.
There is also a setting option for this on the customer, in which case the tick is pre-assigned.
Create forwarding order
FEPA function: Sales > Customer documents > Shipping documents > Arrange shipment
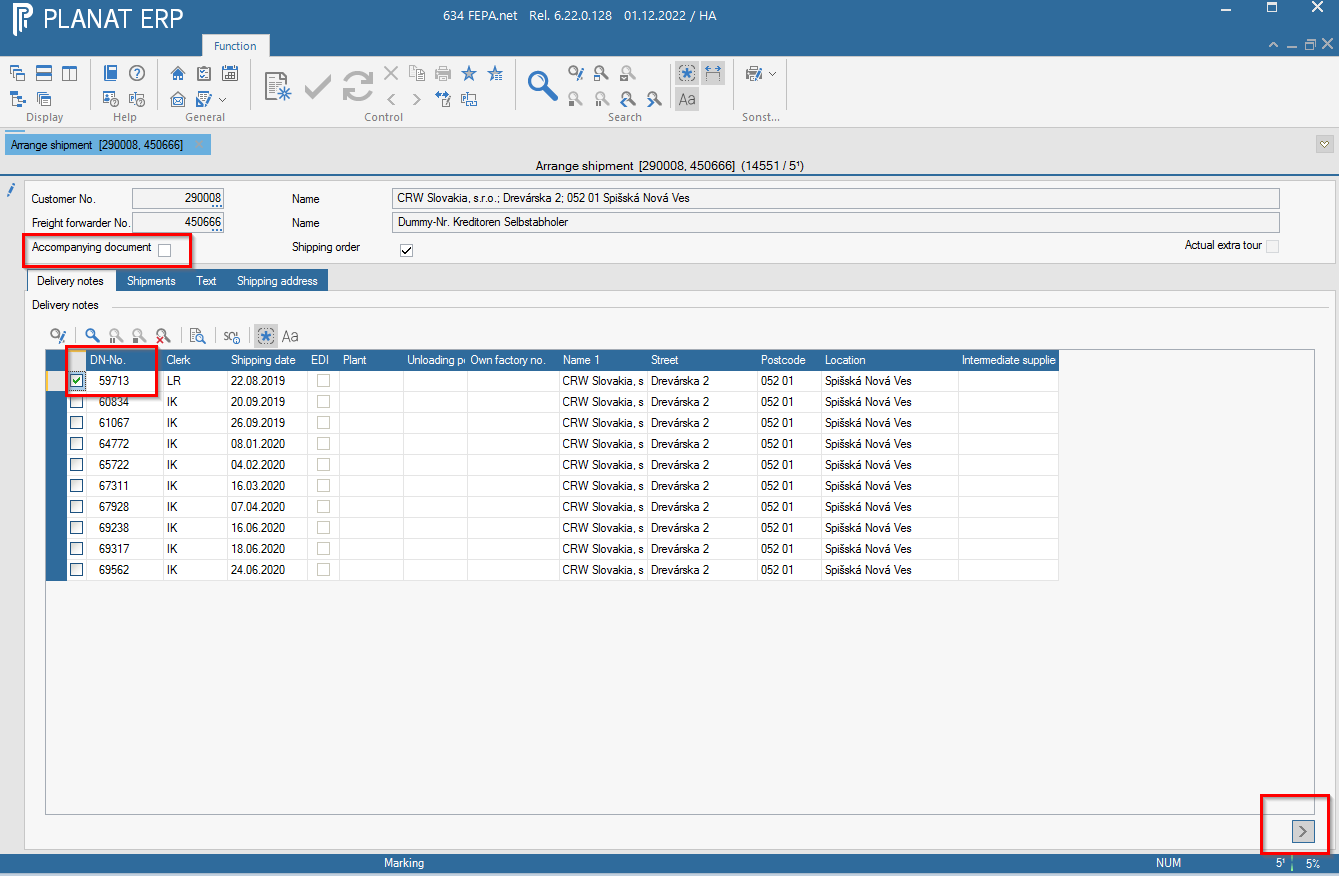
- enter customer number and Enter (forwarder no. appears)
- Press the magnifying glass in the tab Delivery notes. Select the desired delivery notes (There are possibible as much as you want.).
- uncheck the goods accompanying document (will then not be printed)
- Then click on the ">" button at the bottom right (items are transferred to the Shipments tab).
Note: the search in the delivery note tab is preset with the main mandant.

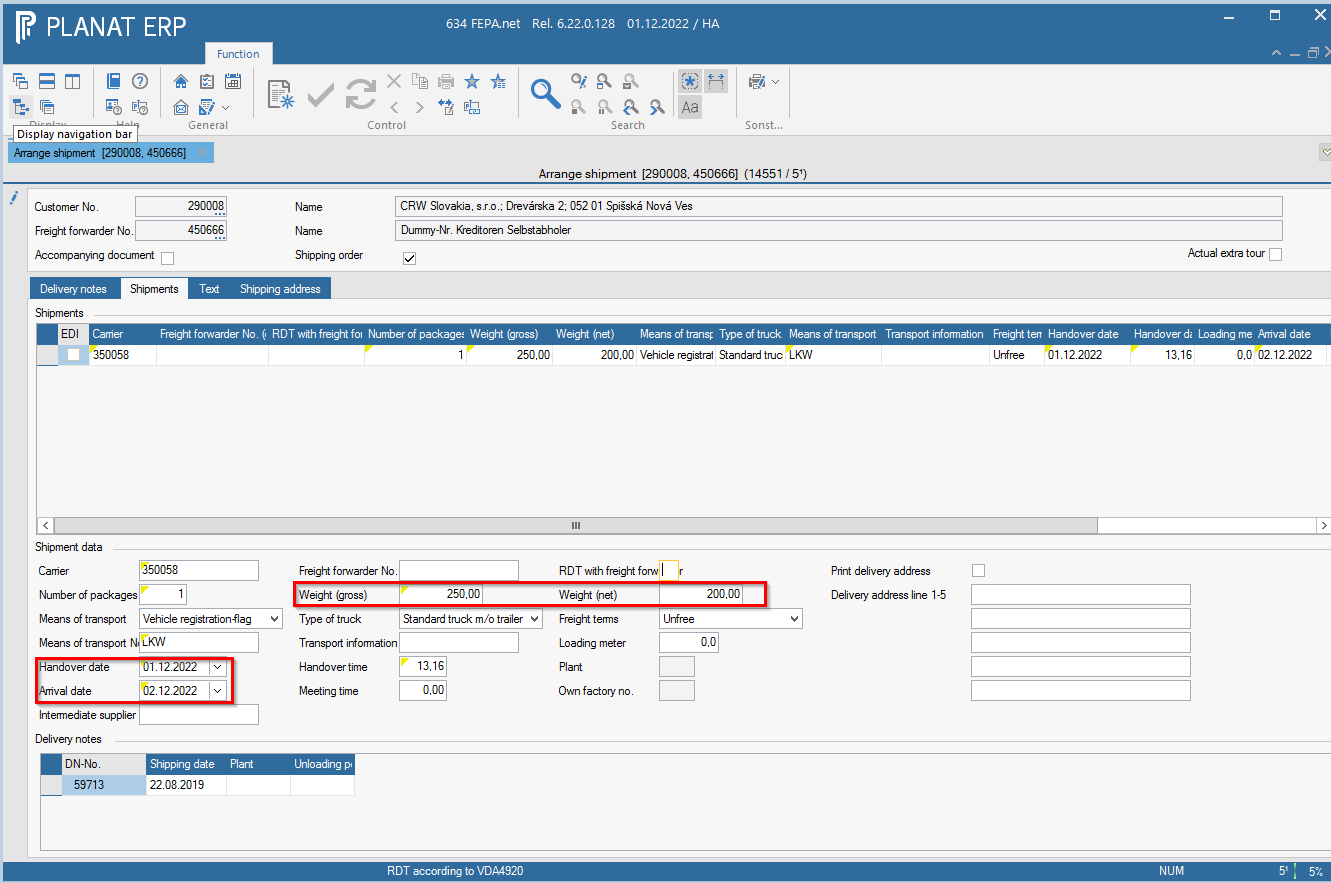
- enter gross and net weight in the shippments tab
- change the date of delivery and the date of arrival (also empty mandatory fields)

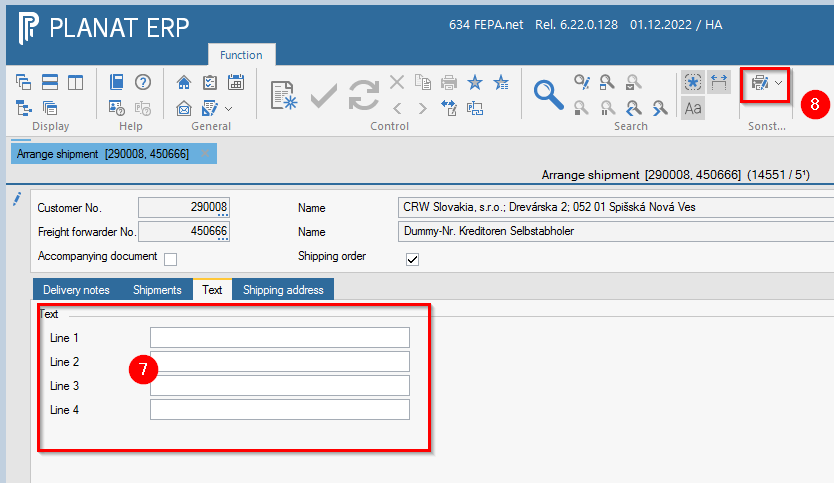
- enter the invoice number and, if applicable, ABD, CMR, etc. in the Texts tab. There is also space here for information for the forwarder.
- Click on the print button and the forwarding order will be created and printed.

Create EDI forwarding order
FEPA Function: Sales > Customer Documents > Shipping Documents > Arrange Shipments
- See help Create forwarding order (not EDI).
- proceed in the same way as described there, weight is determined from the delivery notes, Fepa automatically pulls if all weights were stored in the master data!
Attention carrier field - Please do not enter any special characters here. Only characters from 0-9 and Latin letters A-Z are permitted in VDA 4913. Language-related special characters lead to errors in the VDA file and thus in the ASN!
Send remote data transmission to the customer (ASN)
The basis for this is that the forwarding order has been created and the sales department has specified that the customer receives our data via remote data transmission (also known as ASN for short).
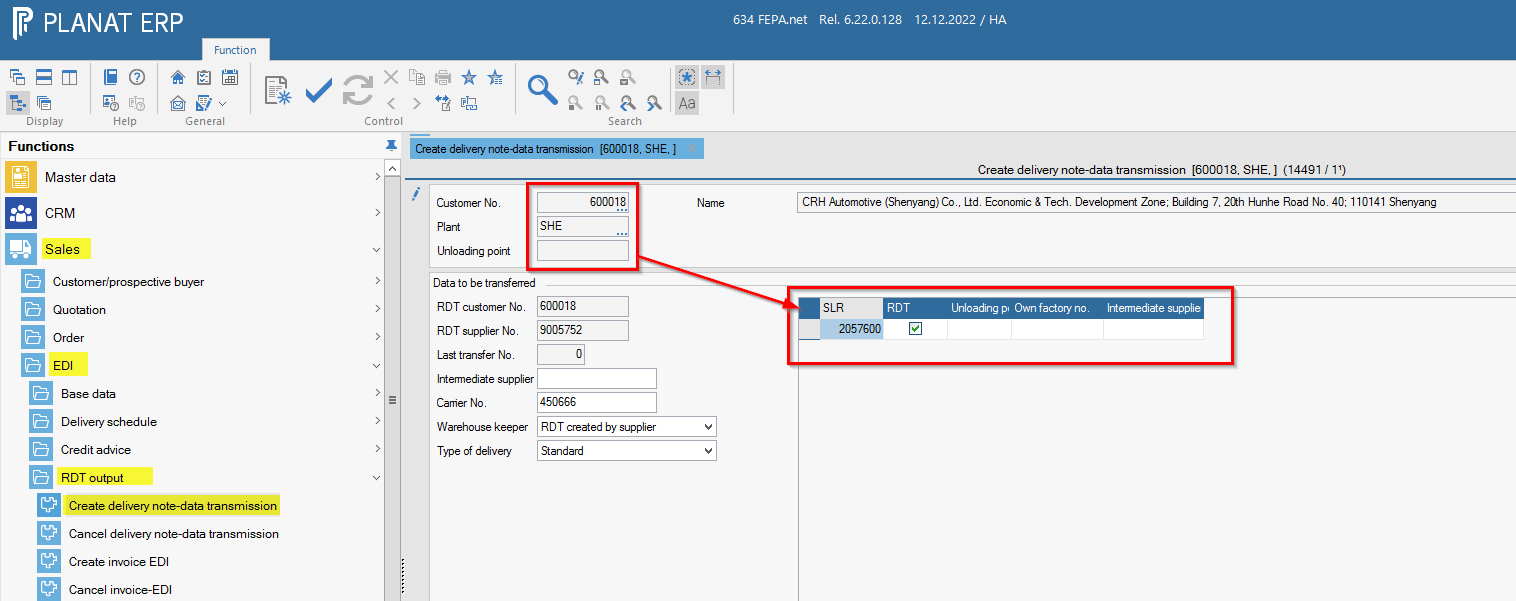
FEPA function: Sales > EDI > EDI output > Create delivery note-data transmission
- enter customer number, plant and unloading point (see also delivery note above right)
- then enter and a list of the data to be sent (= shipments) for the selected combination "customer - plant - unloading point" appears.

- Select the desired forwarding order (several together are also possible).

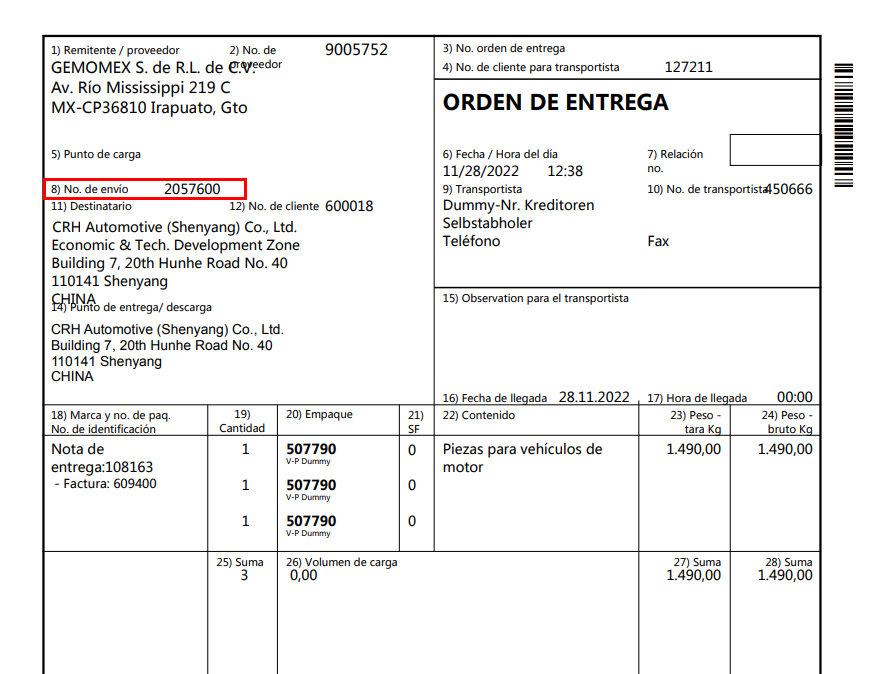
If you are not sure which one it was, you can compare the SLB number (consignment reference number) (this appears on the forwarding order, see image behind 8) above the customer address).
Here is an example:
- Then click on the tick in the tool bar. This creates the file for the ASN and within an hour it goes to the EDI server and is sent to the customer.


Attention:
Shipped forwarding orders can no longer be changed afterwards.
If, for whatever reason, the ASN has to be cancelled in order to change the shipment, the customer must always be informed!
Loading equipment and loading units
General
Loading equipment and loading units are always articles in FEPA and are represented by their own article number. For more information on the printing of goods tags, see article Goods tags (labels).
Loading equipment
Loading equipment is an article that represents specific packaging equipment in FEPA. For example, a specific carton or a Euro pallet.
Here are a few examples of loading equipment:


To mark an article as such a loading equipment, the article must be called up in FEPA in the programme Master data > Article > Edit articlesand then marked as such. Only after this marking is the article available as loading equipment in all other FEPA programmes and functions:
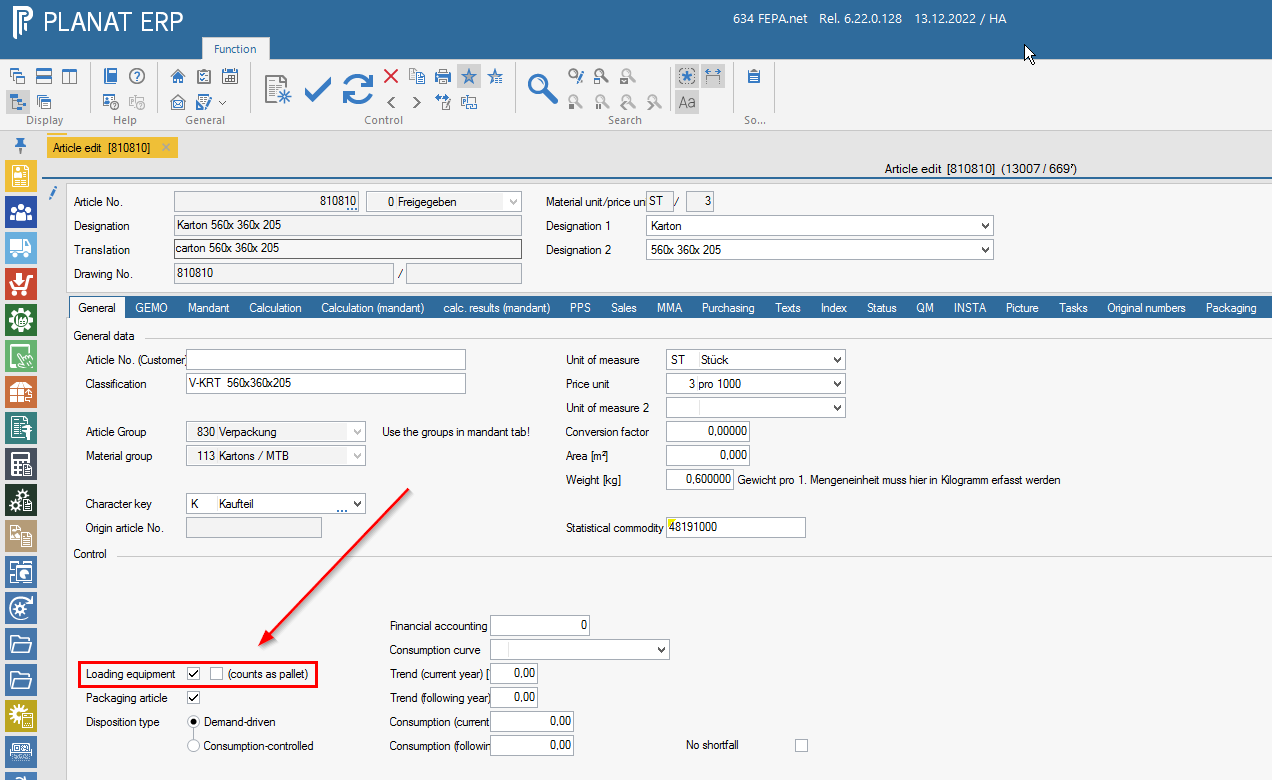
The tick "counts as pallet" only has an effect on the printing of the forwarding order. In the document all loading equipment is listed with the items they contain. Only if the tick is set, the text for the forwarding order item appears.
If the item has been marked as loading equipment, further settings for a loading equipment can be made in the programme Master data > Loading equipment > Edit loading equipment:
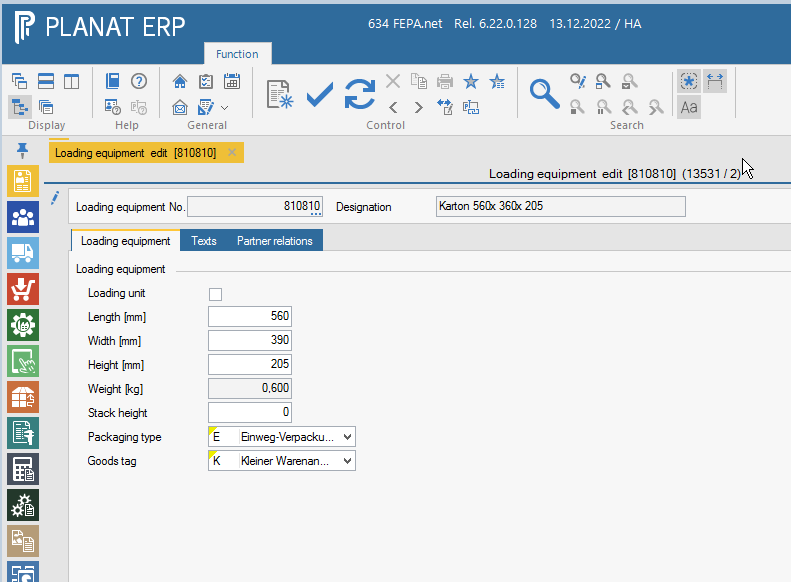
Here are a few explanations of the settings:
- Loading unit:
Marks the loading equipment as a loading unit. Directly after marking, another table appears in the same programme with which the details of the loading unit can be configured. - Length [mm], Width [mm], Height [mm]:
Indicates the dimensions of the loading equipment in the unit millimetres. Has no effect in FEPA and is for information only. - Weight [kg]:
This is the same field as in the article master and can therefore not be edited here. To change the weight, it must be adjusted in the item master (seeMaster data > Article > Edit articles). The weight is used to calculate the gross & net weight of the consignment. - Stack Height:
A purely informative field which indicates the maximum stacking height for loading equipment. You can display the field as information in some functions. - Packing type:
Here you have the option to mark the loading equipment as one-way or reusable packaging. If set as one-way packaging, the item will be consumed (ergo debited) when used in the delivery note. If reusable packaging is selected, the loading equipment is not consumed but transferred to a partner's warehouse (customer, supplier, forwarder) (in this case via posting of issue/consumption to GEMO warehouse and receipt to partner warehouse). The behaviour with reusable packaging can be set even more precisely in the "Partner relations" tab. - Goods tag:
Here you have the option of influencing the printing of the goods tag.
Loading units
Loading units are loading equipment that has been marked as a loading unit in the loading equipment master data (Master data > Loading equipment > Edit loading equipment). These loading units represent a group of several loading equipment and are intended to simplify their handling. You could also say that the complete combination of pallet, cartons, layer pads, cover boards / lids and outer cartons represents a loading unit.
Loading units themselves should not be inventory-managed (Master data > Article > Edit articles, field "MMA-managed") because their components are already booked in the warehouse. For the same reason, loading units should not be assigned their own price and weight.
Here are a few examples of loading units:
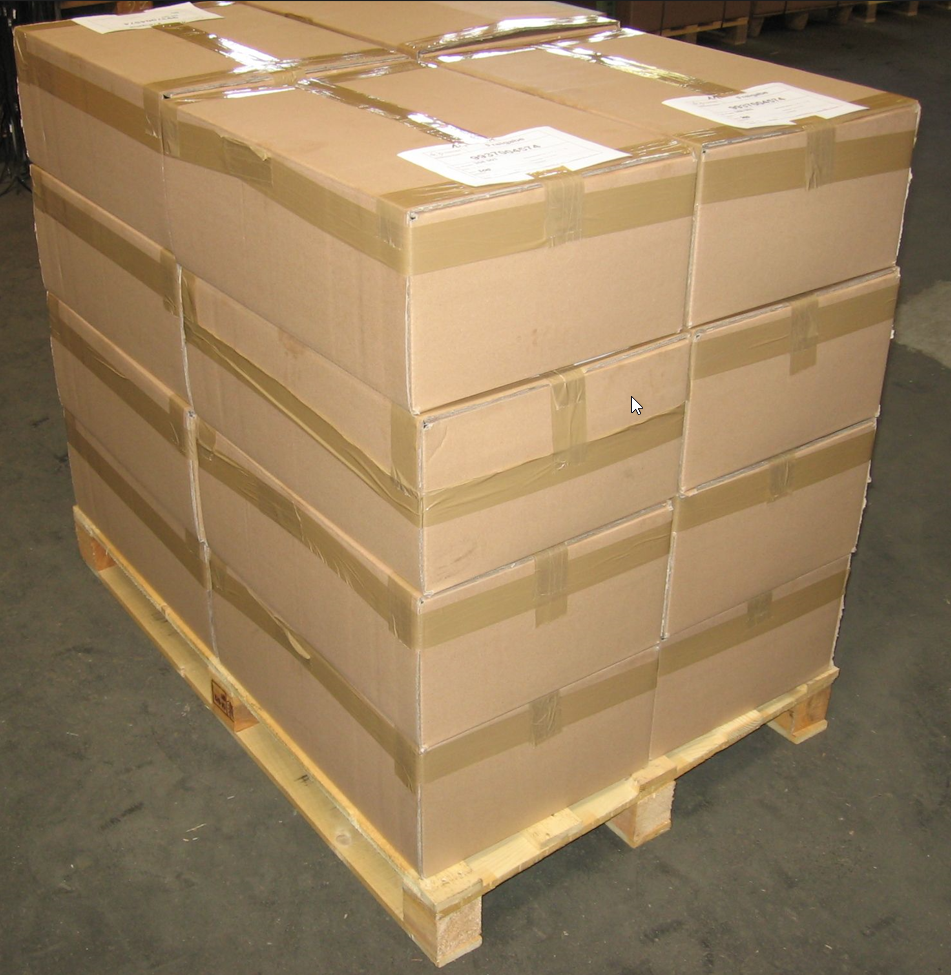
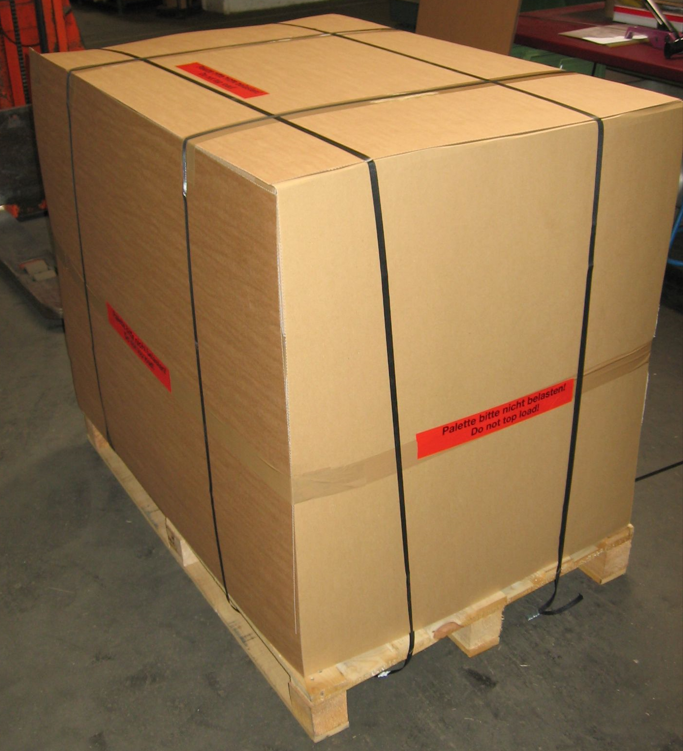
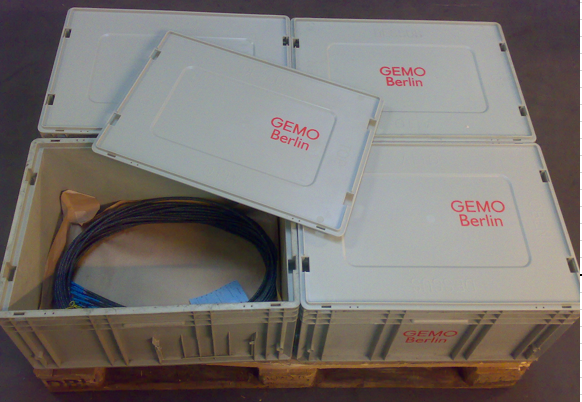
In the programme Master data > Loading equipment > Edit loading equipment a loading equipment can be marked as a loading unit by ticking the box "Loading unit" [1]. A new table appears in which the details of the new loading unit can be configured [2].
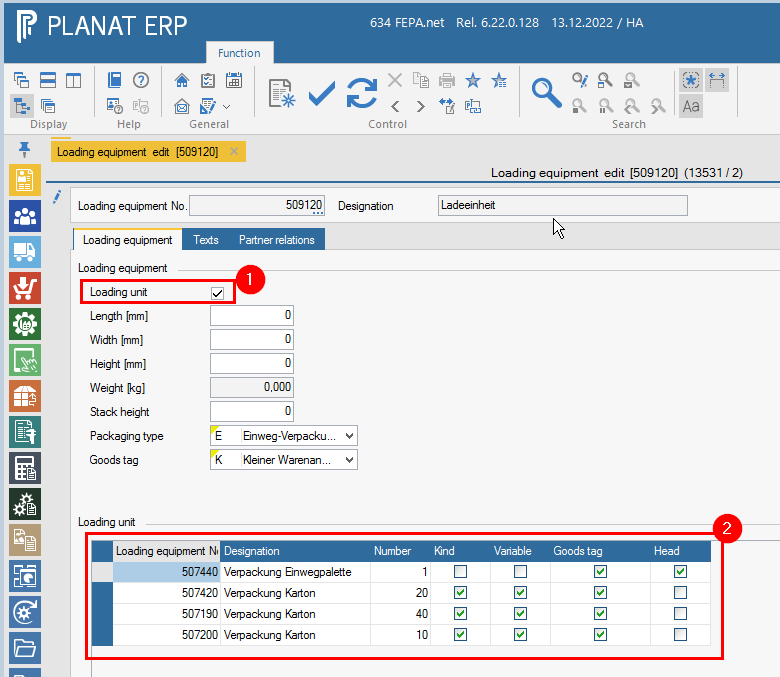
Explanation of the above screenshot:
You can see that this loading unit must always consist of at least one pallet 507440 as this is the only loading equipment that has not been marked as variable. The other loading equipment is all marked as variable and therefore optional. However, these boxes contain the goods to be shipped, i.e. the actual articles (column "Kind"). In this case it is therefore possible to use three different cartons for this loading unit. Due to the different sizes of the individual cartons, they all have a different maximum number. A goods label is to be printed for each of these loading equipment, but the so-called master label for the pallet.
Goods tag (labels)
General
FEPA has the possibility to print goods tags based on the loading equipment used (see also article Loading equipment and loading units). Printing then starts together with the printing of the delivery note. This applies to both EDI delivery notes and non-EDI delivery notes.
Conditions for printing
In order for goods tags to be printed at all, a few precautions must be taken in the delivery note, but these can be automated.
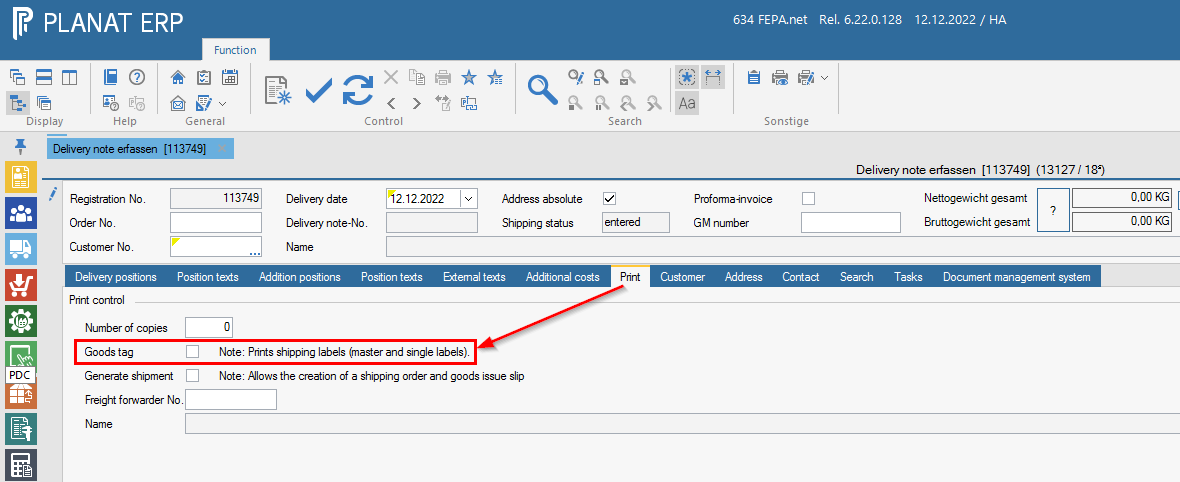
Tab "Print"
In the function Edit delivery note or Edit EDI delivery note there is the tab Print with the option Goods tags. Only if this option is selected will the goods tags be printed together with the delivery note.
Tab Delivery positions
In the function Edit delivery note or Edit EDI delivery note there is the tab Delivery positions. All items to be delivered that have a connection to a customer order are displayed here in table form. For non-EDI delivery notes, there is also the option to enter additional positions, but there is no option to print goods tags for these.
Regardless of the type of delivery note, there is an area with additional tabs below the table with the items to be delivered. These are always dependent on the currently selected delivery note item. To create goods tags, the loading equipment to be used must be entered in the Loading equipment tab. The corresponding table only appears when the Enter loading equipment check mark has been activated.
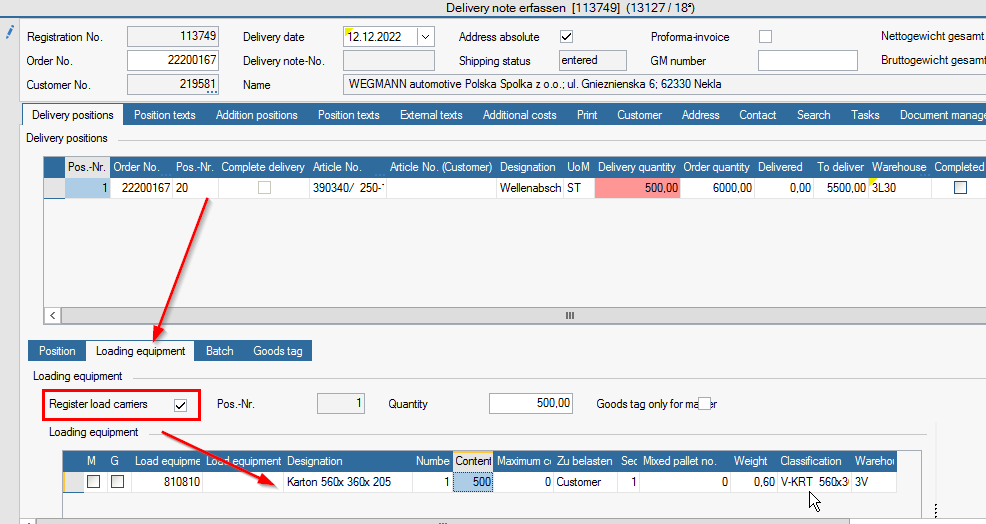
In the screenshot above, you can see the two columns M and G in the loading equipment positions which identify the position as Master, G=Mixed or Single (if neither M nor G is selected). In the following, a Master label, (G=)mixed label or single label is printed accordingly.
It is important to enter the loading equipment in order or to keep an eye on the column "Sequence". All single-label positions always belong to the "previously entered" master-label position. For mixed labels the column "Mixed pallet no." is decisive for the affiliation.
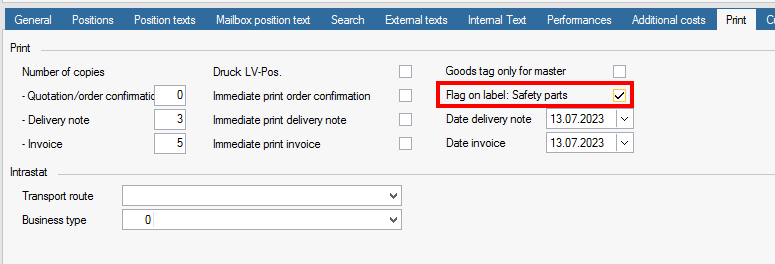
Sales order tab Print
The default setting of the labels for the variant with the "Safety parts" indicator (circle with triangle, "Special features") can be found in the Edit sales order in the Print tab.
Types of goods tags
FEPA recognises several types of tags which are briefly explained below:
- Master
This is usually the goods tag that is printed once per pallet and informs about the entire contents of the pallet. All the goods on the pallet must be of the same article. If it is a pallet with mixed goods, tick "G" (stands for "Mixed") in the loading equipment position and the goods tag "Mixed pallet" is used. - Mixed pallet
Is always printed if the tick in the column "G" is ticked in the loading equipment positions. See also "Master". - Single (small)
The "Single" goods tag is printed per package, usually per box (or loading equipment) containing the actual goods. The "Single" goods tag is available in a large and small version, but we actually only use the "Single (small)". - Single
See also "Single (small)". - Load unit
Goods tags for loading units are only printed if a loading unit is selected in the delivery note item AND in the customer-work relation, in the "Control" tab, no tick has been set in the "Dissolve LE" field (stands for "Dissolve loading unit").
Over time, there has been a need to print these different tags with a different appearance, depending on the agreement with the customer. These agreements are very often based on one of the many standards from the automotive industry, supplemented by various customer requests. The automotive standards VDA or AIAG are common.
So there are several different designs for the goods tags, depending on the standard agreed with the customer. The following table is intended to provide information about this.
The following section contains two different tables. One for goods tags from EDI transactions and the second for goods tags from non-EDI transactions.
The numbers in the cells correspond to FEPA internal document numbers for IT to help locate the labels in case of questions. If a value is missing from the cell, then the standard goods tag (first line) is always printed.
| --- | Master | Mixed | Single | Single (klein) | Loading unit |
| Standard | No. 8044 | No. 8047 | No. 8050 | No. 8053 | No. 8041 |
| VDAv1 | No. 8169 | No. 8515 | No. 8189 / 8190 | ||
| VDAv2 | No. 8173 | No. 8518 | No. 8197 / 8198 | ||
| AIAGv1 | No. 8170 | No. 8516 | No. 8191 / 8192 | ||
| AIAGv2 | No. 8171 | No. 8517 | No. 8193 / 8194 | ||
| CamSlide | No. 8172 | No. 8195 / 8196 |
| --- | Master | Mixed | Single | Single (klein) | Loading unit |
| Standard | No. 8043 | No. 8046 | No. 8049 | No. 8052 | No. 8040 |
| VDAv1 | |||||
| VDAv2 | |||||
| AIAGv1 | |||||
| AIAGv2 | |||||
| CamSlide |
Configuration of the types of goods tags
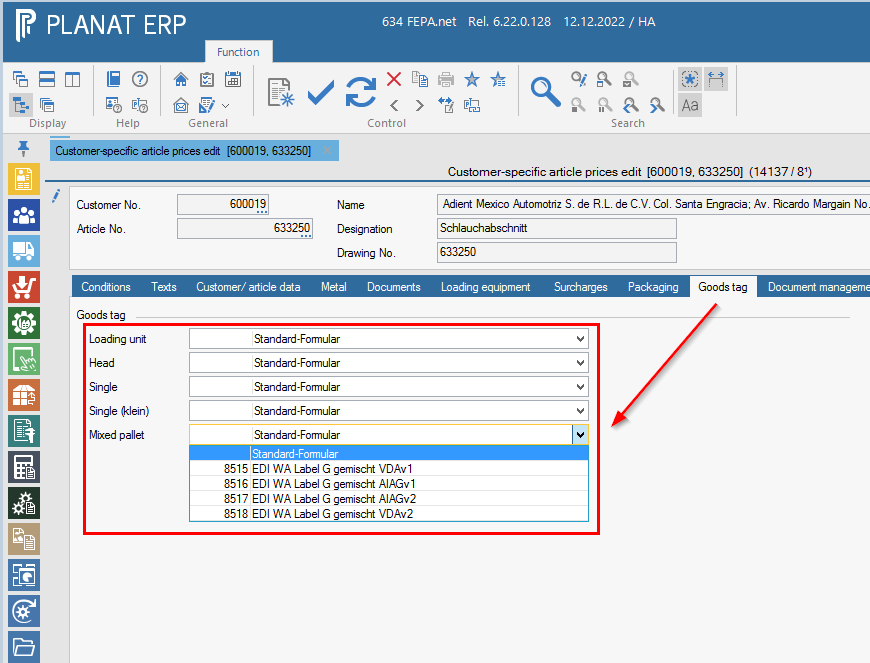
The selection whether the design "Standard" or the design "AIAGv2" is to be printed for a master goods tag is made in the delivery note itself, see the following screenshot:
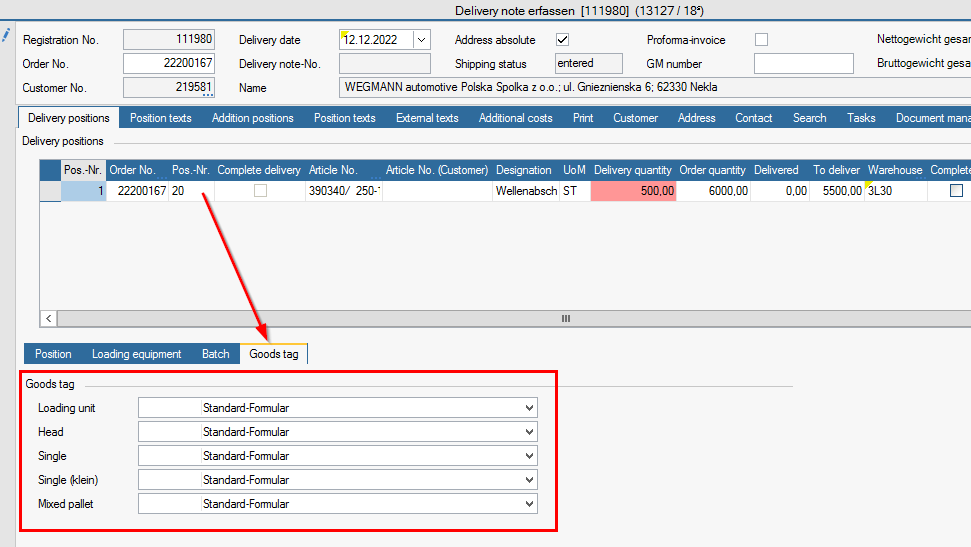
In the case of an EDI delivery note, this setting is loaded from the associated EDI sales order when a new one is created and can thus be preassigned there. The EDI sales order in turn loads the data from the customer conditions when a new order is created (see function Sales > Customer conditions > Edit customer-specific item prices).
In the case of a non-EDI delivery note, the data cannot be stored in the sales order, but can be stored in the customer conditions in order to be preassigned when a new delivery note is created.
Sample goods tags
The following is the section with examples of the different commodity tag designs possible in FEPA.
Non-EDI
Master
Non-EDI, goods tag master, standard: 8043

Mixed
Non-EDI, goods tag mixed, standard: 8046

Single
Non-EDI, goods tag single, standard: 8049

Single (small)
Non-EDI, goods tag single, standard: 8052

EDI
Loading unit
EDI, goods tag, Loading unit: 8041

Master
EDI, goods tag master, standard: 8044
Variant without "safety parts" label (circle with triangle, "special features")

Variant with "safety parts" label (circle with triangle, "special features")
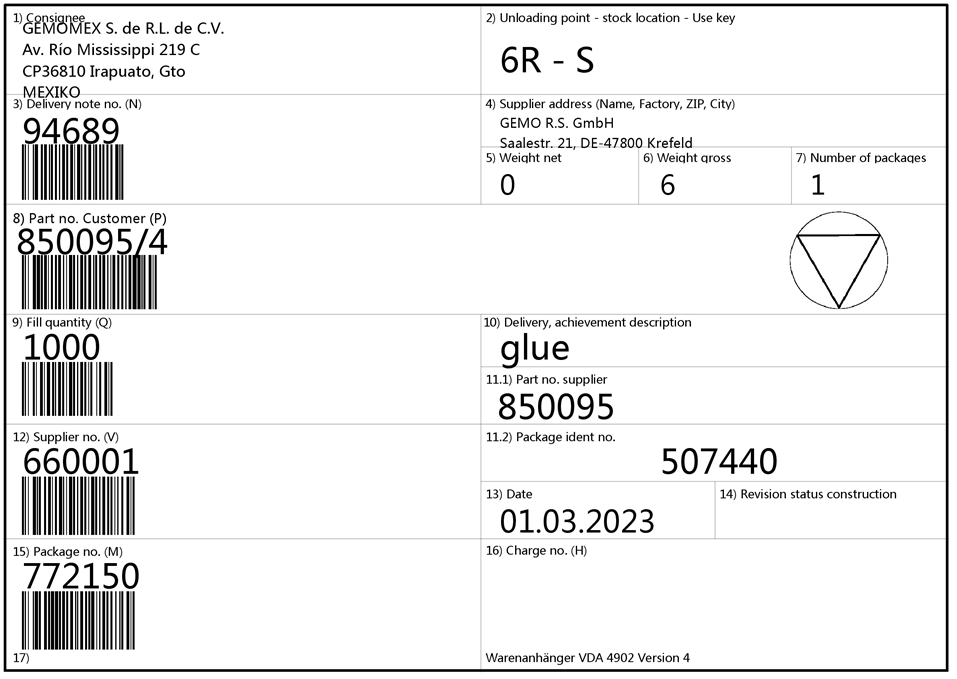
EDI, goods tag, master VDAv1: 8169
Variant without "safety parts" label (circle with triangle, "special features")

Variant with "safety parts" label (circle with triangle, "special features")
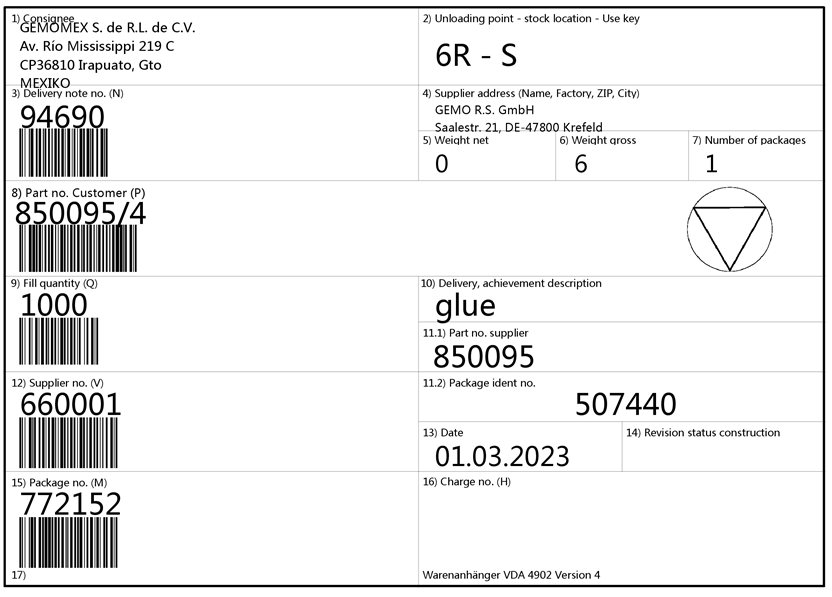
EDI, goods tag, master VDAv2: 8173
Variant without "safety parts" label (circle with triangle, "special features")

Variant with "safety parts" label (circle with triangle, "special features")
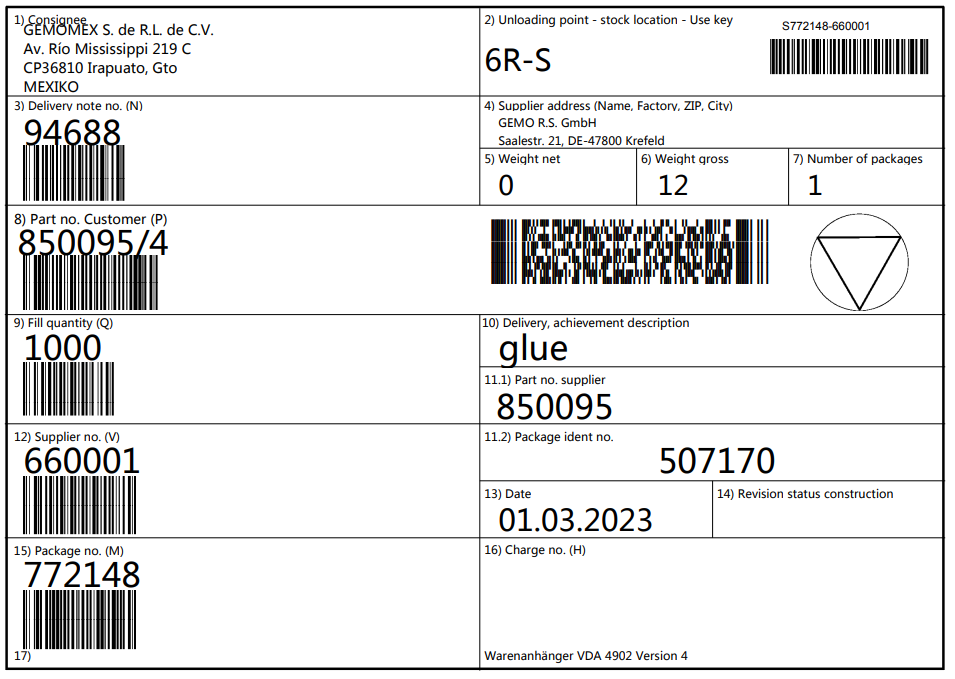
EDI, goods tag, master AIAGv1: 8170

EDI, goods tag, master AIAGv2: 8171

EDI, goods tag, master, CamSlide: 8172

Single
EDI goods tag Single, Standard: 8050

Single (small)
Normally, the product labels of the type "Single (small)" are printed on A4 paper. Usually, three tags fit on one page. However, there are some "Single (small)" tags with an additional "_Single" at the end of the name. The contents of these tags are the same as those without such an appendix, but they are designed for printing on special label printers so that each tag is printed individually.
EDI, goods tag single (small), standard: 8053
Variant without "safety parts" label (circle with triangle, "special features")

Variant with "safety parts" label (circle with triangle, "special features")
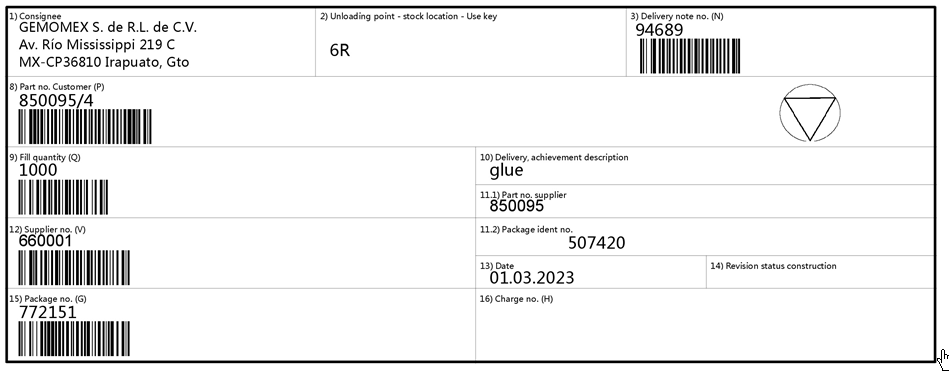
EDI, goods tag single (small), VDAv1: 8189 / 8190
Variant without "safety parts" label (circle with triangle, "special features")

Variant with "safety parts" label (circle with triangle, "special features")
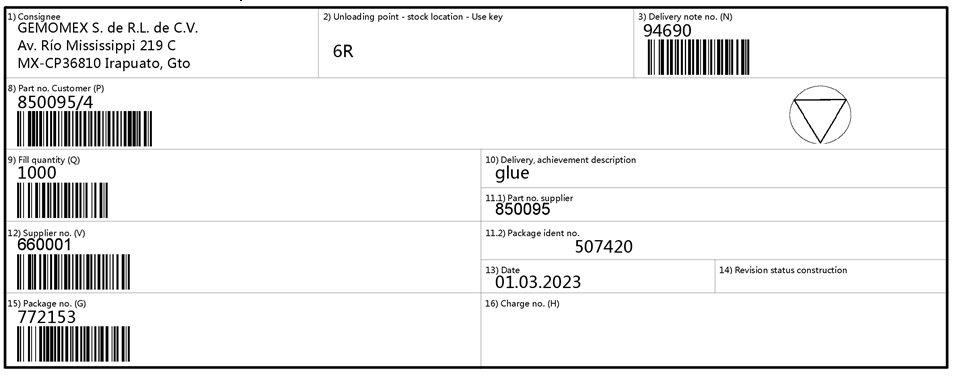
EDI, goods tag single (small), VDAv2: 8197 / 8198
Variant without "safety parts" label (circle with triangle, "special features")

Variant with "safety parts" label (circle with triangle, "special features")
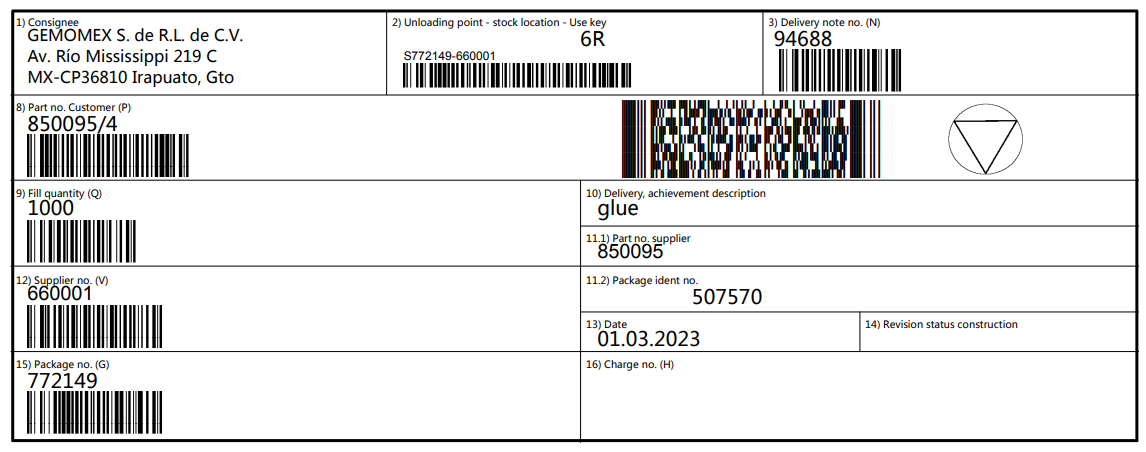
EDI, goods tag single (small), AIAGv1: 8191 / 8192

EDI, goods tag single (small), AIAGv2: 8193 / 8194

EDI, goods tag single (small), CamSlide: 8195 / 8196

Mixed
EDI, goods tag mixed, standard: 8047

EDI, goods tag mixed, VDAv1: 8515

EDI, goods tag mixed, VDAv2: 8518

EDI, goods tag mixed, AIAGv1: 8516

EDI, goods tag mixed, AIAGv2: 8517

Confirmation of entry
Create an entry confirmation
FEPA Function: Sales > Reporting > Collective receipt confirmation
All confirmation of entry requests are output in the selection area. These entry confirmations are generated when calling up delivery notes for customers with the identifier collective receipt confirmation(periodic, on demand) (Setting in Edit customer)
- All customers? then no entries
- Delivery date, check, adjust if necessary
- Check client, adjust if necessary
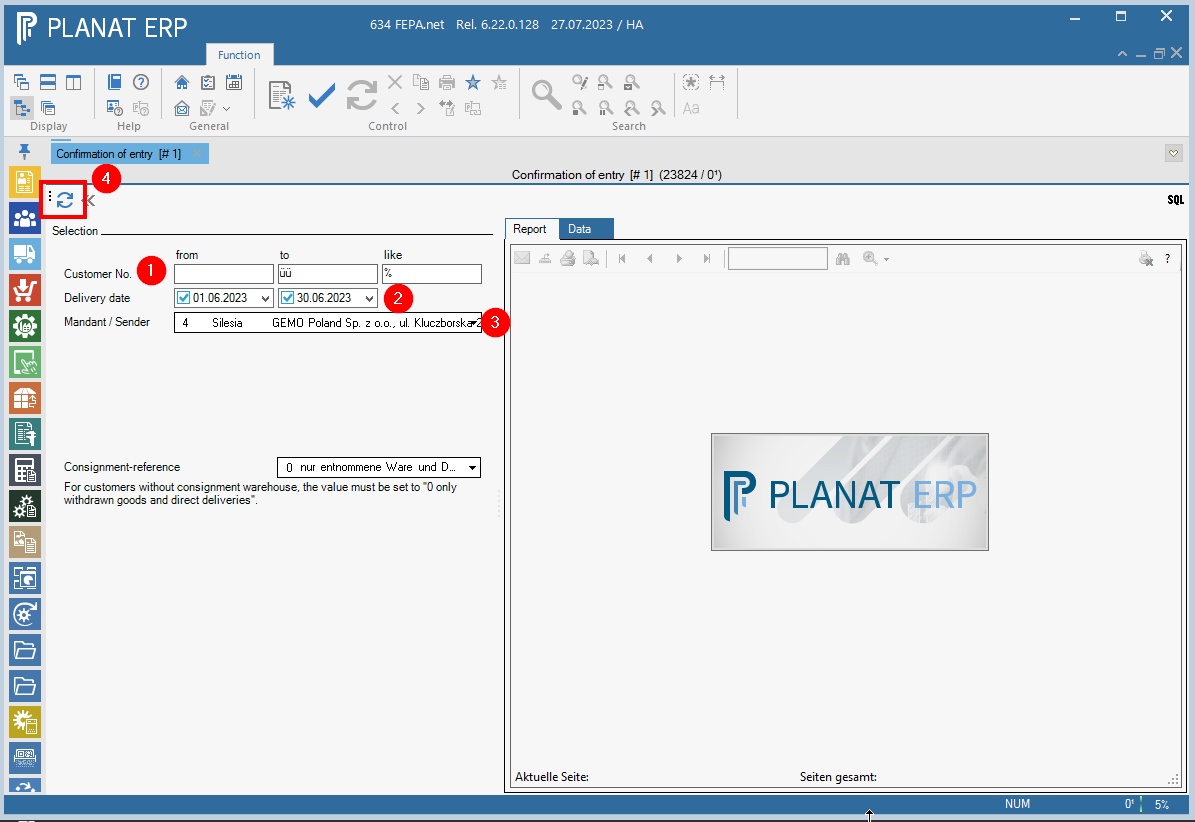
Check created documents + attachments which Confirmation of entry are missing, then print and send to customers. When exporting, a PDF is created for all documents.
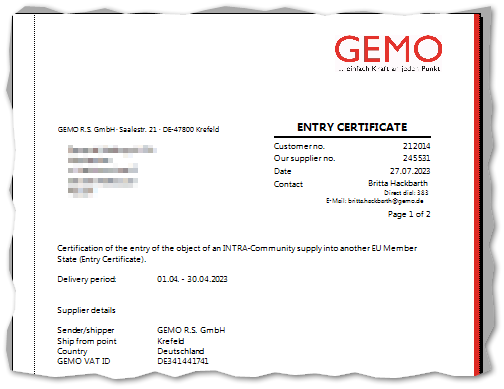
If the Confirmation of entry is to be sent immediately as an email, the Confirmation of entry should be created individually for each customer. Then the email function above the document can be used.
Entering confirmations of entry (GBS)
FEPA function: Sales > Customer documents > Confirmation of entry (GBS)
The purpose of the customer-specific adjustment "confirmation of entry" is to indicate that tax-exempt intra-community supplies from companies within the scope of the German VAT Act have actually arrived in the EU foreign country (cf. WIKIPEDIA - only German version).
For the given selection criteria, it can be noted on the delivery note that a confirmation of receipt has been received from the customer. In addition to the selection criteria, the pre-selection can be
- no confirmation of entry GBS
- confirmation of entry GBS or
- All
can be made. The selection of delivery note types can also be restricted.
Open search, here the delivery date Today (-180 days) is preset as a preselection as well as the main client of the clerk. Further search criteria can be entered. Then click on the magnifying glass and the delivery notes are displayed.
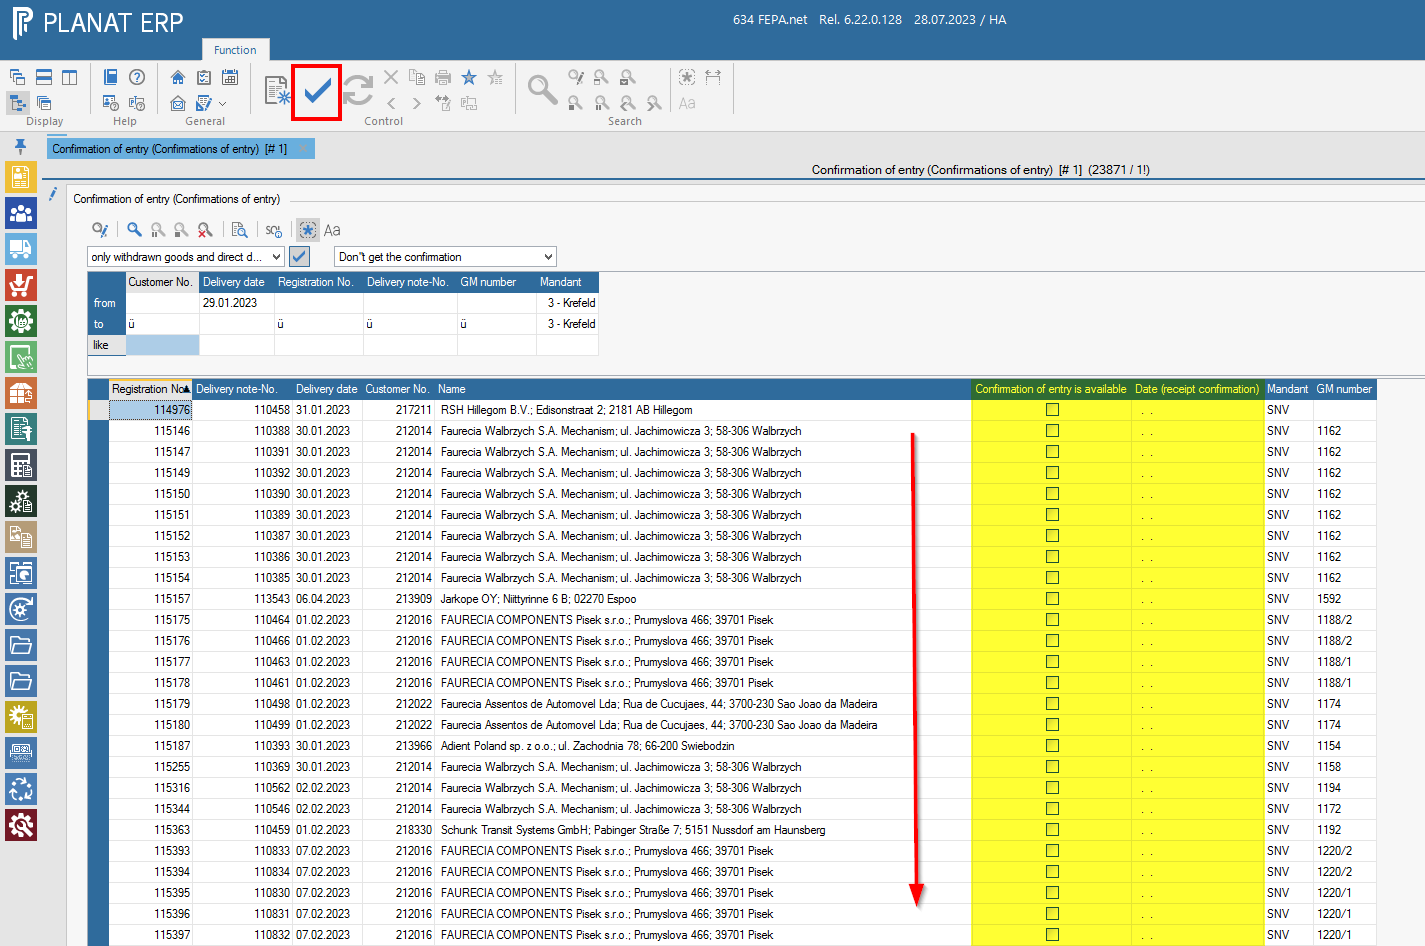
Now tick off the delivery note according to the confirmation of receipt, then today's date is automatically set, and when you have all of them, press the tick in the tool bar to save.
Outgoing invoice journal
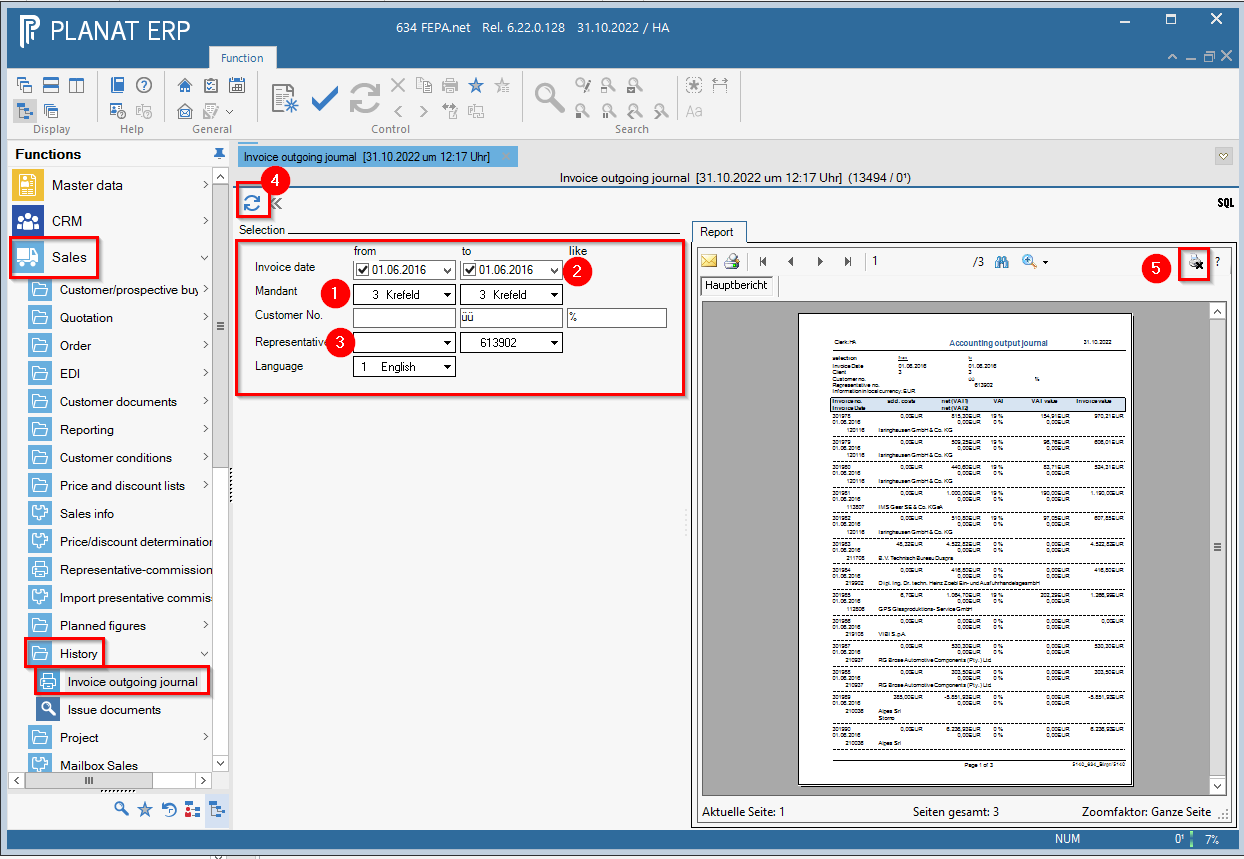
FEPA function: Sales > History > Invoice outgoing journal
1. check Mandant
2. if desired limit the period
3. leave representative no. empty
4. press the button Update and the outgoing journal will be created
Press the printer icon, the journal will be printed and the function will be closed.
Arrange shipping documents
There is a program developed by GEMO with which a user, based on FEPA consignments (See program "Arrange shipment"), can combine and send documents such as shipping documents, invoices and delivery bills in a new e-mail. In addition, further documents of the type "Shipping documents" can be imported into the FEPA DMS (Document Management System).
The program was created at the request of the shipping department in Krefeld, which were confronted with requirements of the carrier "Rauh". For the origin see also ticket #020128 (Link User / Admin).
Sales > Customer documents > Shipping documents > Arrange shipping documents
Starting
When the program has been opened, the client and period of the shipments to be searched for can be selected in the selection area. The period refers to the handover date of the shipment (also pickup date) and not to the delivery dates from the connected delivery notes. By clicking on the magnifying glass symbol "Refresh" the data are loaded and the selection area is hidden.
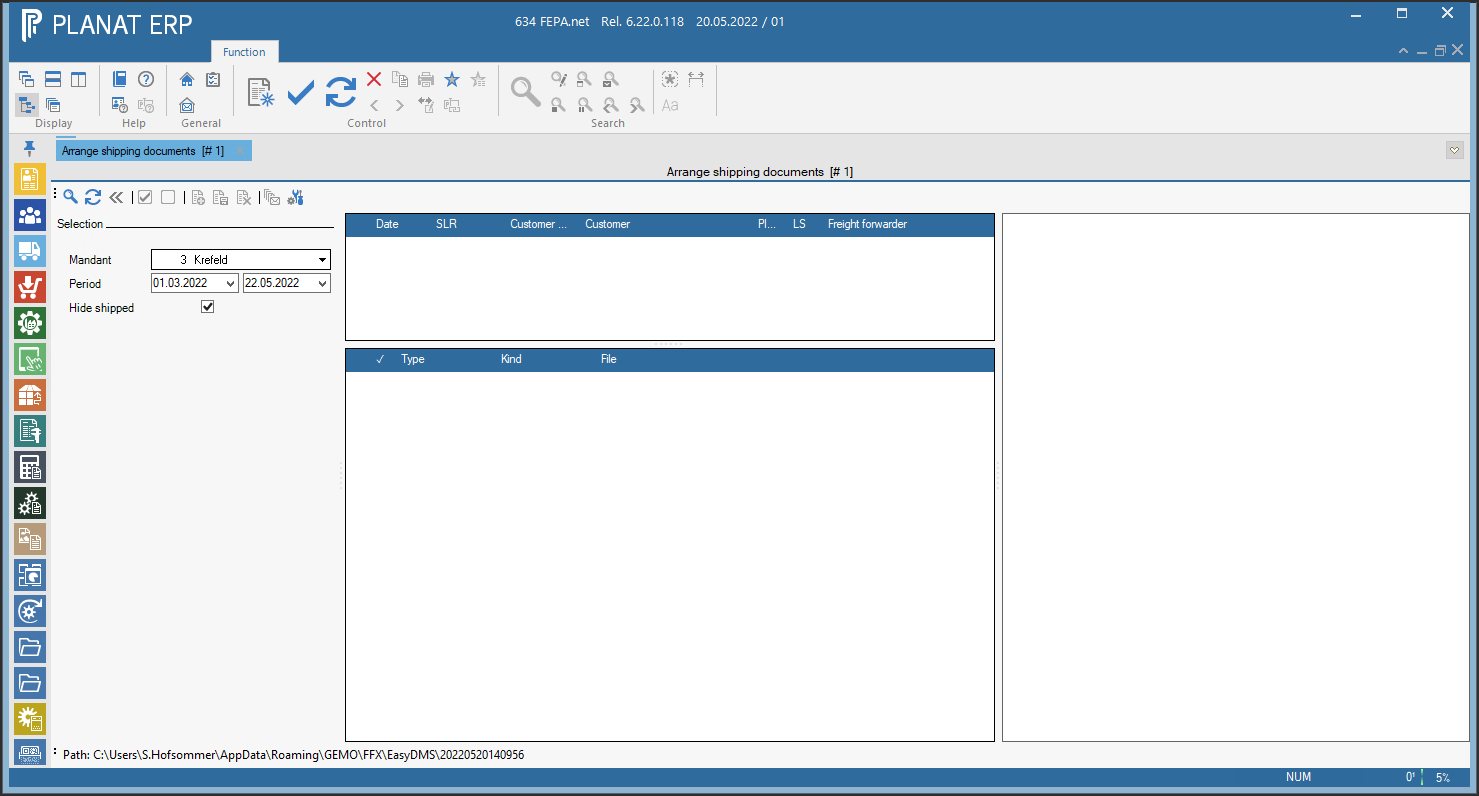
If the "Hide shipped" checkbox is ticked, shipments for which an e-mail has already been generated are no longer displayed. By unchecking the box, these can be made visible again.
Menu

|
No. |
Explanation of the function |
|
1 |
This function starts the search for shipments based on the selection. |
|
2 |
This function reloads only the documents of the current shipment instead of reloading all shipments and their documents. Useful after adding new documents. |
|
3 |
Hides the selection area. Not visible if the selection area is already hidden. |
|
4 |
Displays the selection area. Not visible if the selection area is already visible. |
|
5 |
Adds a check mark to all documents. |
|
6 |
Removes all check marks from the document table. |
|
7 |
Displays the area to add a new document to the selected program. |
|
8 |
Saves the new document to the selected program. |
|
9 |
Cancels adding a new document and hides the input area. |
|
10 |
Creates a new e-mail with the selected settings and documents attached to the e-mail. |
|
11 |
Displays the settings to generate the e-mail subject. |
If you move the mouse over one of the functions, and pause the mouse for a second, then a text is displayed that gives an indication of what will happen when you click.
Load shipments
After clicking the magnifying glass icon, the shipments were loaded based on the selection. In the upper table all shipments are displayed. In addition to the SLR (shipment load reference number), other information is also displayed, such as the number and name of the customer, the customer's plant number, the number of delivery notes and the selected freight forwarder.
In the area to the right of the tables a preview of the selected document is displayed (PDF only).
The plant number corresponds to the plant number transmitted via EDI, but can be overwritten by the so-called plant abbreviation in the program "Edit customer-plant relation".
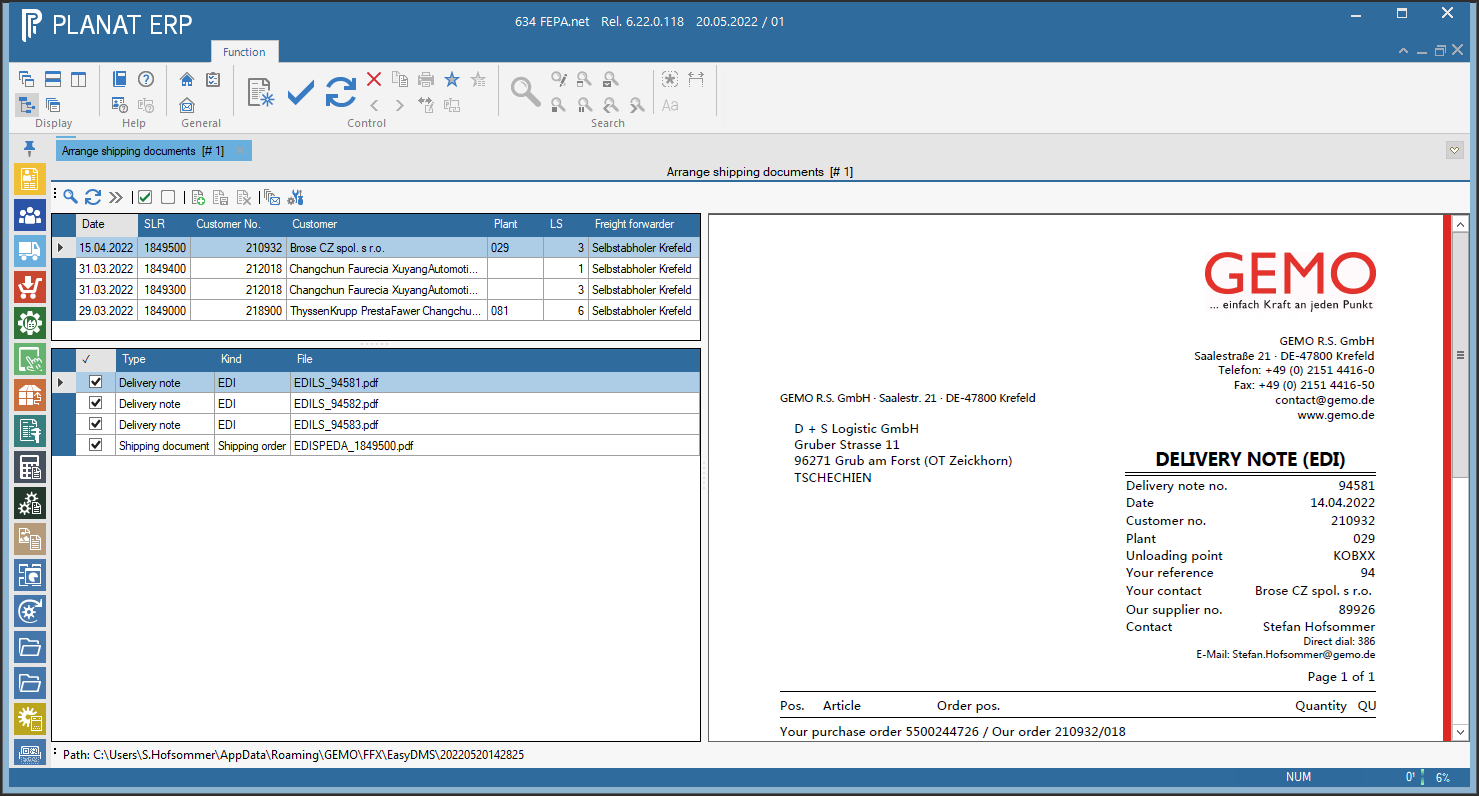
After selecting a shipment (by clicking a row of the upper table), the lower table with the documents belonging to the shipment is displayed. These include delivery notes, invoices and shipping documents.
Add document to shipment
By clicking on "Add document" the upper table is locked and instead of the lower table a new area is displayed. In this area, a new document can be added to the selected shipment. The process can be interrupted at any time by pressing the "Cancel" button. The area will then disappear and the original document table will be displayed again.
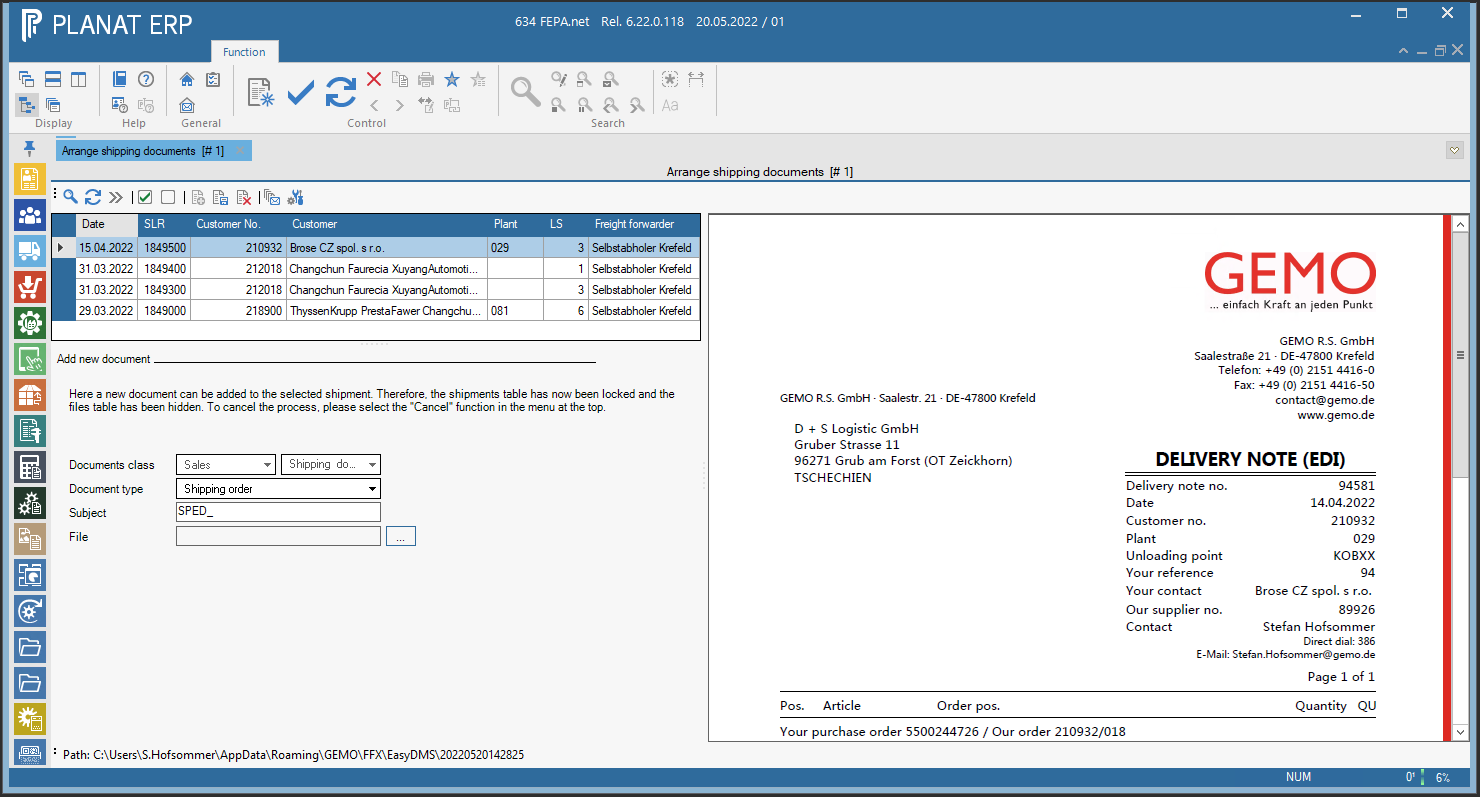
Kind of document
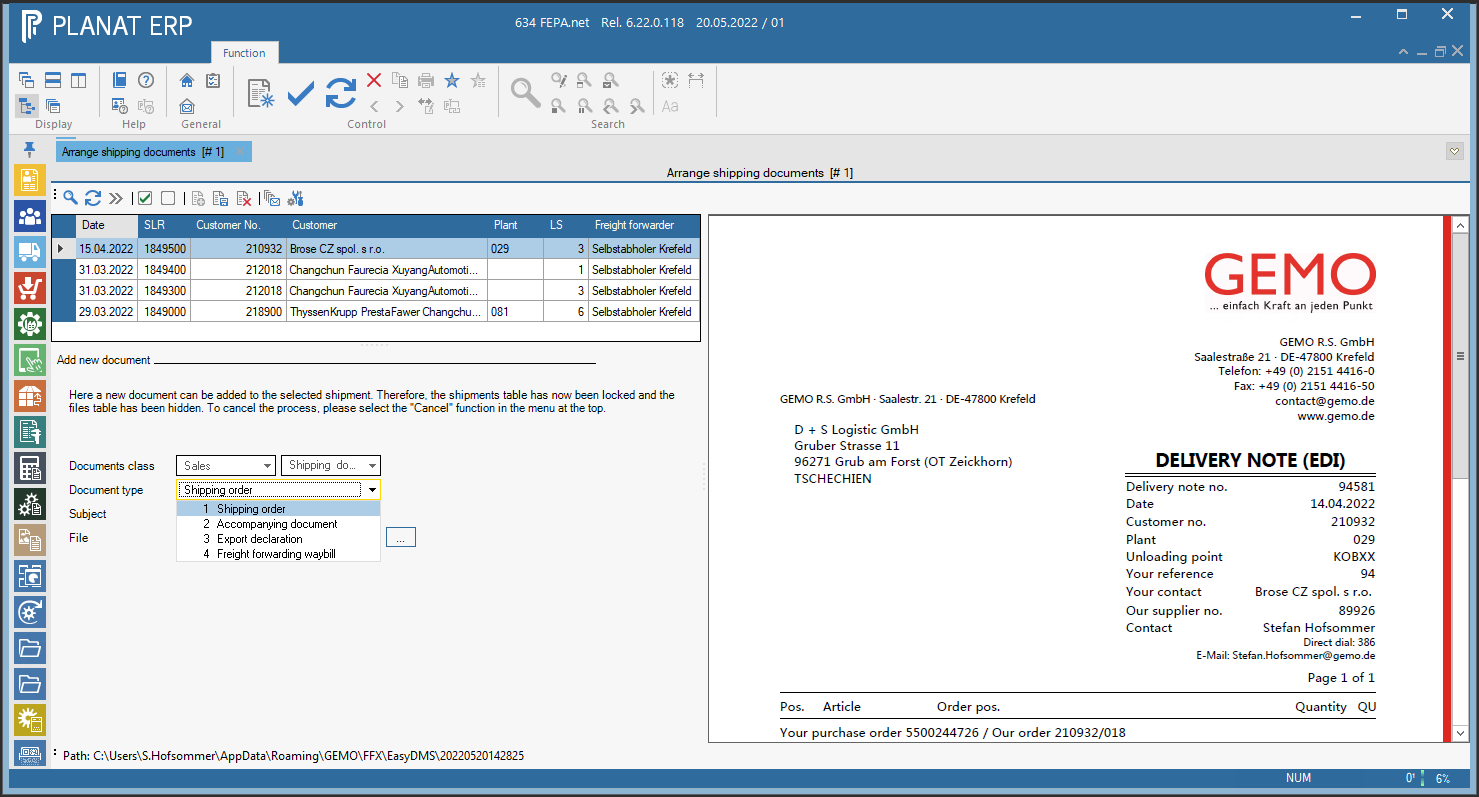
This document must belong to the document class "Sales" and the document type "Shipping document". However, you can select the kind of document. At the moment there is a choice between shipping order, accompanying document, export declaration and freight forwarding waybill.
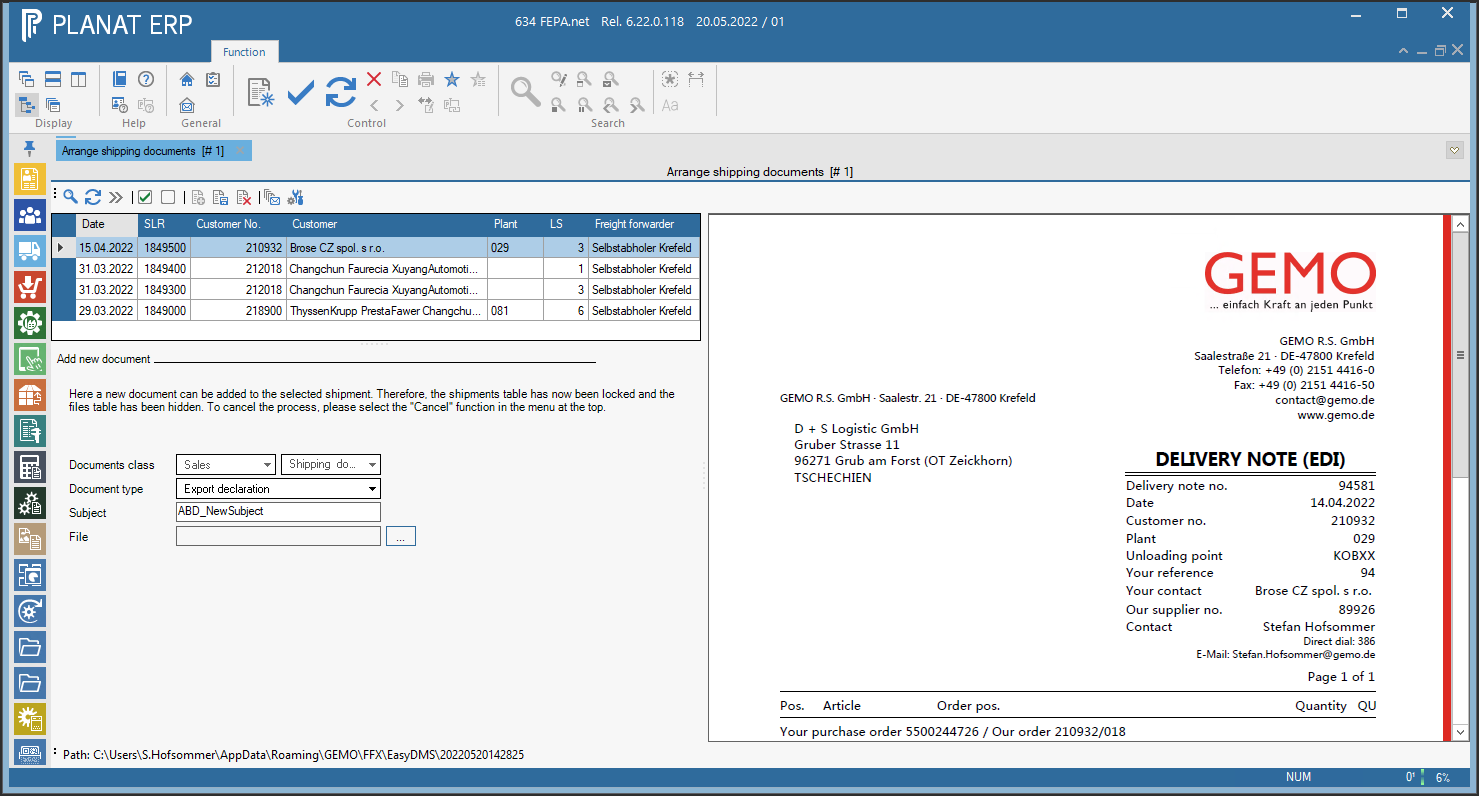
Document subject
The subject is preset based on the selection of the document type, but can be entered completely freely by the user. It should be chosen in such a way that the document can be found again later without major problems.
Select files
Files can be selected from the file system by clicking the "[...]" button - at the moment only files of the "PDF" type are supported.
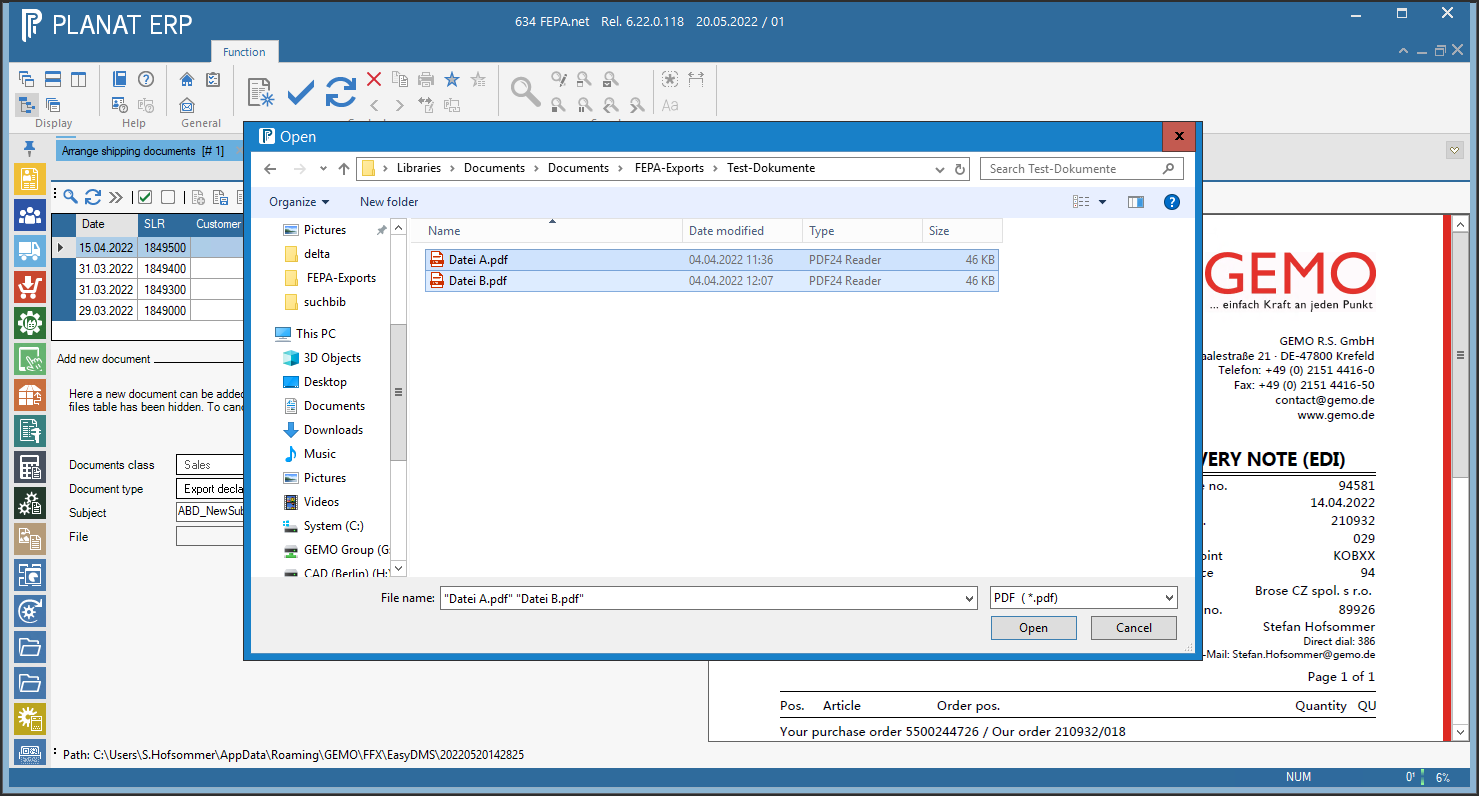
After confirming the file dialog, the selected files are listed in the box next to the "[...]" button.
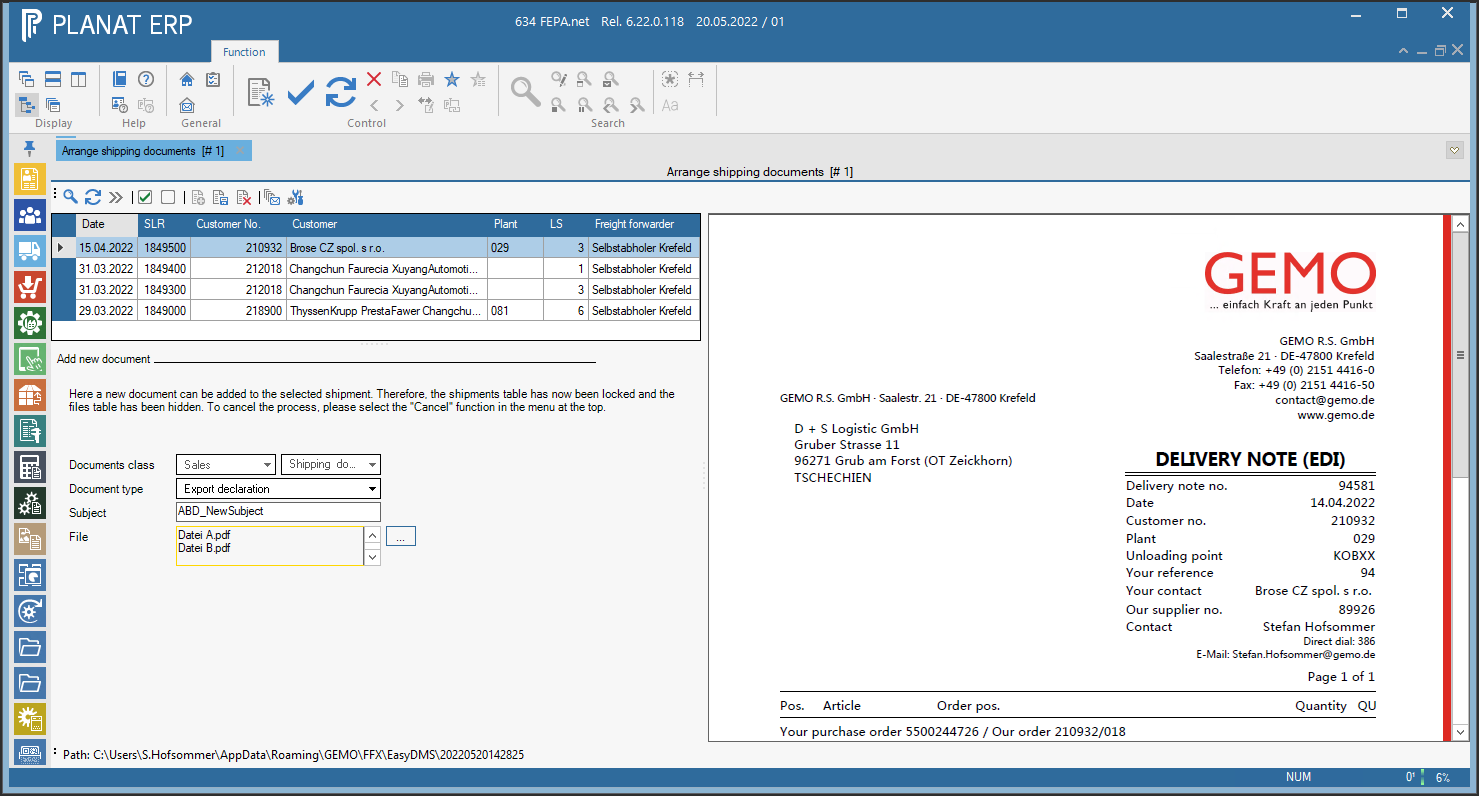
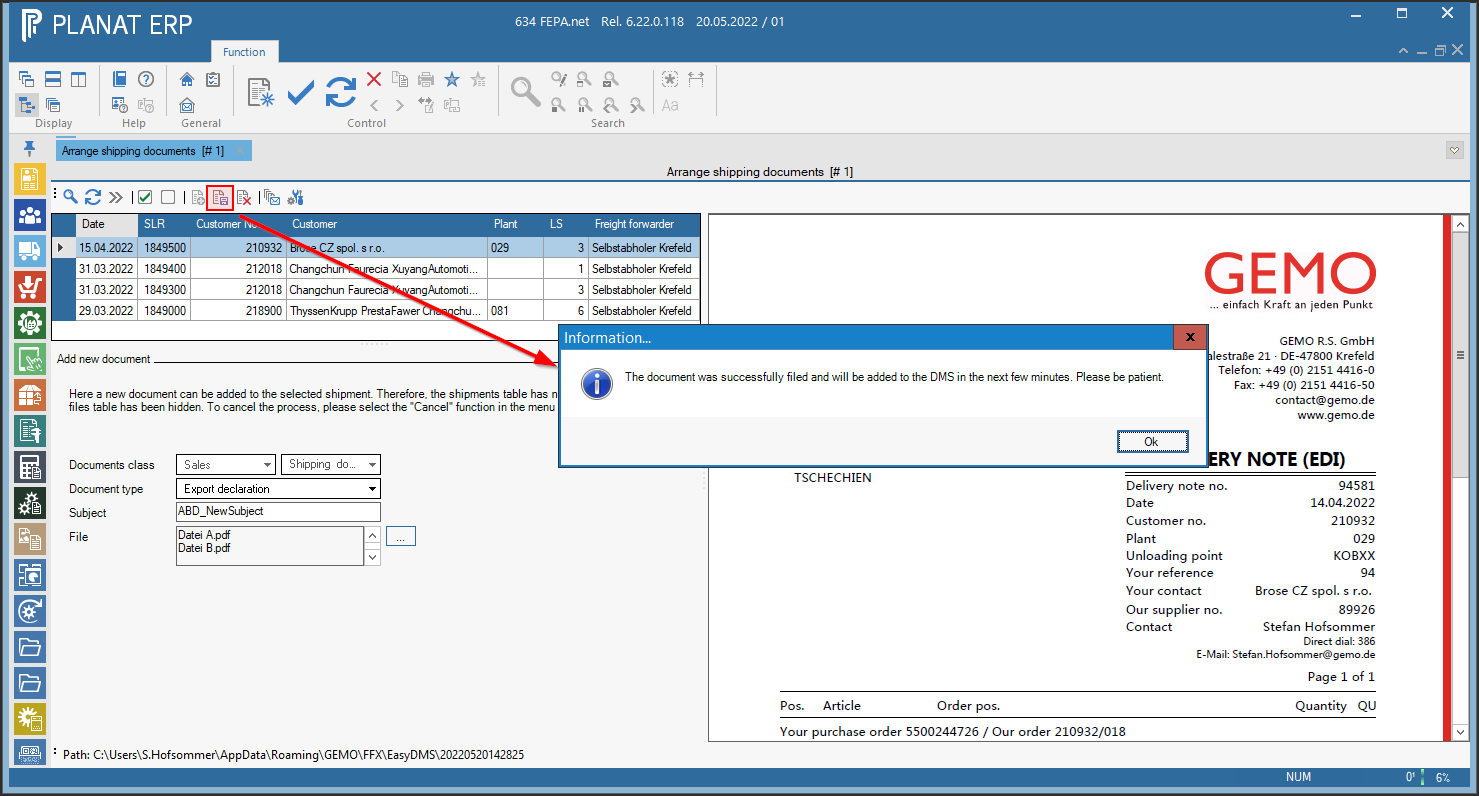
Save the new document
By clicking on the Save button, all files are combined in the new document and sent to the DMS. Depending on server settings and load, it may take up to three minutes for the files to be loaded by the DMS. Usually, however, it should be visible within a few moments.
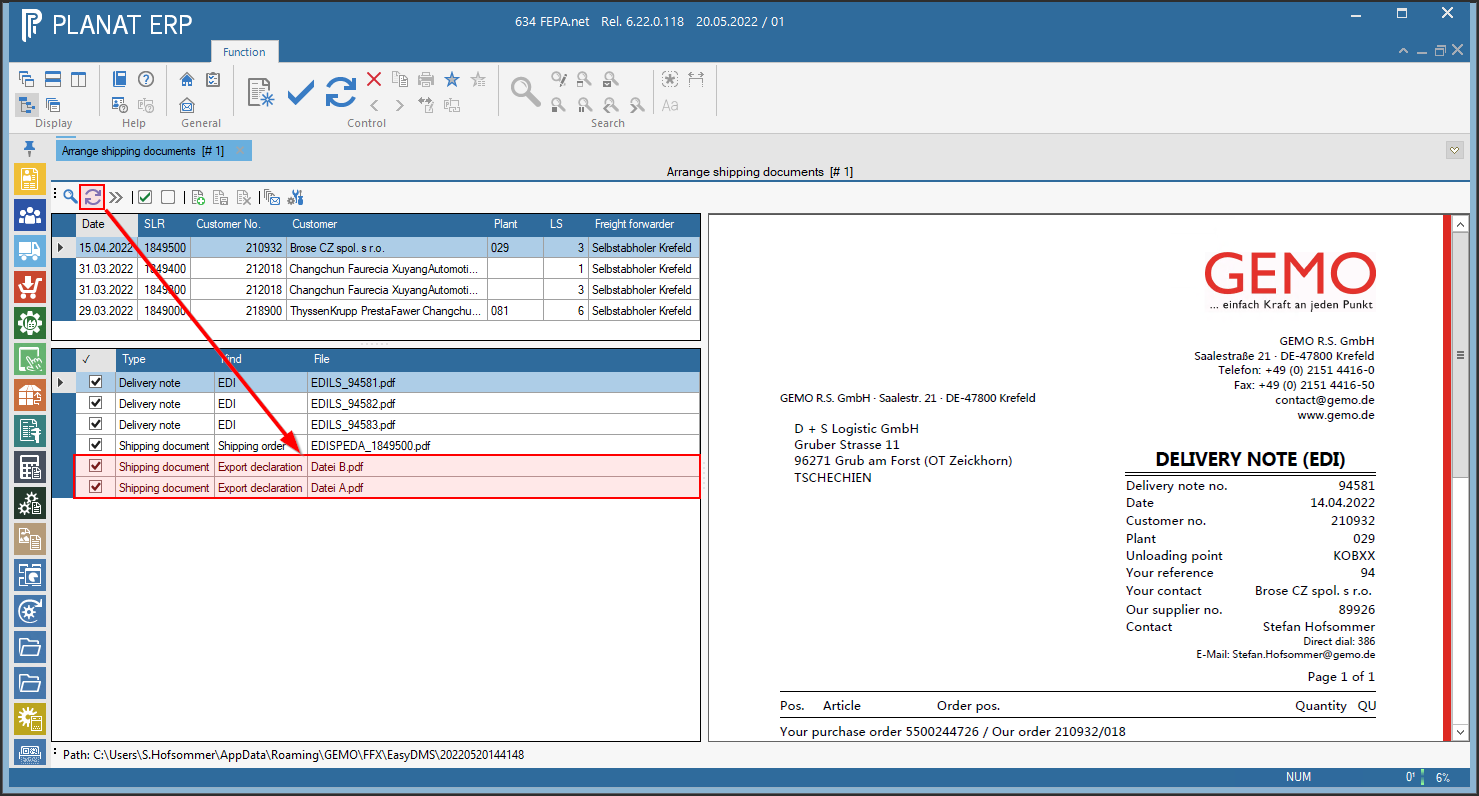
One can click the "Reload documents" button to reload the documents without having to reload all the data. After a few moments the files will be visible:
Create Email
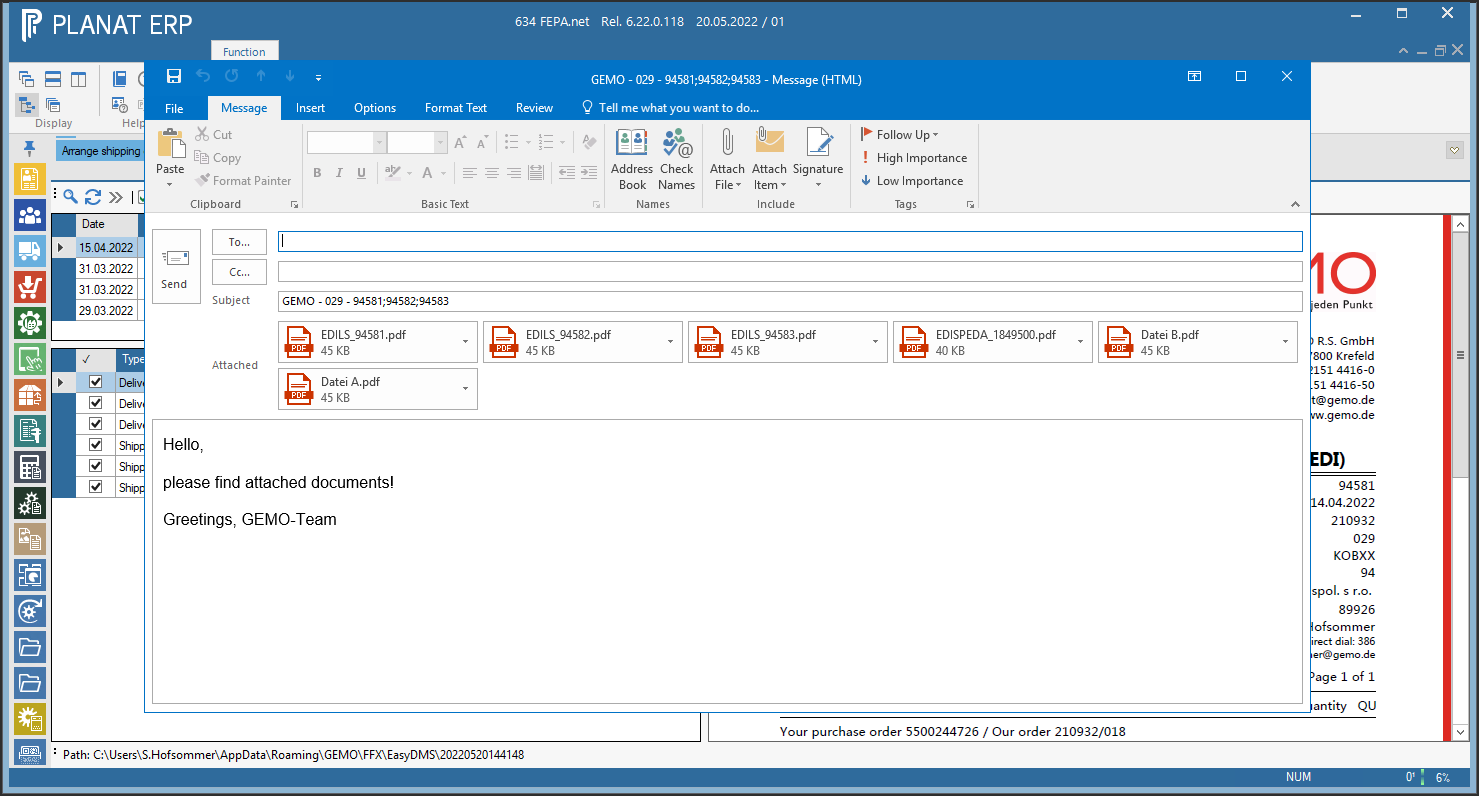
By clicking on "Create e-mail", a new e-mail is created via Outlook based on the selected shipment and displayed to the user. Only if the user clicks on "Send", this e-mail will be sent. The fields of the e-mail will be pre-populated as follows:
- The recipient as well as CC of the e-mail are pre-populated from the invoice or main address of the freight forwarder. These fields must therefore be maintained if they are to be automatically pre-populated.
- The subject of the e-mail is automatically preset from the "Edit Email subject ". See also explanations of the settings options.
- The text of the e-mail consists of a standard text which is stored directly in the code of the program.
- All files that are marked with a check mark (✓) in the file table are collected and attached to the new e-mail.
E-mail subject settings
The subject of the e-mail is suggested automatically. This suggestion can be customized, but is based on the specifications of the freight forwarder Rauh: GEMO - WERK - LS001;LS002;LS003
By clicking on "Edit email subject" the tables disappear and the area to display the email subject appears. There is also a button to preview the subject.
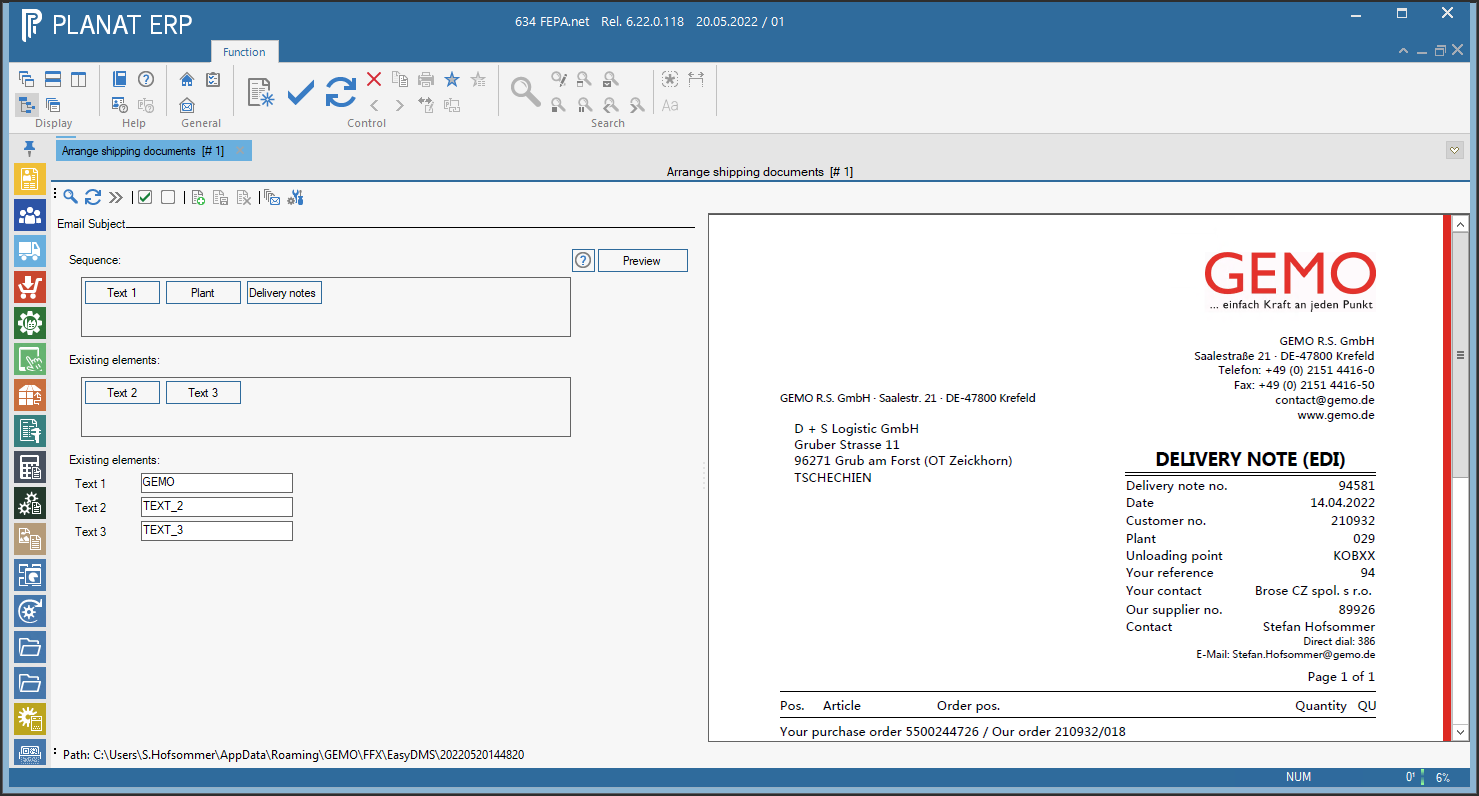
The "Sequence" area contains the elements in exactly the order in which they are then written in the subject. The "Existing elements" area still contains the two elements "Text 2" and "Text 3". By clicking on one of the elements, they are moved to the other area and appended at the end.
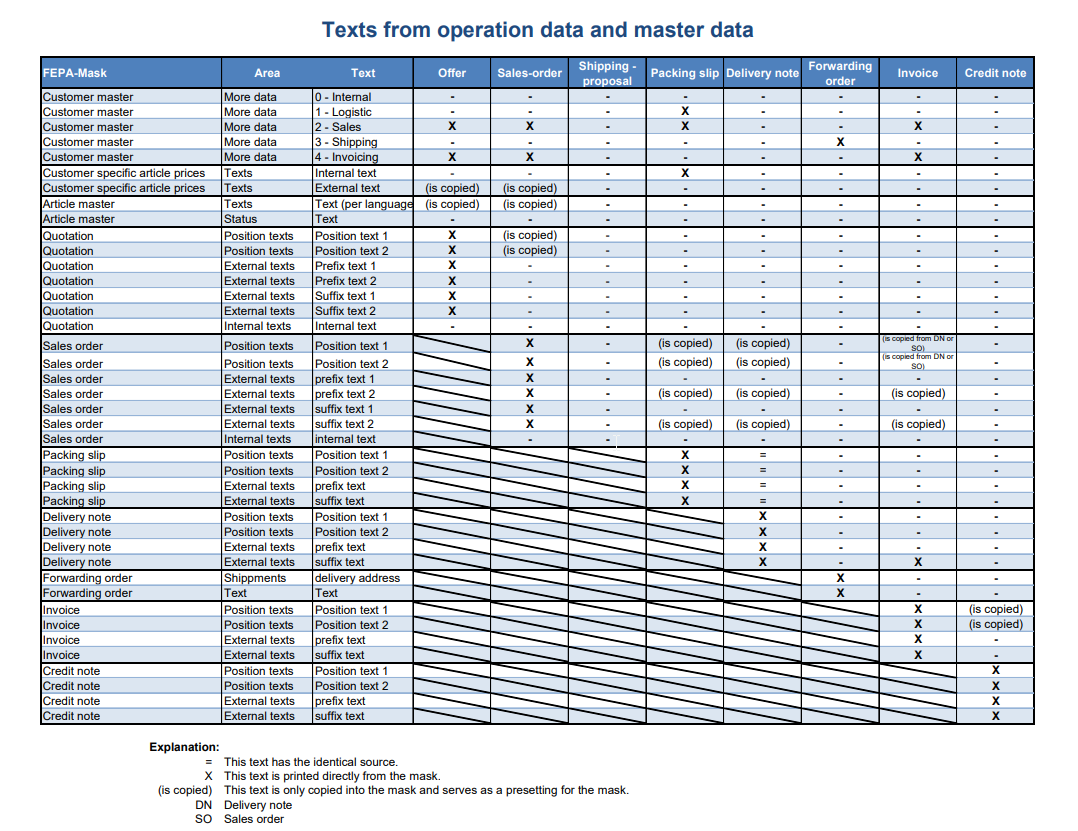
Texts from operation data and master data in sales and distribution
EDI Order with Consignment stock
Change to the GEMO item number
Article no. change at GEMO (e.g., new index), but the customer article no. does not change
Problem: The existing stock of the “old” item number is not taken into account for the withdrawal. How can I transfer the open delivery quantities from the old order to the new order, since the customer item number in the old order is altered (e.g., x or XXX) and therefore no further withdrawals can be made against the old order, or the processing of the outbound notification fails due to the two existing customer orders with the same customer item number?
- Confirmation from Logistics: there are no more deliveries with the old GEMO item number
- Process all received EDL and EDI files
- Check the inventory report from the consignment warehouse; does the total match the “open” quantities on the delivery notes to the consignment warehouse (must also include the open invoice quantity in the order and our stock level in the consignment warehouse)
- Cancel open and partially picked delivery notes; note the quantities—they will be posted back from the consignment warehouse to the warehouse!
- Create a new sales order (or if it already exists)
- Create a new delivery note for the new order and specify the cumulative quantity from the canceled delivery notes.
- Use dummy load carriers—e.g., 507510
- Disable the ASN delivery note (General tab)
- Disable printing of shipping documents and cargo tags (Print tab)
- Add an info text to the footer (see example)
Due to a product change at GEMO, delivery notes without linked outbound notifications had to be canceled, and “open delivery notes” (with outbound notifications and remaining quantities) had to be reversed. The cumulative quantity is then delivered to the consignment warehouse with this delivery note. This delivery note was not transferred via delivery note EDI according to VDA 4913 because it serves only to correct inventory.
Old order: 12345678
New order: 12345679
Canceled delivery notes
1234 with X units
Open delivery notes
1234 with X units
- Check inventory in the consignment warehouse; it must match the previous quantity again
- Correct the reversed quantity of the old item number with 2 MMA movements (old item is back in stock, new item is in negative stock)
This should allow future outbound notifications to be generated against this delivery note.
EDI
This chapter deals with the topic EDI (electronic data exchange), also known by the german abbreavation: DFÜ (Datenfernübertragung).
Program "Overview LAB"
Path to the program: Reporting > Sales > Overview LAB
Purpose of the program
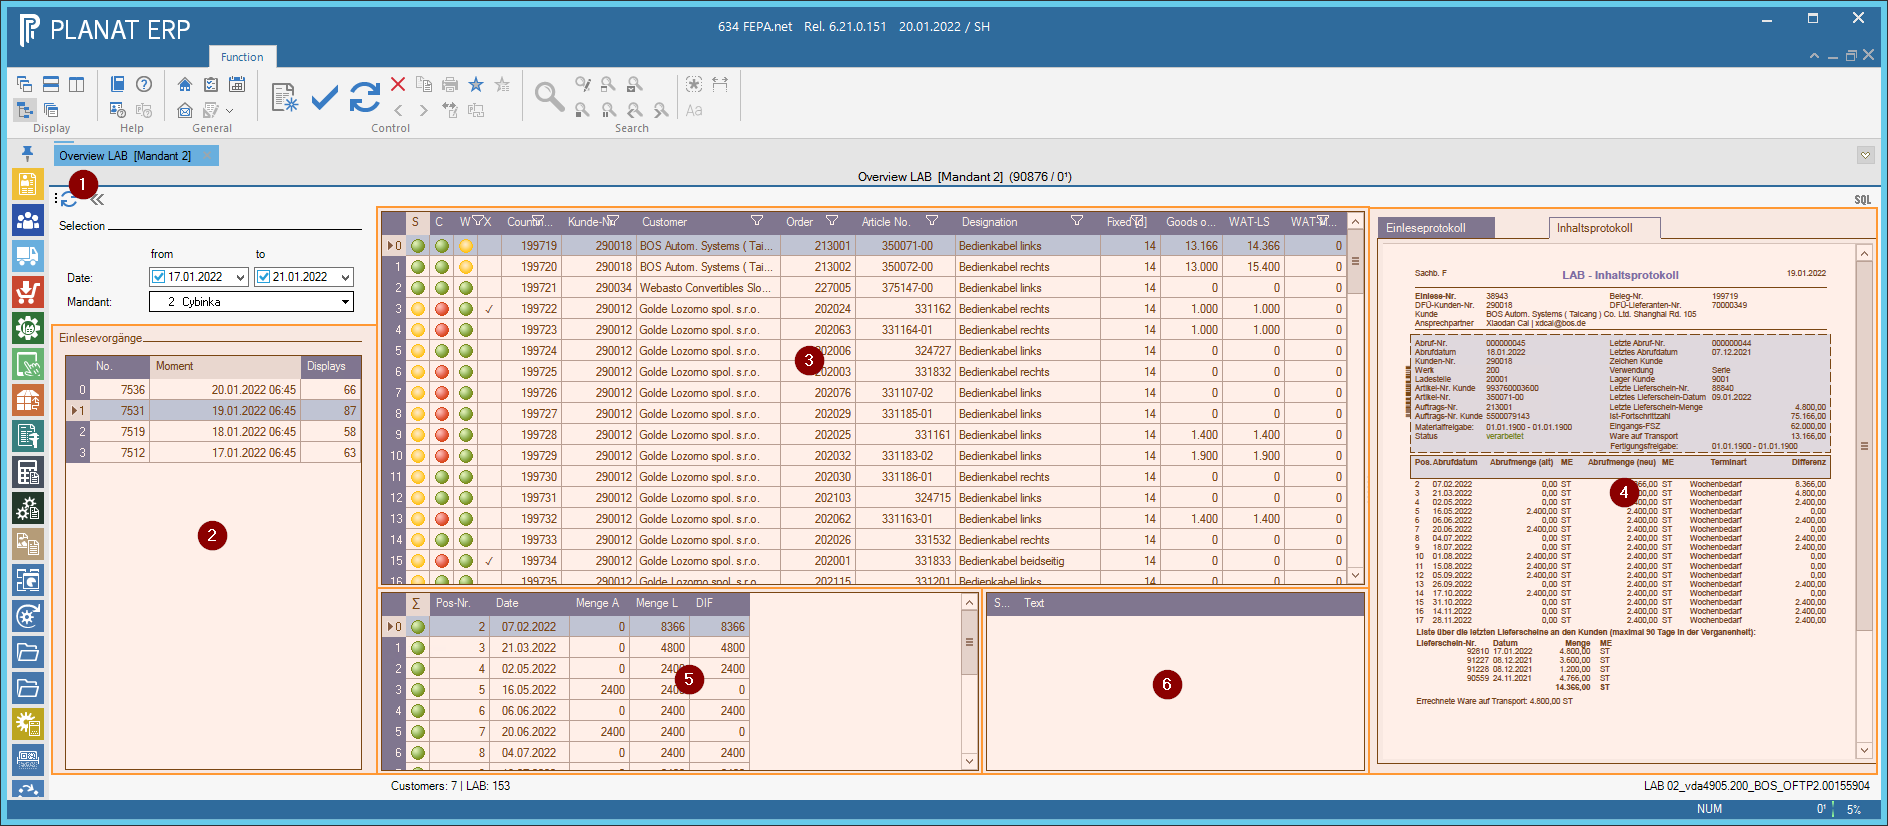
The program "Overview LAB" serves to arrange all read in delivery schedules (in the following "LAB") according to so-called read in procedures [2] and, after selection of a read in procedure, to represent the individual LABs clearly in a table and to provide with references, which support the user with the examination of the LAB.
The program allows us to dispense with printing out the LABs and have FEPA read in automatically in the background.
How the program works
After clicking on "Refresh" [1], the program displays in the area [2] the last import operations of the selected client within the selected period. After loading, the program always automatically selects the top entry. Whenever "Read in LAB" is started, a new read-in process is created and all LABs are then assigned to this process. In addition to the number of the read-in process, you can also see the time at which the process was started.
In the area [3] all LABs are displayed, which were read in the selected read-in process. The first entry in the list is automatically selected. With selection of a LAB:
- The associated documents in area [4] are loaded and displayed as PDF.
This includes the read-in log (DE "Einleseprotokoll"), check log (DE "Prüfprotokoll") and content log (DE "Inhaltsprotokoll"). - The changes in area [5] are loaded and marked in color. These are the changes compared to the sales order (not to the previous retrieval).
- The error and warning messages loaded in the [6] area. These are the messages that are also on the check log and that were determined when processing the call-off.
Traffic lights and markers
Area [2] contains three traffic lights and a column with a small checkmark symbol "✓" in the first four columns to give a quick overview:
- S = Status:
This column indicates if there is a problem with the status of the LAB.- Red = There are error messages and the LAB has not been processed.
- Yellow = There are warning messages, but no error messages. The LAB has been processed.
- Green = There are no warnings and no error messages.
- C = Changes:
This column indicates whether there were expected or unanticipated changes. The "Fixation" setting from the customer-plant relationship is taken into account. The fixation (e.g. 14 days) is a setting that can print a "red bar" on the content log to indicate the period of (e.g. contractual) fixation.- Red: there are messages about backlogs
Attention. This only means that the customer has reported this as "backlog" using "message type 333333". Whether this is an actual backlog must be checked. - Yellow: There are changes in the quantities.
If a firming is set up, then only changes within the firming trigger the status "Yellow", but changes outside the firming do not. If no fixing is set up then all items are taken into account. - Green: There were no changes and no backlogs.
- Red: there are messages about backlogs
- W = Goods in transit:
This column shows if there is a problem with the goods in transit. The WAT status is always calculated at the time when the LAB was read. The details of the WAT numbers can also be seen within the table [3] (scroll a little to the right).- Red: The WAT is greater than the setting for "Max WAT" on the job.
- Yellow: The WAT (difference of the two cumulative quantities) does not match the WAT based on the last delivery bills.
- Green: There is no problem with the WAT.
Notes
The program sometimes reacts a bit slower than usually used by FEPA. The reason is that the program always has to wait for the "file system" to display the PDF files. Unfortunately this cannot be fixed at the moment.
LAB: Errors and Warnings
This document is explaining the possible warnings and errors that can occur during the process of import delivery schedules (in further text just LAB – German abbrev. for “Lieferabruf”) in our ERP system FEPA.net. It also gives explanations about the root cause, general information and possible solutions.
When you find an error or need further or detailed assistance please send this document with comments to our IT ticket system: it-support@gemo.de.
General information
FEPA is working strictly according to the standard from the VDA (abbrev. for “Verein Deutscher Automobilindustrie”, German for “Society or German automotive industry”) and does not know any other EDI standard. Its only working with the VDA 4905 (delivery schedules), 4908 (credit notes) and 4913 (sending and receiving of transport information) standard.
But there is costumers (like the INTEVA-Group) who don't “talk” VDA. They are using a different standard like ANSI or EDIFACT from the American automotive industry. For FEPA we need to translate that standard to VDA and vice versa. That's happening in a special third-party-software called “EDI-management-software” maintained by external German company HILCOM.
Whether or not the costumer is sending via VDA is displayed in the filenames of the transferred files. This information is retrievable from the function “LAB-Info” and is also printed often on the specific protocols that fall out of the printer after reading files into the system. For example the costumers sending via VDA using filenames with the pattern “<Mandant-No.>_vda4905_<ConnectionShortcut>.<Running-No.>”. The part “_vda4905_” is the hint to the used standard “VDA 4905”.
Because all of this standards are not compatible to 100% it’s possible to have some warnings that will never disappear because VDA needs that information but a different standard does not provide it. This warnings are not solvable and will never disappear.
Also it’s very important that the person who is instructed with checking the LABs is also informed about the contract conditions. Often there is set if the customer is allowed to send us “immediate requirement” and how to handle that, how long we’re allowed to hold material or finished goods and also how long after “today” the customer is allowed to change dates (FIXUM).
Errors
Errors always leading to a stop in the import process in FEPA. It means that FEPA wouldn't go on with the import-process and print and paper with the error message on it. In this case we need a manual solution and the import-process for that specific delivery schedule must be restarted.
Depending on the customers connection (EDI via VDA standard or non-VDA-standard) the IT must help to solve the situation because it could be a problem with the translation between different EDIstandards.
No customer can be found / no single customer can be assigned
DE: Kein Kunde ermittelbar / Kunde nicht eindeutig ermittelbar
Will be processed: NO
The data that has been transferred within the header of the LAB like “EDI-Customer-No.” and “EDISupplier-No.” can’t be assigned onto one single entry in the “Costumer-plant-relations”. FEPA cannot find any data or finds more than one relation that fits. That's the reason FEPA cannot handle this situation on its own and need guidance.
Solutions:
- If the cause is a wrongly transmitted EDI number in the file the customer must be asked to resend the file with updated, correct data.
- If the cause is a missing Customer-plant-relation then it must be configured. Afterwards the LAB can be processed again.
No order can be found / no single order can be assigned
DE: Kein Auftrag ermittelbar / Auftrag nicht eindeutig ermittelbar
Will be processed: NO
The data that has been transferred within the header of the LAB like “EDI-Customer-No.” and “EDISupplier-No.” in combination with “plant no.”, “unloading point” and “customers article number” can’t be assigned onto one single sales order. FEPA cannot find any data or finds more than one sales order that fits. That's the reason FEPA cannot handle this situation on its own and need guidance.
Solution:
- The solutions depends in the root cause. The named fields must be checked. When the data is obviously causing the problem the customer should be informed and asked to send new, repaired data.
- The costumer-plant-relation could be corrected of the EDI numbers has been changed without noticing it.
- In the sales order the unloading point or the costumer article number can be corrected if that has been the problem.
- A new EDI sales order can be placed then some of the data has intentionally changes. Maybe because of a new project or index of an article. The old EDI sales order stays in the database for historical purposes. But the old EDI sales order should be “closed” and the open quantities that won’t be shipped anymore should be deleted (coordination with the production planning team needed)
- Most likely it’s just a new order from the costumer and the EDI sales order must be placed into the system before restarting the import process.
Item has not been found
DE: Artikel existiert nicht
Will be processed: NO
If FEPA does not know the Costumer-item-number the import process will be stopped and the message appears.
Solution:
- Place a new EDI sales order with that costumer article number.
Wrong date in position
DE: Fehlerhaftes Datum in Position
Will be processed: NO
When one of the positions in the LAB contains a wrong date, which is not possible according to the documentation of the standard like 34.01.2019 or 05.16.2019 then this error appears. FEPA stops the import. But please note that there is some special dates in the VDA 4905.
Here are some samples:
| Format | Description |
YYMMDD |
Date of the exact day when the costumer wants the material to be in its plant where “D” stands for day, “M” for month and “Y” for year. The numbers are always two-digits. So 180529 stands for 29.05.2018. |
000000 |
For that schedule there is done and has no more needs nor dates. |
222222 |
That stands for “no needs”. |
333333 |
That stands for backlog. The costumer has clearly set that information into his system. If it’s legitimate or not is not said here! |
444444 |
That means an immediate need. The costumers clerk has set up a special immediate need and wants GEMO to know about it. |
555555 |
The following dates have a change in type. For example instead of day-dates there will be week-dates following. FEPA will process that automatically and shows that in the EDI sales order. |
JJWWWW |
Need for the period between WW and WW. FEPA will calculate the need for the first day of that period. |
JJMM00 |
Need for one whole month. FEPA will calculate the first day of that month as date. |
JJ00WW |
Need for one whole week. FEPA will calculate the first day of that week as date. |
999999 |
Rest quantity for everything “after the last date”. |
Solution:
- The customer must be informed about that problematic LAB and should send a new, correct one.
Warnings
Only in some cases a warnings will stop the import process. In that case the specific solution must be applied and the delivery schedule can be processed. In all other cases the warning information is an information for the user to take care about a (mostly) minor problem.
Last LAB-No. is not according to saved LAB-No.
DE: Letzte LAB-Nr. stimmt nicht mit hinterlegter LAB-Nr. überein
Will be processed: YES
The LAB-No. is a number that is conducted by the costumer. Every rehash of the data on the costumers’ side will cause a count up on that number. When this warning is shown is means that there is an LAB lost between the actual one and the last one and it sometimes indicates a problem in the transmission. A gapless documentation of all the costumers needs is not given anymore.
Solution:
- The costumer should be informed about the fact that one LAB is missing. If the costumer is not working with LAB this warning has no impact because that number is only existing in the VDA standards.
Zeroing leads to negative actual cumulative number
DE: Nullstellung führt zu negativer Ist-FSZ
Will be processed: NO
The customer hast set a zeroing for that LAB. FEPA has applied that in the database and reset the inflow cumulative number to zero. When the actual cumulative number was smaller (what is an error itself) it leads to a negative actual cumulative number on GEMO-side.
If the costumer has done that zeroing without informing GEMO about it than it can cause an long time of no planned deliveries. Because combining the both cumulative numbers aggregate to the so called “quantity on transport”. This quantity is used by FEPA to reduce the amount that has to be delivered in the future. To prevent that the field “maximum quantity on transport” should be used in the EDI sales orders. Please also see section “Quantity on transport is higher then allowed”.
Costumers without VDA normally don't use zeroing after all because it’s not a required field. When a new connection to a costumer is being established it should be always asked if zeroing will happen or not.
Solution:
- The actual cumulative number must be set to 0 again manually.
- In the EDI section of the EDI sales order it must be checked if the date of the zeroing is correct. Is must match the date the customer has send in the LAB.
Zeroing leads to negative quantity on transport
DE: Nullstellung führt zu negativer Ware auf Transport
Will be processed: NO
Solution:
- Same reason and solution like section “Zeroing leads to negative actual cumulative number”.
Negative value for quantity on transport
DE: negativer Wert für Ware auf Transport
Will be processed: NO
Quantity on transport (“WAT” in German; abbrev. for “Ware auf Transport”) is always calculated and never saved in the system. It’s always the difference from actual and inflow cumulative number. The quantity can only be negative when the inflow cumulative number is bigger than the actual one. That can happen, when the costumer or the supplier mistreat a process (like from amount while inflow booking).
Here some examples:
- The customer books more inflow then was delivered on the delivery note.
- The supplier changes its cumulative number wrongly.
- The customer books one delivery note that was not belong to the EDI process.
Solution:
- The cumulative number has to be recalculated and corrected in the EDI sales order.
Transmitted unit of measurement is not according to saved UM
DE: übertragene ME stimmt nicht mit hinterlegter ME überein
Will be processed: YES
In the delivery schedule the customer sends his unit of measurement (UM). If the source system is for example in English language the UM will differ from FEPA in some measurements. PCS in English language stands for pieces. In German language (and therefore in FEPA) it will be ST for “Stück”. Anyway in the VDA the German UM are defined and using the English ones is comprehensive but wrong.
The same warning occurs then the customer changes it’s UM from G to KG or M to KM.
Solution:
- The LAB has to be checked according the amounts and the customer possibly has to be informed about it.
Data for last received delivery is not correct
DE: Daten zur letzten vereinnahmten Lieferung nicht korrekt
Will be processed: YES
When the sent value for the delivery number has been found in FEPA then some attributes like date of the delivery note, item number and quantity will be checked as well. If one of the transmitted information are not according the FEPA values the warning will occur.
If customers are not using VDA but EDIFACT or ANSI the field “last delivered quantity” is not mandatory (in VDA it is). That's the reason that LABs will always print that warning. We cannot suppress that.
Solution:
- The customer must be informed about that and according to the process the customer has to check and resend that LAB. If just the quantity is wrong basically a correction in the actual cumulative number is enough. But it’s always better to get the correction from the costumer side.
Quantity on transport is higher then allowed
DE: WAT übersteigt maximale WAT
Will be processed: NO
In the header of the EDI sales order there is a field “maximum quantity on transport / maximale WAT”. That's not according to the VDA standard but can help against big mistakes in the cumulative number that is sent by the customer. When the calculated quantity on transport is too high the import process will be stopped and the message will be printed. For example that occurs when the customer does a zeroing without informing about that before sending the data.
Solution:
- The cumulative number must be corrected in the EDI sales order. Afterwards the LAB can be processed again.
FEPA loading equipment number could not be assigned
DE: FEPA-THM-Nr. konnte nicht ermittelt werden
Will be processed: YES
THM stands for the German “Transporthilfsmittel” and means the loading equipment. It means everything that is needed to pack products for shipment. The customer can send requirements for loading equipment and if he does – FEPA will check them. This warning occurs, when the number the customer is sending cannot be found in the FEPA master data for loading equipment.
Most likely that's the case, when the customer is changing its numbers without informing GEMO about that fact. To prevent complaints because of wrong packaging numbers the new numbers should be entered to replace the old ones.
So see the requirements from the customer you must have a look into the register “EDI data”, second register “Loading Equipment” of the EDI sales order. In the area “Requisition (DS)” you’ll see the requirements.
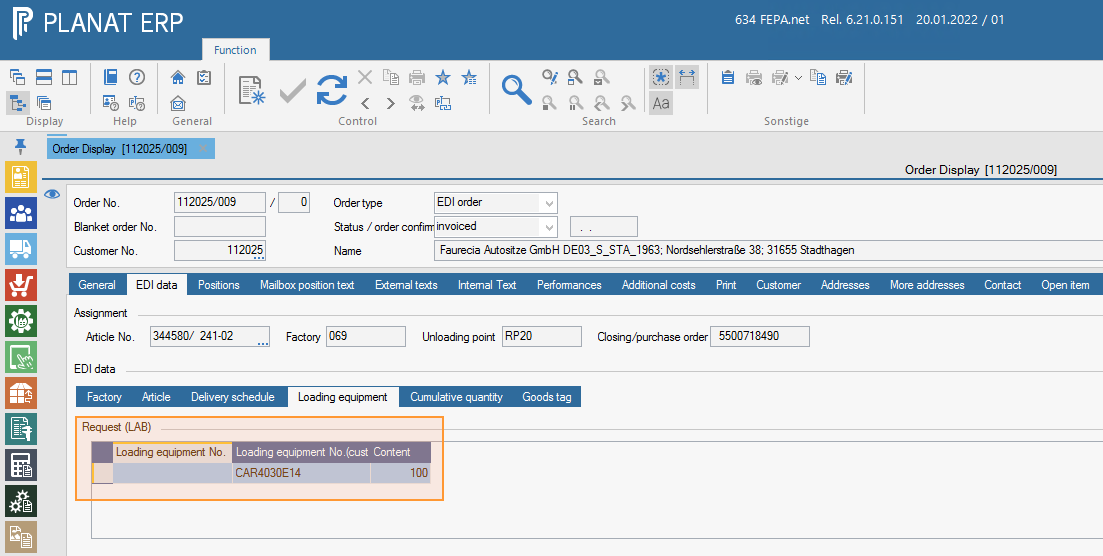
In the column “Loading Equipment No. (Customer)” is the number displayed the customers requires, added with the information about the quantity one box / carton / pallet / container can keep. If the columns “Loading Equipment No.” is empty – like in the screenshot - it means that FEPA couldn’t find any information about that number and the warning was printed.
The new number can be updated into “FEPA.net / Master Data / Loading Equipment / Edit Loading Equipment”. If the information from the customer is wrong, the customer should be informed about that fact.
No contact person has been found to sign of customer
DE: Kein Ansprechpartner zum Zeichen des Kunden gefunden
Will be processed: YES
In the delivery schedule is a field called „sign of customer“. This is very often used to send the code of the clerk responsible for the schedule. If this message appears FEPA was not able to find the correct clerk for that transmitted code.
Solution:
- The new contact person must be placed in FEPA and connected to the “contact person pool” of the customer.
Check ASN status
There is a program that displays the ASN status of EDI delivery notes. For this, the user must have permissions for sales in FEPA.
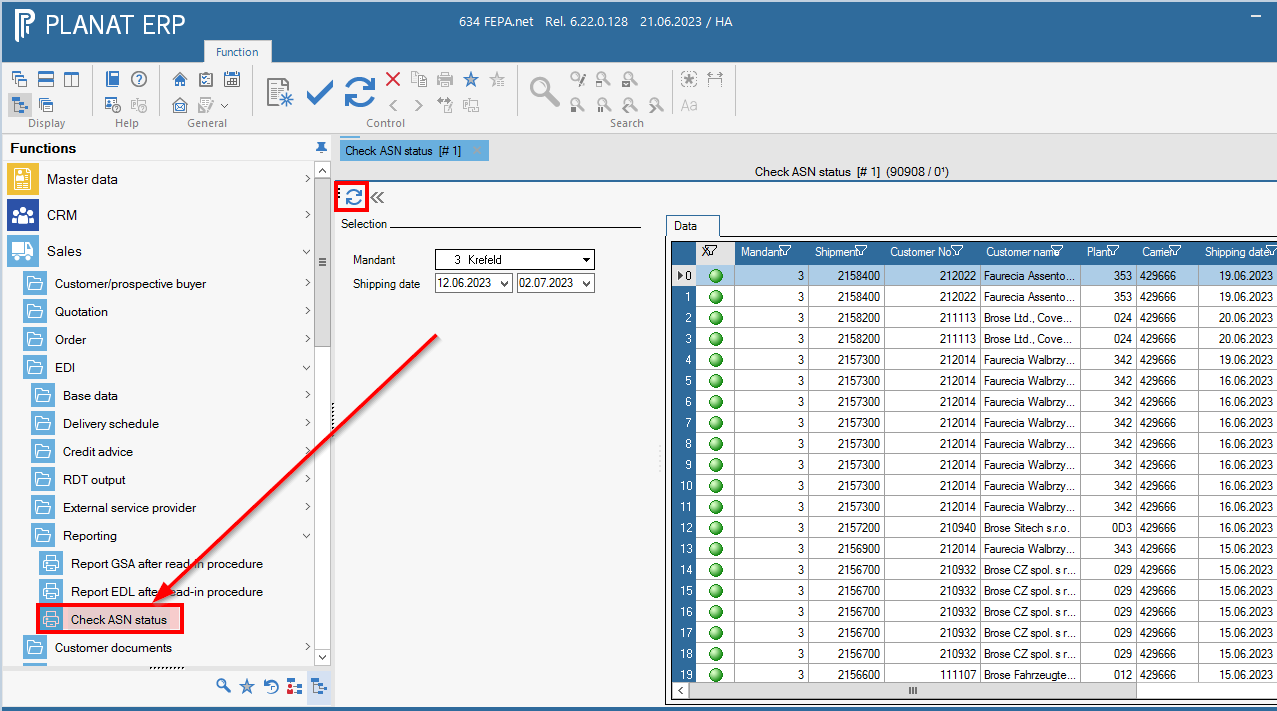
In FEPA you can find this overview under Sales > EDI > Reporting> Check ASN Status.
The following things have to be considered:
- The program shows only EDI delivery notes because only these can be sent via ASN.
- The whole process "Send ASN to customer" is quite complex and needs several different systems. Therefore this program can only check if everything has been done in FEPA to get the ASN on its way.
The status "ASN has been sent!" (green traffic light) means in this case that FEPA is "ready" and a file has been generated which will then be taken over by the next system. Should an ASN still be criticized by the customer as "missing", please continue to open a ticket (as always stating the customer no., the date and either delivery note no., consignment no. or article no.).
Purchasing
Explanations on the subject of purchasing
Purchasing-Info
General
Here you can view comprehensive information on the entire purchasing area.
FEPA Function: Purchasing > Purchasing Info
For the fields suppliers no., article no., inquiry/order no. and project no. a field search is possible. To do this, press the key combination [Ctrl]+[F] for search in the field or click on the magnifying glass in the status bar at the bottom of the window.
Settings
In the tab Settings you can define your display for the type of transactions and their status.
The Like setting means that you can enter % characters after the number in the field ticked here, as in the search/selection, and everything matching this character string is displayed in the result.
For example:
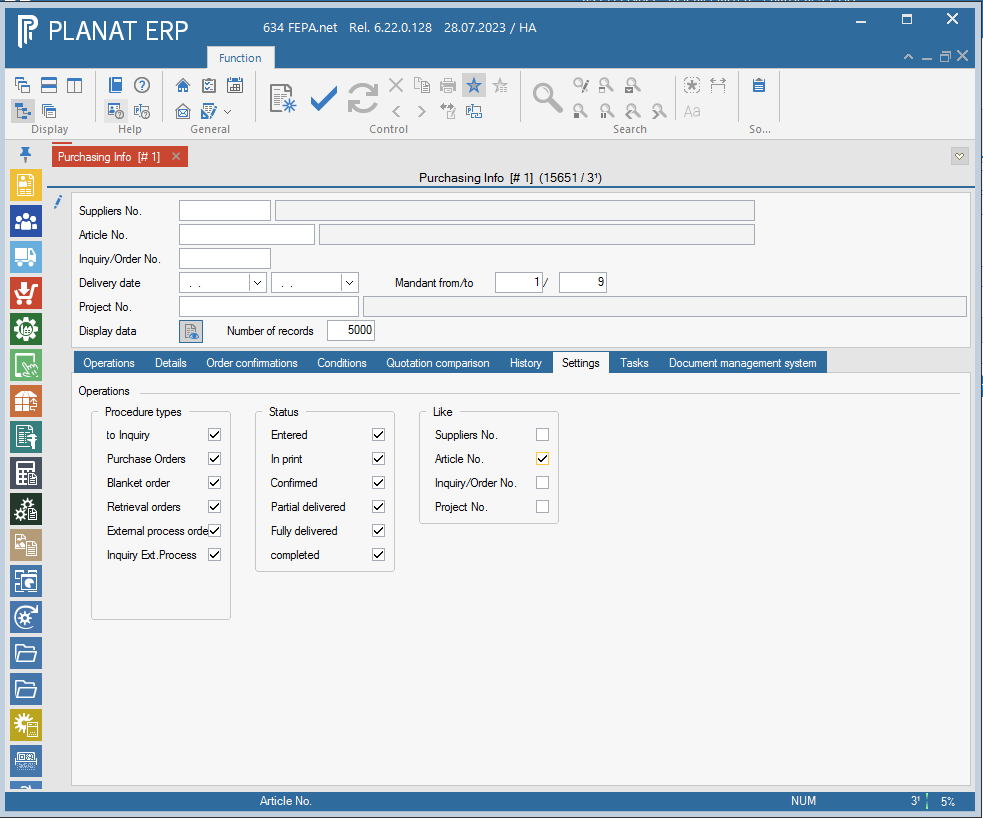
All operations for item numbers that begin with the character string "1000":
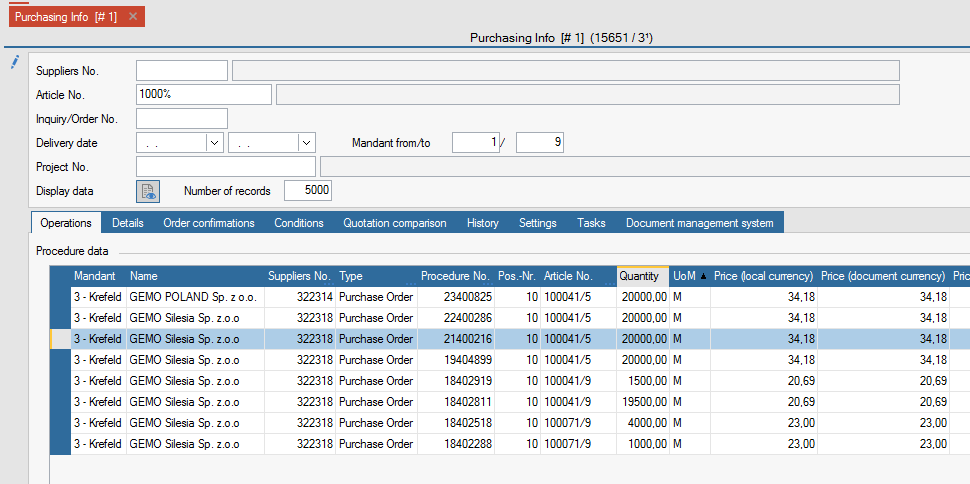
Note: When searching for a purely numeric number, a % character must also precede the number! Numbers are padded with leading blanks when saving if it is an alphanumeric field.
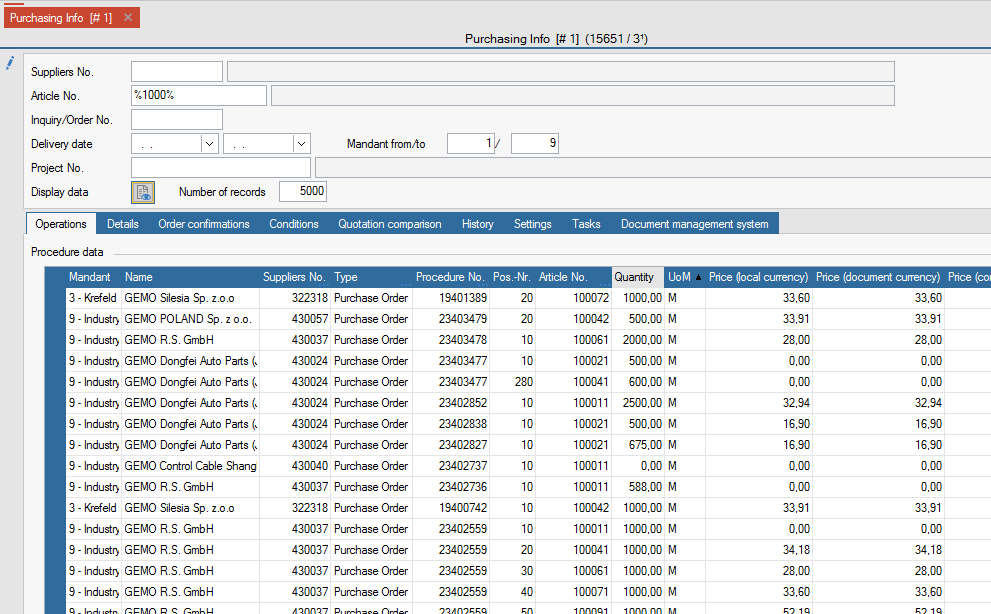
Goods receipt
General
The function Edit Goods Receipt is used to enter the goods delivered by the supplier on the corresponding order item.
In the course of entering the goods receipt, the status of the order item is set to partially or completely fulfilled and at the same time the goods receipt (actual receipt) is posted in materials management.
Dispositions (planned receipts) in materials management are also partially or completely reduced.
In addition, the price of the last receipt in the article master is updated with the order price in the MMA tab in the corresponding client.
If the article is set to QM-inspectable with the QM tick in the client tab of the article master, a QM document is created in FEPA and a data record for the Babtec interface when the goods receipt is processed. The goods then go to the Q warehouse until a decision is made.
Edit goods receipt
There are 2 ways to enter. One is via the supplier number, the second is via the transaction/order number.
You can enter all items of the delivery note with a goods receipt. If corrections have to be made to an item of a goods receipt, only the entire goods receipt has to be cancelled. Afterwards, the goods receipt must be repeated for all items.
It makes sense to make an individual goods receipt for each delivery note item. Please note the location-specific procedure.
If mandatory fields are not filled in, the goods receipt cannot be saved and processed.
FEPA function : Purchasing > Deliveries > Goods Receipt > Edit Goods Receipt
- Press Enter twice in the field Document No., FEPA assigns the document number.
- Enter the transaction number, the supplier number is automatically taken from the transaction.
- Today's date is automatically selected as the delivery date, if a goods receipt is subsequently made, the delivery date can be changed to the day of the original goods receipt. This is a mandatory field.
- Enter the delivery note number of the delivery note, this is a mandatory field.
- Select and confirm the date of the delivery note
- Visually check supplier - does the supplier match the one on the delivery note

- Click on the Order Confirmation Items tab and press the magnifying glass, FEPA searches and displays the open items for the operation (or for the supplier if you have not entered an operation but the supplier)
- Select the goods receipt item and enter the delivered quantity in the quantity field.
- Tick the "Mark" box at the front for the appropriate goods receipt item and click the arrow in the bottom right corner. The goods receipt item is now transferred to the Goods Receipt Items tab.

- The goods receipt item is now transferred to the Goods Receipt Items tab. The number of planned outgoings is displayed at the front.
The Details tab shows the details of the position you are currently in.

- A goods receipt label can be printed for each container/carton received. The number of labels is entered in the Labels column. The quantity per label is entered in the Quantity column. The quantity can also be left blank to be entered manually. (e.g. if the quantity per container varies).

- If you only have a container that differs from the quantity, you can also print out a label via the columns Remaining label and Quantity.

- The ticks for processing and printing are set automatically. For processing, only the tick in the tool bar must be clicked.
Then the printing takes place.
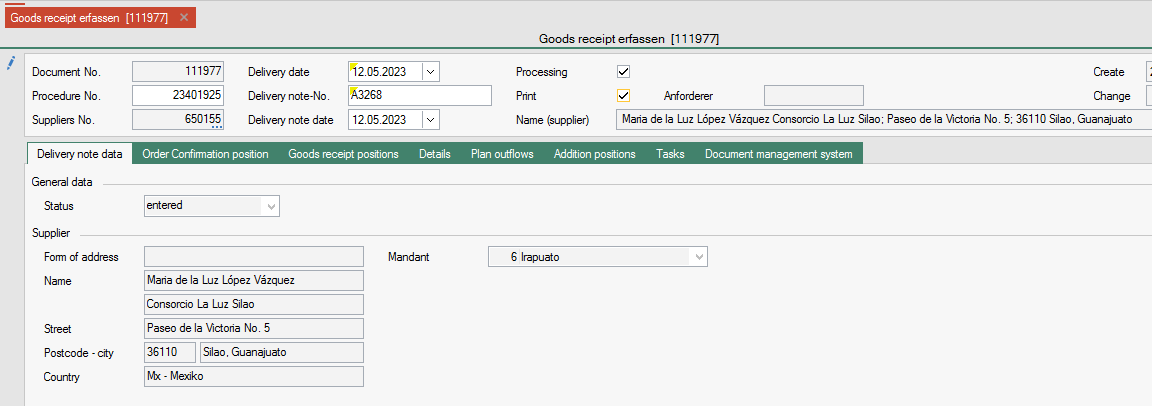
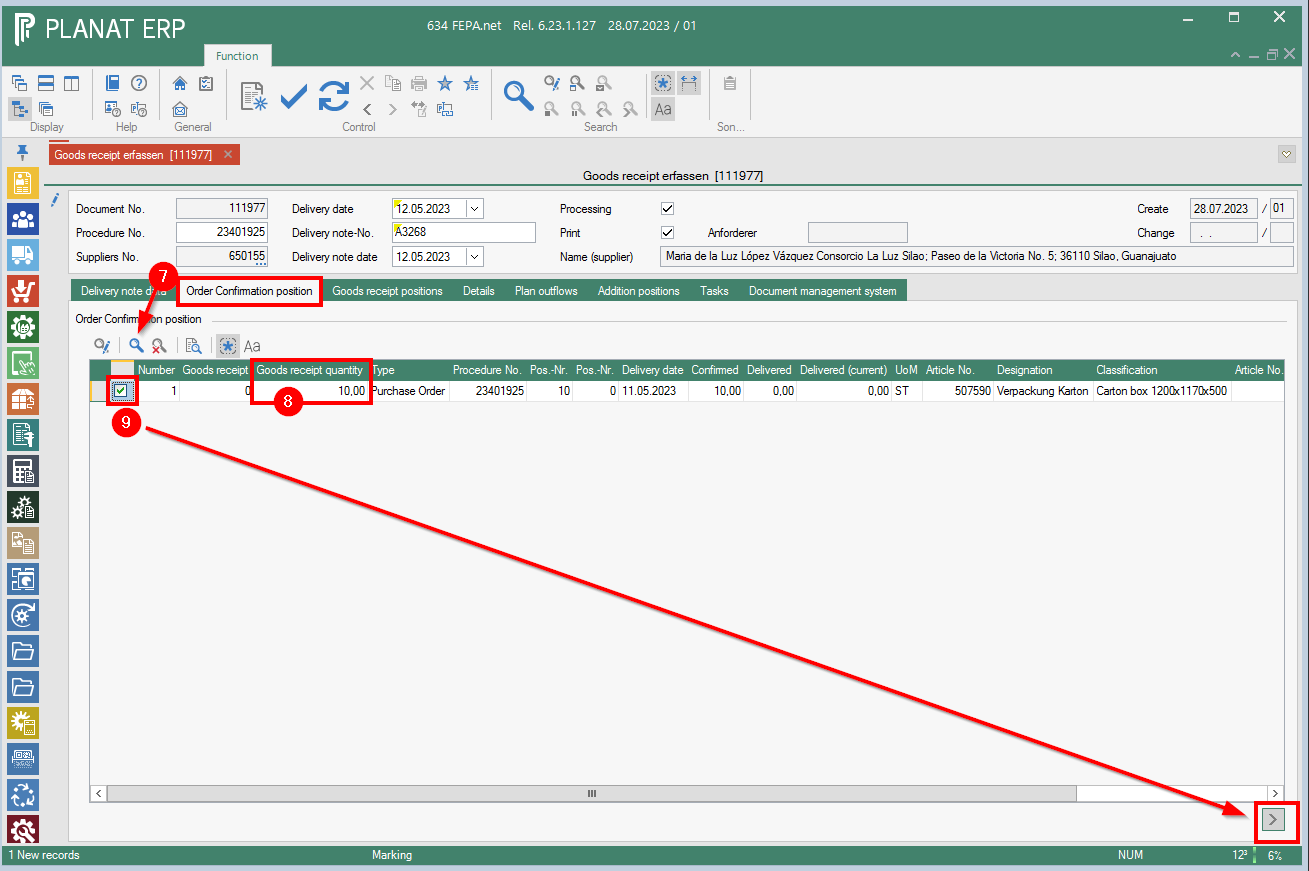
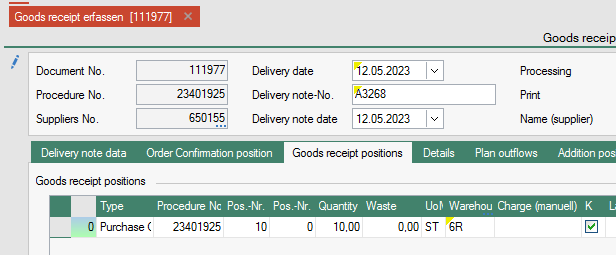
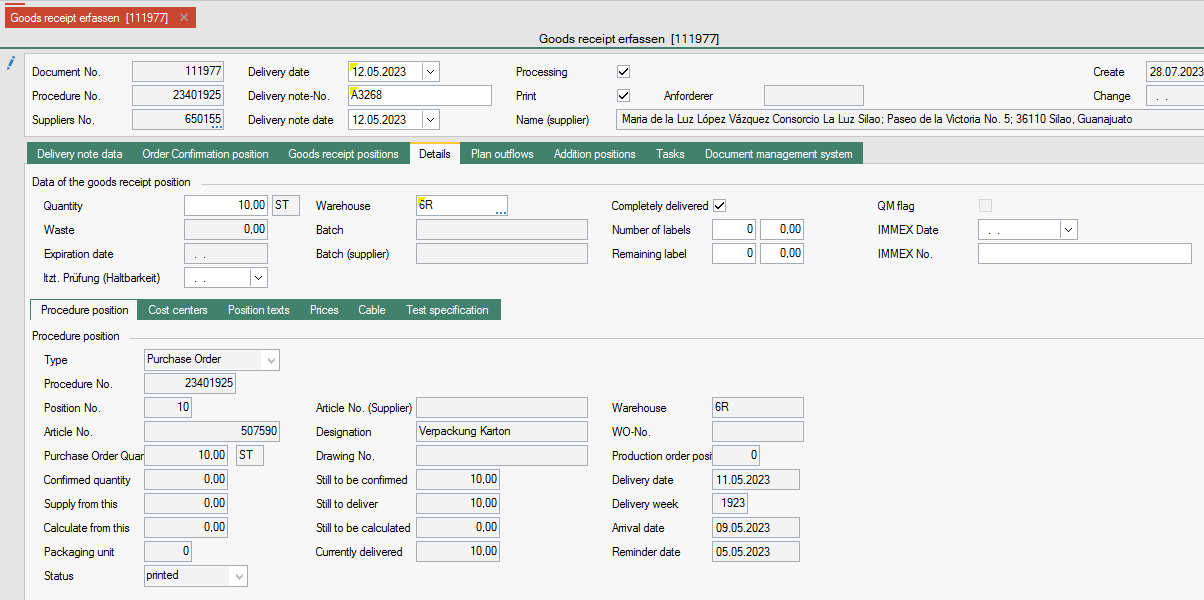
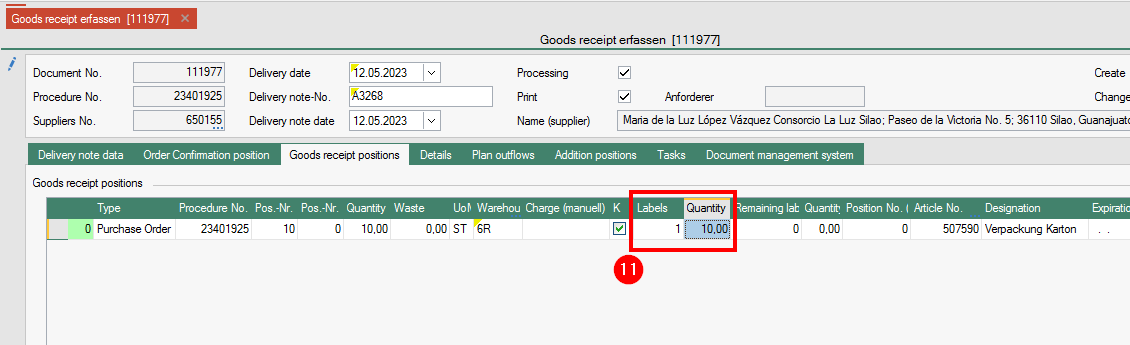
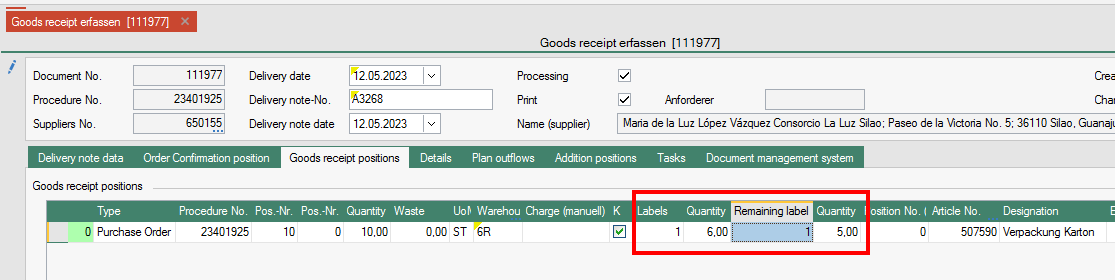
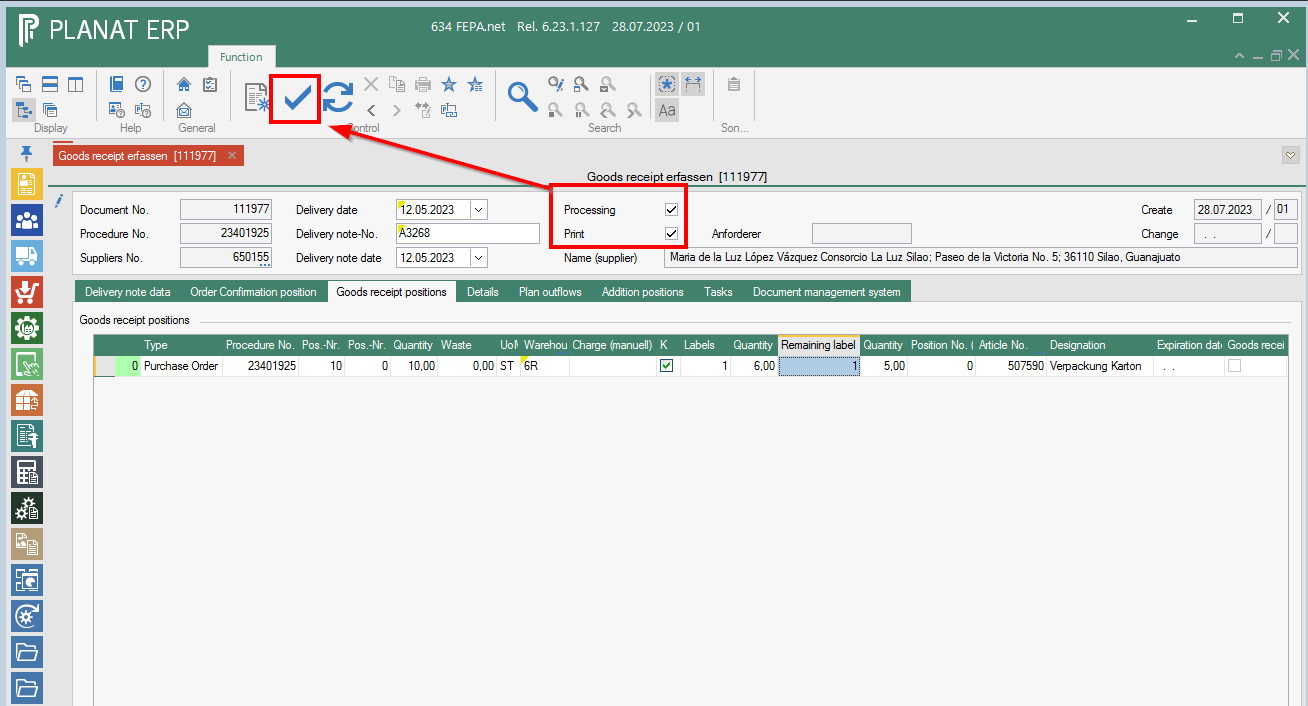
Special features
Internal EDI (WE_Check_LS)
When saving and processing the goods receipt, the system checks whether the transaction is an EDI order. If the transaction is an EDI order it is checked:
- Does the delivery note number correspond to the transaction of VDA49013, i.e. numeric, maximum 8 characters long?
- Does the delivery note exist in FEPA?
- Does the delivery note belong to a sales order where the order number is the same as the entered transaction number.
If a problem is detected, an information message is displayed:
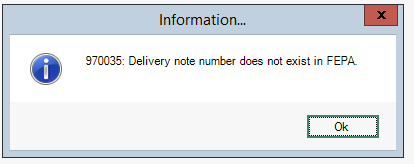
The delivery note number must be corrected, otherwise no processing takes place.
Goods Receipts for Intercompany Transactions
When saving and processing the goods receipt, the system checks whether the transaction is an intercompany order. If the transaction is an intercompany order, it is checked:
- Does the delivery note exist in FEPA?
- Does the delivery note belong to a sales order where the order number is the same as the transaction number entered.
If a problem is detected, an information message is displayed:
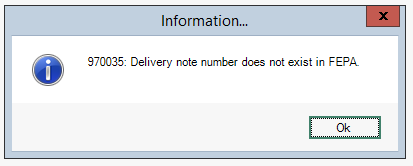
The delivery note number must be corrected, otherwise no processing will take place.
Goods Receipts for the Polish Location
Moving Average Price Plug-In (LocalWagedAverrageValuation )
This script calculates the moving average price (also 'FIFO price') based on the exchange rates of the national banks given by the local tax administration/government (in Poland).
The average price is calculated here according to the specifications of the colleagues.
Goods receipts for external process orders
(Plugin - ShowInfoOnInflow) This is switched off for client 3-Krefeld.
If there is a production order for an item in the goods receipt (= award order), then information and a list of the linked WOs and operations (because there can be more than one) is displayed after processing the goods receipt.
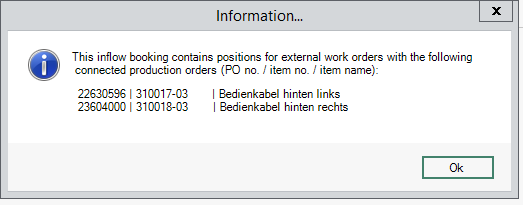
Before processing / saving, a check is carried out for FIFO. When the goods receipt is posted, it is checked whether the same goods are already in the destination warehouse. This is to avoid mixing the batches. The message is as follows:
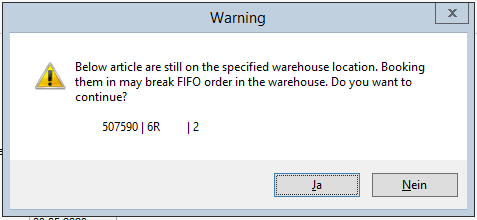
Cancel goods receipt
Attention! If the goods receipt item is subject to QM confirmation, the QM confirmation must first be confirmed and completed. Only then can the goods receipt be cancelled.
FEPA Function: Purchasing > Deliveries > Goods Receipt > Cancel Goods Receipt
- Enter the document number of the goods receipt or find and select it via the search.
- Confirm with the tick in the toolbar. The goods receipt is cancelled

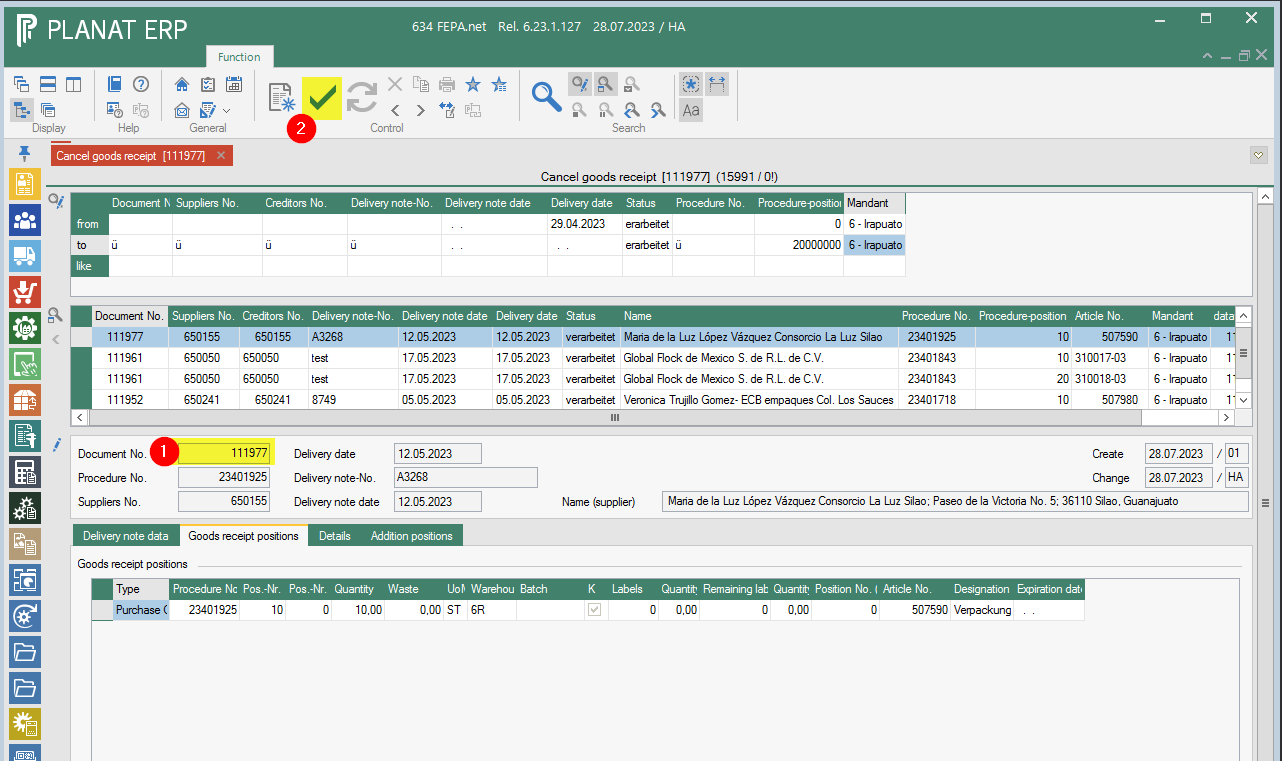
Invoice
General
The Edit Invoice Receipt function is used to enter the invoices sent by the supplier on the corresponding order item. It is possible to transfer the entered data to the financial accounting system via an interface.
The invoice receipt check also serves to compare the delivered quantities with the invoiced quantities, as well as to check the invoiced prices.
On the part of Planat, there is no fixed linking of goods receipts with the invoices entered here.
For the entry of invoices, the specifications valid at the location must be observed.
Edit invoice receipt
FEPA function: Purchasing > Deliveries > Invoice receipt > Edit invoice receipt
Header data
- Press Enter, document no. is assigned (if necessary, the client is queried).
- If the invoice is for only one order, the transaction number can be entered. Otherwise continue with the entry of the supplier no.
- Select the date of receipt of the invoice
- Select the invoice date
- Enter gross invoice amount
- Enter the invoice number of the supplier
- Check or select posting period

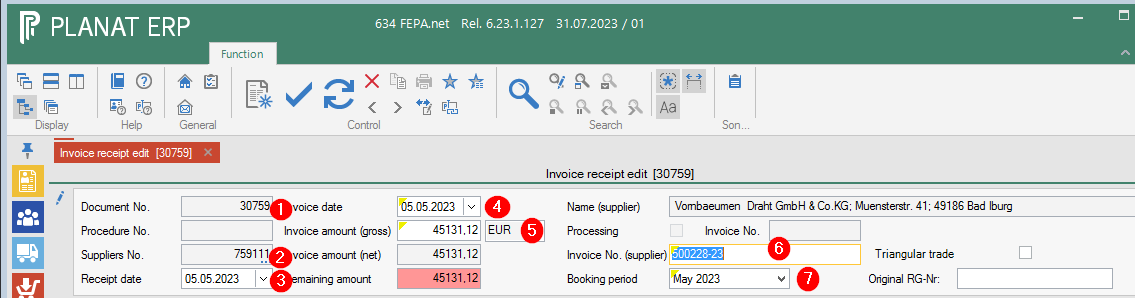
As long as the balance is not 0, the entered invoice cannot be processed.
Invoice data tab
- After entering the header data, the supplier is displayed here. Compare address and VAT ID. Must match
- If it is a domestic transaction, the tax rate and the tax amount are displayed here.
- Check or change the terms of payment are possible here. Compare with the invoice.

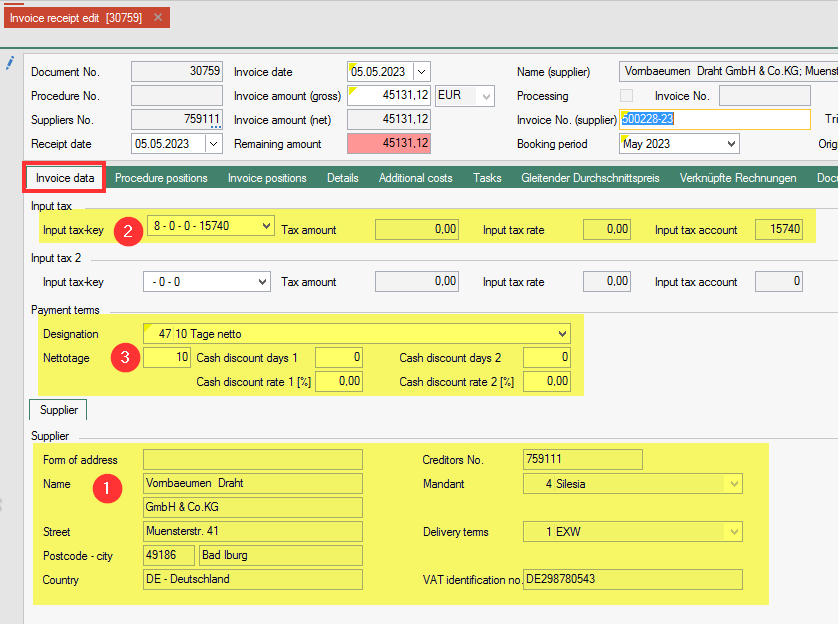
Procedure positions tab
- Click on the tab Procedure positions
- Press the magnifying glass, then only the open positions for the supplier are loaded.
- From the displayed order items, I select the item(s) listed in the invoice by clicking in the checkboxes at the very front (green tick) (order no. = procedure no., item, article, quantity ...).
- By clicking on the arrow > in the bottom right-hand corner of the screen, the items are transferred to the Invoice positions tab.

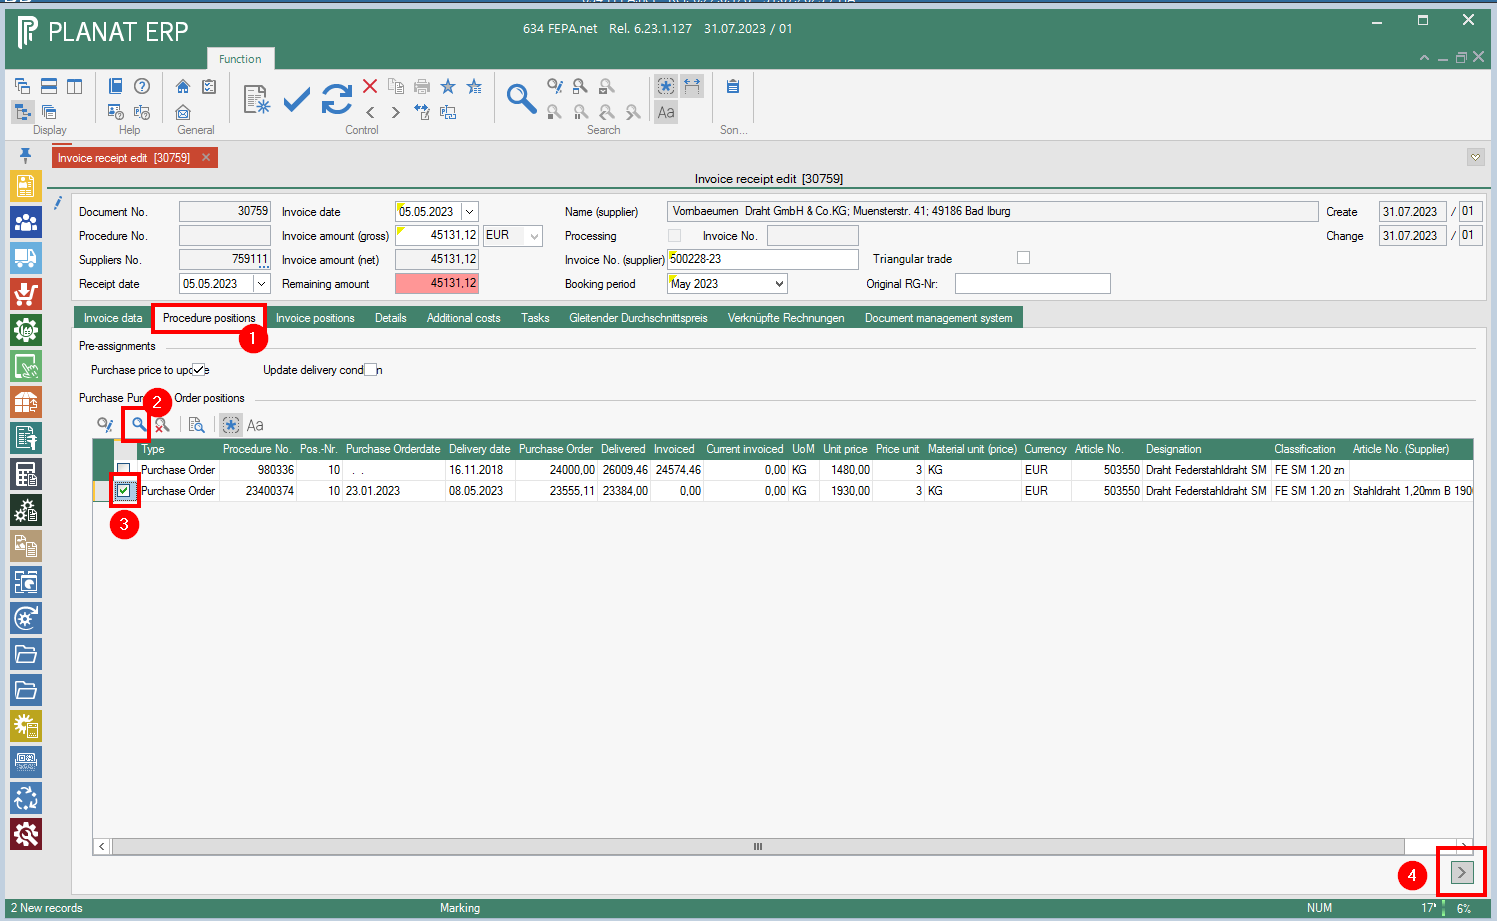
The entry automatically jumps to the invoice positions tab. If any are still missing, you can go back to the Procedure positions tab and also select the missing ones and transfer them to the invoice positions.
Invoice positions & details tab
Invoice positions
In the tab Invoice positions, the positions are displayed in table form. At the bottom, the item texts from the purchase order are displayed for the position in which the cursor is placed.
Field contents can be edited. This can be seen in more detail in the tab Details. According to the content of the invoice, e.g. quantity and price can be adjusted to the invoice.

Details tab
The data from the Invoice positions tab is displayed here in the form of a mask. The values can also be edited in the invoice item data.
According to the information on the invoice, only the quantity, price, discounts, etc. are checked here according to the invoice content and adjusted if necessary.
If the quantity corresponds to the ordered quantity, the check mark "Item completed" is automatically set. It can also be set manually. This completes the order item after processing.
The tick for updating the purchase price in the item master is set automatically.
The tick for updating the delivery condition can be set manually if required. The price is then updated when processing the invoice entry.
Cost centres
If cost centres are required for an article, they must be entered in the Cost centres tab. The tab can be found in the Details tab under the data on the invoice position. Here you can select one of the cost centres and the percentage (Portion) for it. A maximum of 3 cost centres are possible. Cost centres already entered in the transaction or the master data are taken over here.
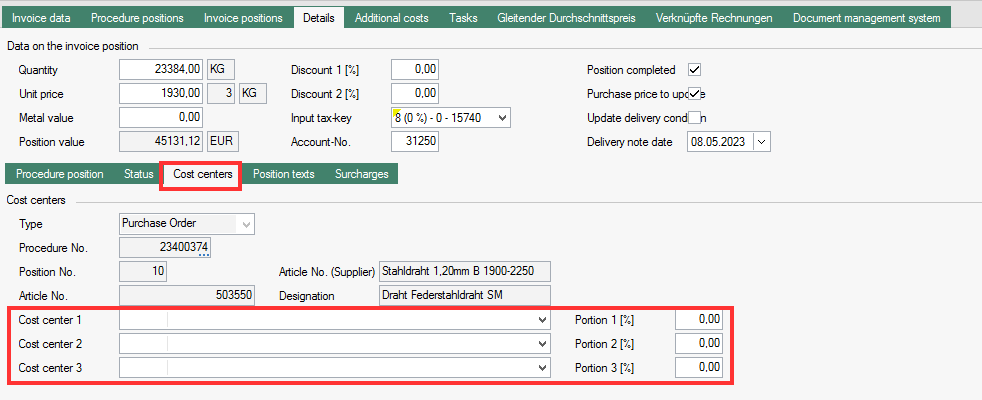
A cost centre is required for some material groups. This is checked when the invoice is saved and information is displayed that the cost centre must still be entered. Without a cost centre, processing is not possible.
Surcharges
Surcharges are an add-on in FEPA. In the Surcharges tab, surcharges can be entered for the invoice. The costs are then added to the item value of the invoice item. How they are to be used must be agreed with the purchasing management. They are not automatically allocated to the purchase price. By means of a GEMO own program, the surcharge is allocated to the Last Receipt price and replaced in the master data item when processing the invoice entry.
- Add line
- Select type of surcharge (Ask the CPO to enter the surcharge types in other languages.)

- Select type of surcharge

- Enter a remark, maximum 30 characters possible
- Enter price or percentage

-
The surcharge is added to the "purchase price" and transferred to the price of the last receipt. To check the calculation, click on the tab Linked invoices and click on the button
[Prüfe Berechnung PreisLZ]
- A window opens showing how the price is recalculated. (scroll in the window) Press the [OK] button to close the window.

-
To check this, you can look in the item master data to see whether the price has been adopted.
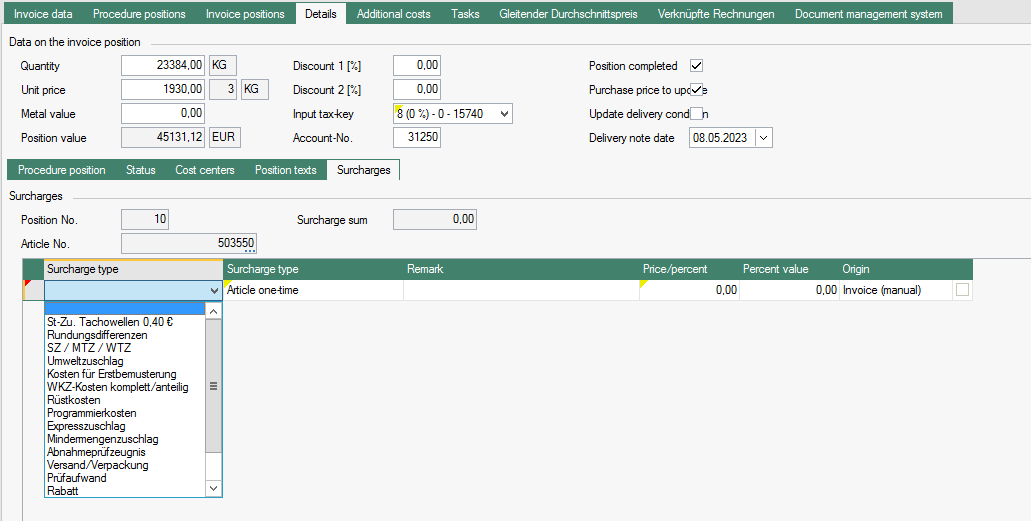
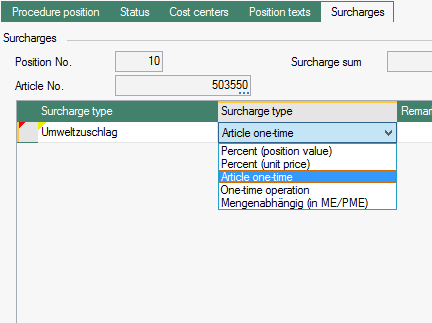
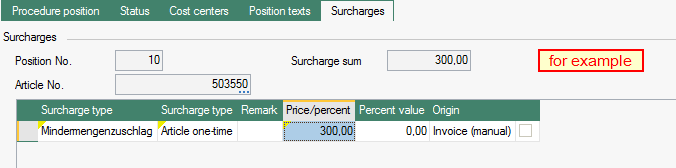
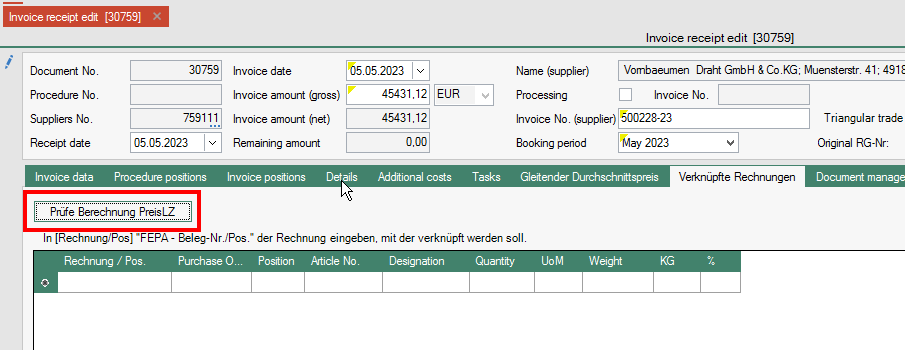
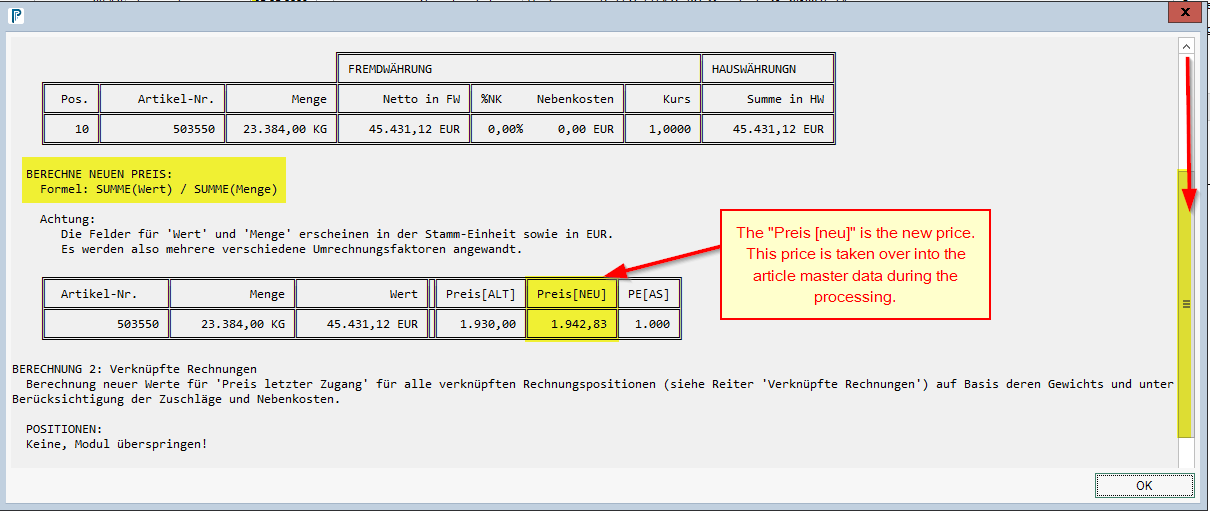
Additional costs tab
In the tab Additional Costs, additional costs listed in the invoice (e.g. freight or packaging) can be entered.
The value is to be entered in the column "Amount" behind the appropriate description. The exact use of the possible types must be agreed with the purchasing management.
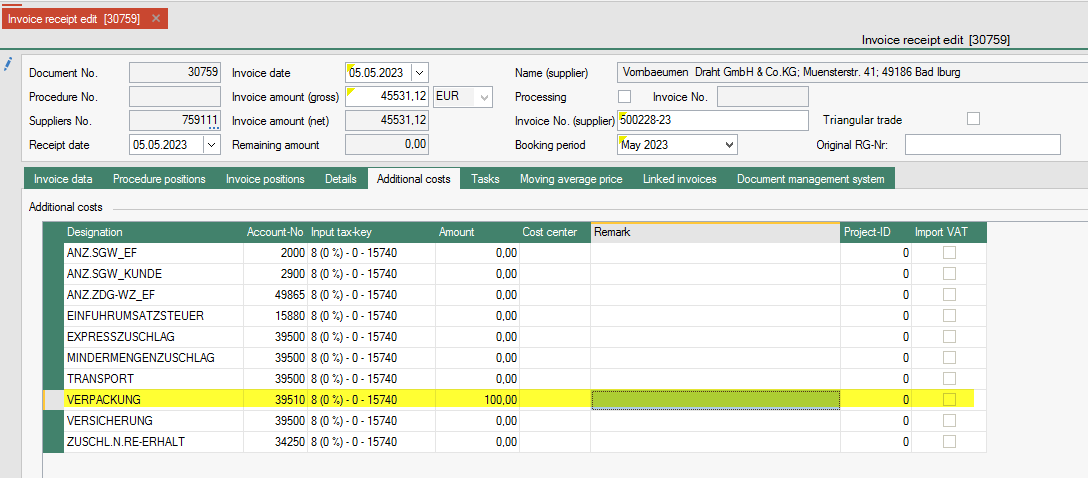
Without further entries, the entered costs are not transferred to the price of the last receipt in the master data item!
For a transfer of the additional costs to the last price receipt, please go to Allocation of surcharges and/or additional costs to the purchase price.
The list of possible additional costs can be extended by the FEPA administration.
Process
As long as the field Remaining amount in the header of the invoice receipt is highlighted in red, the processing of the entered invoice cannot be carried out. The Processing field cannot be ticked.

The entry can only be processed when the field Remaining amount is no longer highlighted in red. To do this, the Processing box must be ticked.

Then the tick must be clicked in the toolbar. The entry is processed and can no longer be edited.
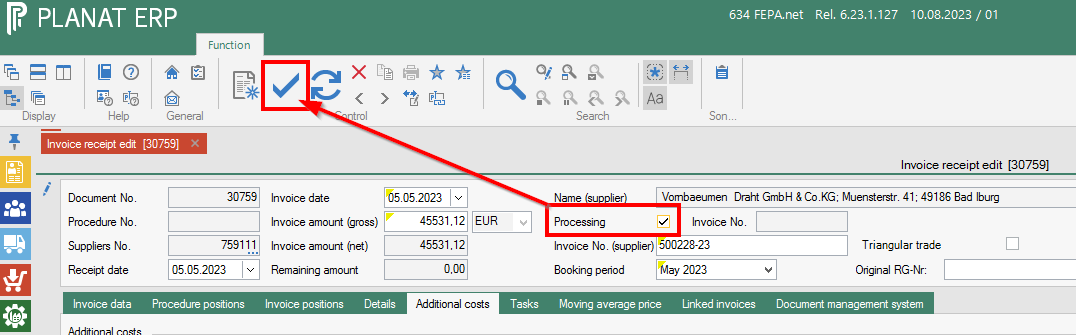
Saving is also possible without processing. The entry can be completed later. The voucher is accessed via the voucher number.
GEMO's own extensions
Invoice-Goods Receipt Connections
This add-on allows the user to link items on the A/P invoice to existing items on the A/P delivery. This is part of a solution for the implementation of the local currency average price inventory valuation. Linking to incoming deliveries is required for all clients that have locally activated the moving average price solution.
- Click on the Invoice Positions tab
- if the cursor is in the order item, clicking the button [Pos. lesen] reads the GR items for the transaction

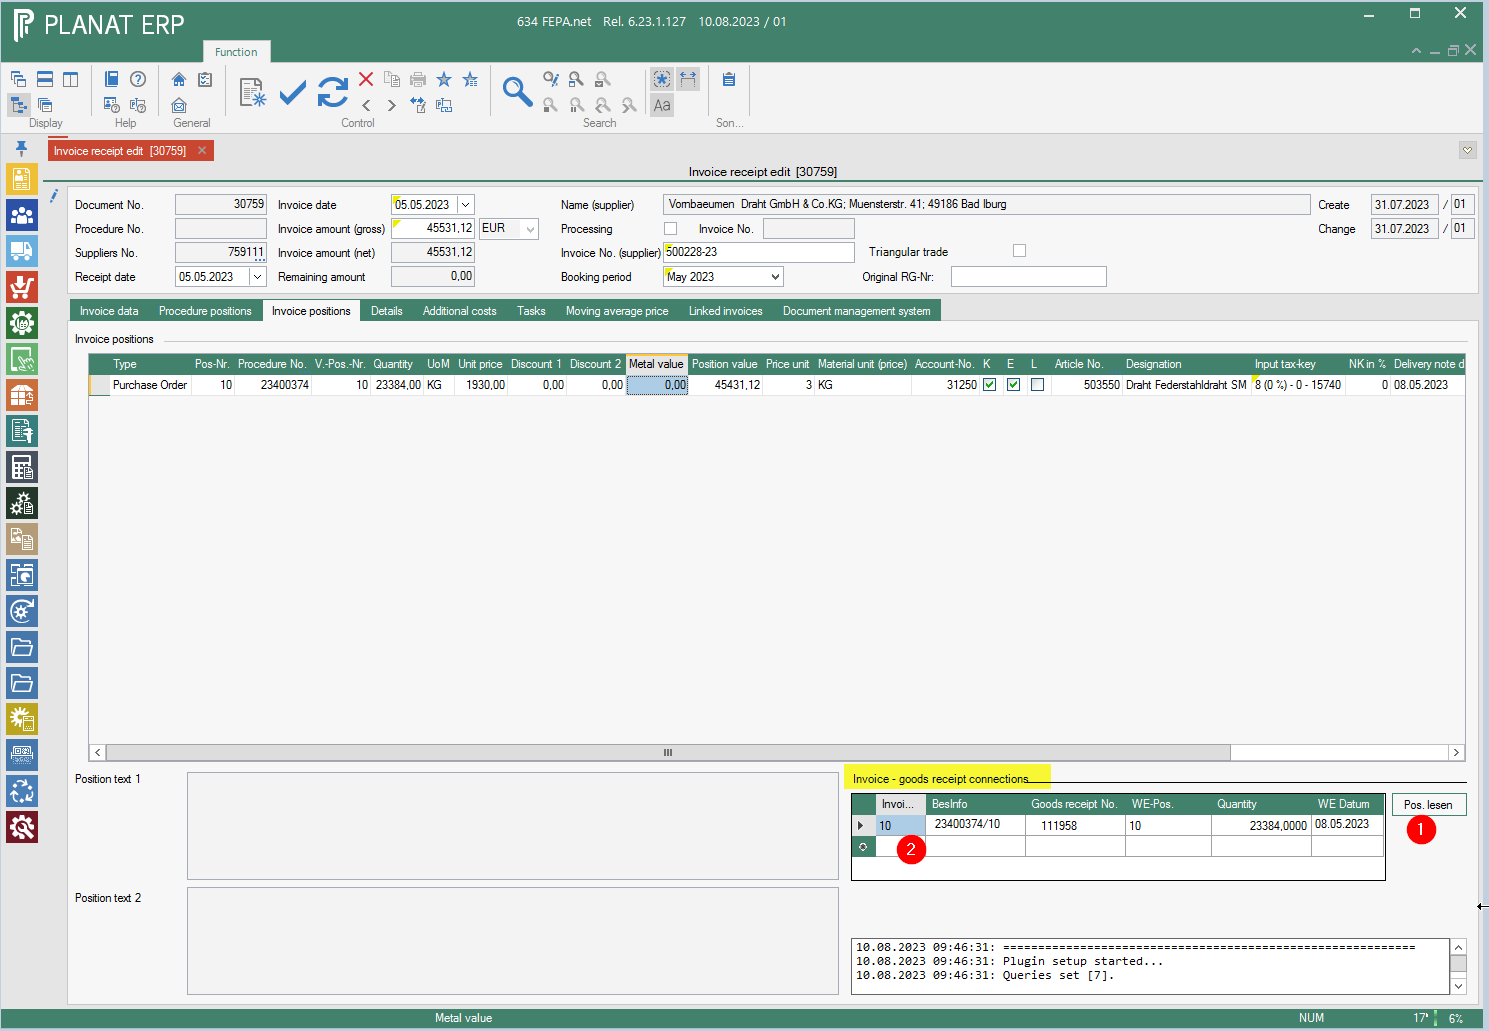
In the text field below the invoice-receipt connections, you can read what the programme has done. If the client does not work with the moving average price, "Solution is not activated for this client." appears here at the end and the GR items are only displayed.
Allocation of surcharges and/or additional costs to the purchase price
UPDATE last price Access in the article master data
There was a request to transfer additional costs to the purchase price for the master data, so that the costs are included in the price for calculations. For this, a weight must be entered for the articles in the article master data.
There are three possibilities.
The invoice contains surcharges. (see under Surcharges)
The invoice contains additional costs
There is a service charge invoice for an already entered invoice.
Additional costs
The additional costs can be allocated to the purchase price if required. A field has been added for this on the Details tab under the Transaction Items and Status tab. The allocation is made in % according to the weight recorded on the item. (Default from the purchasing management).
If an entered value is to be apportioned to the item purchase prices, a percentage must be entered in the item(s) after entering the value in the additional costs to determine the percentage of the costs to be apportioned to the item.
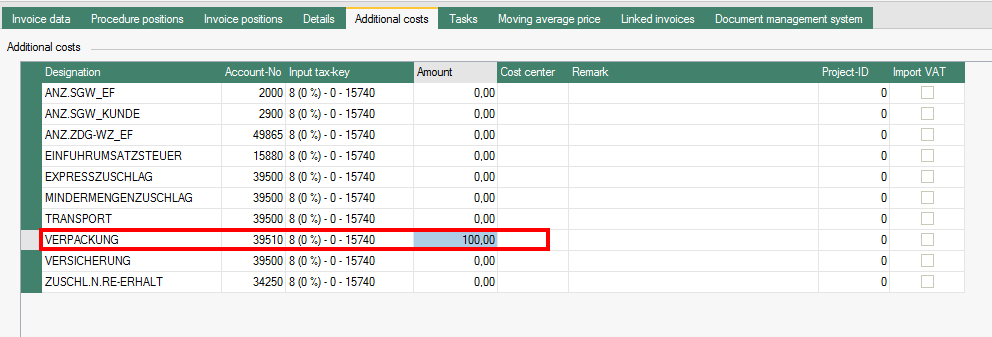
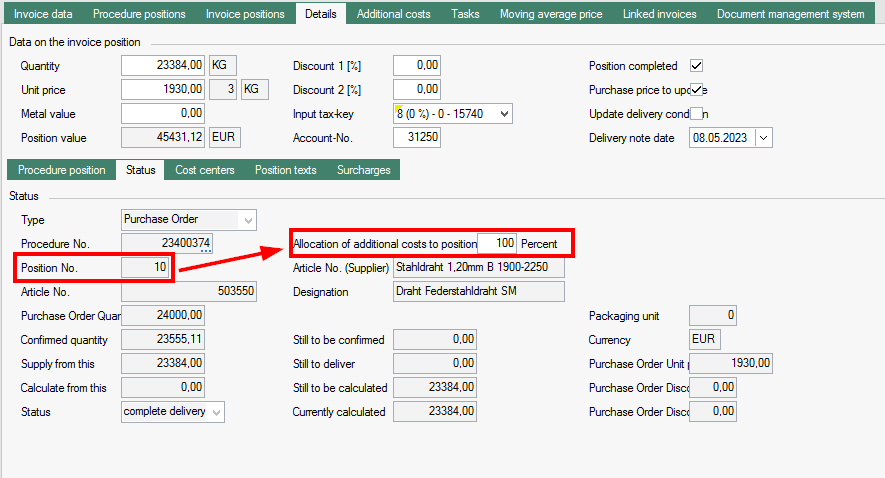
To check if the calculation is correct, click on the Linked Invoices tab and click on the [Prüfe Berechnung PreisLZ] button.
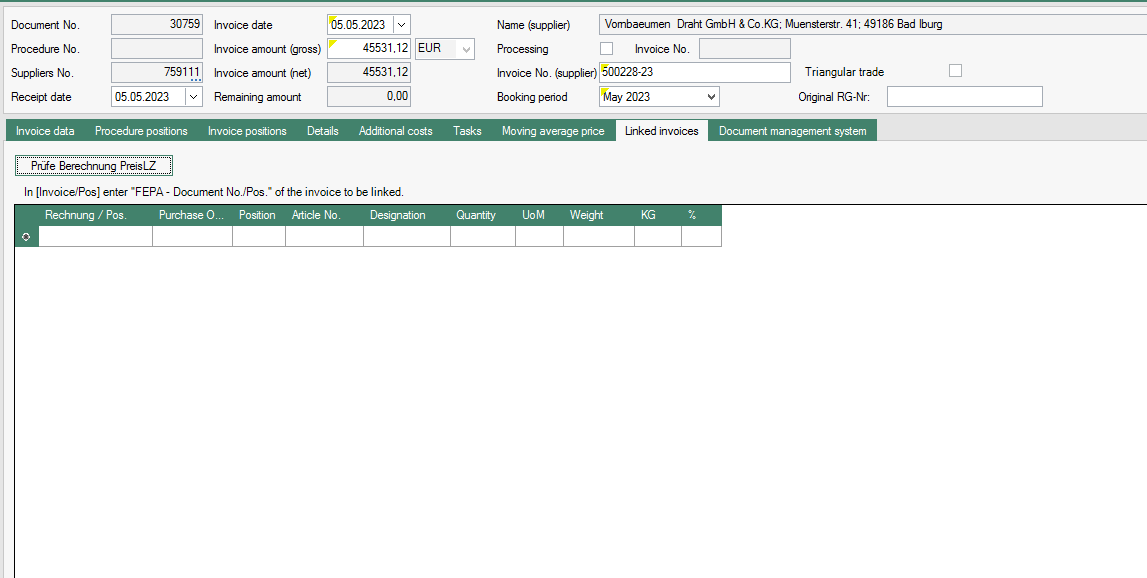
A window opens showing how the price is recalculated (Only in German language). Press the [OK] button to close the window.
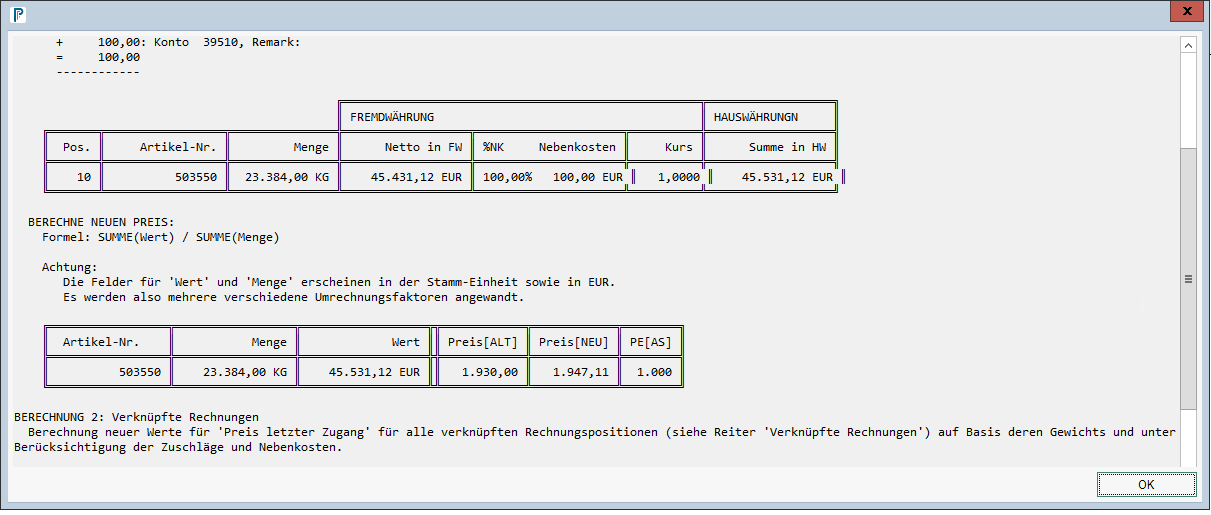
To check, you can look in the item master data to see whether the price has been taken over.
Entering a service charge invoice and linking it to another invoice receipt
First find the document number and item number of the invoice to be linked from the display invoice receipt!
Then continue entering in the invoice receipt:
- Enter invoice header data without transaction number. (see Edit Header Data)
- Enter the values for the appropriate account and description in the Additional Costs tab.

- Go to the Linked Invoices tab and enter the document no. / item, the transaction item to be linked is retrieved.

The percentage rate is always 100%, which is allocated to the last receipt price. - The apportionment is checked by clicking on the button [Prüfe Berechnung PreisLZ].

- If the allocation is correct, the invoice can be processed. The price in the item master data is updated.

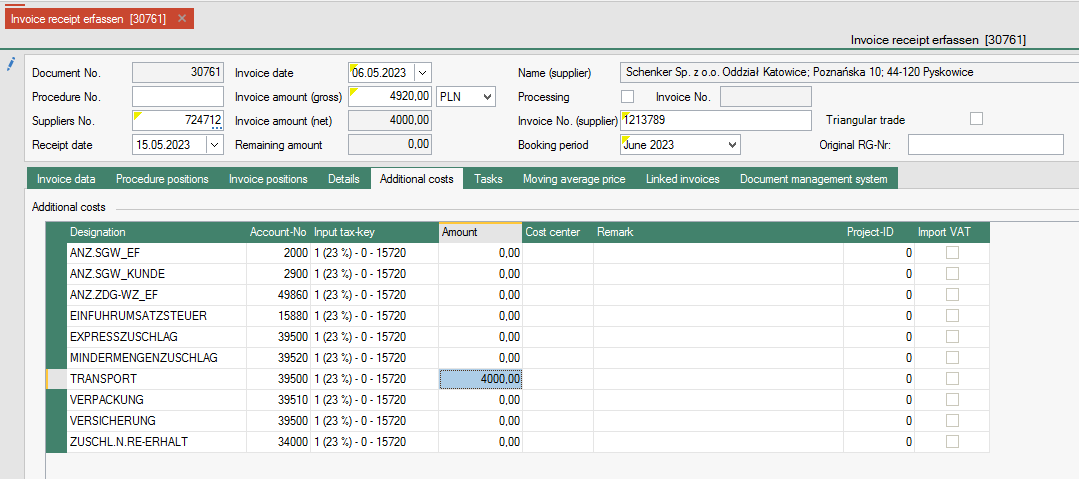

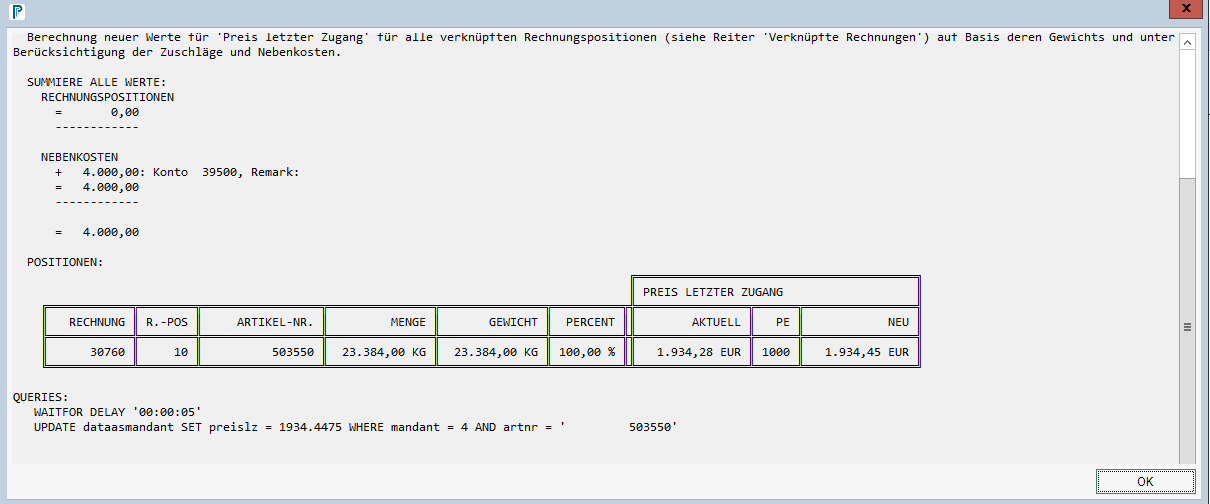
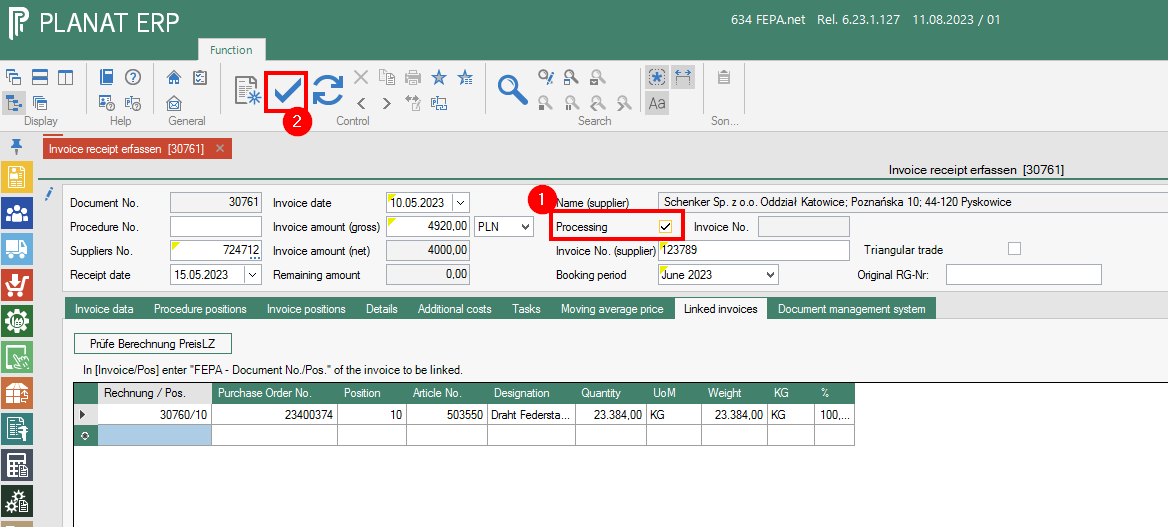
Example calculation:
If no weight is entered for the item to be linked, it is not possible to allocate the weight. In this case, a weight must be entered in the Article master data in the General tab, after which the invoice can be linked again.

There is an input tax amount check that can lead to information.
When the invoice is entered, it is checked whether it is a triangular transaction. If this is the case, tax key 5 is set. Information is displayed.
For Polish locations, a moving average price (also called 'FIFO price') is calculated based on the exchange rates of the national banks given by the local tax administration / government.
Cancellation of an entered invoice
There is no function to cancel an entered purchase invoice in Purchasing.
The invoice must be re-entered in the same way as the one that was "cancelled" but with a negative gross Rg amount. To enter the position "negative", the quantity must be entered as a negative value! Simply put a minus in front of the quantity.
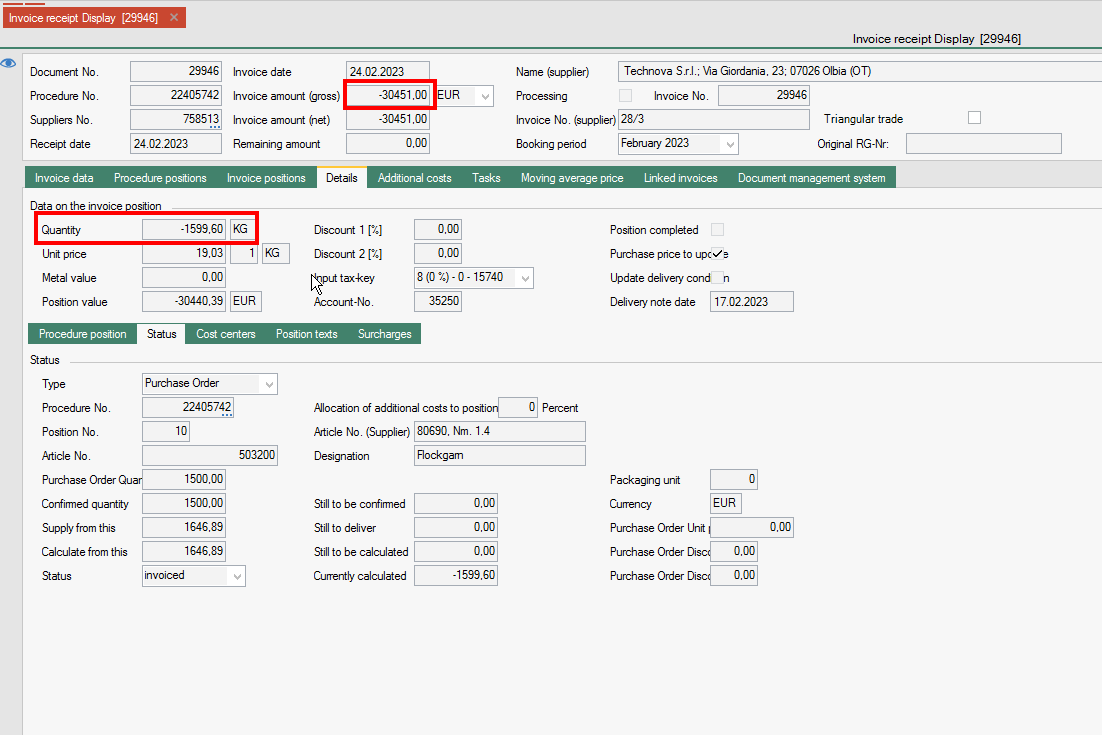
Delivery Condition
General
Here it is possible to create any number of quantity, price and discount scales. A validity date must be set for these scales.
Edit delivery condition
FEPA function: Purchsing > Delivery conditions > Edit delivery condition
- In the header we see the unit of measure 1+2 as well as the price unit from the article master.
- Status (drop-down menu): A status can be assigned to a delivery condition (Maybe you talk with the CPO – change the status to English language instead of German)
- Change (date and person in charge): For information purposes, it is displayed which person in charge last changed the status and when.
- Origin (drop-down menu): From the country table (see Utility Programs, Tables, Sales / Purchasing, Countries) a country of origin can be assigned to the delivery condition.
- Supplier article number (30 digits): In this data field you can enter the article number under which the purchased part is listed at the supplier. The value of the supplier's article number can be output on request and order by means of report adjustment.
- Remark (50 digits): A remark can be entered for the delivery condition for information purposes.
- Validy Date: Edit the line and enter a validy date.
- Quantities-price-discount-scale: edit the lines as far as you have scale prices. Enter the “from Quantity”, the price and the discount (%) for each quantity & price from this validity date.
- Currency (drop-down menu): You can select from the currency table to which currency the price of the delivery condition refers. The currency from the supplier master data is suggested for a new entry
- Priority (1 N): The priority determines the importance of the selected supplier for the item being processed; the lower the priority number, the higher the supplier's priority for the item. Analogous to the delivery time information, the priority serves as a visual decision-making aid when there are several suppliers to choose from. When selecting suppliers within the function Enter order items, the suppliers appear sorted in ascending order of priority. As there is no other functionality in the FEPA standard behind the priority, the same priority can be assigned to several suppliers. However, if the function Pre-calculation with graduated prices is used, it should be noted that the price is determined on the basis of the delivery conditions of the preferred supplier (priority = 1). This should therefore only be assigned once per article.
- Delivery time [days] (3 N): This data field specifies the average delivery time of the selected item from the selected supplier. This information is to be understood as additional information for the selection of an optimal supplier if an item is offered by several suppliers.
- Advance (goods receipt processing) in working days: Lead time for the delivery in purchasing in working days. When entering enquiry / order or award order items, the delivery date is pre-set from the delivery date minus the lead time for delivery. The delivery date can still be changed manually in the enquiry / order or award order item. In the case of order confirmation and goods receipt, the delivery date is displayed on the item screen. This entry only overrides the global value Delivery lead time (Utilities / Company data / Programme control / Purchasing) if a value other than 0 is entered
- Minimum quantity: The minimum quantity defines the smallest order quantity that the supplier can deliver.
- Packaging unit: The packaging unit tells the packaging quantity if the supplier can only deliver the item in certain quantities. If an entry greater than zero is entered in the packaging unit, the order quantity should be a single or multiple of the packaging unit.
- Transport time (weekdays): displays the entered transport time from the supplier address
- Material unit (Quantity) (unit of measure) drop-down menu: A unit of measure for this delivery condition can be selected from the unit of measure table (see Utilities, Tables, Master Data, Units of Measure).The unit of measure determines the unit in which the article is ordered from the supplier in terms of quantity. The quantities of the scales are also related to this unit of measure. The unit of measure can be different from the first or second unit of measure in the article master, in which case the data field U-factor (quantity) is additionally released for entering the corresponding conversion factor. If available, the second unit of measure from the article master data is suggested (in this case the conversion factor for the first unit of measure according to the article master also applies), otherwise the first unit of measure according to the article master is suggested.
- Material unit (price) (unit of measure price) drop-down menu: A price unit of measure for this delivery condition can be selected from the unit of measure table. The price unit determines the unit in which the article is ordered from the supplier in terms of price. The price unit can be different from the first or second unit of measure in the article master, in which case the data field U-factor (price) is also released for entering the corresponding conversion factor. If available, the second unit of measure from the article master data is suggested as the price unit of measure (in this case the conversion factor (price) for the first unit of measure according to the article master also applies), otherwise the first unit of measure according to the article master.
- Price unit (drop-down menu): The price unit is defined (see utilities/Tables/Master data/Price units) to which the information in the price scales refers. When entering new conditions, the price unit from the article master is suggested here.
- Conversion factor [Quantity] (3.4 N): In the conversion factor field, the conversion factor of the unit of measure (material unit (quantity)) to the first unit of measure in the item master can be entered if the unit of measure of the delivery conditions was entered differently to the first or second unit of measure of the item master. The conversion factor represents the relationship between unit of measure 1 in the article master and the unit of measure (material unit (quantity)) and must be non-zero. Required here is: How many units of the unit of measure (material unit (quantity)) are required for one unit of the 1st unit of measure in the item master.
- Example 1: 1st unit of measure metre
Unit of measure (quantity): kilogramme
In this case, the number of kilograms that a metre weighs must be entered in the factor. - Example 2: 1st unit of measure metre
Unit of measure (quantity): Roll
If there are 100 metres on a roll, enter 100 in the factor.
- Example 1: 1st unit of measure metre
- conversion factor [Price] (3.4 N): In the conversion factor field, the conversion factor of the unit of measure (material unit (price)) to the first unit of measure in the item master can be entered if the unit of measure of the delivery conditions was entered different to the first or second unit of measure of the item master. The conversion factor represents the relationship between unit of measure 1 in the item master and the unit of measure (material unit (price)) and must be non-zero (see example for unit of measure “material unit (quantity)” and conversion factor quantity).
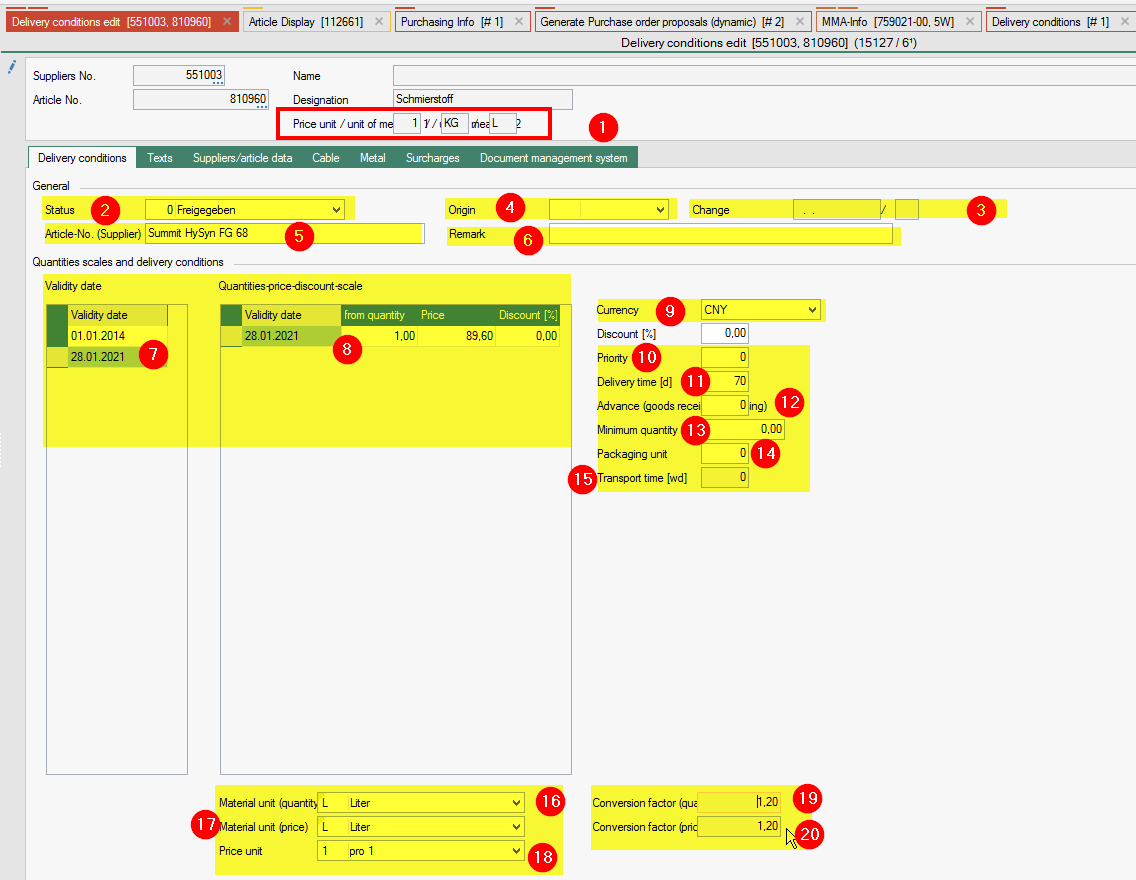
Production
Explanations on the subject of production.
PPS-info
General
This function provides extensive information about the production area. In the Settings tab, you make a preselection of which data should be displayed. This can be saved.
FEPA function: Production > PPS Info
All fields in the upper part of the window offer selection options to limit the data display.

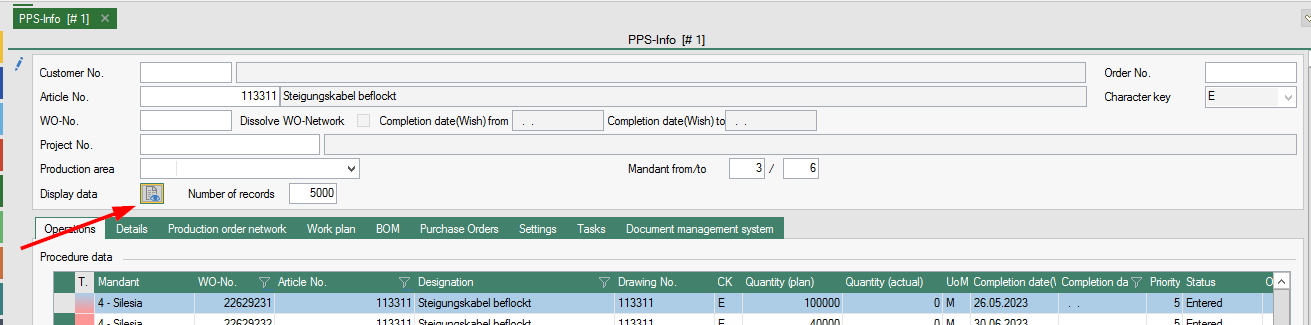
Weekly overview via PPS-info / settings
In the PPS info you can display all production orders (WO). In the settings you can define for yourself what you want to be displayed. With the check mark in the tool bar you can save your own settings.
If the scheduling was used and all WO are fine planned, a weekly overview of the WO of the current calendar week can be made as follows.
Filtering:
- Settings tab: Only check the box for In print and in process. (if necessary, select your own product area)
- enter Completion date(wish) from until to date from e.g. Monday to Friday of the calendar week.
- field: enter client from "n" to "n".
- Click on the Display data button.

- now the corresponding calendar week is displayed on the tab Operations.

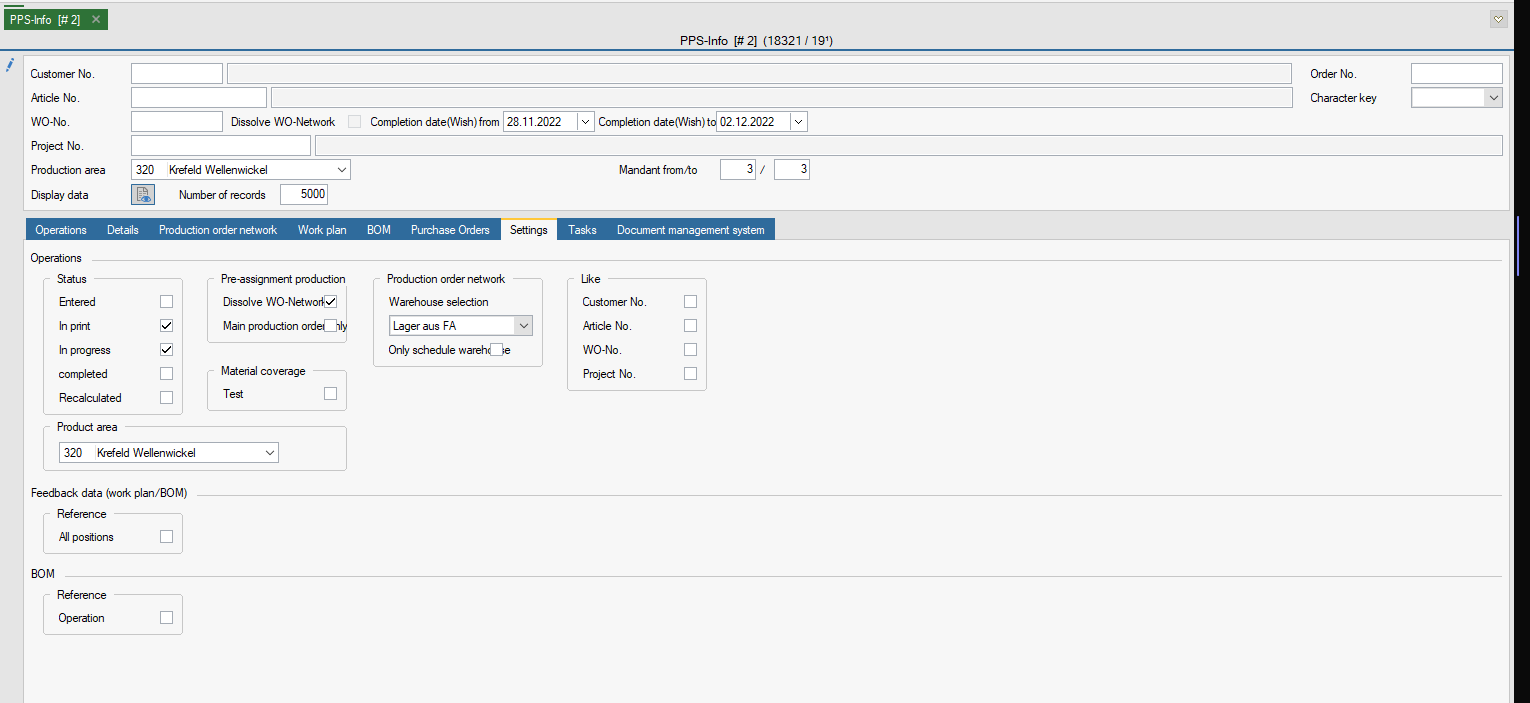
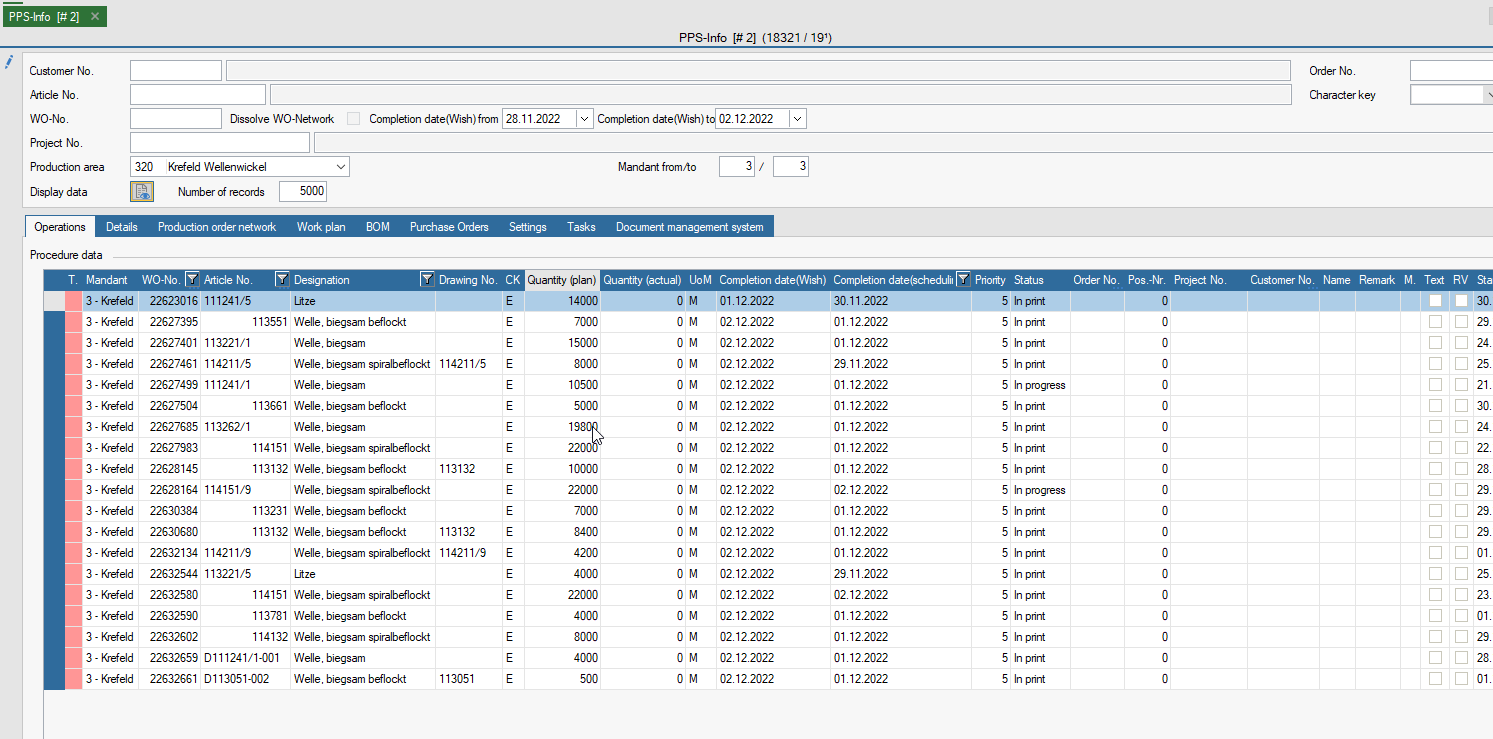
Releases
Release of the workplaces
In order to use workplaces via the PDC and to report times on them, they must be released after they have been created:
The function for this is Edit assignments.
It can be found in FEPA at: PDC - Assignments - Edit assignments
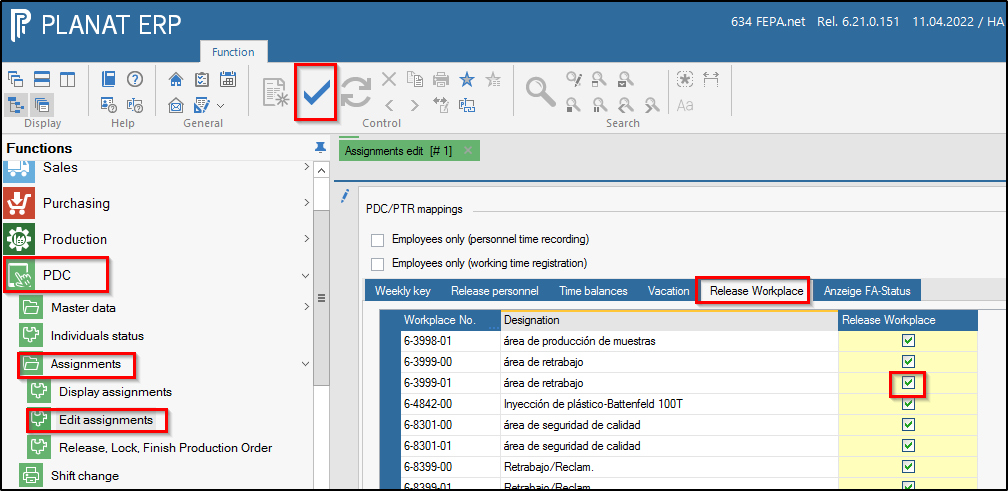
After opening the mask, click on the tab release workplace, search for a new workplace in the list and tick the box in the column "Release workplace".
To save, click on the large tick in the symbol line. The Edit Assignments mask is closed.
Afterwards, the data for the GEMO-AZE must be updated (a setter must update the data in the GEMO-AZE terminal), then the workplace is available for the GEMO-AZE. By default, the update takes place approx. once a day.
Release personnel
After creating a new employee via the Edit personnel function, a weekly key must be entered for the new "personnel" and it must be released. The FEPA function Edit assignments is used for this.
The function can be found under: PDC - Assignments - Edit assignments
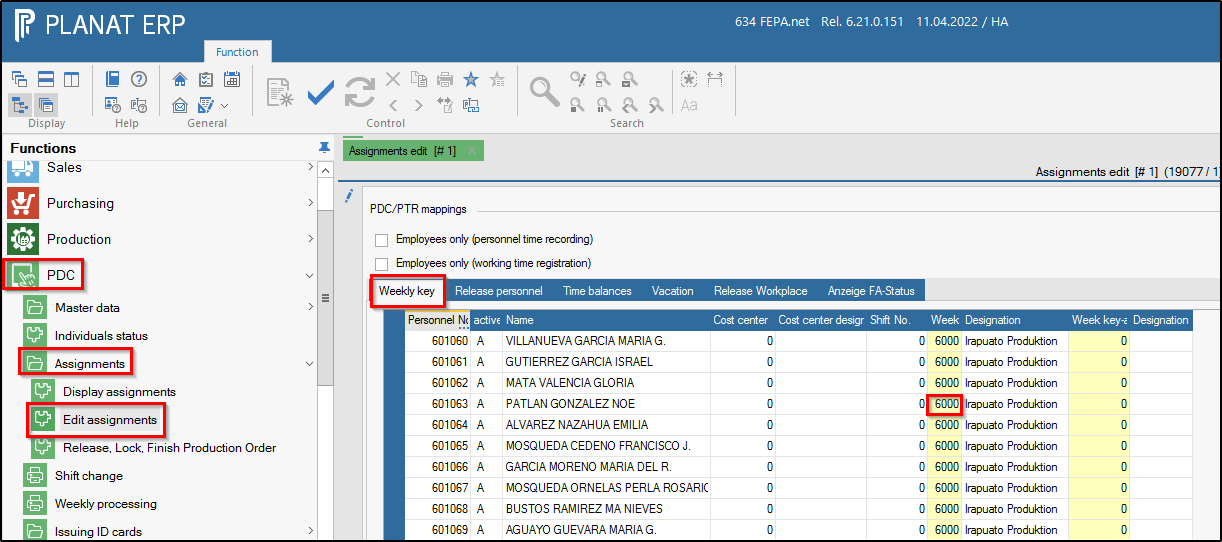
Click on the Week key tab, enter the location-specific week key in the "Week key" field, e.g. Irapuato, Mexico = 6000
Then click on the tab Release personnel search for a new employee in the list and tick the column "Release personnel",
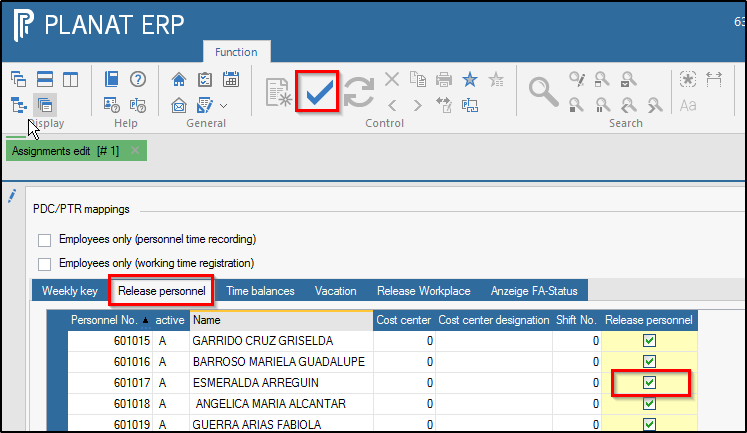
Save (click on the large tick in the symbol line). The function Edit assignments is closed.
Afterwards, the data for the GEMO-AZE must be updated (a setter must update the data in the GEMO-AZE terminal), then the workplace is available for the GEMO-AZE. By default, the update takes place approx. once a day.
Materials Management
MMA-Info
Settings
FEPA function: Materials Management > MMA Info
In the settings tab, some settings can be predefined and saved so that you always enter MMA Info with these saved settings. The settings can also be adjusted at any time in the current view.
- Settings for the header area for the tabs Movements with prices, Movements, Movements condensed.
- Warehouse "%" shows all warehouses, "Client abbreviation +%" only all warehouses for the client
- Tick for transaction and movement types displays data or not (no tick)
- Date (from) /date (to) limits the display period
- Number of data records, how many lines are displayed
- Settings for the header area for the Availability tab
- Settings for the header area for the tab Consumption
- Settings for the header area for the Serial No. tab
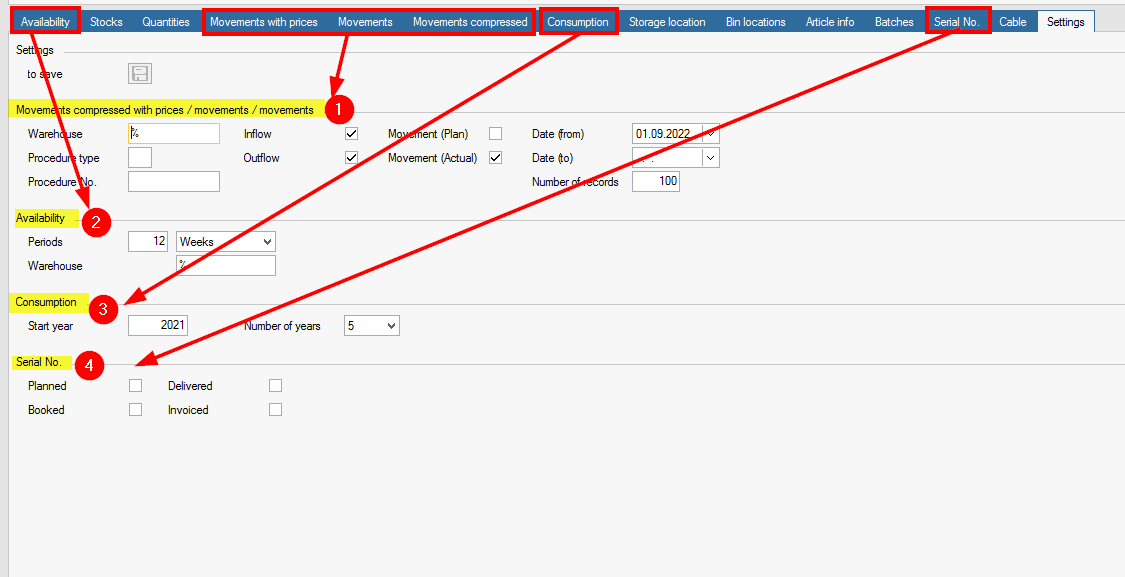
Check availability stock
FEPA function: Materials management > MMA-Info
- enter article no., press enter 2x (until everything is grayed out)
- select tab Availability (if desired, select the button Graphic, then a graphic view appears instead of the tabular view)
- enter the mandant+ % for stock to see only the mandant related quantities. Then press the button next to it. (Calculate across warehouses)


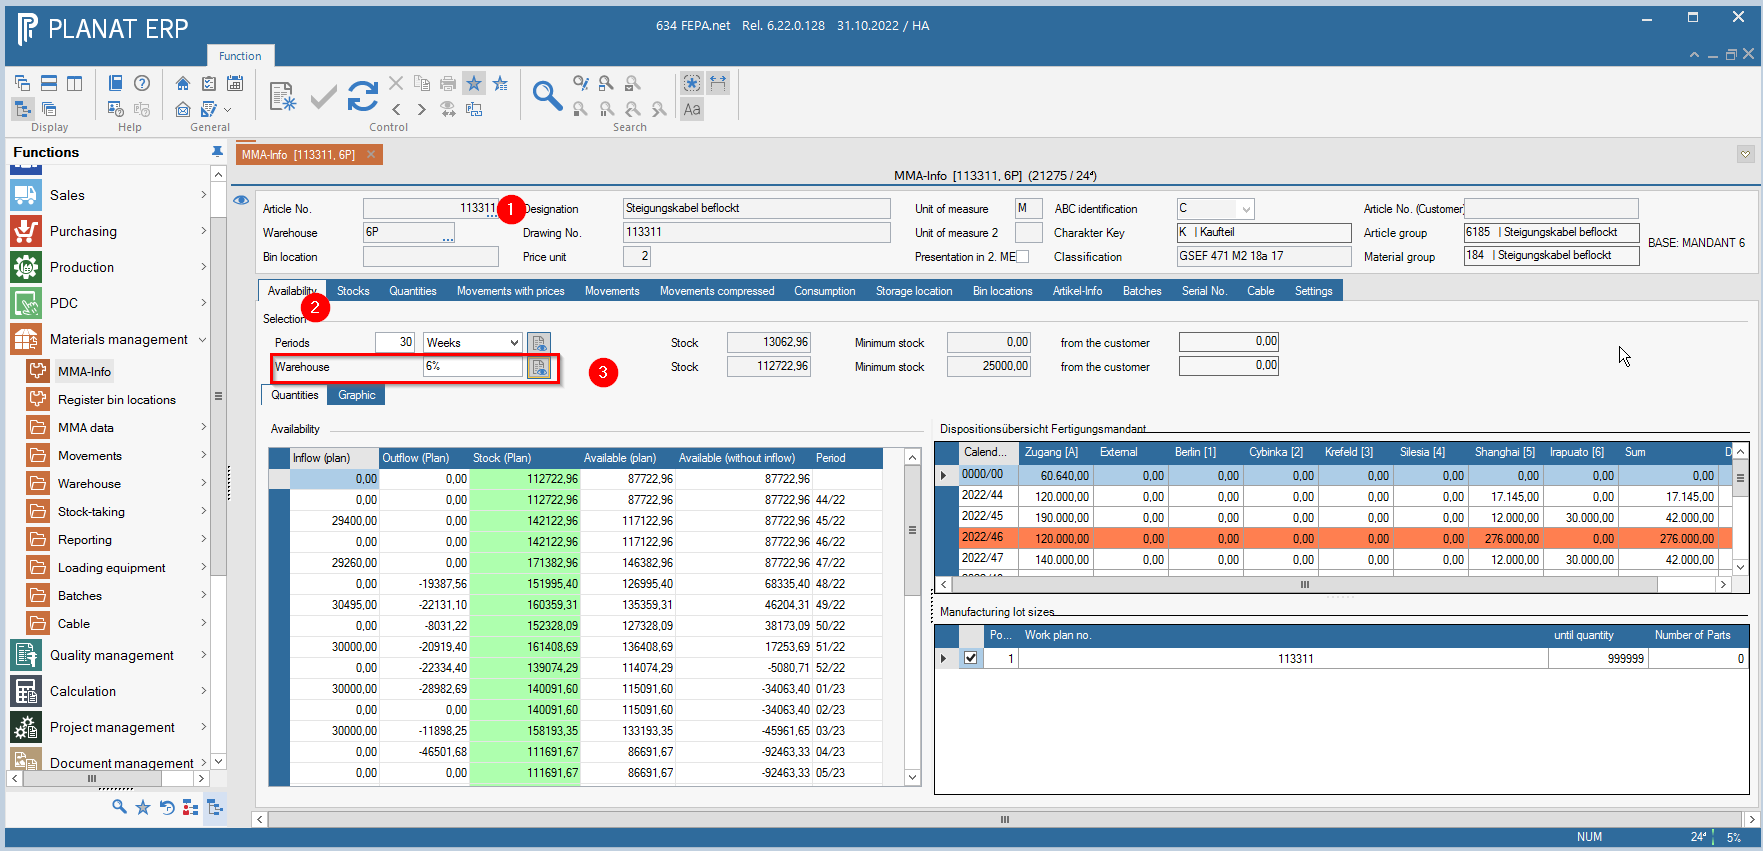
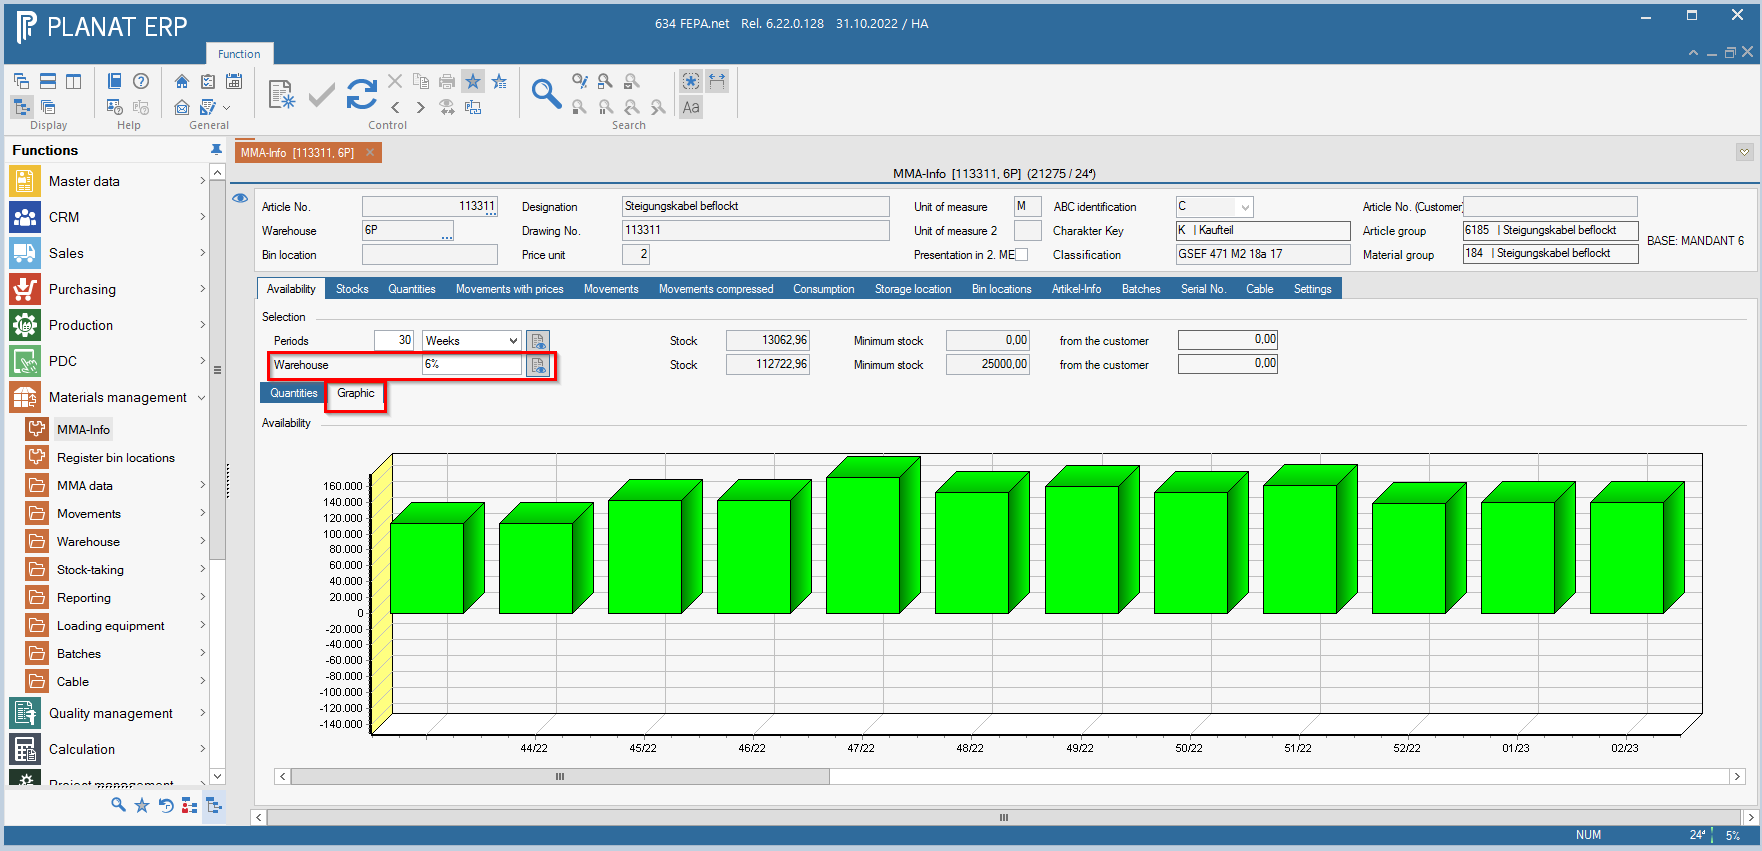
Overview of total stock of an article
FEPA function: Materials Management > MMA-Info
- enter article no., press enter 2x (until everything is grayed out)
- select tab Storage location
- change number of digits to 10 (so it shows all warehouses of all clients in full length)
- click on the button Display data

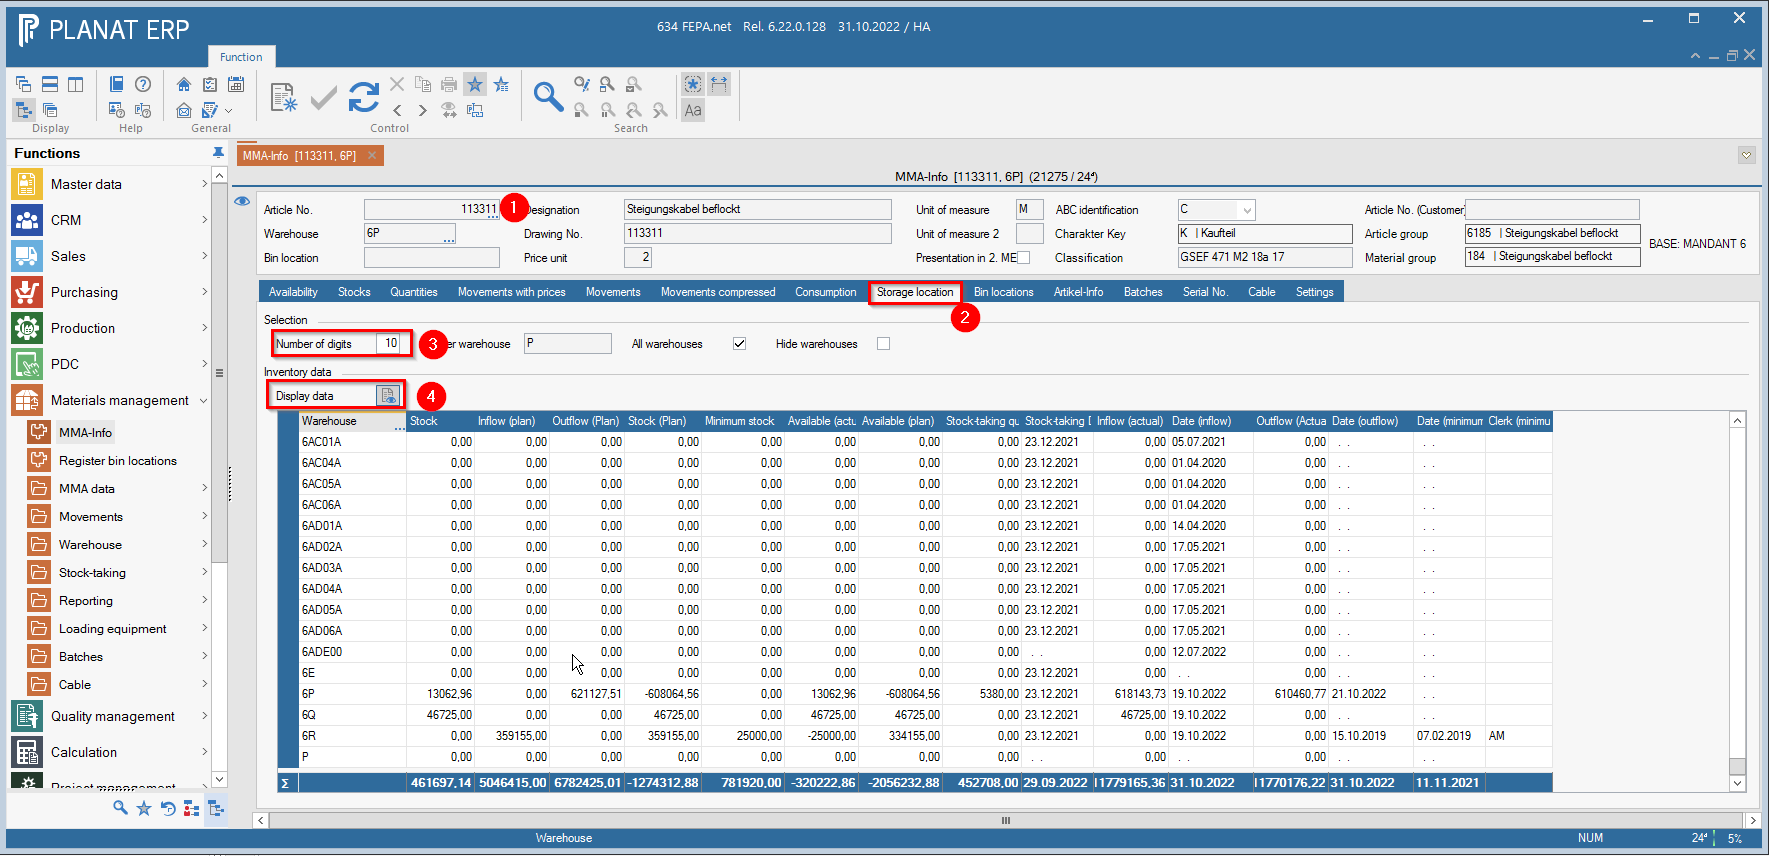
FEPA cannot be limited here to the warehouses per mandant. All warehouses (worldwide) are displayed.
Rebook inventory quantities
Using the function rebook inventory quantities, a rebooking or transfer of an article to another warehouse can be carried out as a manual actual movement.
FEPA function: Materials Management > Warehouse> Rebook inventory quantities
- append line
- enter article number
- enter the desired quantity to be transferred (if necessary, note the unit of measure!)
- select the warehouse of departure (outflow warehouse, the warehouse from which the goods are to be deducted)
- enter the warehouse of receipt (access warehouse)
- date fits?
- Confirm with the tick in the tool bar, only then will the booking be made.

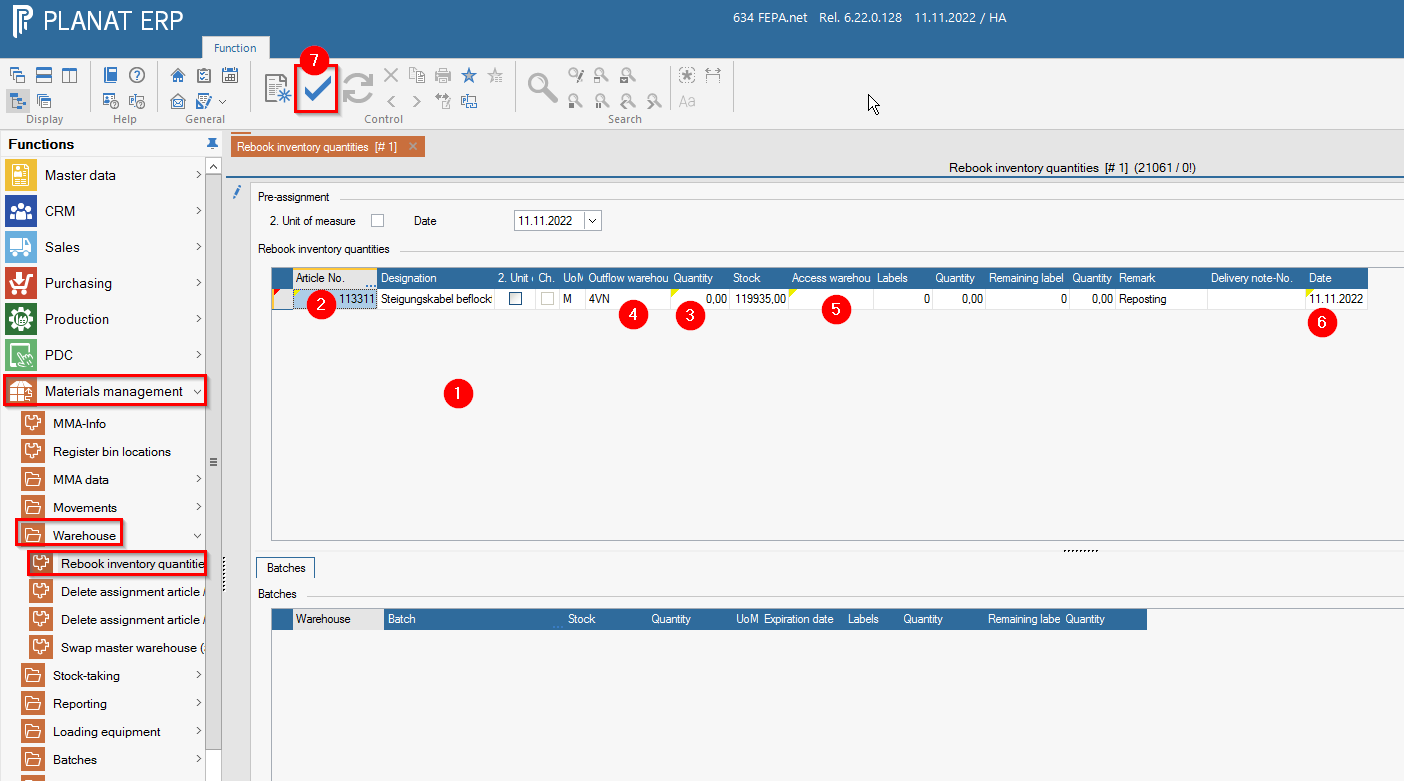
Note: Information can be entered in the Remark column!
Empties - Account statement ( loading equipment)
The movements for selected articles at selected warehouses that have occurred in a specified period are output in the form of an account statement. The account statement is used to reconcile the bookings with the business partner.
FEPA function: Materials management > Loading equipment > Issue account statement
- enter warehouse (for a customer warehouse K + customer number e.g. K290023)
- enter loading equipment (article number 813001 - packaging small carrier e.g.)
- limit date from - to
- adjust mandant and language if necessary
- set sorting field1 to loading equipment (Ladungsträger)
- press the update button
- print on the printer symbol - document will be printed

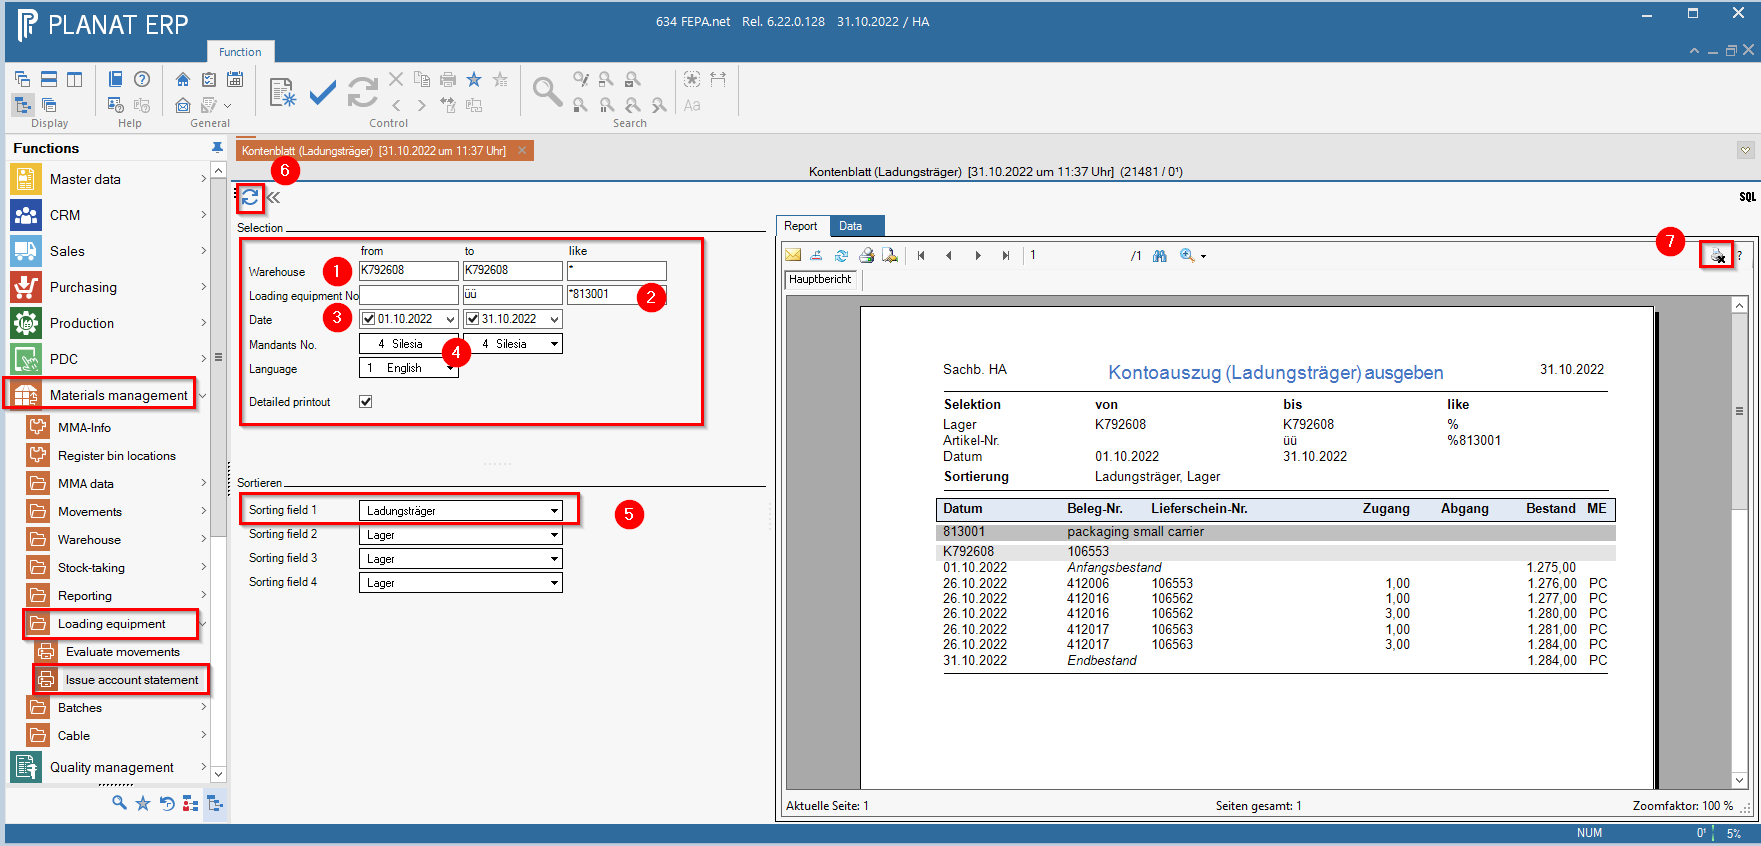
Note: In the Data tab there is information about the account sheet, which can be exported to Excel.
Inventory
General
Carry out an inventory
The inventory is suitable for both an annual inventory and a permanent inventory. The following functions are available for the inventory in the menu Material Management > Stock taking > :
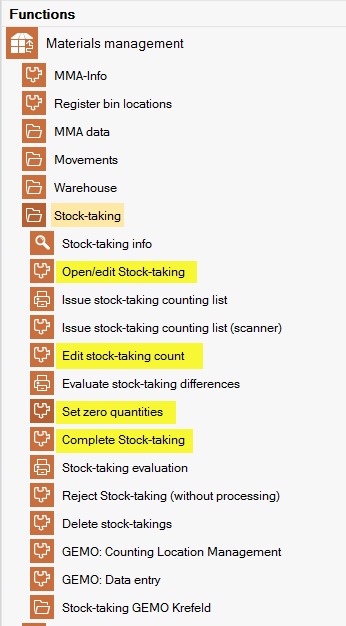
To carry out a complete inventory, the functions marked in yellow - opening, count input, zero quantities and closing (complete) - must be run through in the specified order.
The inventory is carried out on the basis of mandant/article/stock combinations; therefore, only articles of one storage location (stock-number) can be counted.
Several inventories can be carried out at the same time.
A client/article/storage location combination already entered in a (not yet completed) inventory is no longer taken into account in a further inventory opening.
Only one employee at a time can work in the Edit stock-taking count function for an inventory!
All FEPA actual postings that are made before the inventory is opened must also be made physically by the start time of the actual count.
No physical stock movements may be made until the end time of the actual count.
FEPA actual postings may also be made after the opening of the physical inventory, provided that it is ensured that these do not influence the count result.
Inventory info:
All stored inventories are listed in the grid on the screen. The status of the respective inventory is shown in the "Status" column:
1 = in progress
5 = completed
Inventory tasks in advance
Monthly work
Stock valuation
Check the inventory valuation for articles with "0" price. Determine the price and enter it in the field transfer price inflow access in the article master in the programme Master data > Articles > Edit articles in the tab MAWI according to the mandant.
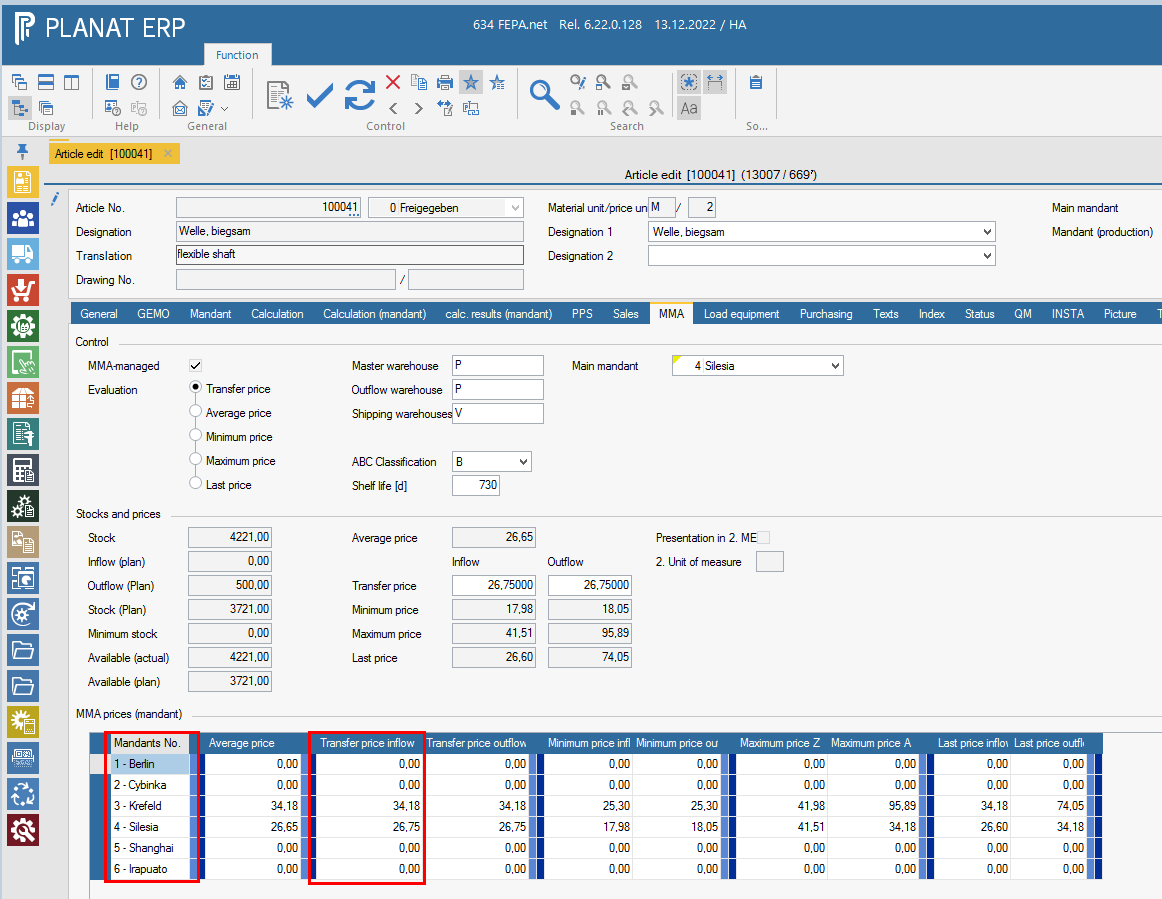
Advance work on annual inventory FEPA
- All goods receipts are recorded and reported via Babteq - Check stock Q Warehouse. See FEPA
Reporting > MMA > stock ledger
And see FEPA programme
Quality Management > Confirmations > Purchasing > Edit Confirmation, open the selection area of the search, enter the field "Date (goods receipt)" in the line "from" the 1.1. of the current year, check the field " Mandant" and start the search. You will then get a list of all open feedbacks for your 'mandant'. All should be completed and the list should be empty.

- All incoming invoices are posted in FEPA by the purchasing
- All production orders are finished and completed via the programme
Production > PDC > Determine production order status. Check via PPS - Info, settings only work orders (WO) in processing, pull list with all WO, see if all bookings are completed and if the material is booked! If bookings are still missing, add these bookings and complete material bookings so that the WO status is set to completed. - Check FEPA for missing scanner bookings
- All delivery notes and invoices for dispatch have been printed.
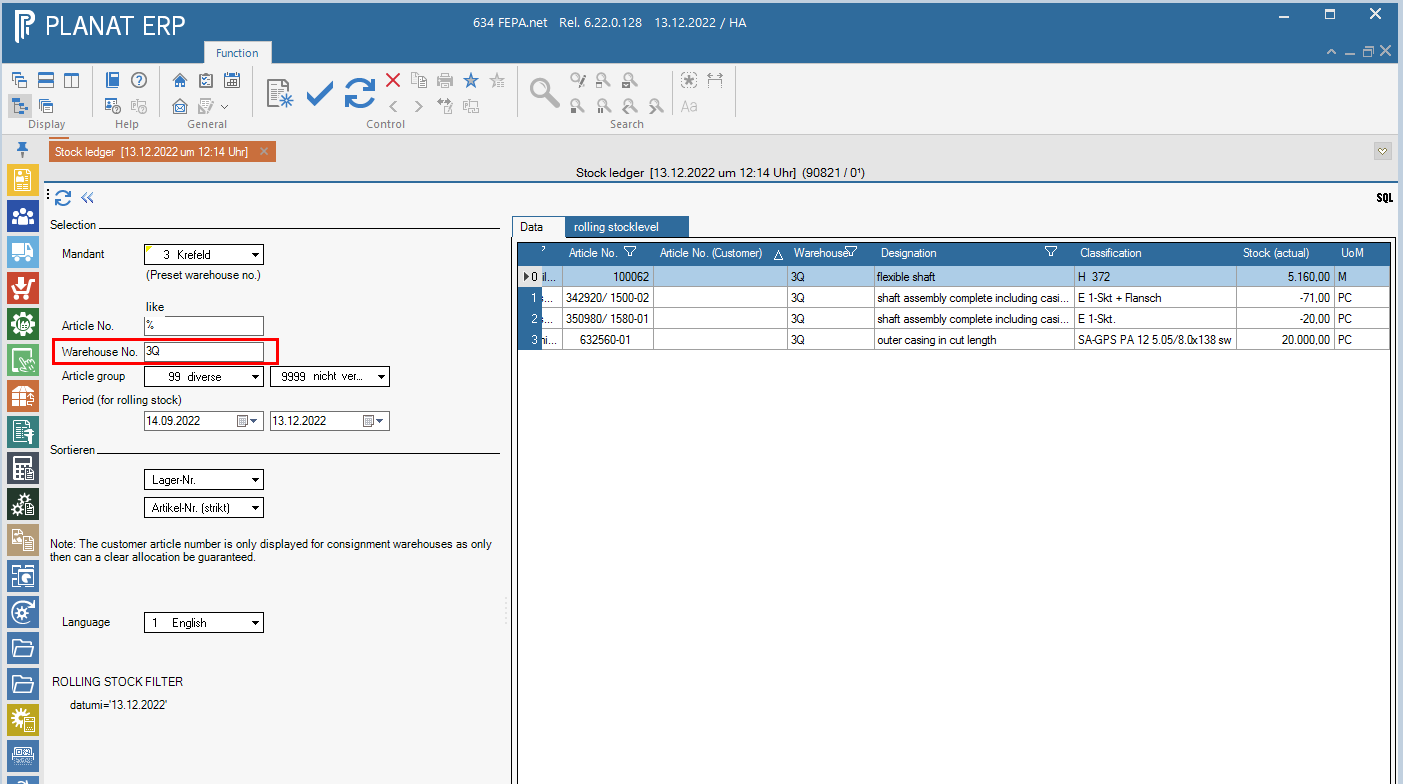
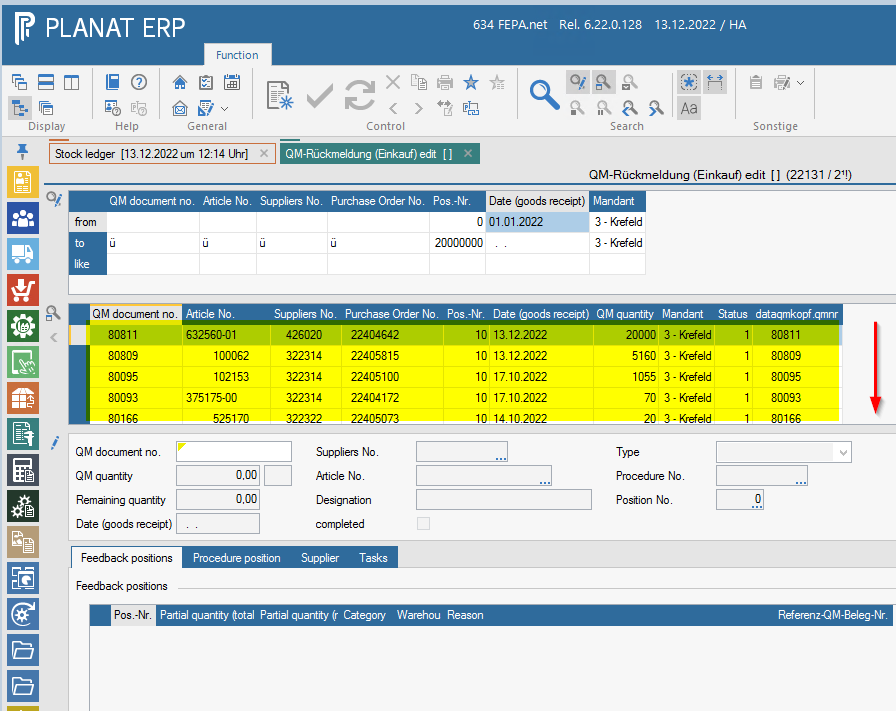
Inventory
General
Open inventories with incorrect article/warehouse combinations or other errors can be deleted using the Reject Stock-taking (without processing) function. The article/warehouse combinations are then available again for a new stocktaking.
Open stocktaking
FEPA function: Materials Management > Stock-taking > Open/Edit stock-taking
A number is automatically assigned for each new stocktaking. The last number can be stored under Utility program > Company data > number ranges. (Materialwirtschaft - Inventur)
The proposed number can be changed; an existing number can also be entered.
New entries can be added at any time to an inventory that has not yet been completed. The name of the inventory should at least contain the own FEPA mandant or the warehouse prefix for a better overview of the inventories. See Stock-taking Info.
The article/warehouse combinations to be included in the current stocktaking can be selected according to the following criteria
- warehouse no.
- article no.
- classification
- character key
- article group
- material group
- date of last inflow
- date of last stock-taking
- stock (quantity)
- Storage location (if used)
can be selected in each case (from - to) (the search library can be extended, if desired please open a ticket for this).
Procedure:
- enter, (number will be assigned automatically, alternatively you can enter your own number), Enter
- naming - assign a name for the stocktaking, Enter
- open search - click magnifying glass with pen
- enter search criteria, click magnifying glass
- check result! Only storage location/article combinations for your own location may be included. (Warehouse no. must start with your own mandant!) - If this is not the case, close without saving and start again.

-
Search result is as desired, save inventory with the tick in the tool bar. Fepa opens the inventory for the selected items.
-
To enter an article subsequently, open the inventory here and enter the warehouse and the article via the search or append a line and enter both values.
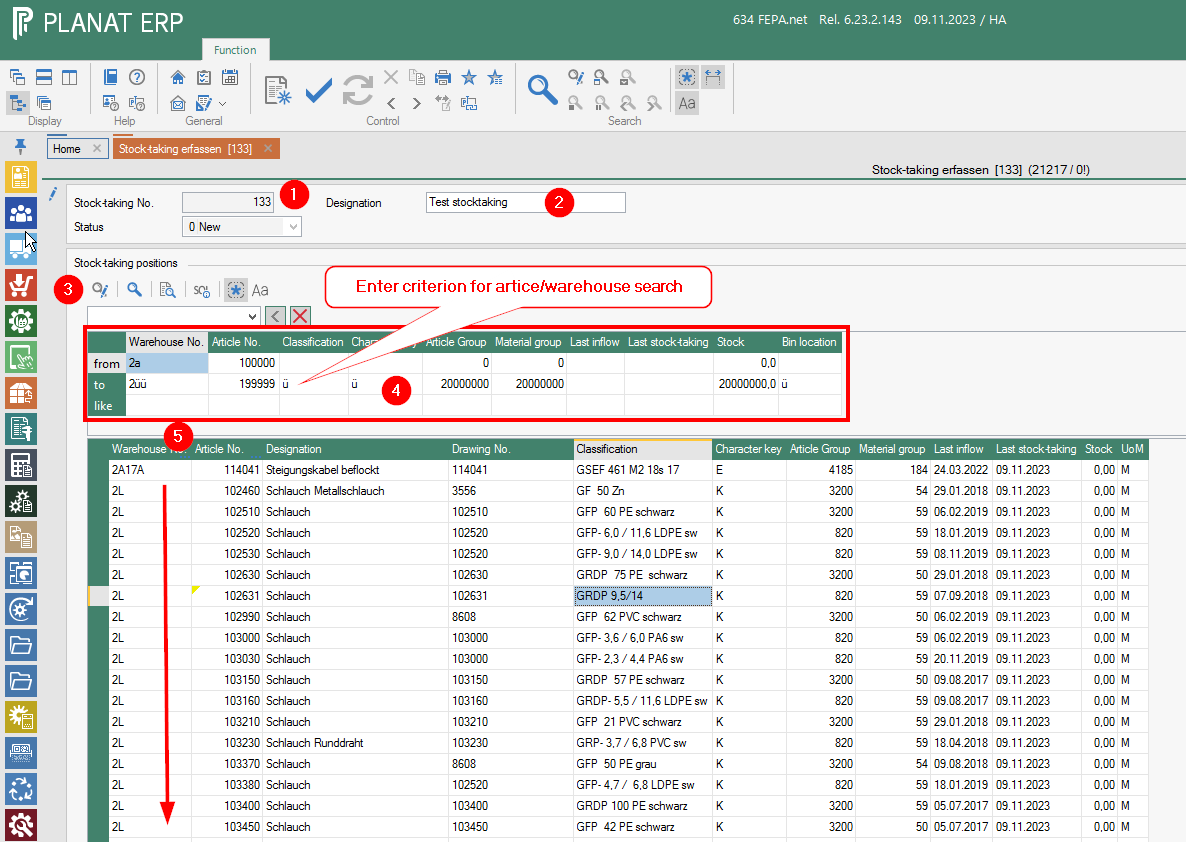
Issue stocktaking counting list
A complete stocktaking or individual selections from the stocktaking can be output to count lists. count lists.
FEPA function: Materials Management > Stocktaking > Issue Stocktaking Counting List
Via the selection and the sorting you can control which article - warehouse combinations are on the list. It is only important that at the end everything has been counted and that there is a list for all article-storage combinations. The item number here is the position of the article-storage combination in the inventory.
Here is an example: All item-storage combinations sorted by storage location
- Enter inventory number
- Sort field 1 = [Stock no.] Sort field 2 [Item no.] Sort field 3 = [Item no.]. press the marked button

- Printing is started with the printer symbol above the screen output. List will be printed and the mask will be closed.
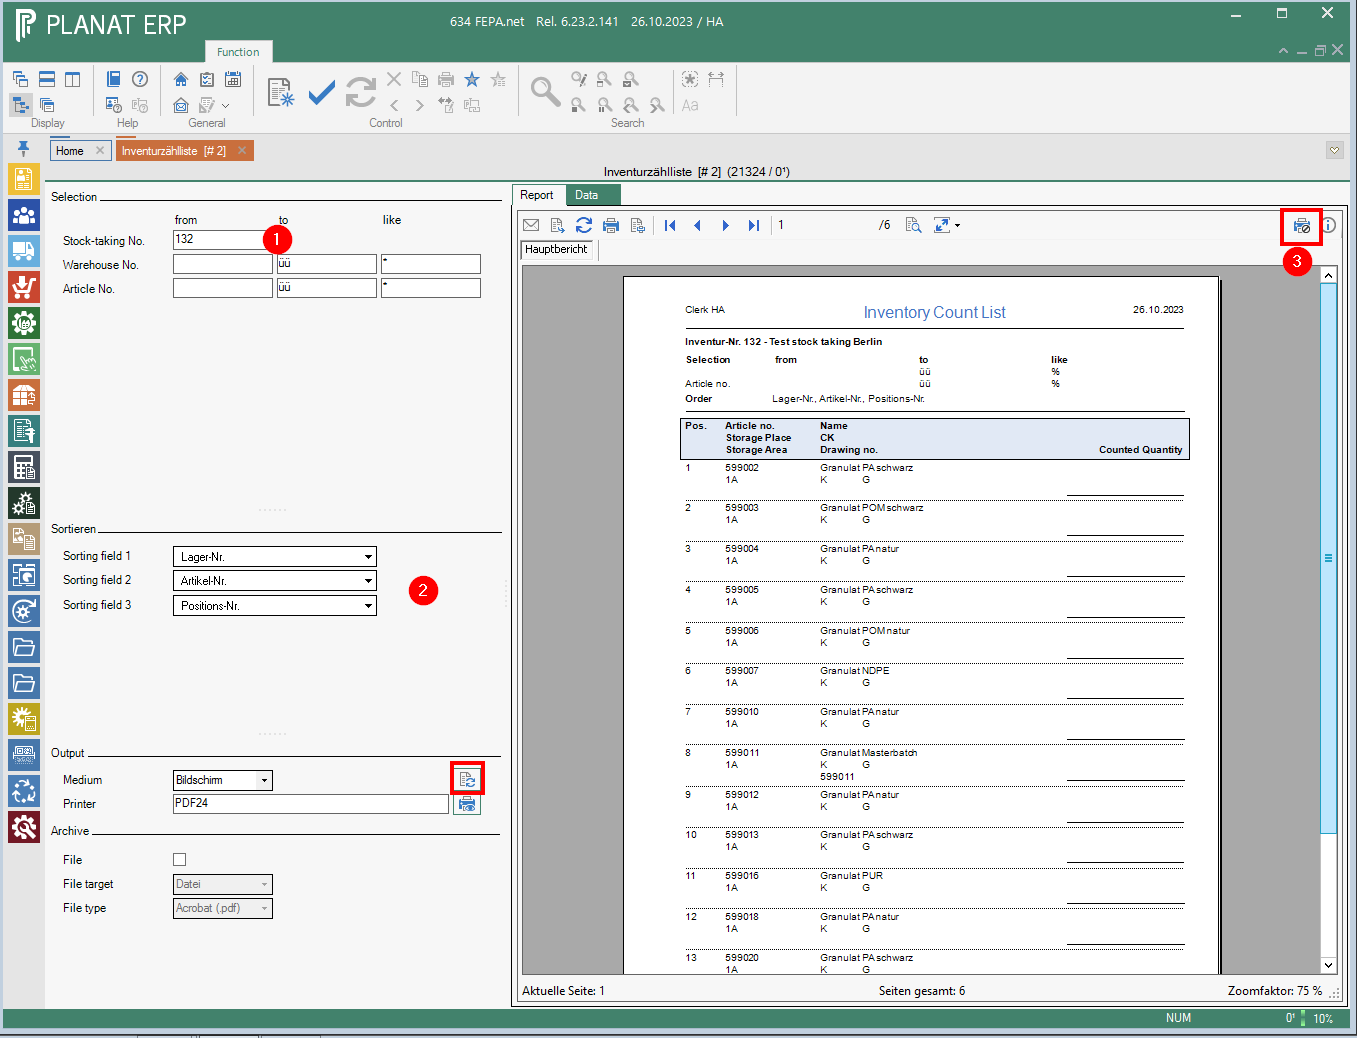
Edit stock-taking count
Only entries that meet the selection criteria are displayed. If an entry is made, the quantity is added to the previous inventory count quantity; the indicator is set to "counted" (status = '!').
Enter / correct counted quantities
FEPA function: Materials management > Stock-taking > Edit stock-taking count
If you have made a mistake, you can re-enter the last entry with a minus sign. Then the quantity is subtracted from the total.
- Enter inventory no., Enter
- Open search (press magnifying glass with stylus)
- If a page is to be recorded, simply click on the search and all items will be loaded. If only a specific item is to be recorded, enter [Stock no.] + [Item no.] in the Like line and click on the magnifying glass.
- The counted value for the item-stock combination is entered in the counted quantity column.

If this is the 1st entry, the status in the line with the "!" indicator is automatically set. The entered value appears in the [total] column and in the [last entry] column.

Erfasst man eine zweite Zählmenge in der gleichen Zeile wird der 2. Wert zum ersten Wert addiert und die Summe steht in der Spalte [Summe]. In der Spalte [letzte Eingabe] steht nur der eben zuletzt erfasste Wert.

Note: Please always note the unit of measure. In the inventory, the value is recorded in the 1st unit of measure of the item. There are items with 2 units of measure. The counter must always write the unit of measure on the count list.
The columns can be moved according to your own wishes. Simply click on the column heading at the top, hold it and move it. - Save, klick the button in the tool bar

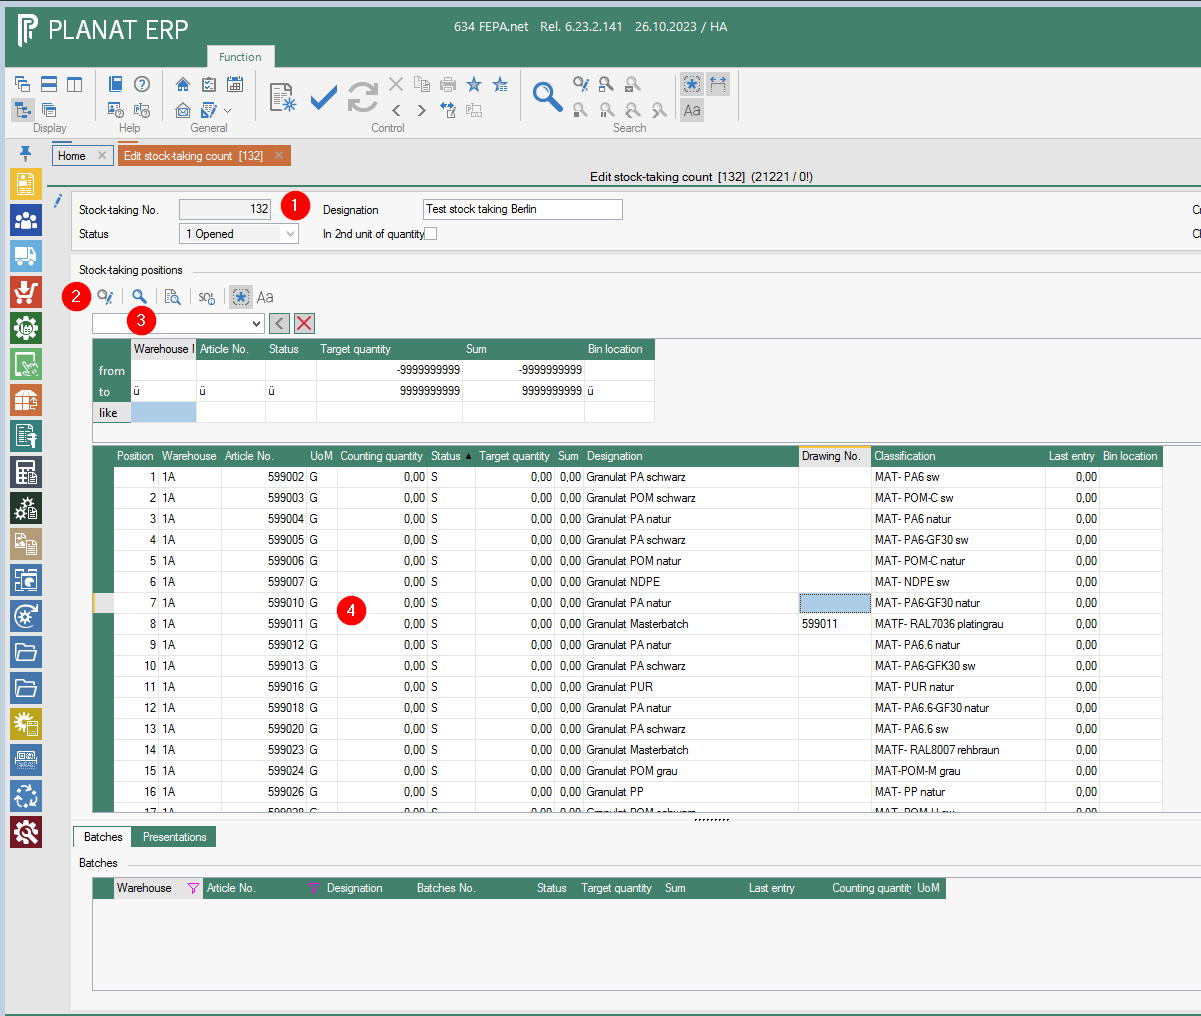



If you go back to the stocktaking to enter values, no old values are displayed in the [last entry] column!
Evaluate stocktaking differences
To compare the manually counted inventory data with the calculated inventory data, there is an inventory difference list.
FEPA function Materials Management > Stock-taking> Evaluate stock-taking differences
After all counted values have been entered, the inventory difference list is printed.
- Enter inventory no. (preselection is the last entered inventory no.)
- Inventory valuation: "transfer price inflow" = preselected
- Now you can choose whether you want to see differences from a certain value and/or a certain percentage quantity difference. The default is 0, so all differences are shown.
- Grouping on article, shows everything only in total for the article. It makes more sense to use a list without grouping for the first list. It has the advantage that you can see the warehouse no. where the value was entered (makes recounting easier).
- Sort field 1 e.g.: Article no. and sort field 2 e.g.: Stock.
- Then press the "Refresh" button over the selection area and the list is created. Print out with the printer button about the report.

Now the list can be used to decide what, if anything, needs to be checked. One can also combine a list over several stocktakings, as long as they follow each other.
-
Exporting the lists
-
Export the report to a PDF
click on the marked button for export
Then select the document type (1) + (2),
then assign the file name (3), select the storage location (4) then click on save. The file is saved there.

- Export data to Excel
Click on the tab Data (1), in the list with the right click (2) you can export the data to Excel and save it.

-
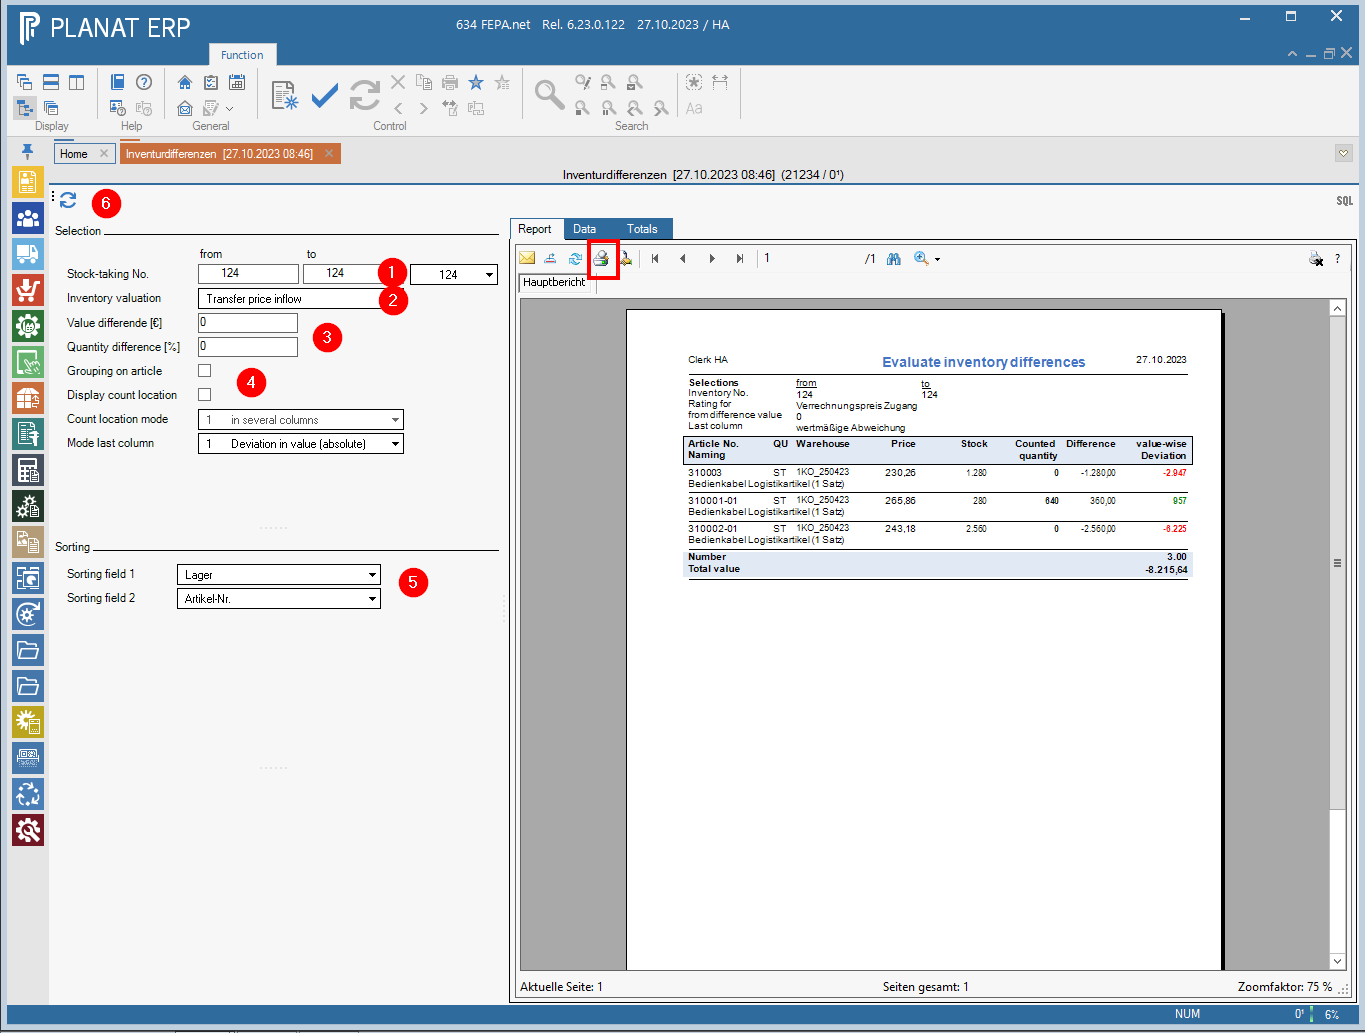
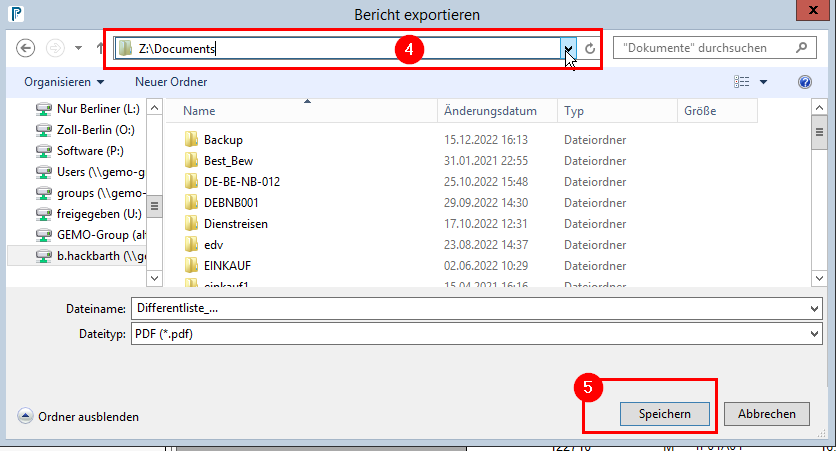
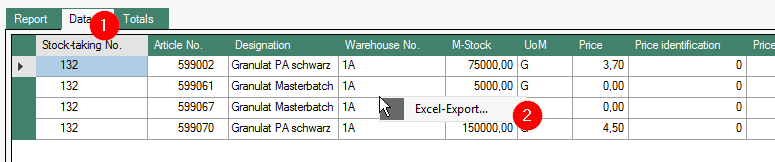
Note: the sum at the end of the list must match the same criteria in the individual list and in the grouped list!
Set zero quantities
For entries that are not counted, the counted quantity is set to 0.0 (no stock) and the indicator is set to "counted" (status = '!').
A stocktaking must be carried out once a year for all articles and the open stocktaking can contain article-warehouse combinations that have a stock but no stock is physically present. With this function the counted quantities are set to "0" and also all contained items that currently have a zero stock as long as they were entered in the inventory.
FEPA function: Materials Management > Stock-taking > Set zero quantities
- Enter inventory-no., press Enter -> FEPA loads all items that have the status "S" = "not counted". Here you can check again whether something has been forgotten to be counted.

- If all the data is OK, save using the tick in the tool bar. FEPA sets the status of all items to counted and the counted quantity of the stocktaking to 0. The window closes.
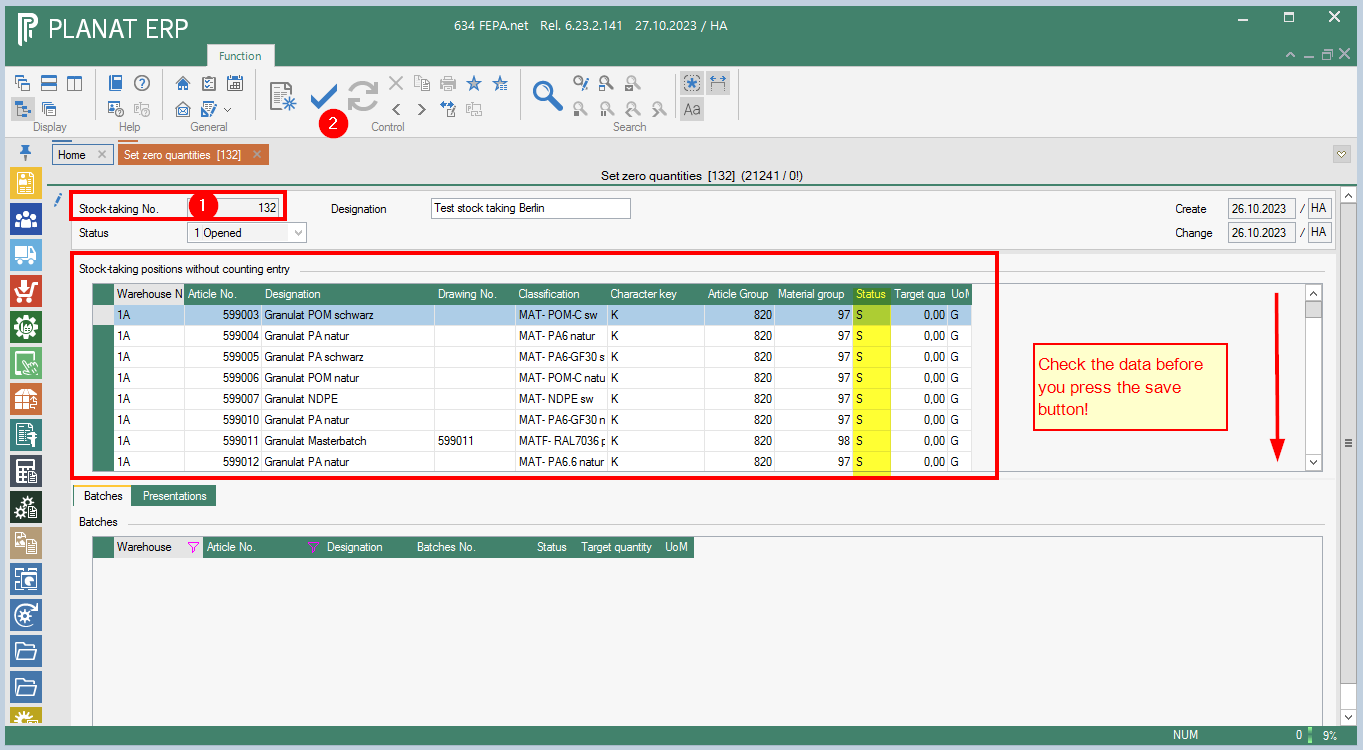
Note: The column Target Quantity contains the stock currently in FEPA. This is set to 0 with this function. This list can also be exported to Excel before pressing "Process".
Complete stocktaking
A year change is carried out for all counted entries (status = '!') and the entries in the DB tables for materials management and the article master are updated.
The indicator is set to "counted closing". For all other entries, the indicator is set to "uncounted closing, no inventory", i.e. if no counted quantity has been entered and no zero quantity has been set.
Afterwards, all entries are available again for a new inventory.
FEPA function: Materials Management > Stock-taking > Complete Stock-taking
- enter the inventory no.
- select a price for the determination of the value (if necessary, ask the person responsible for the stocktaking).
- If everything is OK (nothing more to change), save/process via the tick in the tool bar.

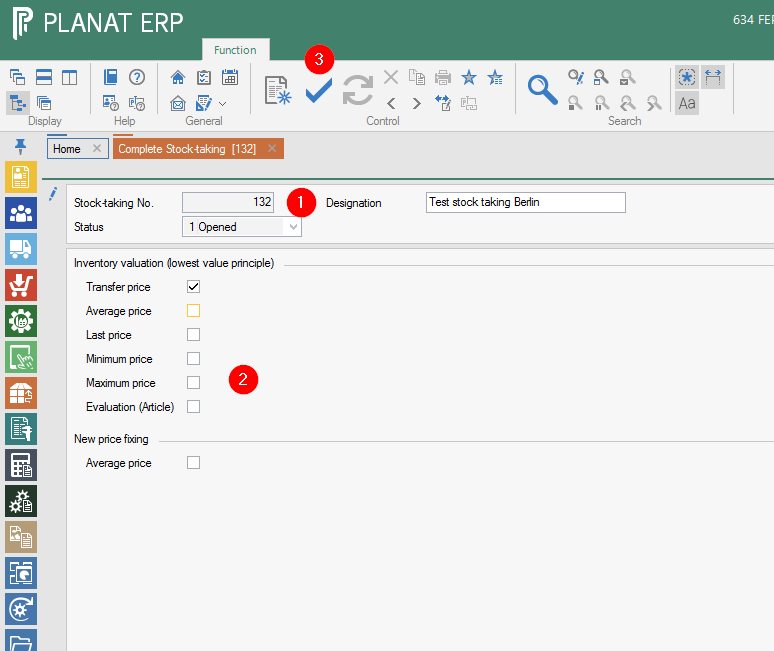
Inventory valuation
is carried out in the same way as the inventory valuation - ask the person responsible for the inventory for criteria
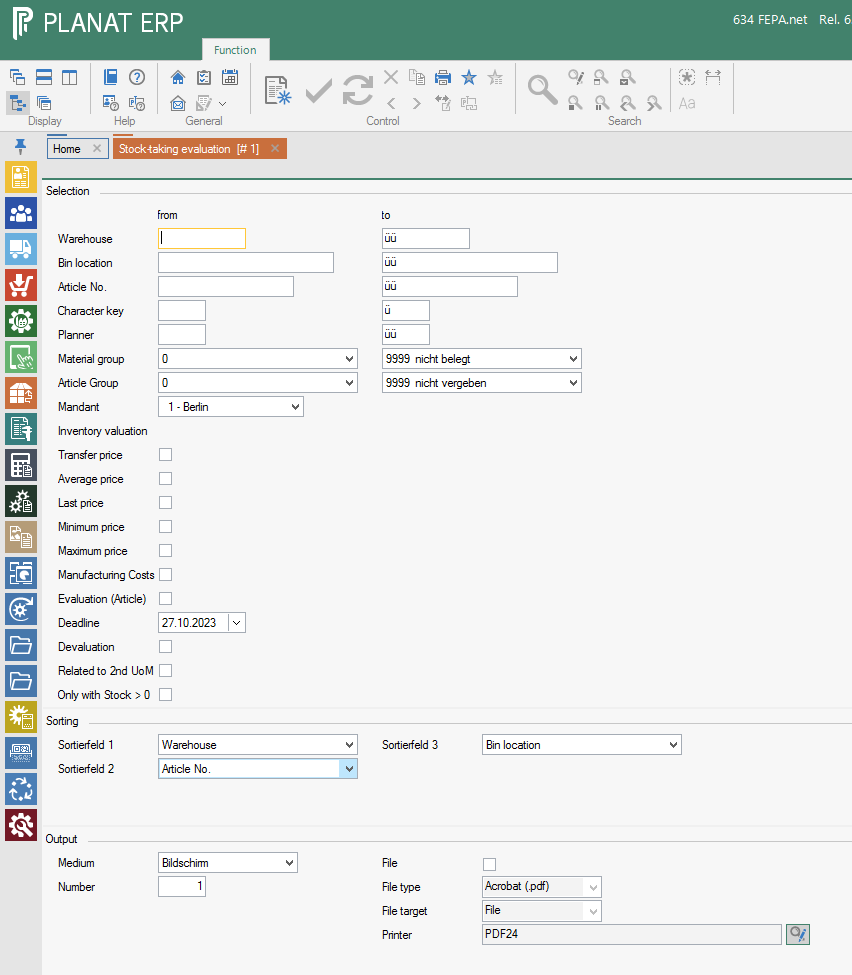
Reject stocktaking
Only an opened stocktaking that has not yet been completed can be discarded.
FEPA function: Materials Management > Stock-taking > Reject Stock-taking (without processing)
- Enter the inventory no. , enter
- press the save button in the toolbar.

By pressing the OK button, the stocktaking identification is reset for all items that were assigned to this stocktaking. These items can now be reassigned to another stocktaking. Entries that have already been made for this stocktaking are no longer available and are discarded.
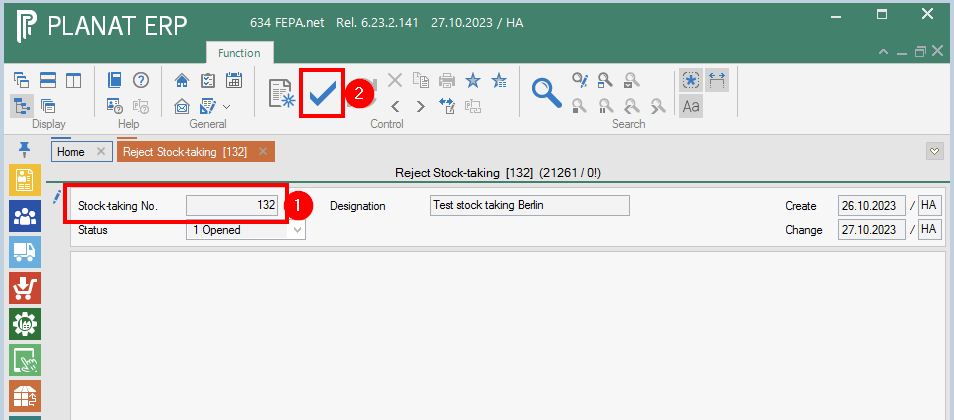
Inventory with scanners
Open stocktaking
FEPA function: Materials management > Stock-taking > Open/edit stock-taking
A number is automatically assigned for each new stocktaking. The last number can be stored under Utilities > Company master data > Sequence numbers.
The proposed number can be changed; an existing number can also be entered.
New entries can be added at any time to an inventory that has not yet been completed. The name of the inventory should contain at least the own FEPA mandant or the warehouse prefix for a better overview of the inventories. See stock-taking- Info.
The article/warehouse combinations to be included in the current stocktaking can be selected according to the following criteria
- Warehouse no.
- Article no.
- Classification
- Character key
- Article group
- Material group
- Date of last inflow
- Date of last stocktaking
- Stock (quantity)
- Storage location (if used)
(from - to) can be selected (the search library can be extended, please open a ticket for this if required).
Procedure:
- enter, (number will be assigned automatically, alternatively you can enter your own number), Enter
- Naming - assign a name for the stocktaking, Enter
- Expand search - click magnifying glass with pen
- Enter search criteria, click magnifying glass
- Check result! Only storage location/article combinations for your own location may be included. Individual lines can be deleted. (Warehouse no. must start with your own client!) - If this is not the case, close without saving and start again.
-
Search result is as desired, save stocktaking by ticking the box in the tool bar. Fepa opens the stocktaking for the selected articles.
-
To subsequently record an item, open the stocktaking here and enter the warehouse and the item via the search or append a line and record both values.
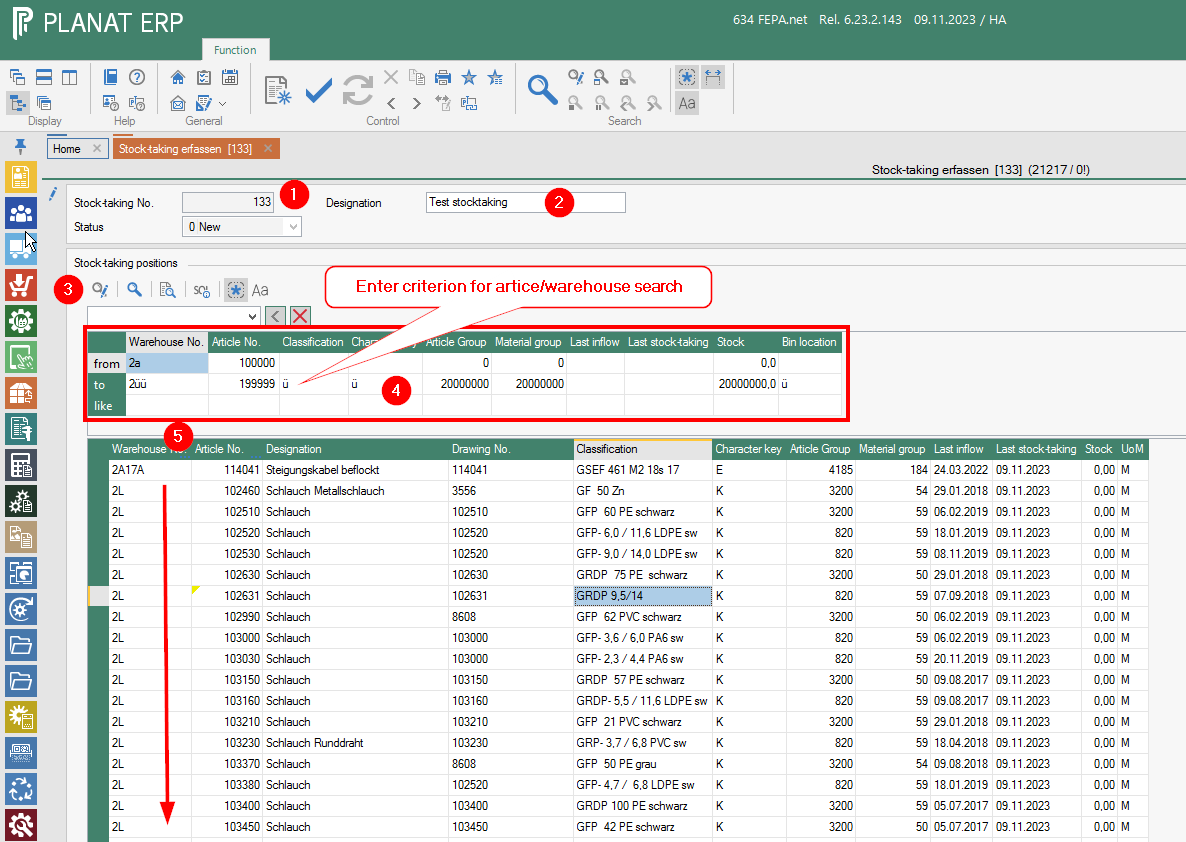
It is not necessary to print the stocktaking count list here!
Scanner
General
| No. | Description |
| 1 | Power Button |
| 2 | Switch to orange |
| 3 | OK (like Enter) |
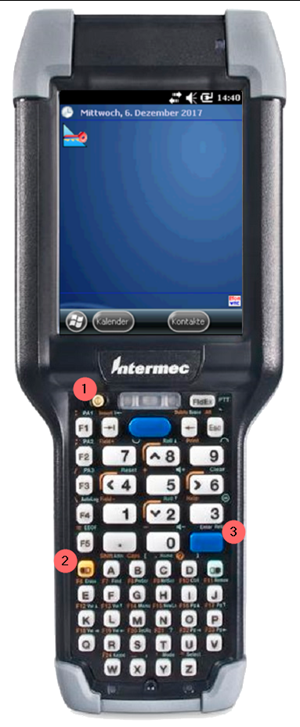
Stocktake entry
Start FEPA via the symbol on the display.
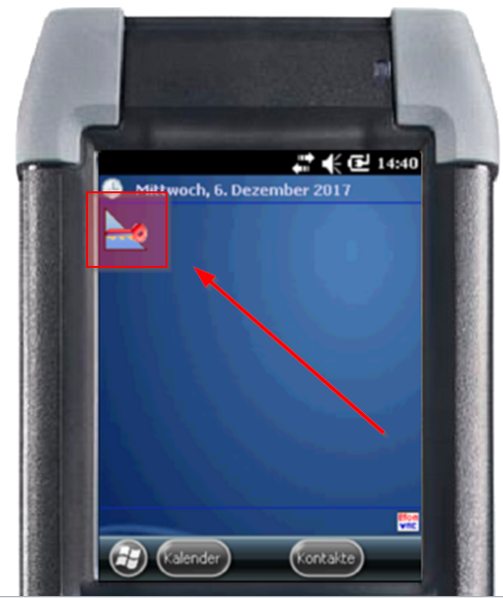
FEPA login - enter user (Benutzer (SbKz)) and password (Passwort). Display is only in German.
Please use your login for the stocktaking. You will need your user (2 characters) and your password.
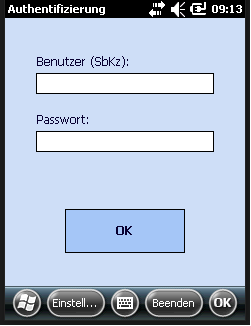
After successful login we see main screen (also in German only). In the main menu, click on the "Inventur" (stocktaking) button.
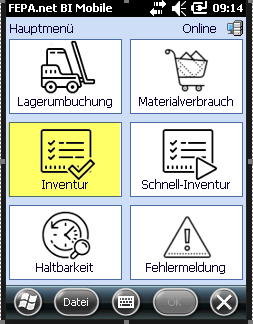
| Benennung |
Bedeutung |
| Stocktaking-no. | Number of the stocktaking in FEPA |
| Item no. | Number of the material or of the product |
| Batch | Nummer der Charge, wenn das Material für die Chargenverwaltung erforderlich ist. |
| Warehous loc. | Warehouse Location / stock number / storage location. |
| Quantity |
Amount of items counted at the scanned location. |
| New |
Display is cleared. |
| Save |
Input is saved. |
| PL |
Change the language (DE = German, CN = Chinese, EN = English, ES = Spanish, PL = Polish) |
| Close |
Goes back to the main menu. |
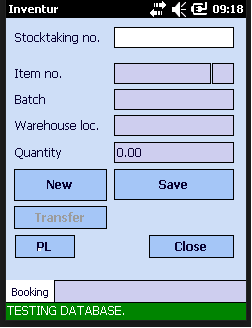
TAKE CARE OF:
- Stocktaking number will stay!
- Watch the unit of mesaurement especially for granules, oil, glue!
- Booking safes after hitting „OK“-button on scanner keyboard or „Save“-Button on the mask.
- Booking will take place immedialy!
Inventory count list scanner
FEPA function: Materials management > Stockt-aking > issue stock-taking counting list (scanner)
- Enter the stocktaking number in the mask, select the grouping and
- load the recorded data using the refresh button.
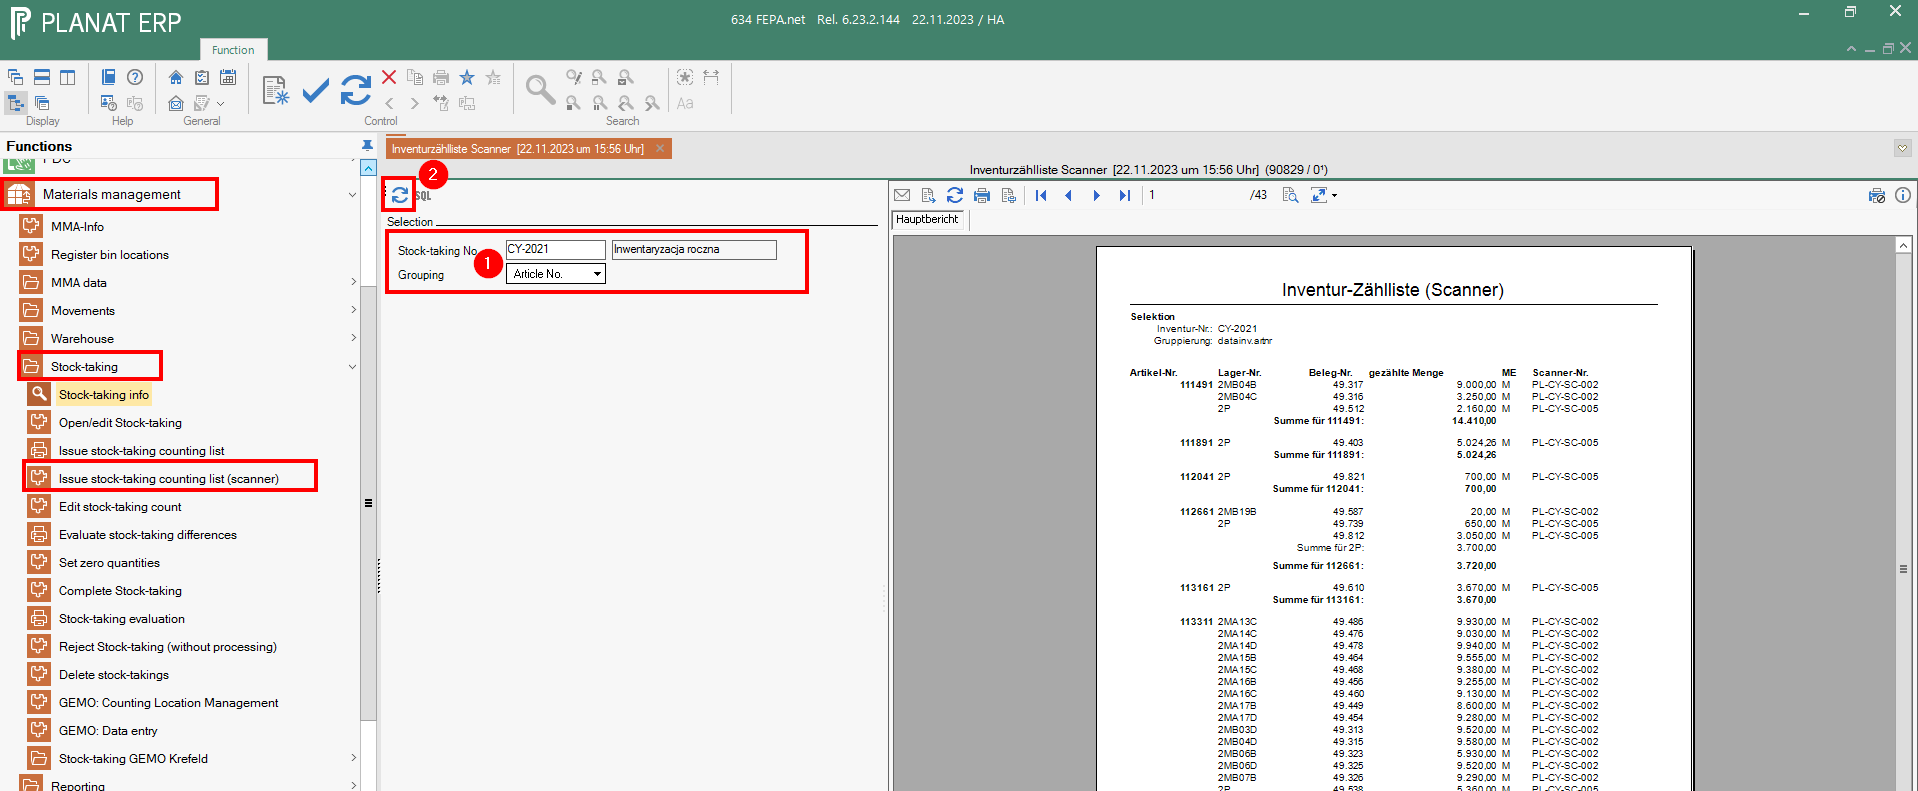
The data can now be checked visually. The list can be printed or exported.
To correct values, please follow the link and read the section in the inventory instructions under Corrections
Once all items have been counted and recorded using the scanners, continue as described in the inventory instructions under evaluate stocktaking differences.
Calculation
Information on the calculation area in FEPA, notes on automatic calculation
General
In FEPA, the calculation numbers 1 and 2 are reseved by the FEPA system.
Automatic calculations
Calculation number No. 1 is for the automatic calculation, the data is displayed in the master data item in the tab "Calculation results (mandant)" after selecting the mandant.
All aticles that are not identified as purchased items by the character key "K" are automatically recalculated every weekend. The automatic calculation runs via a service as it can take approx. 8 hours per mandant as all items are calculated per mandant.
The calculation can only run correctly if the master data is maintained correctly.
- master data > article
- master data > ressources
- master data > work places
- calculation > cost type scheme
- utlity progam > wage groups
Update transfer prices
On Monday morning, all newly calculated production costs (full costs) are transferred by batch to the transfer prices receipt & issue in the master data>article, MAWI tab for the client of the cost estimate.
For articles with the character key "K" or "H", the transfer price is updated by the last price inflow.
A list is sent to selected colleagues by email if the price of the article has changed.
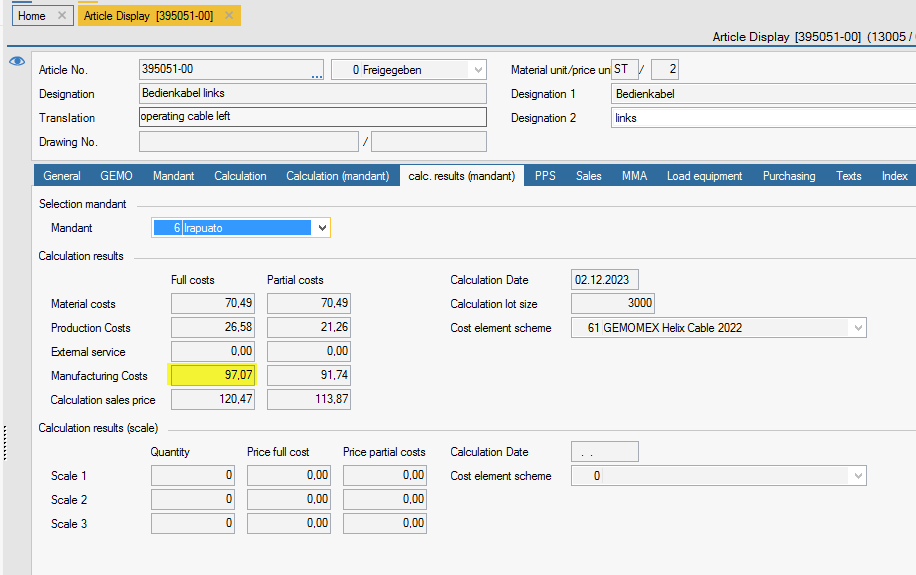
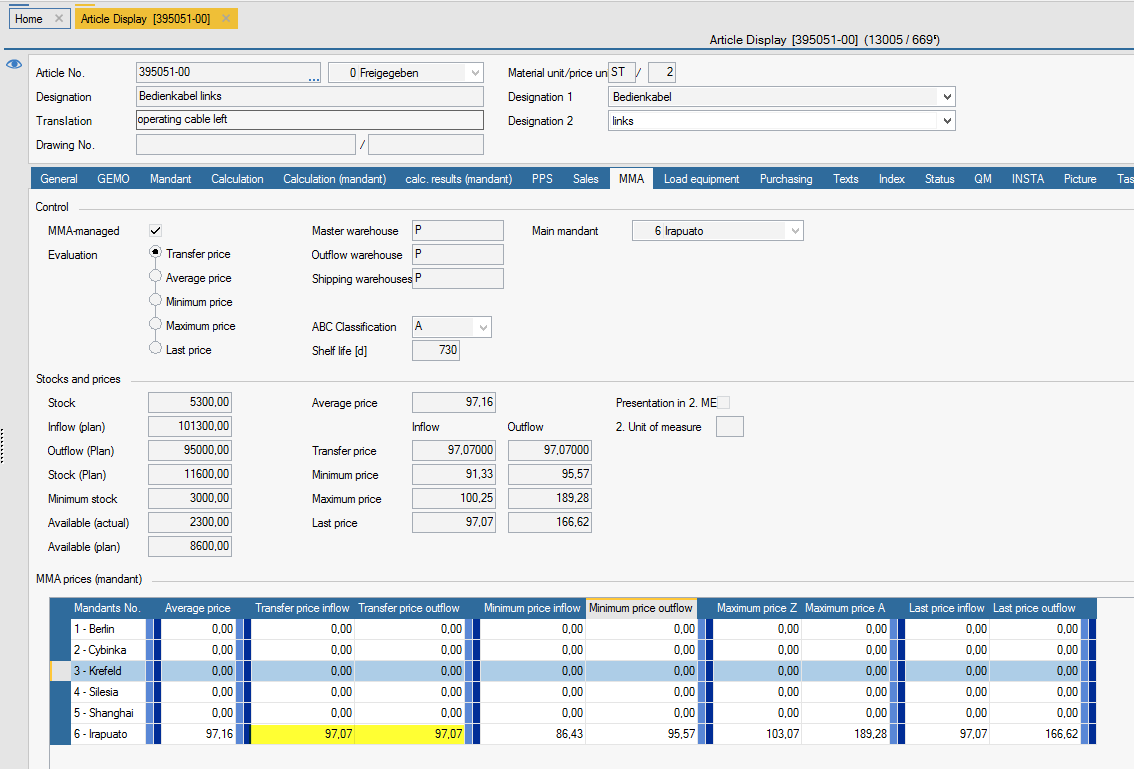
Reporting
General
Only the tables can be transferred to Excel via the display of the calculations. However, the header data for the cost estimate, such as article number, lot size, cost element scheme, etc. are missing here.
Evaluate precalculations
In FEPA under the function Calculation > Reporting > Evaluate precalculation is the report, which can also be exported to a PDF.
I can restrict the result via the selection. The data refers to the information stored in the cost estimates.
e.g. - a specific calculation that you have created, enter/select selection criteria and press the "Update" button
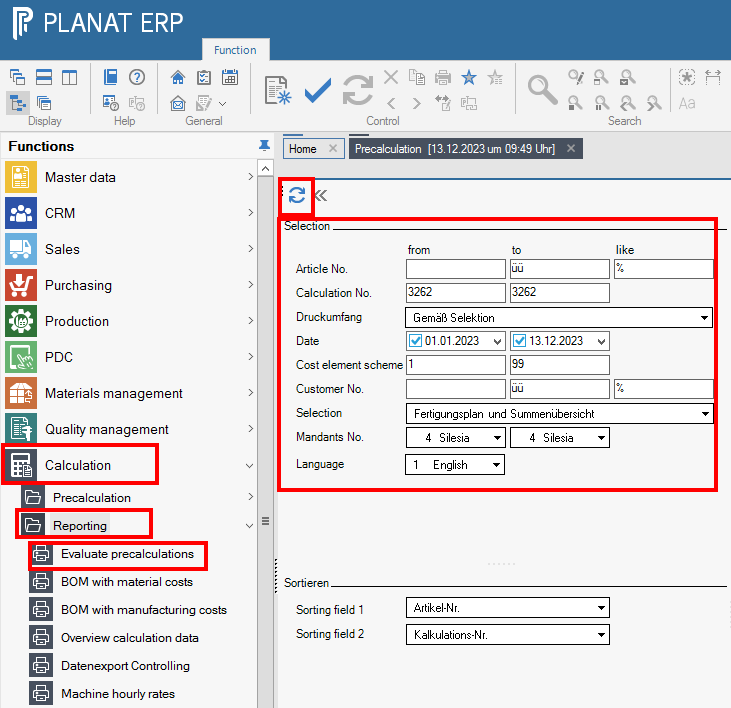
A report is generated. Page one begins with the work plan data, followed by the totals overview. Area 1 is used to scroll through the pages. Area 2 is the page display.
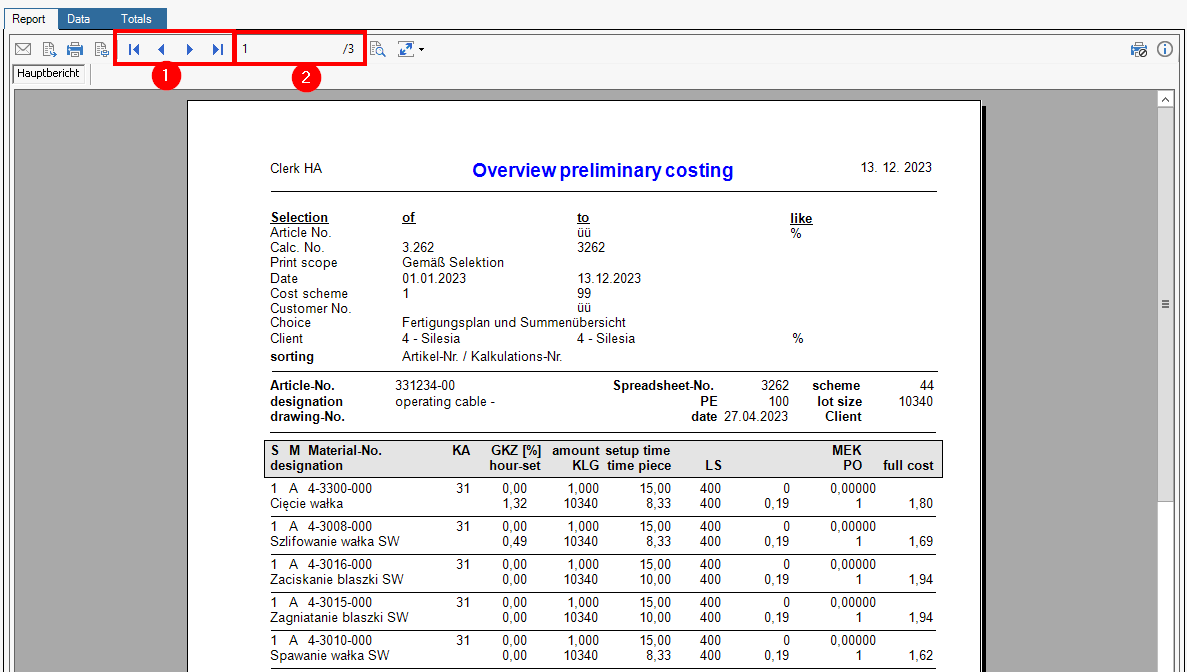
The document can be exported to a PDF via the export button, alternatively it can also be printed on our PDF printer. The setting is made via the printer symbol directly next to it.
In the other views, you will find the item data of the calculation (Data tab) and the totals data (Totals tab), which can be exported individually to an Excel sheet using the right mouse button.
Precalculation
Create precalculation
FEPA function: Calculation > Calculation > Create precalculation > Create calculation.
You can also refer to the FEPA help, menu bar button "Help" (question mark in circle). Here you will find information on the FEPA basic version and the fields displayed.
Note: Master calculation is calculation no. 1. It is displayed in the client in the master data in the Calc. Client results tab in the client. If the master cost estimate is created via Create precalculation, the costing lot size is overwritten with the lot size in the cost estimate in the master data!
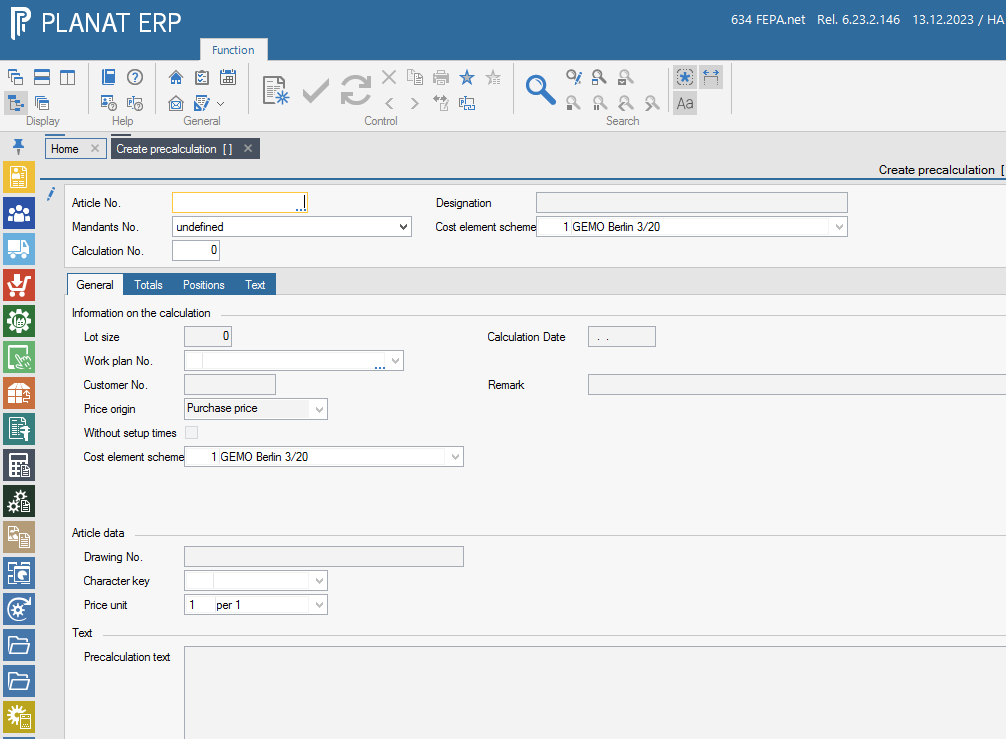
- Article no. - Enter Press Enter
- Mandant - select from list and press Enter
- Calculation no. - if new calculation, then continue with Enter or open known calculation, then enter the calculation no. and press Enter. Then the name and the cost element scheme, if stored, are taken from the master data (article) and it is checked whether the article is not a purchased part. The lot size is taken from the [to quantity] field in the routing assignment.
- Lot size - check, change if necessary
- Cost element scheme - check no. and change if necessary
- Price origin - purchase price = last MEK (direct material costs), graduated price = from delivery conditions (is taken as it was stored in the calculation schema)
- Toggle without setup times, if this is ticked, setup times are not drawn

- Then press the [Create new calculation] button. The item is calculated with the set data. The message [Action is being executed] appears. This must be confirmed with [OK].

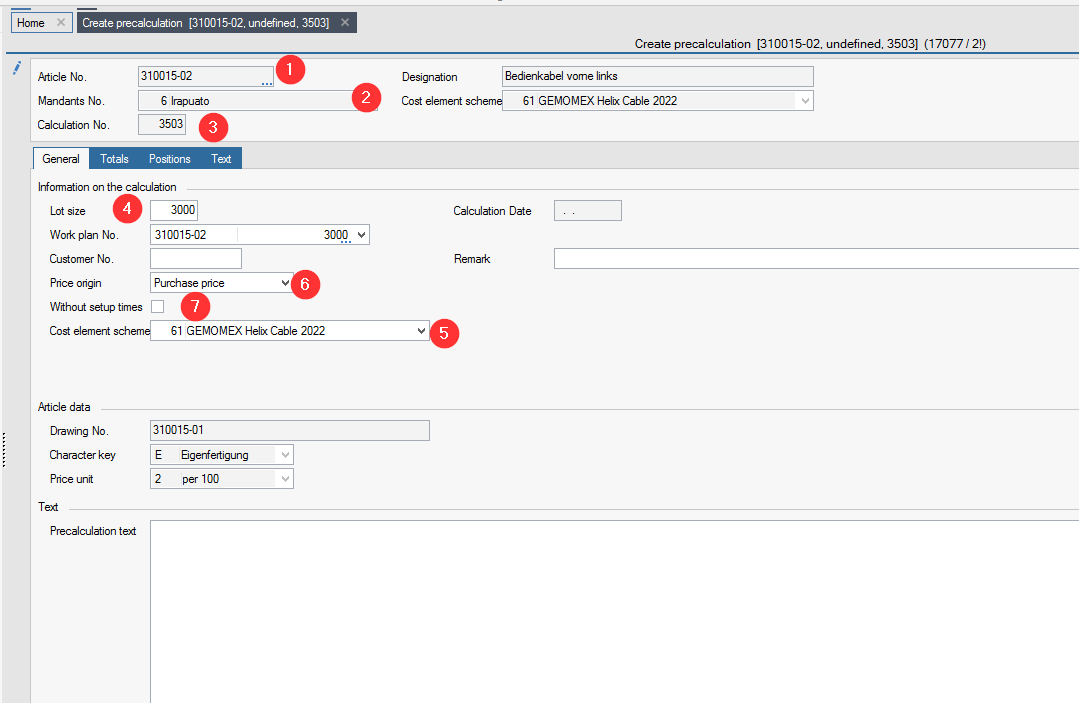

After creating the calculation, nothing changes in the view except the menu bar in the header and the totals and position tabs are filled.
The Totals tab contains the values of the calculation for the cost elements and surcharges stored in the cost element structure and the prices resulting from the work plan and the bill of materials.
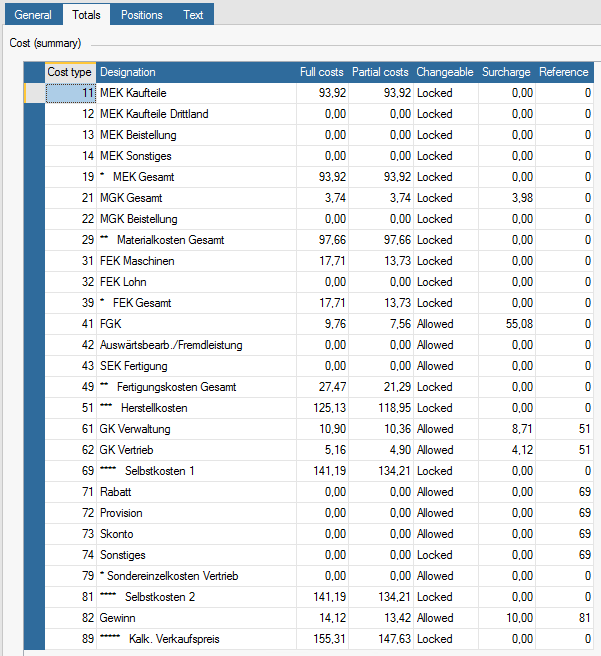
You can change changeable surcharges (Changeable column: allowed), but FEPA only recalculates according to manufacturing costs. I.e. I can change the MGK(material overheads) Total (21) in the Surcharge column, but FEPA still does not recalculate because this cost element comes before the cost of goods manufactured (80). This means that only cost elements from no. 81 onwards are taken into account in the recalculation of a cost estimate.
Positions tab
For an improved display, click in the table with the mouse and click on [Auto column alignment] with the right mouse button.
Columns that you do not want to see can be hidden by clicking with the mouse in the heading and unchecking the relevant column.
The table is organised by levels and types.
- Work place type = operation from the routing
- Material type = parts list item from the routing
- Assembly type:
If a BOM item is an "in-house production" and has a BOM and a work plan, it becomes an assembly and the type work place and material are assigned level 2. (This would continue if this applies to BOM items again. → level 3, level 4 etc.)
If the material is a pseudo item, the operation must not have full costs, as it also occurs in level 1. Only material prices are relevant here.
The value in the full costs column is transferred to the totals list (Totals tab) for the line of the relevant cost element. The full costs are already shown here including the overhead surcharge (if applicable).
If the work plan has several levels (screenshot = level >1), the calculation builds on each other, taking into account the scrap and the quantity used in the next level. This is done from bottom to top. However, the full costs displayed only relate to the item and cannot simply be totalled to recalculate something in Excel! Items at level 1 are allocated directly to the item to be costed; for items with a level number > 1, the costs are first allocated to the higher-level component.
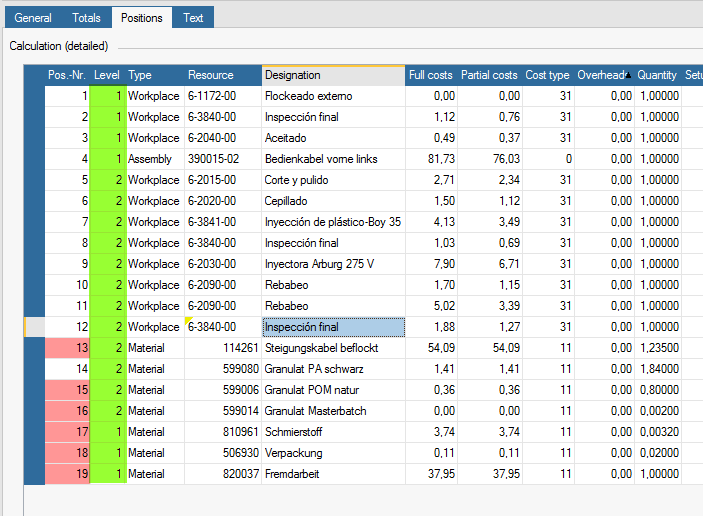
In the Positions tab after the first master costing, you should check whether there is a time and a cost element in each operation, a purchase price and a cost element in the rows for material, and no cost element in the Assembly row.
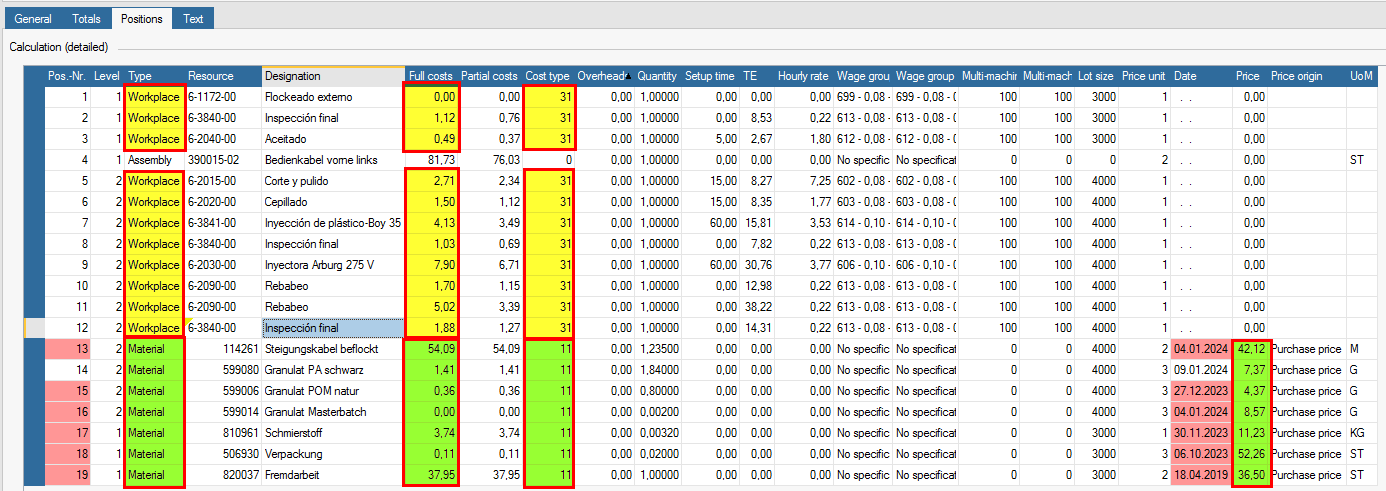
If a price for a material is missing in the cost estimate, it can be entered in the line in the items in the Price - matching the price unit column.
A TE (job time) for an operation can also be added. Cost elements can also be added or removed. In any case, after a correction in the Positions tab, the article must be recalculated using the [Create calculation with changed data(2)] button. The relevant department should then be informed that the errors have been corrected so that the correct data is used for the next calculation.
If an surcharge is changed, the difference is immediately allocated to all subsequent lines according to the cost element structure.
The button [Save totals data of calculation(3)] is also activated. This allows you to save the change if you wish. The change is also saved if you save at the end when you close the calculation. After reopening this calculation, however, only the values in the full costs are still displayed. The percentage is no longer displayed in the Surcharge column!

Abbreviations in column headings
If you click with the mouse in the relevant column, you will find a description of the abbreviation in the footer of the FEPA. e.g. TE = Job time