Sales
Explanation to the topic of SALES. If necessary, site-specific conditions / regulations must be taken into account.
- Sales - Info
- Print shipping proposal
- Packing slip
- Delivery notes
- Invoices
- Forwarding order
- Send remote data transmission to the customer (ASN)
- Loading equipment and loading units
- Goods tag (labels)
- Confirmation of entry
- Outgoing invoice journal
- Arrange shipping documents
- Texts from operation data and master data in sales and distribution
- EDI Order with Consignment stock
Sales - Info
General
Here you can view comprehensive information on the entire sales area.
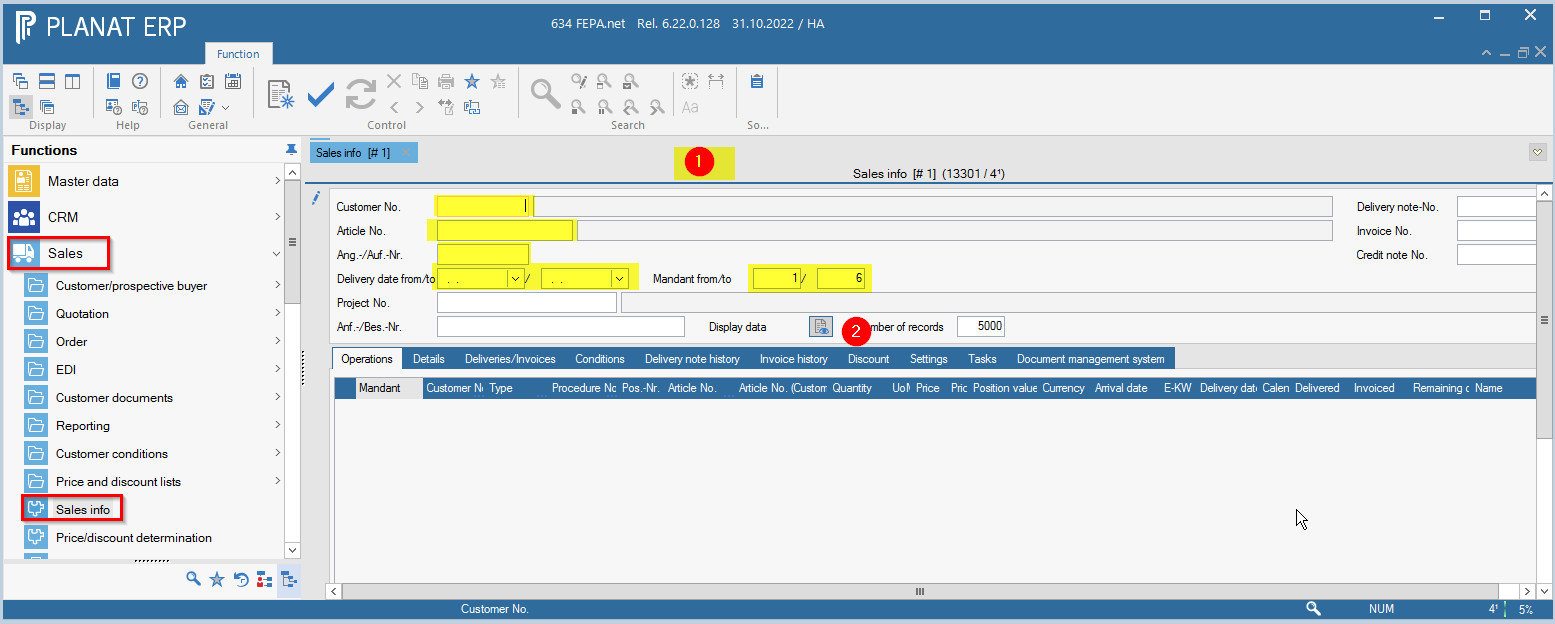
FEPA function: Sales > Sales Info
A field search is possible for the fields Customer No., Article No., Quot. /Order No. and the Project No. To do this, press the key combination [Ctrl]+[F] for search in the field. Alternatively, press the magnifying glass in the right footer of the window.
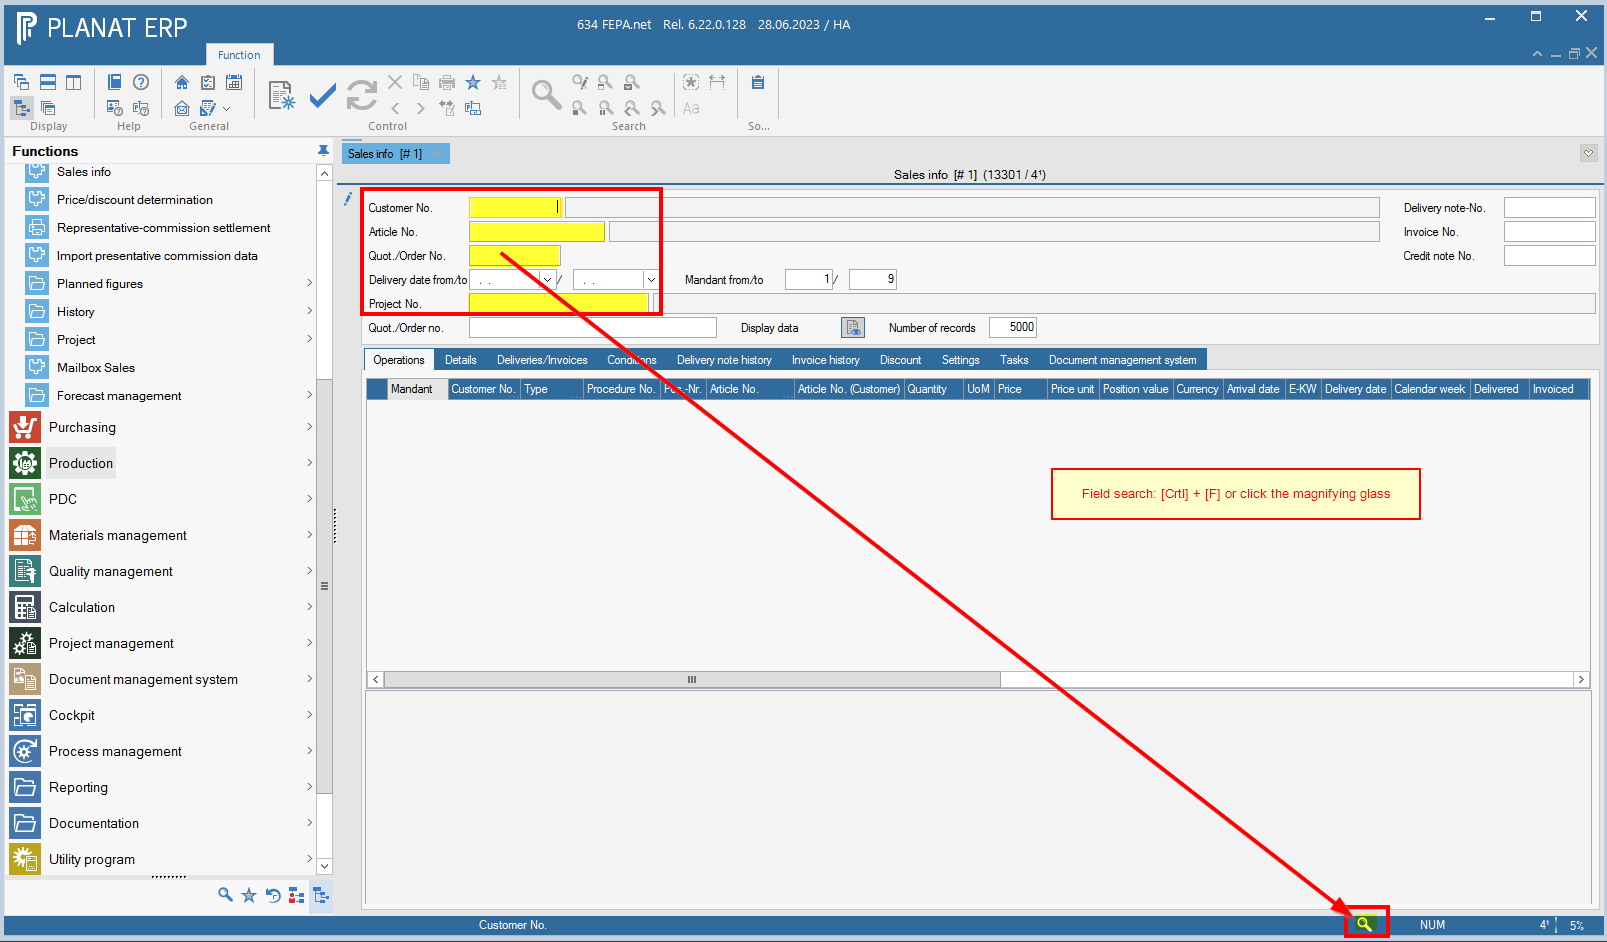
Press Display data to load the operations.
Settings
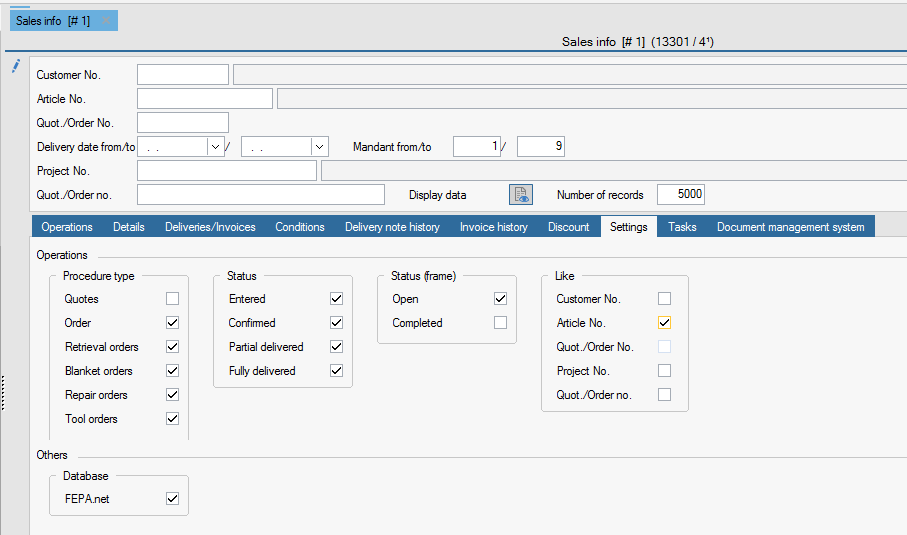
In the Settings tab, you can define your display for the type of activities and their status.
The Like setting means that you can enter % characters after the number in the ticked field, as in the search, and everything that matches this character string will be displayed in the result.
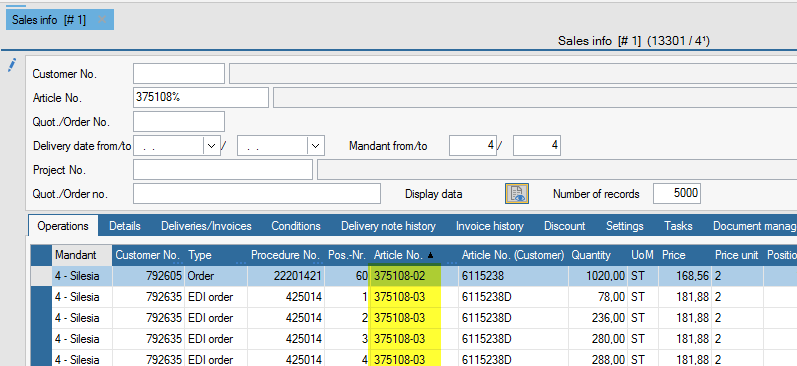
For example:
Result, all transactions except offers that have an item beginning with "375108" in the line item.
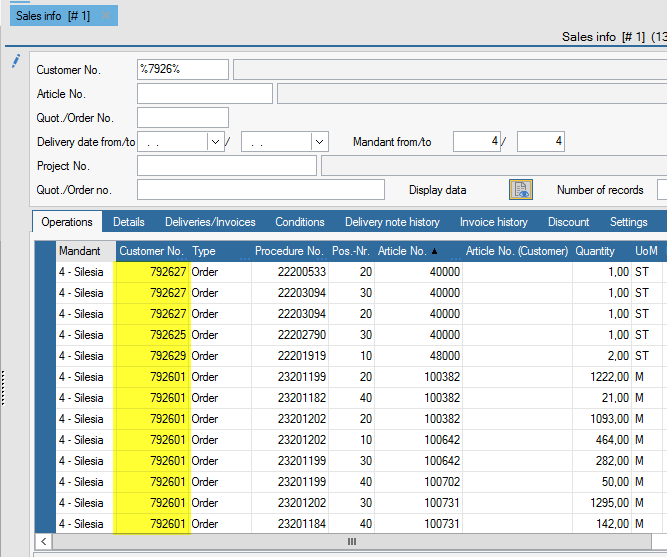
Note: When searching for a purely numeric number, the number must also be preceded by a % character! Numbers are completed with leading blanks when saving, if it is an alphanumeric field.
Overview of all sales orders
FEPA function: Sales > Sales-info
1. There determine the individual search criteria, such as customer number, article number, etc..
2. Then click on Display data
3. Under the tab Settings, you can set the following search criteria:
- Procedure type (order, blanket order, retrieval order, etc.)
- Status (entered, partially delivered, etc.)
- Example of settings to view all open orders for shipping:

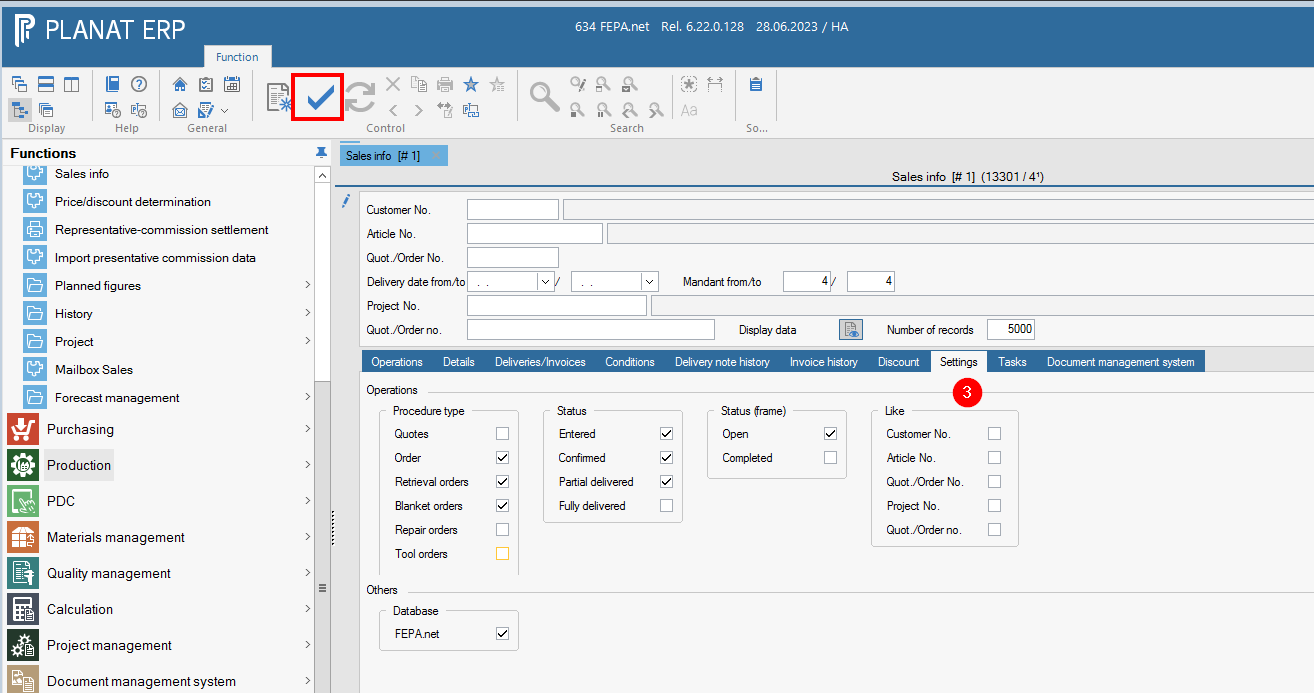
These settings can be saved with the checkmark in the ribbon toolbar.
Print shipping proposal
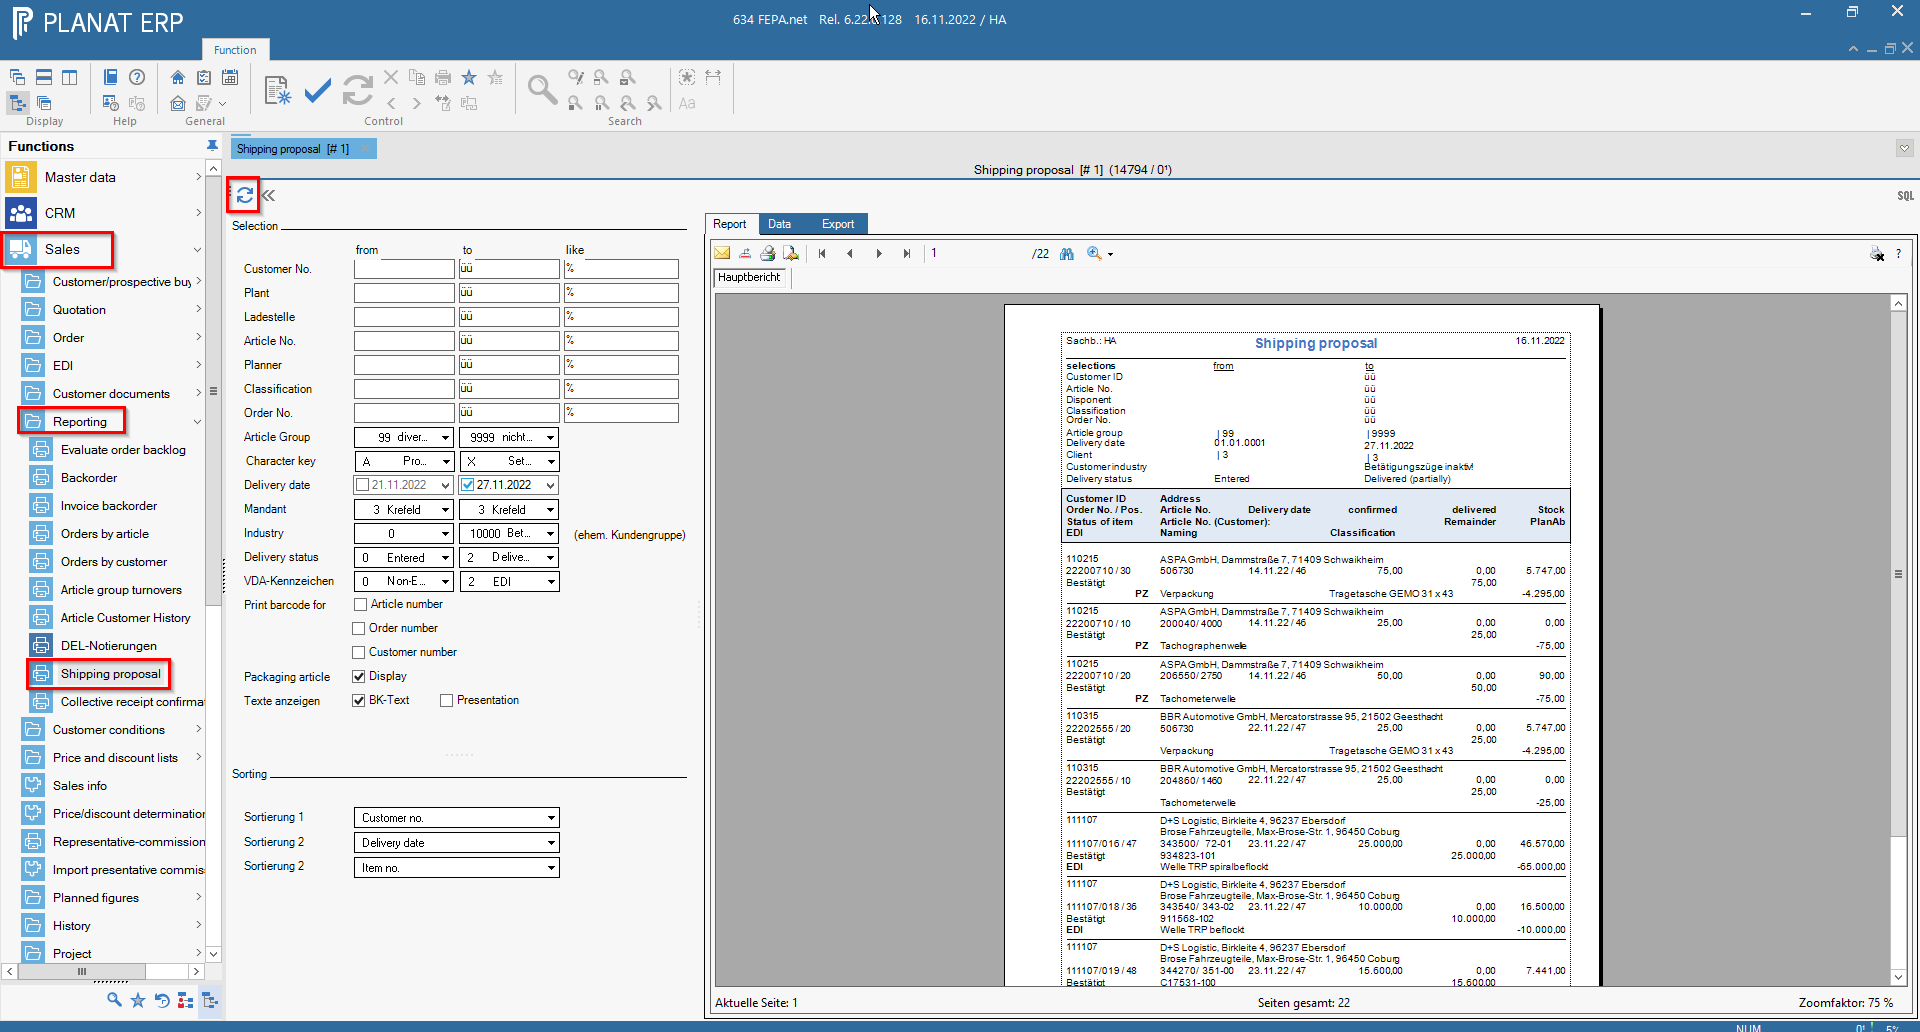
FEPA function: Sales > Reporting > Shipping proposal
If desired, enter the following search criteria, without restriction all articles/customers will appear, here are the most important ones:
- customer number
- article number
- delivery date
- order number
- enter from and to to simplify the search (delivery date)
- mandant from to
- When you have entered everything, click on the Update button, the shipping proposal will be created on the screen and you can print it by clicking on the Print button on the right above the printout.
Attention: If you only want to see the open quantities for a certain order, uncheck the date box.
By default the sorting is customer no., delivery date, article no. The sorting can be changed!
Packing slip
Deposit markings / information for packing slips
Serves to avoid having to store a marker for each new order, which means that it is only stored once for the customer. (Deposit of constant information about the customer for the shipping employees who pack the goods).
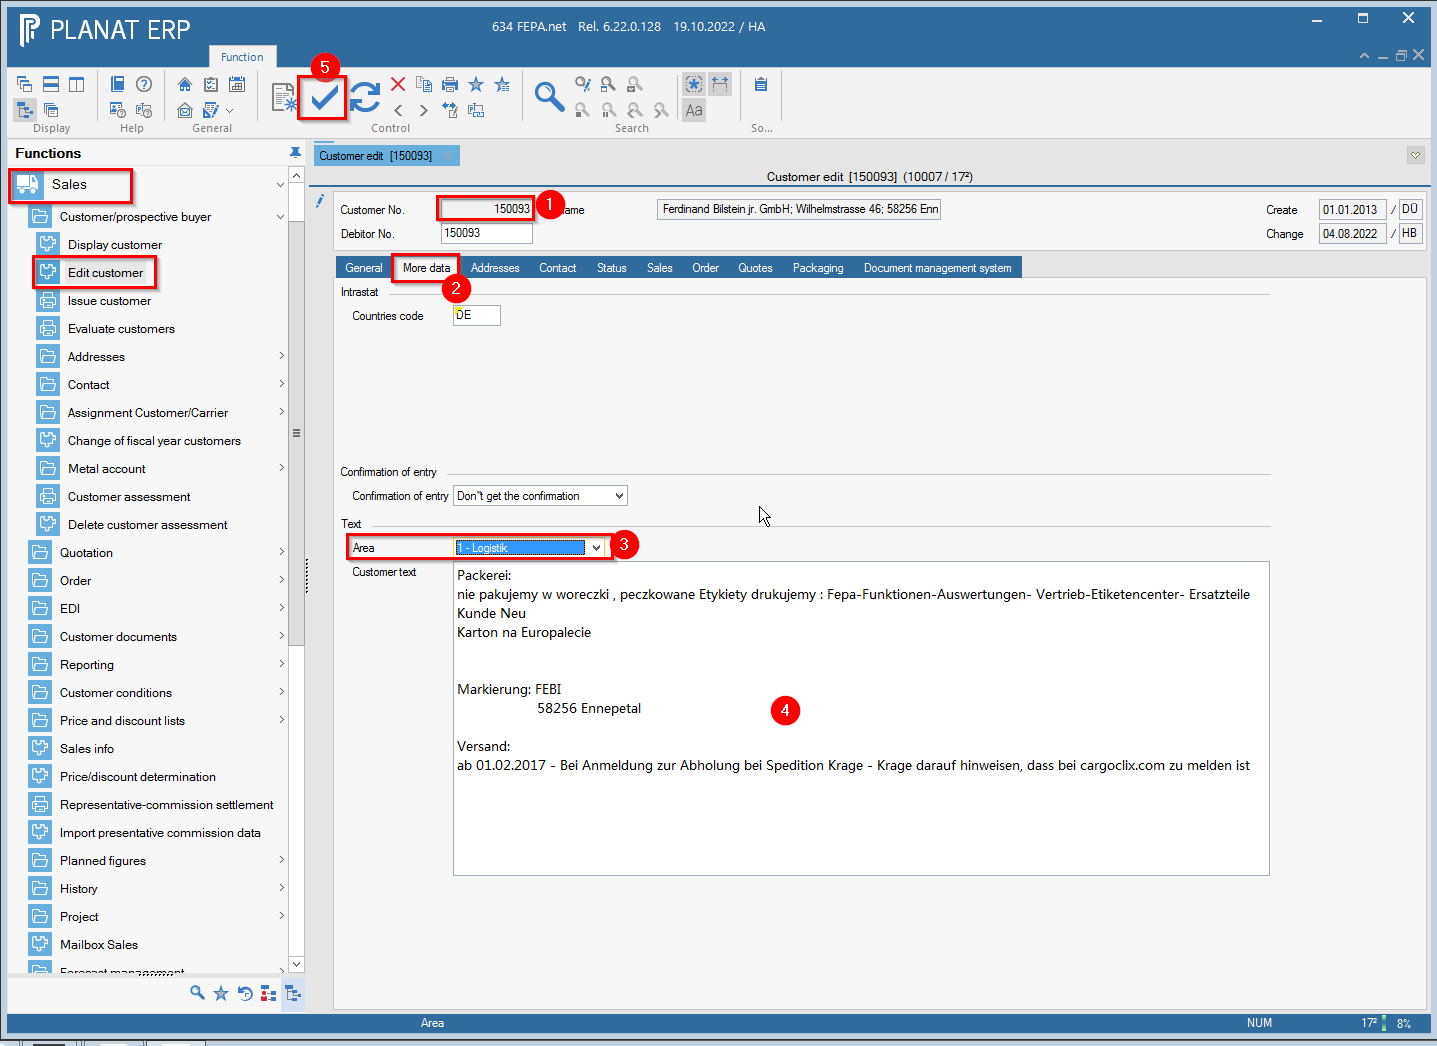
FEPA function: Sales > Customer/prospective buyer > Edit Customer
- enter customer number, press enter
- click on the tab More data
- select Logistics in the Text drop-down menu
- enter the desired marking in the field Customer text
- save

Create packing slip
FEPA Function: Sales > Customer Papers > Edit Packing Slip
- press enter at registration number (an registration number will be generated)
- enter order number or customer number, enter delivery date or confirm current date, enter
- FEPA jumps to the search tab, otherwise click on this tab.
- click on start search (magnifying glass)
- All items for this order appear
- In the box at the front, check the box take over for the positions you need. (The items marked in red have no or not enough stock to deliver the item completely in the warehouse that is also displayed here).
- Then click on ">" at the bottom right (positions are taken over).

-
Return to the Delivery positions tab and check everything, change the delivery quantity if necessary.
-
In the External Texts tab, enter the prefix text, e.g. the week in which it is to be packed and other notes, e.g. in the package
-
If everything is OK, click on Print and the packing order will be printed and saved.

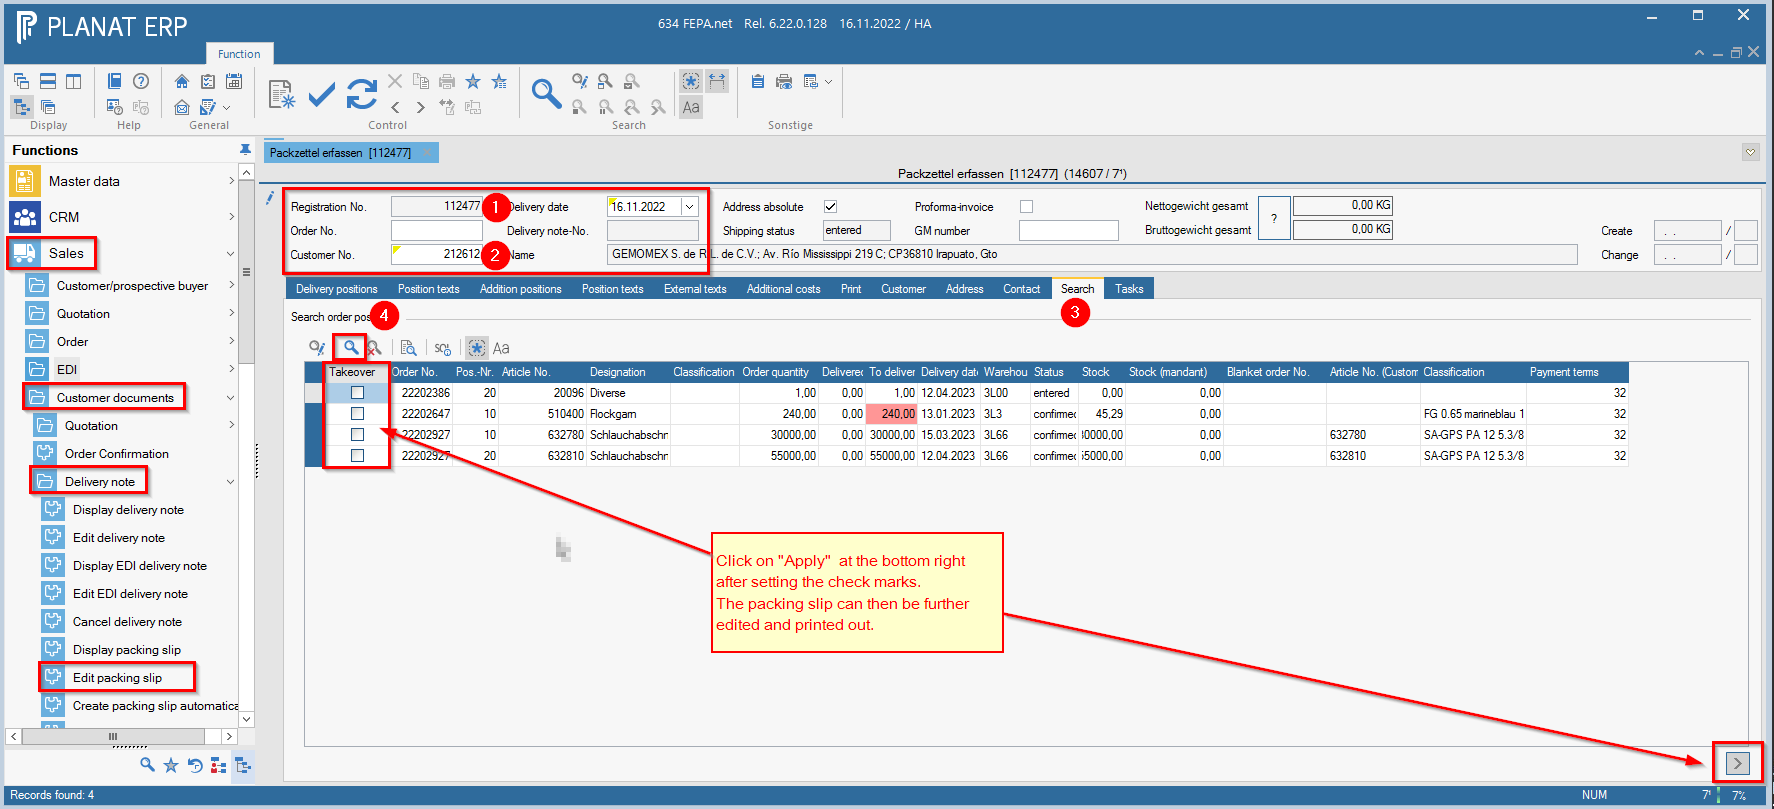
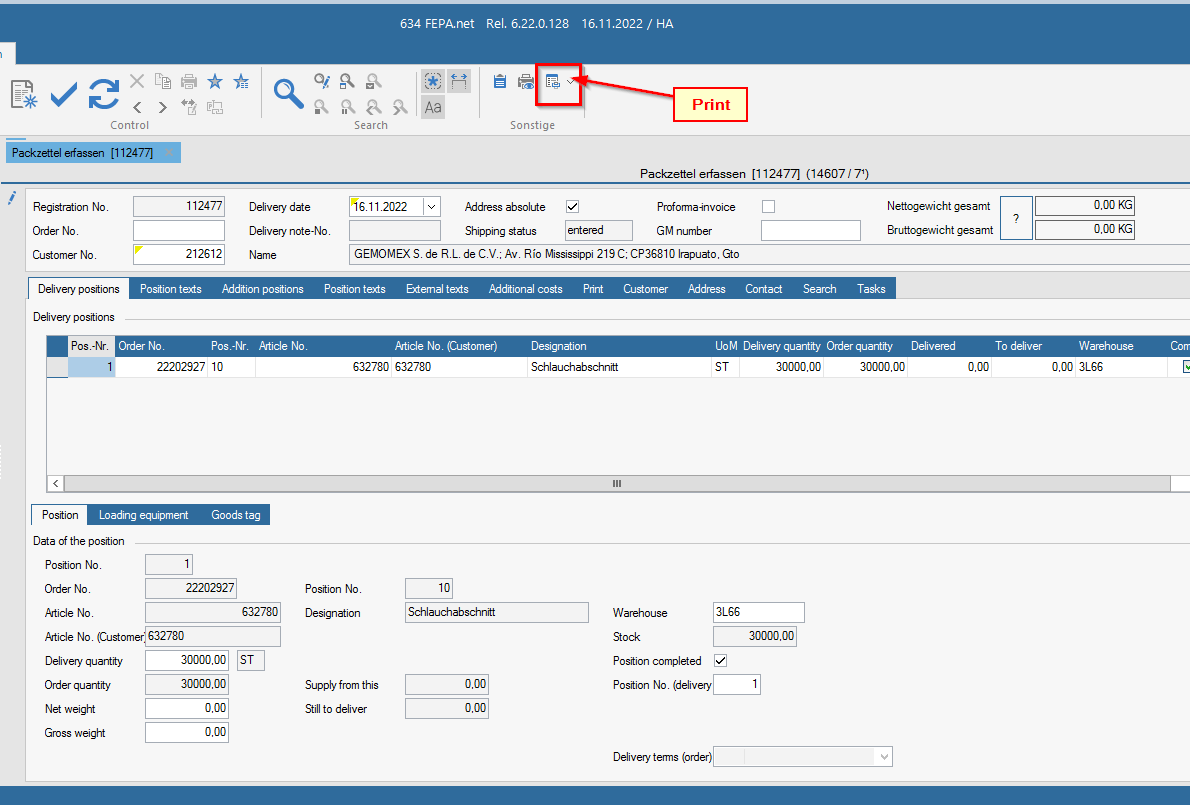
Note: If there are more customer orders to be included in one packing slip for the same customer, only start with the customer number (2)!
Create EDI packing slip
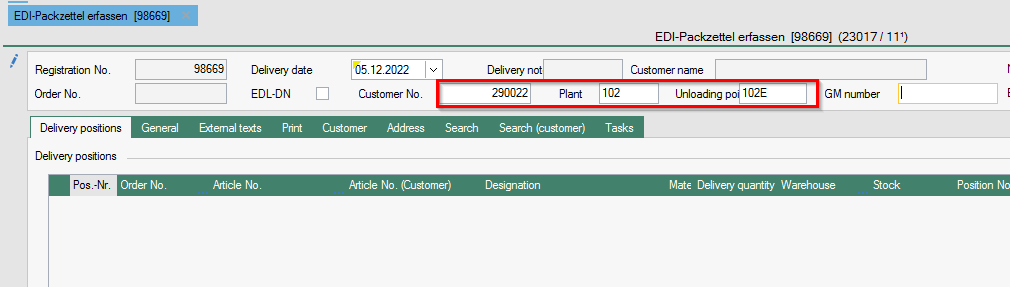
FEPA function Sales > Customer documents> Delivery note > Edit EDI packing slips
- press enter at registration number (an registration number is generated)
- enter either - order number or - customer number, plant and unloading point

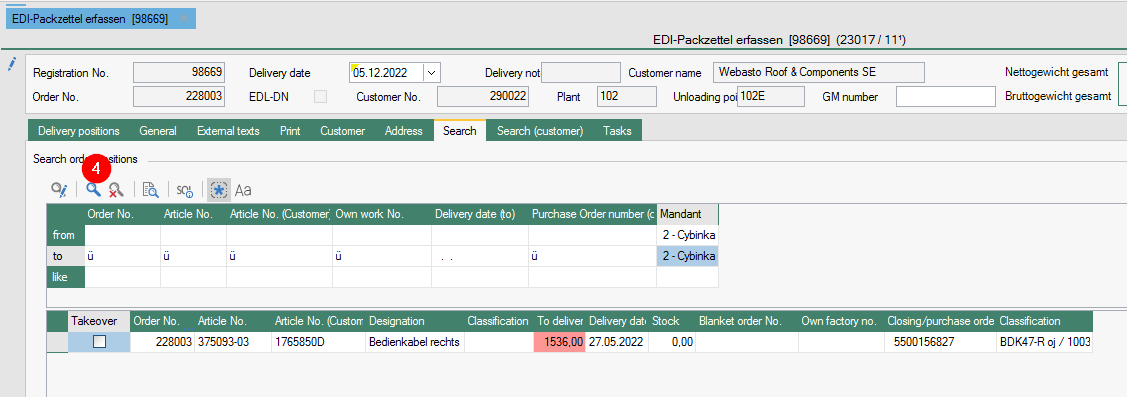
- If the next position is not automatically set as the Delivery position, then continue on the Search tab otherwise 4.4.
- click on Start search... (magnifying glass)

4.1 All items for this order or this customer are displayed up to the set delivery date of the search.
Attention !
If nothing is displayed there:
Click on the selection area of the search and check how far you have limited the delivery date.
and extend it if necessary.
Entry into the packing slip without customer order, all open delivery positions for this customer are displayed in the search result. As a rule, only one sales order is selected per delivery note. Unless mixed pallets are allowed for the customer. See note.
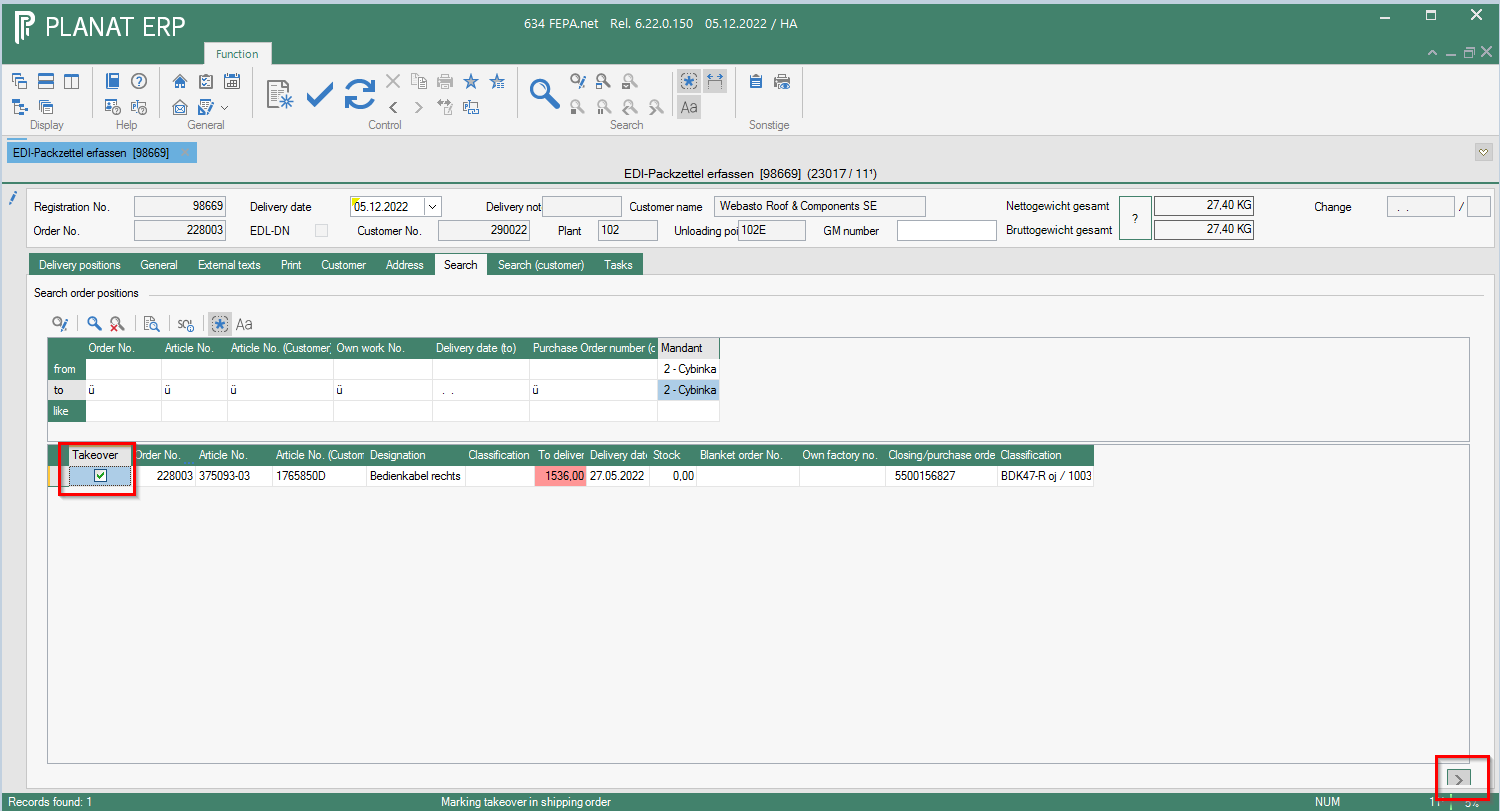
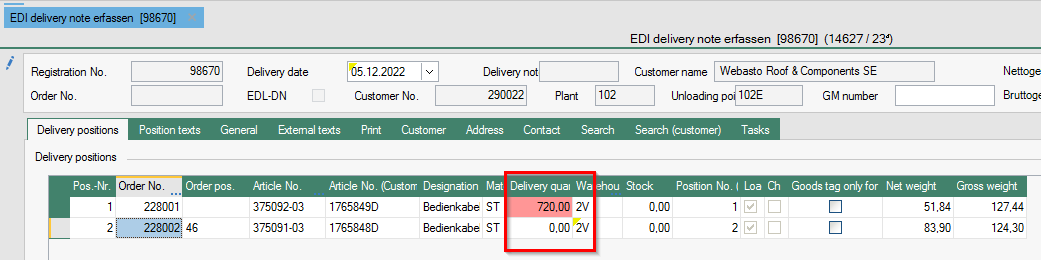
4.2 Check the box in front for the respective positions you need. (Those marked in red have no or not enough stock to deliver the position completely) -> possibly partial delivery.
4.3 Then click on the button > at the bottom right (positions are transferred to Delivery positions).
NOTE: In a packing slip, only items should be combined into mixed pallets where the customer receives the ASN according to VDA4905 and the items have the same customer order number, otherwise there will be problems when receiving the ASN, as the customer order number is only transferred for the first delivery note item!

4.4 Back to Delivery positions tab
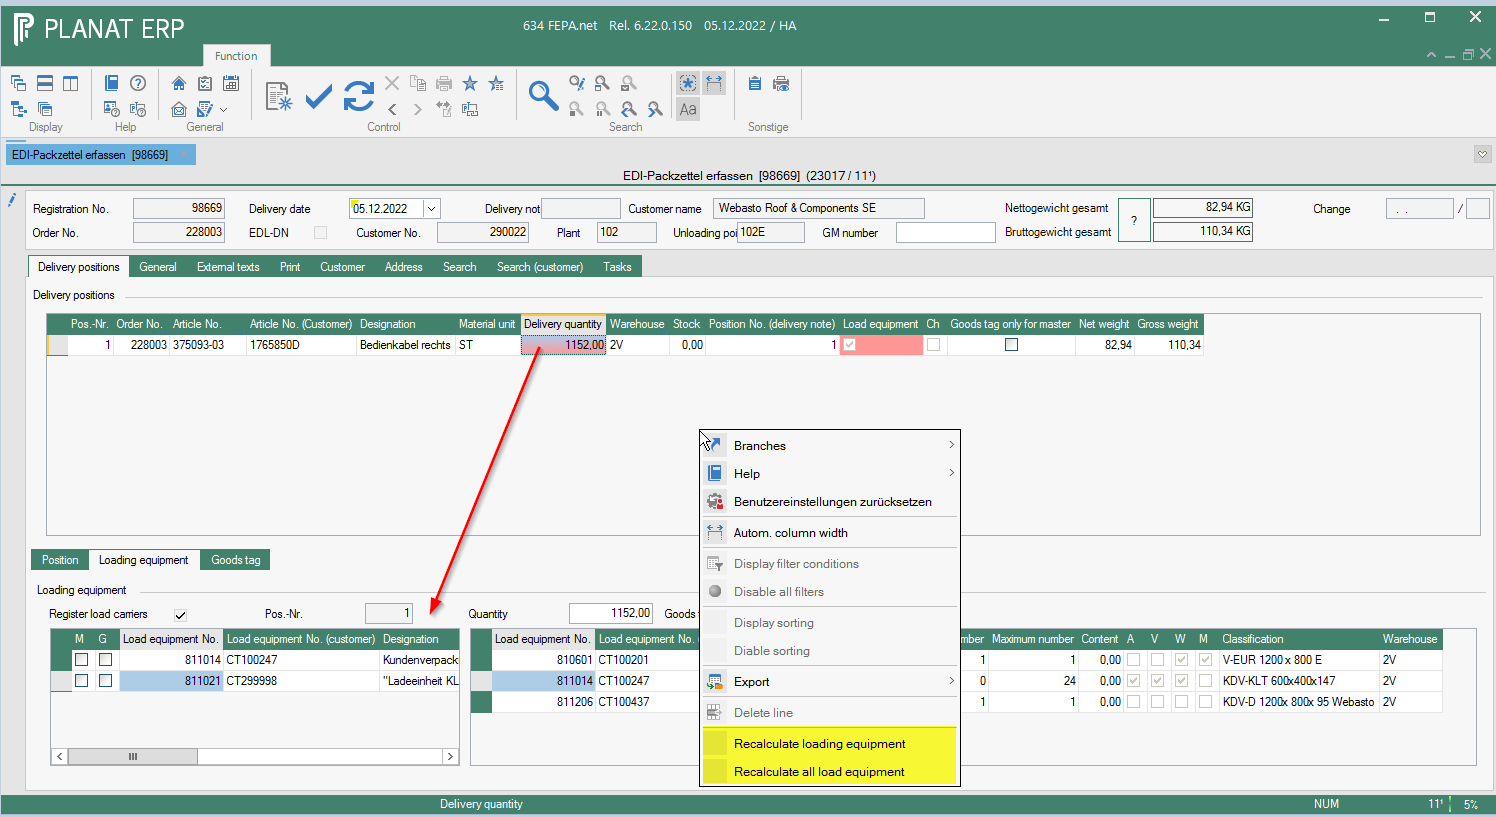
4.4.1 Enter the desired delivery quantity for each item.
4.4.2. right click in each position and recalculate loading equipment (Fepa calculates how many pallets etc. are needed).
-
Click on the printer button and the packing order will be created.
Delivery notes
Create delivery notes
FEPA function: Sales > Customer documents > Delivery note > Edit delivery note
The basis is usually a packing order. However, you can also enter a delivery note without a packing order, in which case you start as in the packing order.
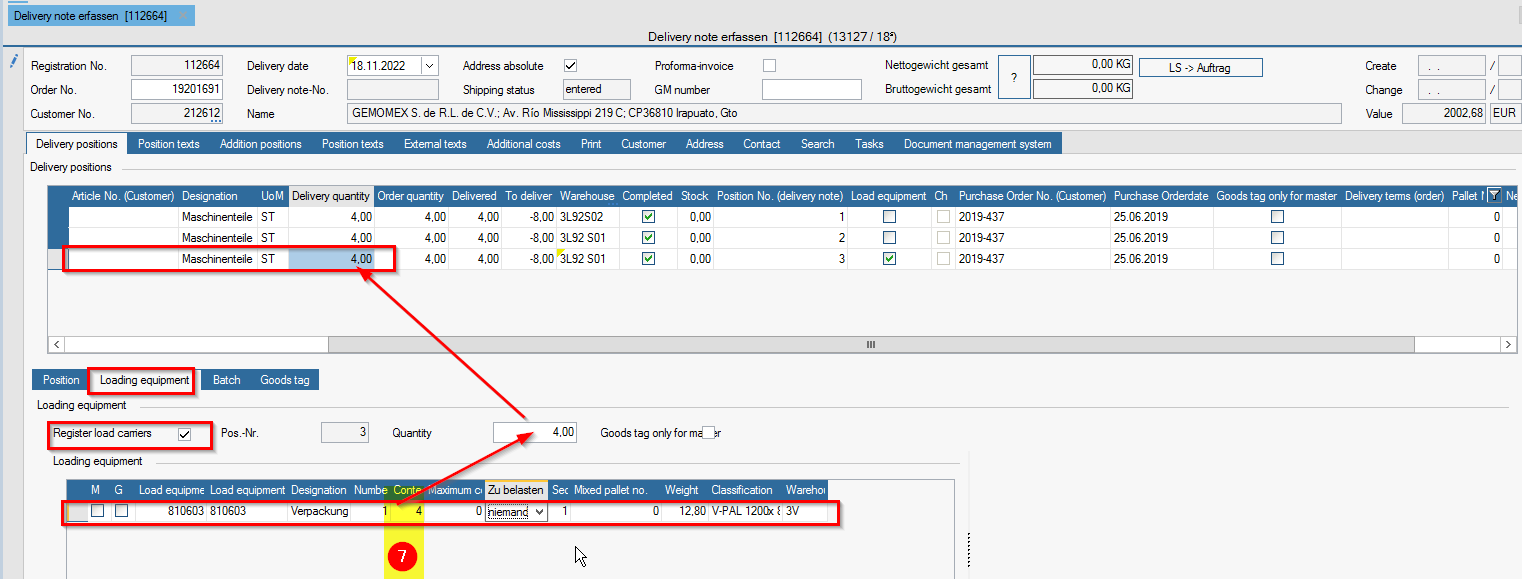
If load carriers are entered in the delivery note, the packaging is debited from the warehouse when the delivery note is processed. For non-returnable packaging, please note that "nobody" has been selected in the column to be debited. Returnable packaging is transferred to the customer account. Return deliveries of empty packaging only have to be transferred from the customer's warehouse to the customer's own warehouse.
Folder Delivery positions / Position
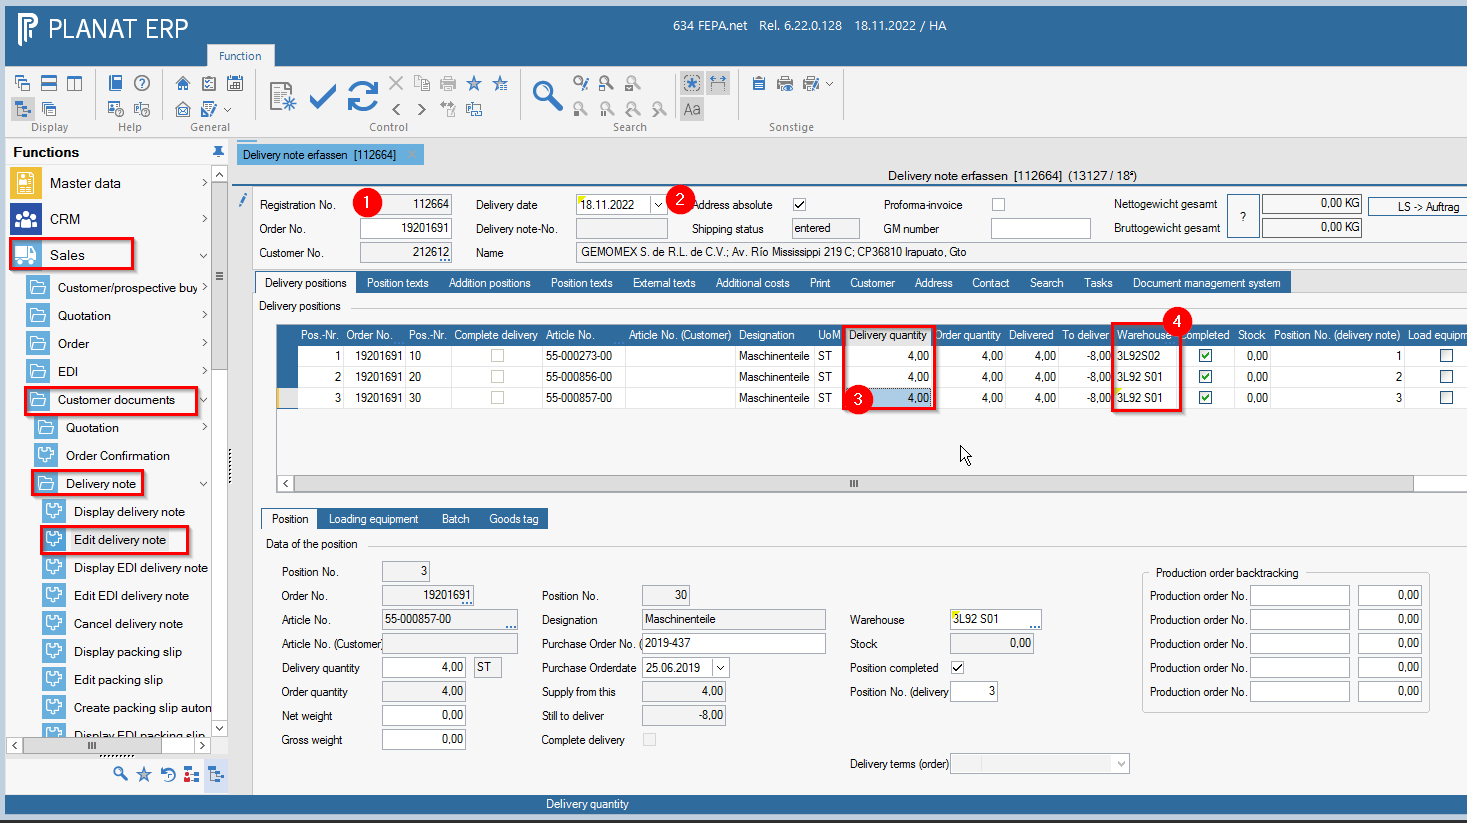
- Enter the entry number of the packing order
- Change the delivery date to the date of the current day, or enter the date according to the procedure valid at the location.
- Check delivery quantities again, if there are deviations from the packing order, these can be changed in the delivery quantities field.
- Check warehouse, if necessary change to the dispatch warehouse.

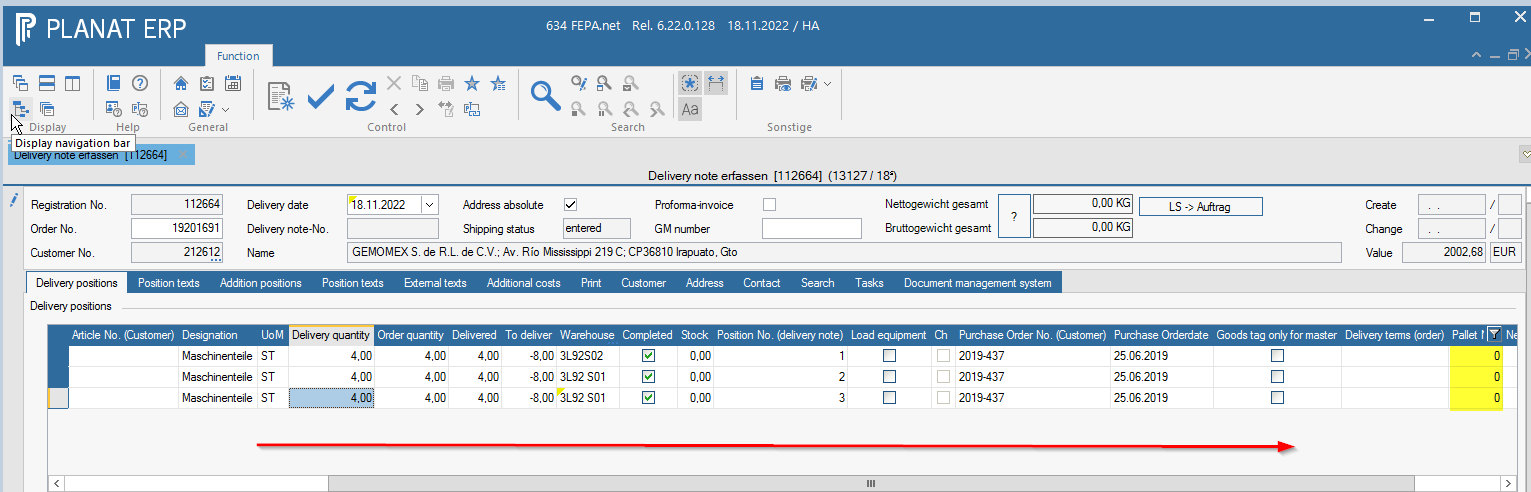
- If there are several pallets, they can be numbered at the pallet number.

Folder Delivery positions / Loading equipment
- In the spare parts business, tick the last item for loading equipment and create some, otherwise none will appear on the forwarding order - if no dummy pallet is used, the quantity (number of packaging) will be booked away from the stock, so check the stock here too and in the case of disposable packaging to debit = no one
- It is compulsory to enter the number of pieces for contents, otherwise this position will receive the value 0

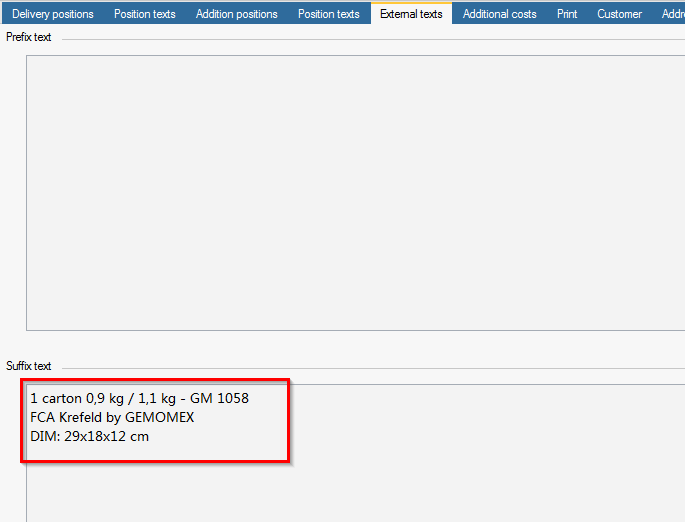
Folder External texts
- If desired, enter the number of pallets, pallet dimensions, weights etc. on the external texts tab in the prefix / suffix text; these will then appear on the delivery note.

- If nothing is entered, delete the external texts prefix text the week etc. that were in the packing slip for the packing department.
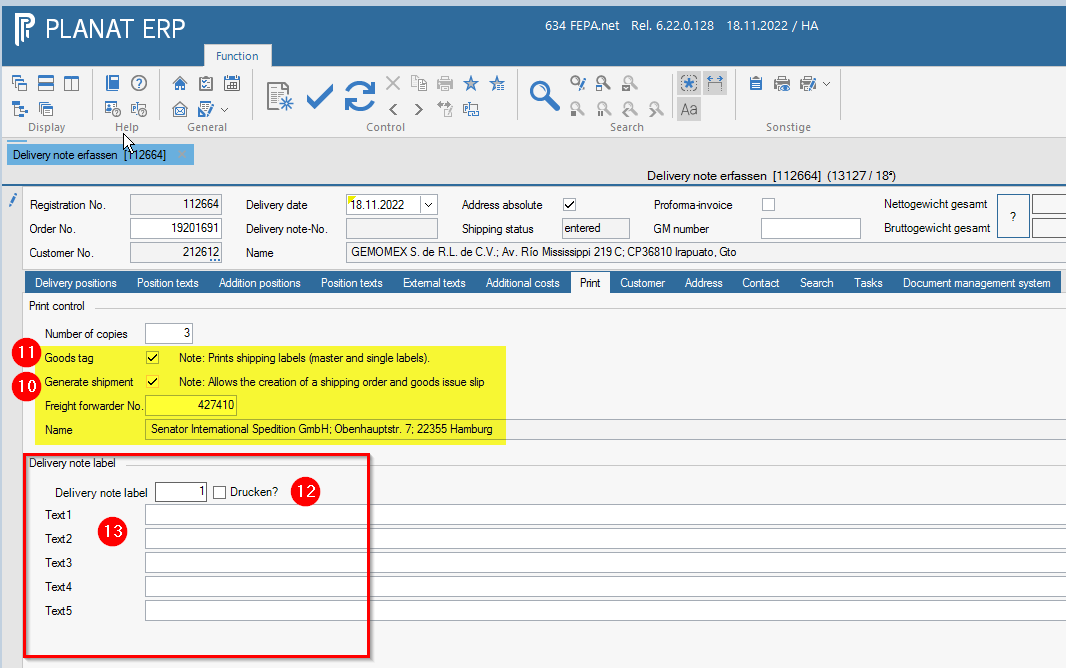
Folder Print
- On the Print tab, tick Shipping documents if it is to be shipped by forwarding agent (the forwarding agent no. should be entered in the field below), if it is to be shipped by DPD or Post, then remove the tick.
- If goods tags are required, also tick the box for goods tags.
- If you want to mark the carton, tick the box for the delivery note label and enter the number of pallets.
- Below this, 4 text fields appear where you can enter the desired marking

- If everything is OK, click on the printer button and the delivery note is processed and printed (and the goods tags, if selected).


Create EDI delivery note
FEPA function: Sales > Customer documents > Delivery note > Edit EDI delivery note
Note: To print goods tags and shipping documents, the checkbox must be ticked in Print tab (see point 10 under Create delivery note).
To create an ASN for an EDI delivery note, the tick for the delivery note-RDT (1) must be set in the General tab and the tick for shipping documents (2) in the Print tab. These settings are made automatically if they are set in the EDI sales order (1) and the in edit customer (2).
- enter the registration number of the packing order
- change delivery date to date of current day
- check the delivery quantities again, if there are deviations from the packing, they can be changed in the field delivery quantities
- check the warehouse of departure and change it if necessary
- if there are no mixed pallets, just click on print and the delivery note + goods tag will be created.
Mixed pallets
- if mixed pallets have resulted, please proceed as follows:
A mixed pallet consists of at least 2 articles (this does not mean the empty container, but the article that is packed).
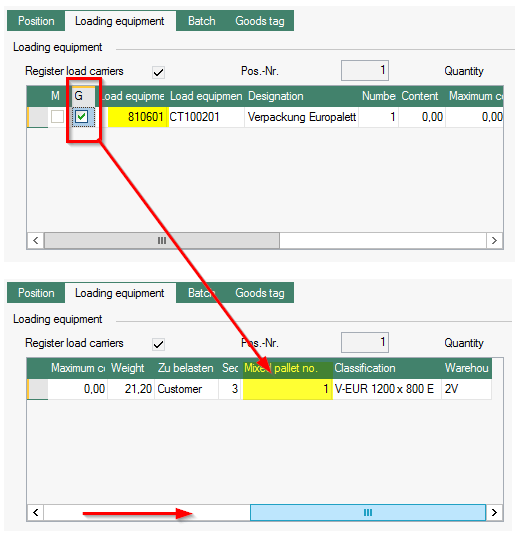
6.1 Click on the position that is affected by the mixed pallet.
6.2 Dissolve all existing loading units (right click to remove row).
6.3. then right click, append line and enter the pallet and 1 for quantity
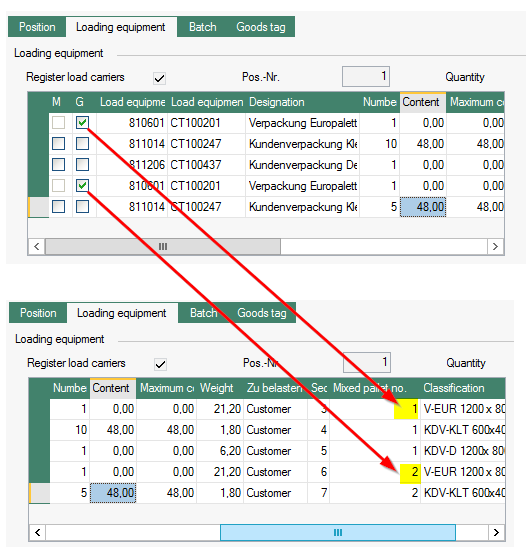
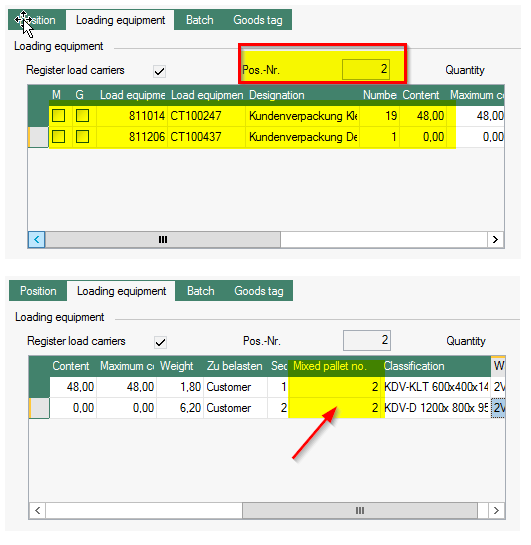
6.4. then check G (this will assign a mixed pallet number)
6.5. then append row again and add the KLT or carton
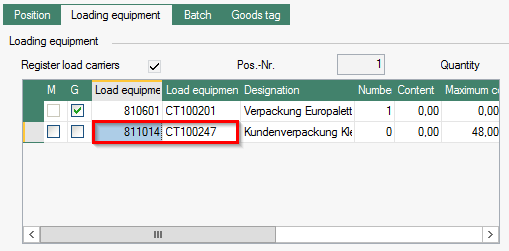
6.6. Make sure that the LT. no. (customer) (LT = loading equipment number) is stored, otherwise an error will occur during printing (if no loading equipment article no. is used, but the customer requests this, this may lead to complaints and charges from the customer).
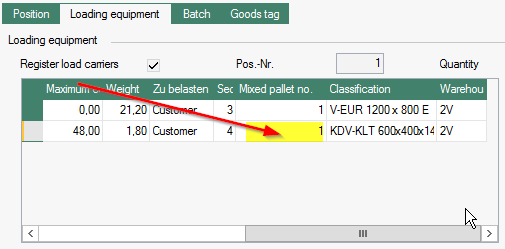
6.7. Indicate the number of cartons on the pallet for each article and the number of pieces per carton for the contents. 6.8. enter the mixed pallet number at the back if it has not yet been assigned.
6.9 If there are still lids on the mixing pallet, proceed as for cartons/KLT.
You can create as many mixed pallets as you like for each article, but you must make sure that the respective cartons with the corresponding mixing pallet number.
6.10. For self-checking, check again if the total number of pieces in the edited article matches what is to be delivered.
6.11. Then do the add the loading equipment for the 2nd article which is also packed on the same mixing pallet number. 6.12. Note, however, that we only need to specify the KLT/cartons/lids, as we have already stored the pallet as loading equipment for the 1st article.
6.13. Enter the pallet on which the goods are placed, compare the total quantity of the delivery note item with the packing slip.
6.14. In the Print tab, check whether the checkmark is set for goods tags and shipping documents ("Shipping documents" should be preset for EDI customers in the customer master, without shipping documents no ASN can be created).
6.15 When everything is done, click on print again and the delivery note is created (and the labels).
Cancel delivery note
This function is used for delivery notes and EDI delivery notes.
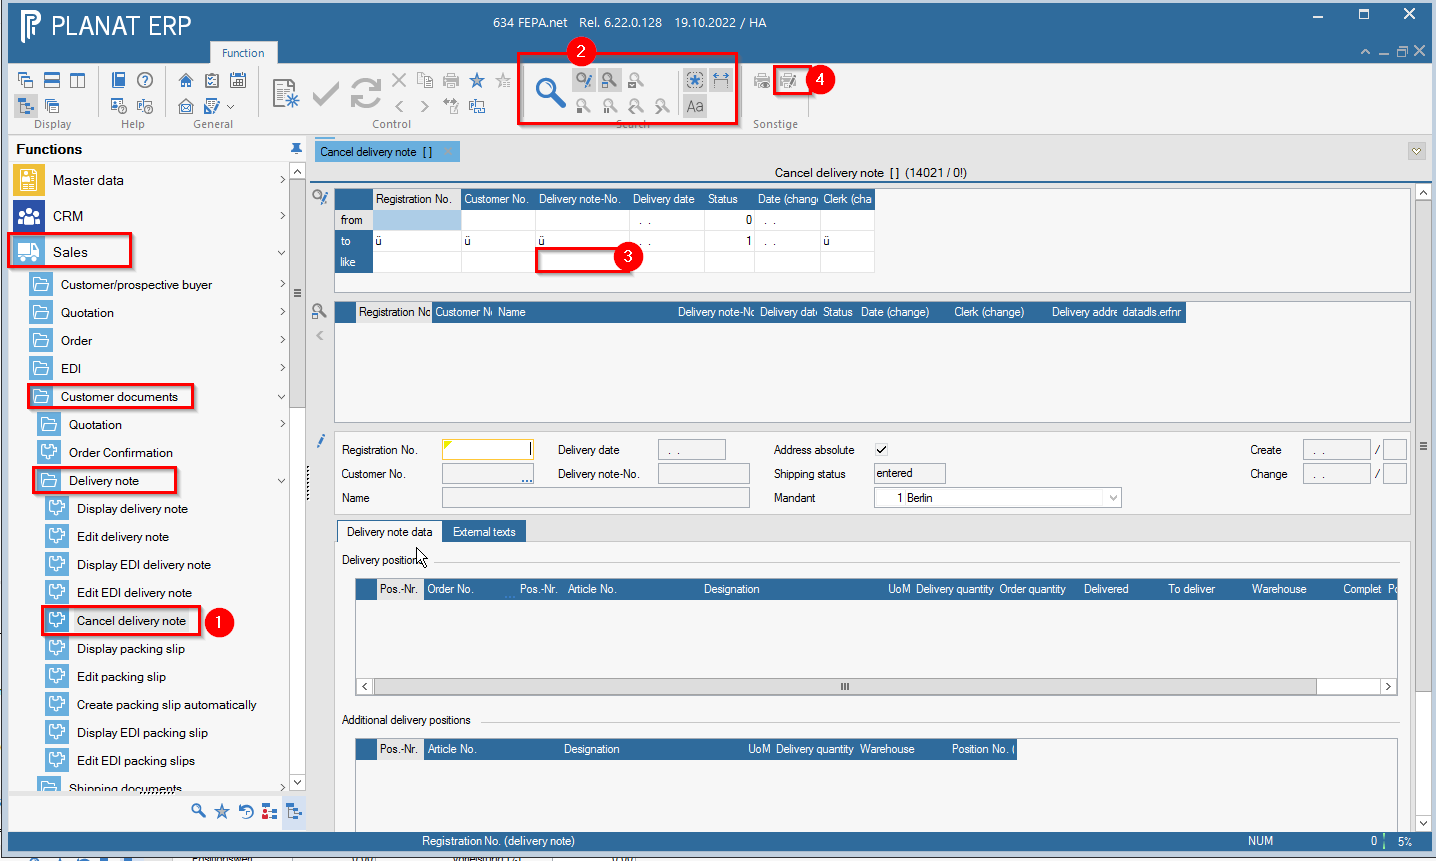
1. FEPA function: Sales > Customer documents > Delivery note > Cancel delivery note
2. Open search (magnifying glass with pen) enter the desired delivery note no. in the search field at like, press magnifying glass
3. Select the desired delivery note (double click), the delivery note is loaded - check for correctness. 4.
4. Cancel the delivery note by pressing the button for printing and processing, the cancellation delivery note is printed.
Attention: Calculated delivery notes can only be cancelled when the invoice has been cancelled.
Invoices
General
Here you will find general information on creating and cancelling invoices in FEPA. Location- or customer-specific features are not taken into account here!
Create invoices
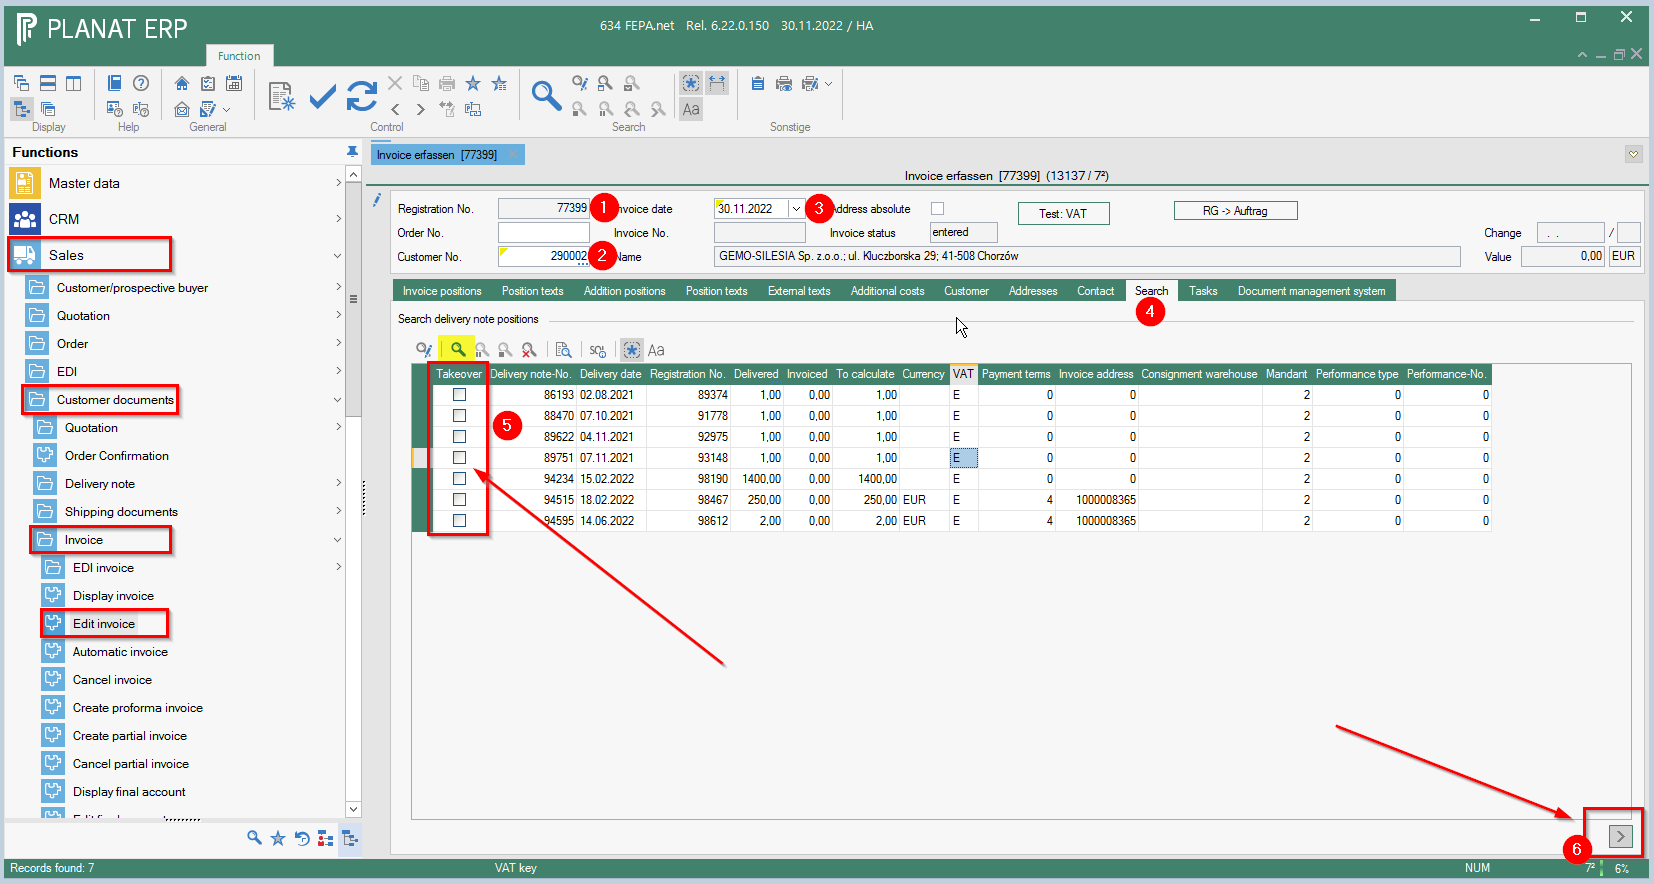
FEPA function: Sales > Customer documents > Invoice > Edit invoice
1. press Enter ( registration number will be assigned)
2. enter the customer number in the Customer No. field
3. confirm invoice date
4. go to the search tab and start the search with the magnifying glass (click!).
5. all delivery notes not yet invoiced for the customer will be displayed, tick the desired delivery note number in the Take over field
6. click on the button ">" at the bottom right (delivery note positions are taken over into the invoice positions)
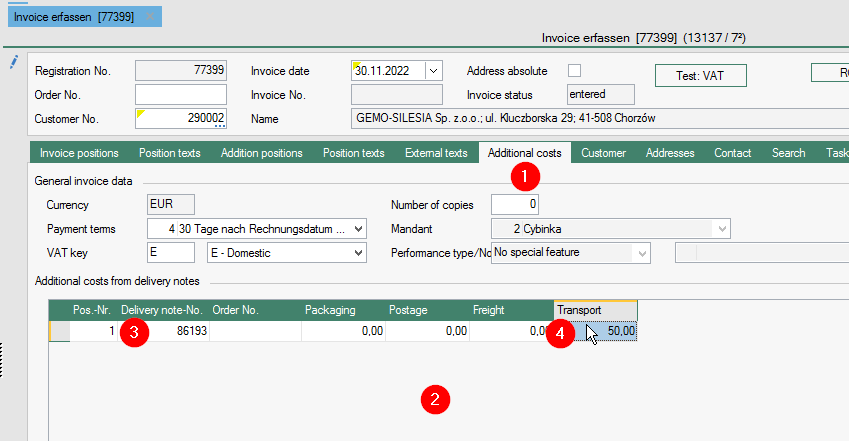
6.1 Calculate packaging costs, transport costs, etc:
6.1.1. additional costs tab
6.1.2. append line
6.1.3. enter the delivery note number
6.1.4. and enter the desired value in the respective field
7. click on the button Print and process (invoice is created)

In the External Texts tab, prefix or suffix texts can be entered for the invoice, which are then printed on the invoice.
A print preview (button Printer with eye) can be used to check the invoice before processing.
Create EDI invoice
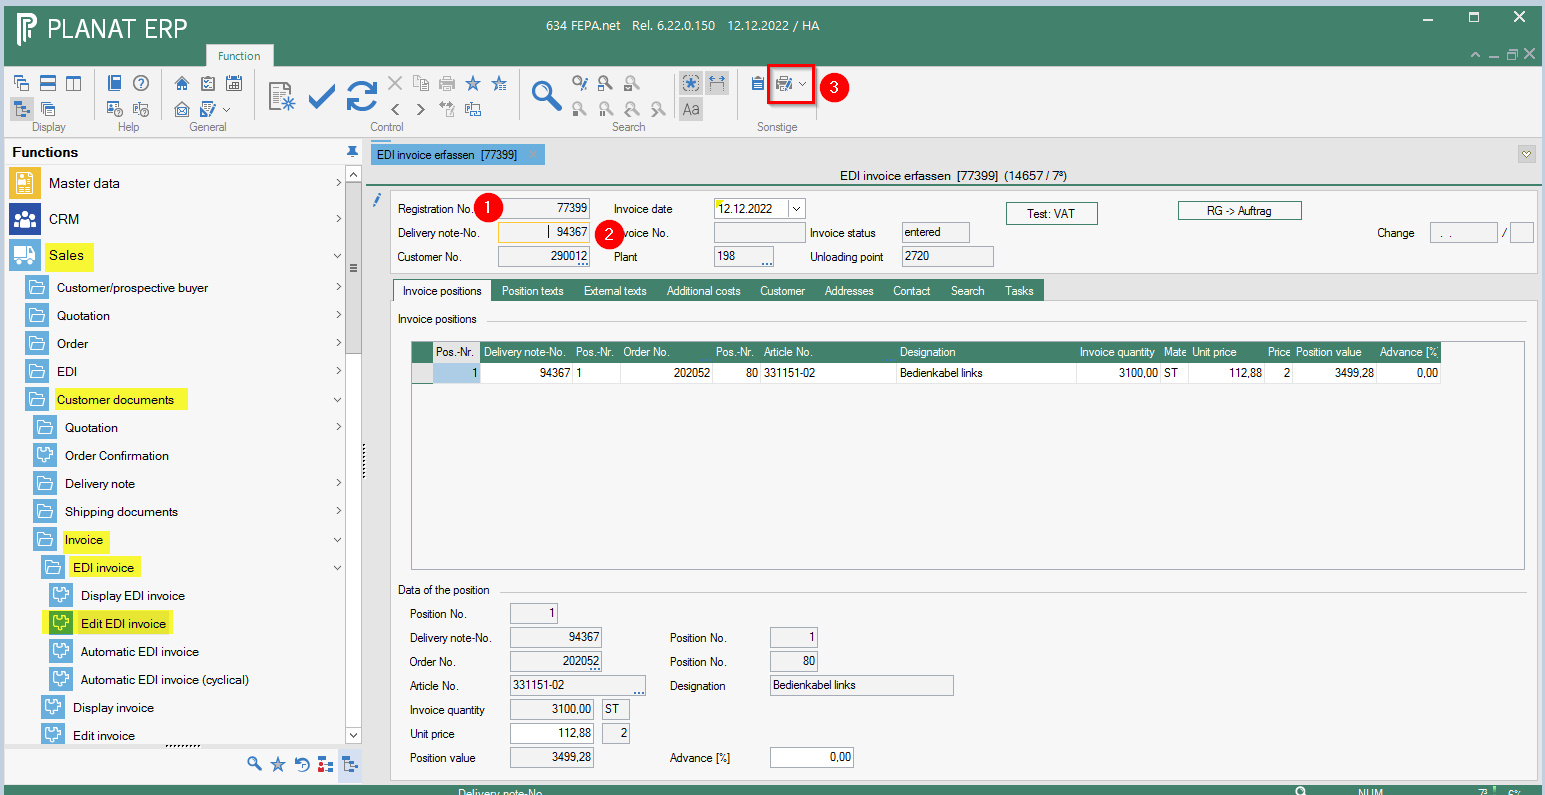
FEPA function: Sales > Customer documents> Invoice > EDI Invoice> Edit EDI Invoice
- Press Enter (Registration number is assigned).
- Enter delivery note number
- Click on the printer button and the invoice is created.
Cancel invoice
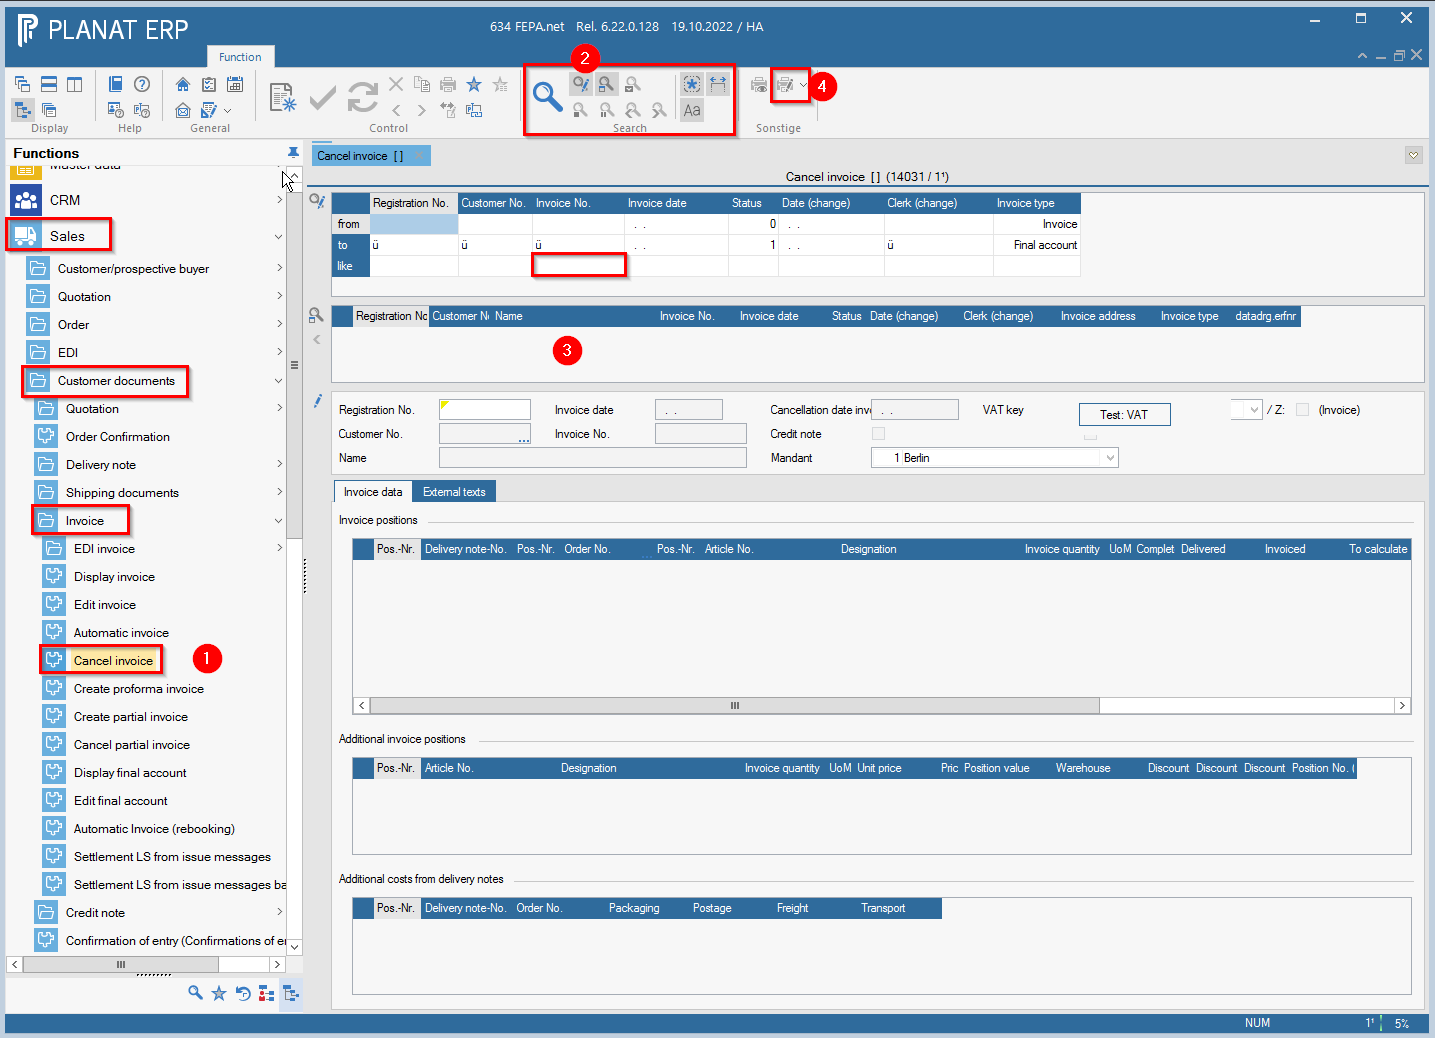
Attention: Invoices from the previous year cannot be cancelled. The year change in FEPA takes place on 01.01. of each year. Whether an invoice may be cancelled at the turn of the month depends on the regulations at the location. (If the invoice may no longer be cancelled, a credit note must be created.
- Mask under: Sales > Customer Papers > Invoice > Cancel Invoice
- Open search (magnifying glass with pen) enter the desired invoice number in the search field at like, press magnifying glass
- Select the desired invoice (double click), the invoice will be loaded - check for correctness
- Cancel the invoice with the button for printing and processing, the cancellation invoice is printed out.
Create credit note
This function can be used to create credit notes with stock chargeback and value credit notes.
FEPA function: Sales > Customer papers > Credit note> Edit credit note.
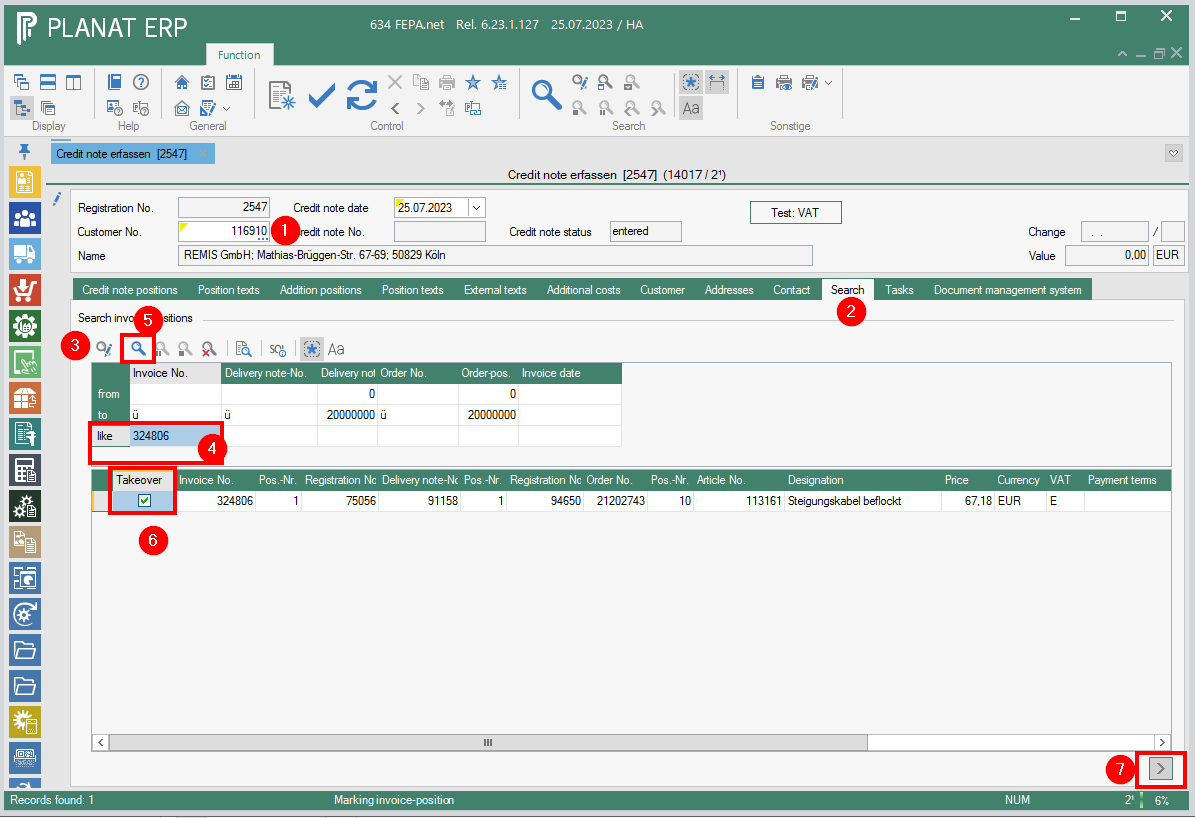
- Press enter (entry number is assigned), Enter customer number (1), enter
- Click in tab Search
- Open search (magnifying glass with pen)
- Enter the desired invoice no. in the search field at like
- Press magnifying glass
- Search for the desired invoice and tick it in the field Take over
- Use the arrow at the bottom right to transfer to the tab Credit items.

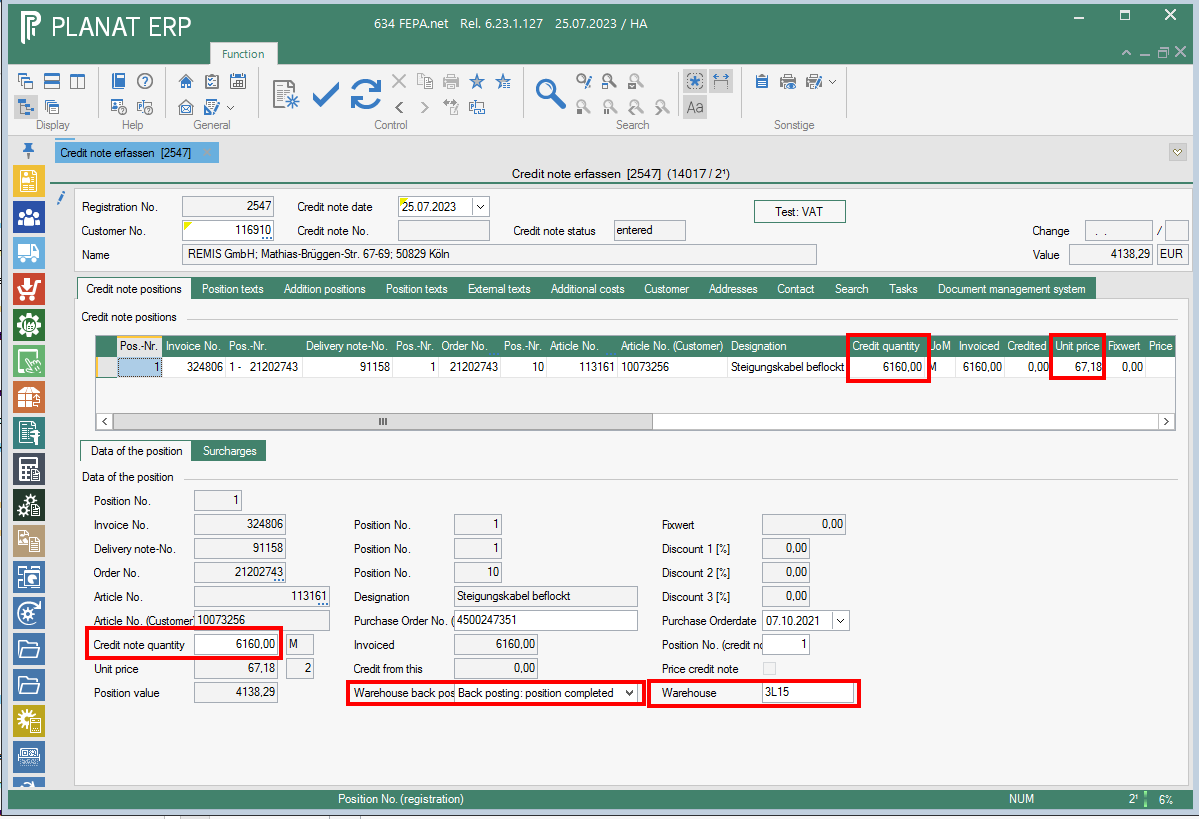
- Check quantity and price - The "price" is the difference from the calculated price to be credited.
- If a quantity is credited back, select in the item and the warehouse at yes, If it is a value credit the check mark is set at price credit.

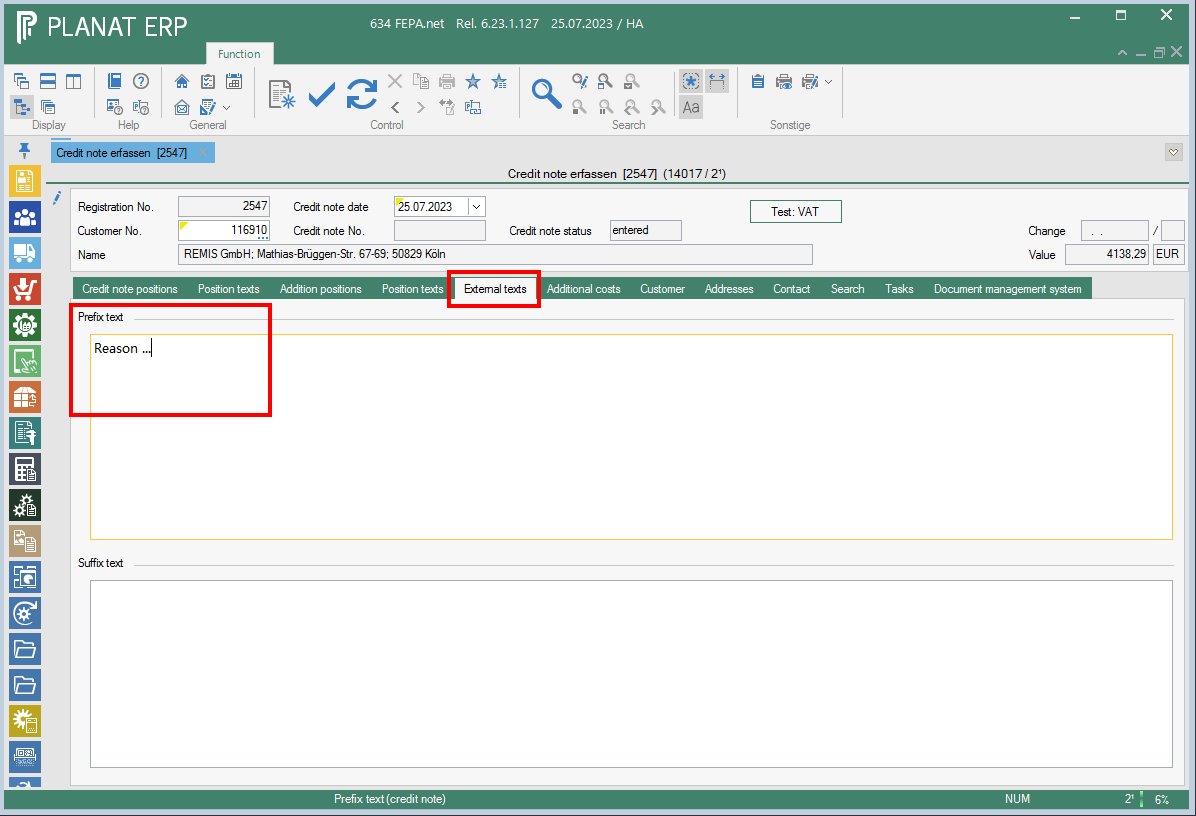
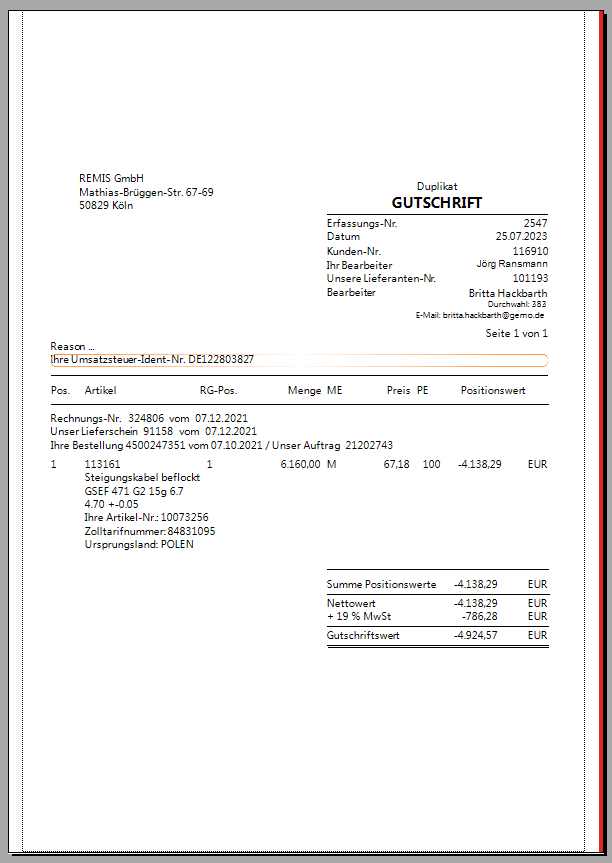
- In the external texts tab you can enter information, e.g. refer to the correspondence that leads to the credit note. It is also printed out.

- Create print preview, check credit note for correctness


- If everthing is correct, "print and process" the credit note

Cancel Credit note
Attention: Credit notes from the previous year cannot be cancelled. The year change in FEPA takes place on 01.01. of each year. Whether a credit note may be cancelled over the turn of the month depends on the regulations at the location.
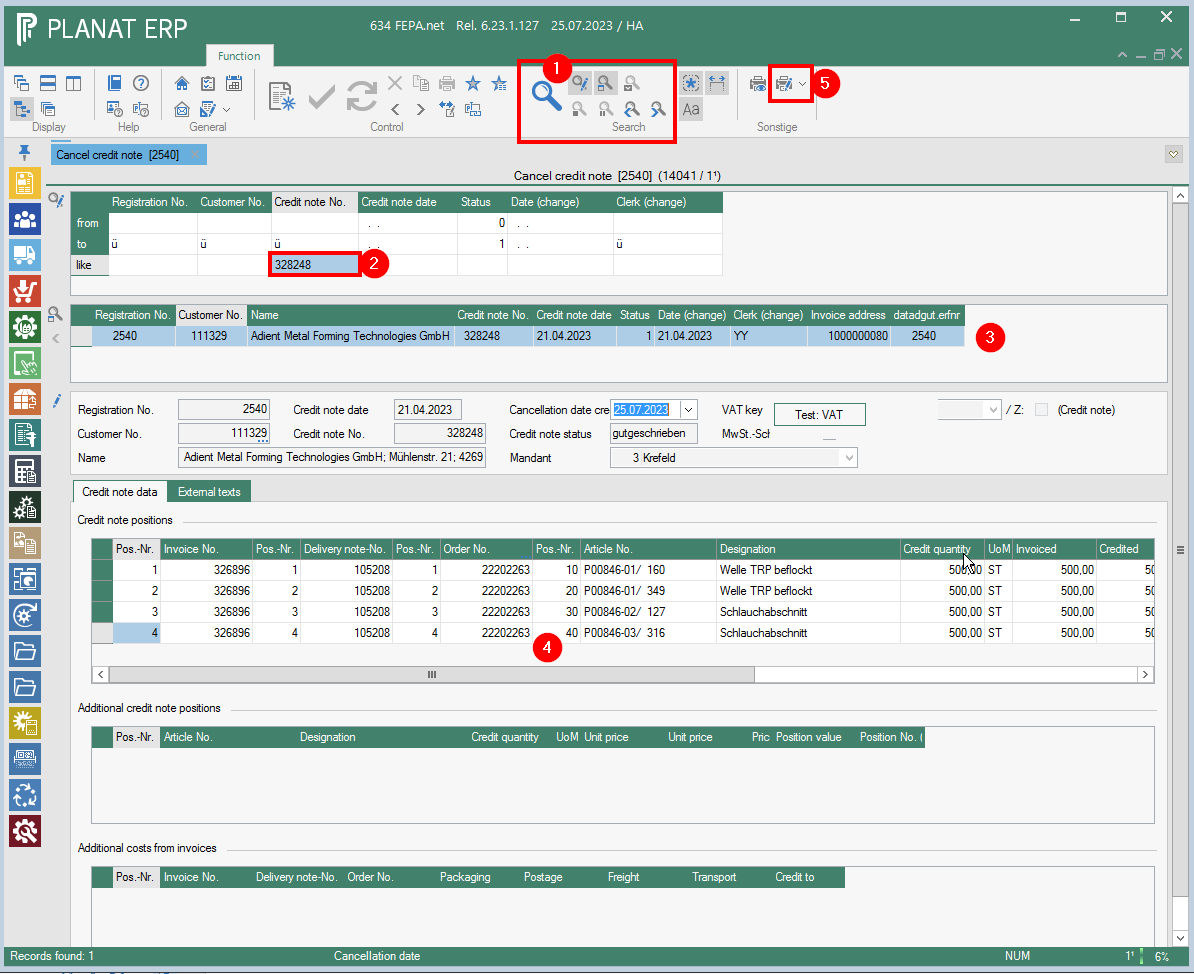
FEPA function: Sales > Customer documents > Credit note > Cancel credit note
- Open search (magnifying glass with pen)
- Enter the desired credit note number in the search field at like, press the magnifying glass.
- Select the desired credit note (double-click), credit note is loaded
- check for correctness. (a print preview is possible!)
- Press the button for printing and processing to cancel the credit note, cancellation credit note is printed out.

Forwarding order
General
Delivery notes will only be proposed in the function Arrange Shipment if the checkmark for Generate Shipment was set in the tab Print of the delivery note when processing the delivery note.
There is also a setting option for this on the customer, in which case the tick is pre-assigned.
Create forwarding order
FEPA function: Sales > Customer documents > Shipping documents > Arrange shipment
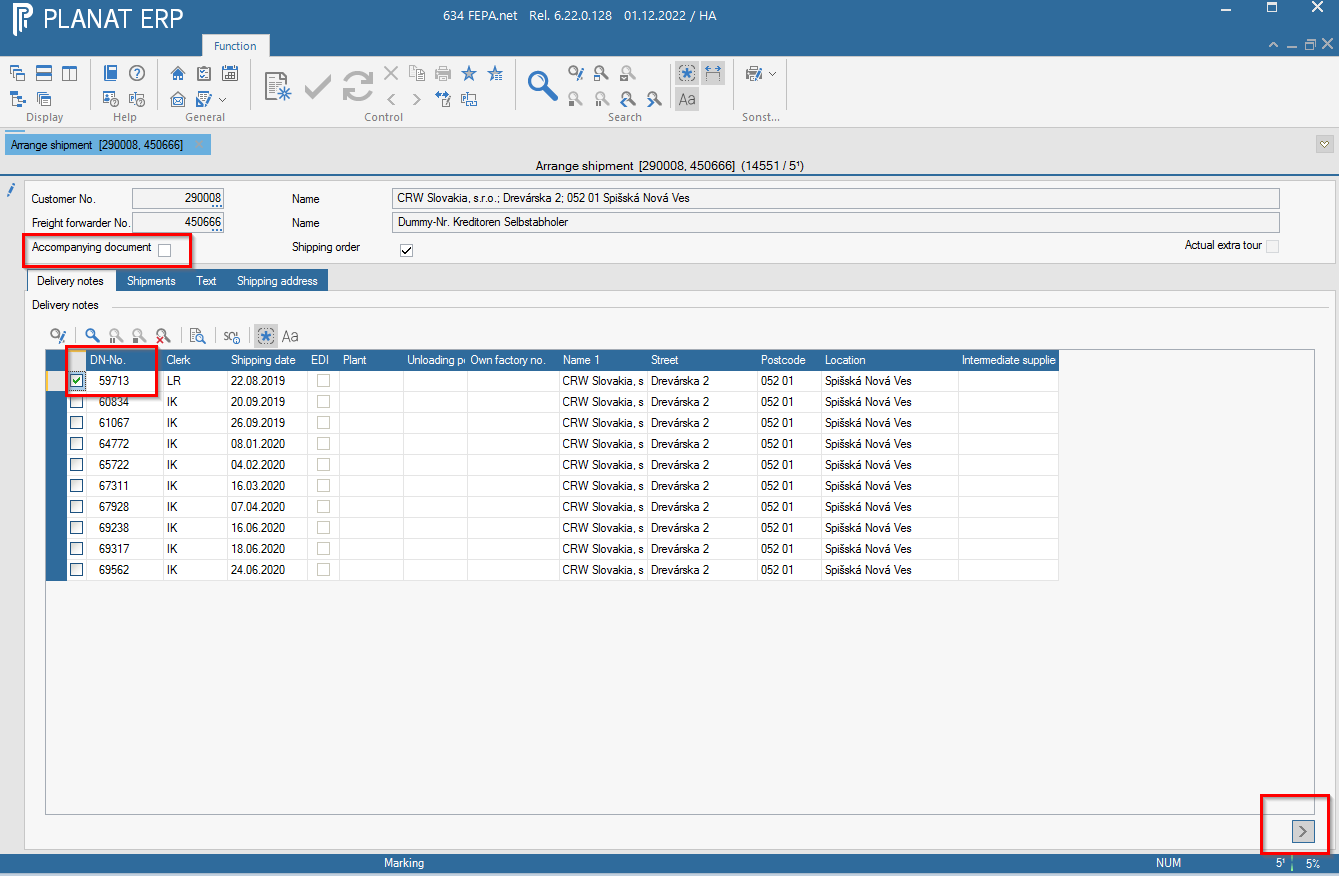
- enter customer number and Enter (forwarder no. appears)
- Press the magnifying glass in the tab Delivery notes. Select the desired delivery notes (There are possibible as much as you want.).
- uncheck the goods accompanying document (will then not be printed)
- Then click on the ">" button at the bottom right (items are transferred to the Shipments tab).
Note: the search in the delivery note tab is preset with the main mandant.

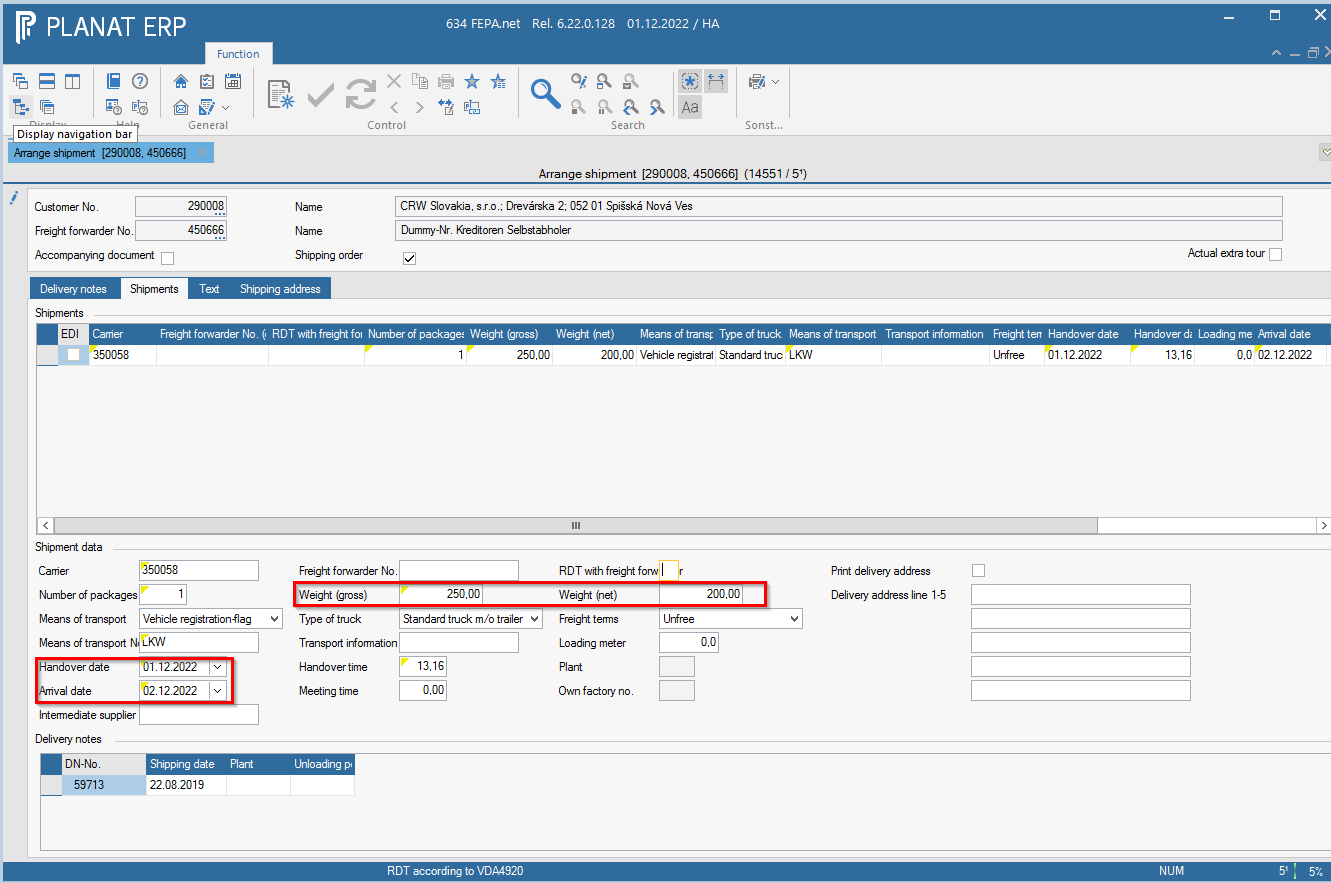
- enter gross and net weight in the shippments tab
- change the date of delivery and the date of arrival (also empty mandatory fields)

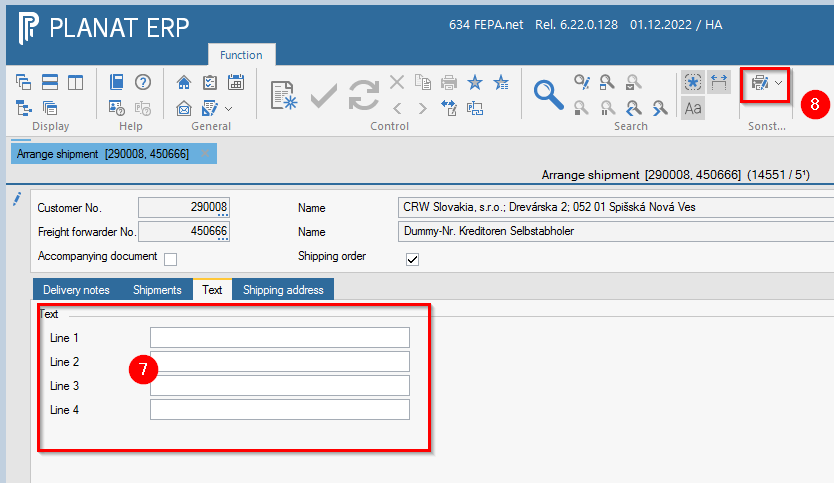
- enter the invoice number and, if applicable, ABD, CMR, etc. in the Texts tab. There is also space here for information for the forwarder.
- Click on the print button and the forwarding order will be created and printed.

Create EDI forwarding order
FEPA Function: Sales > Customer Documents > Shipping Documents > Arrange Shipments
- See help Create forwarding order (not EDI).
- proceed in the same way as described there, weight is determined from the delivery notes, Fepa automatically pulls if all weights were stored in the master data!
Attention carrier field - Please do not enter any special characters here. Only characters from 0-9 and Latin letters A-Z are permitted in VDA 4913. Language-related special characters lead to errors in the VDA file and thus in the ASN!
Send remote data transmission to the customer (ASN)
The basis for this is that the forwarding order has been created and the sales department has specified that the customer receives our data via remote data transmission (also known as ASN for short).
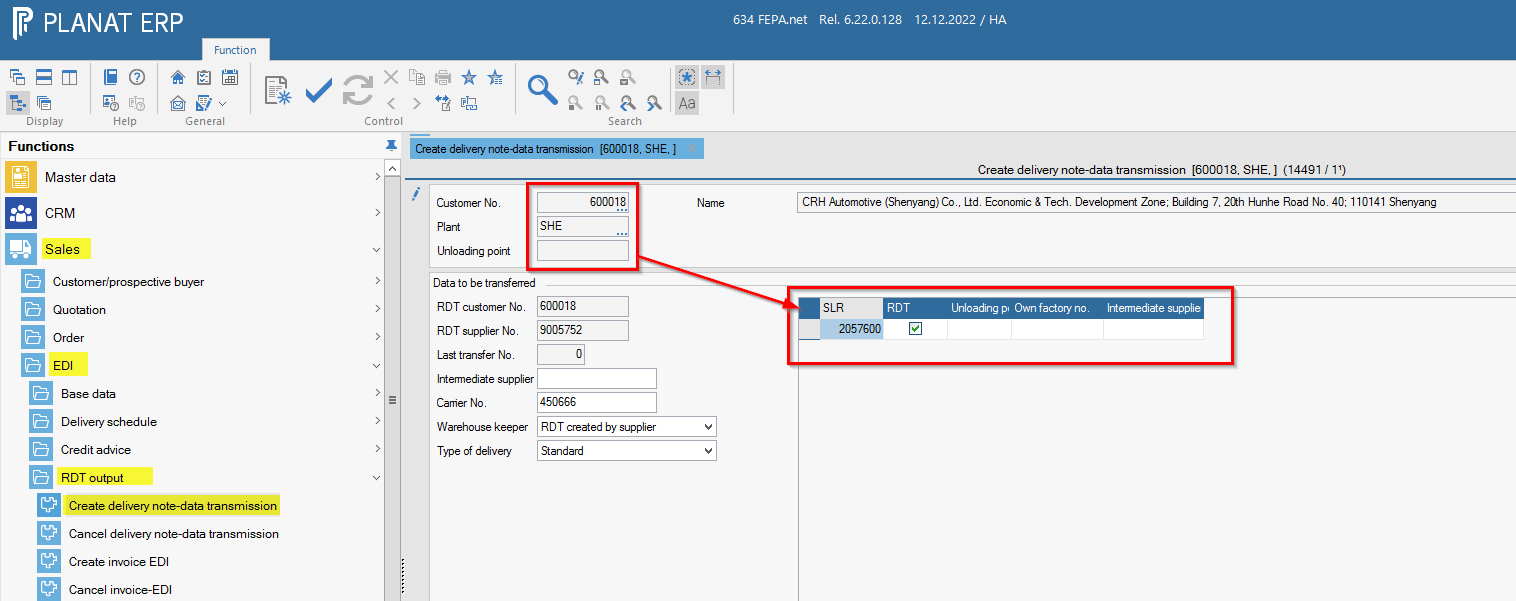
FEPA function: Sales > EDI > EDI output > Create delivery note-data transmission
- enter customer number, plant and unloading point (see also delivery note above right)
- then enter and a list of the data to be sent (= shipments) for the selected combination "customer - plant - unloading point" appears.

- Select the desired forwarding order (several together are also possible).

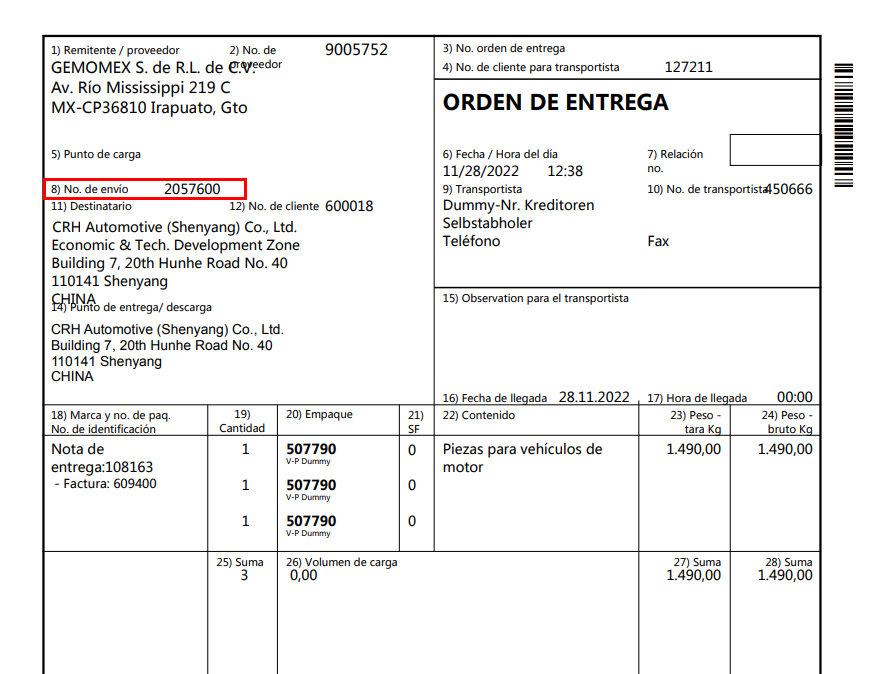
If you are not sure which one it was, you can compare the SLB number (consignment reference number) (this appears on the forwarding order, see image behind 8) above the customer address).
Here is an example:
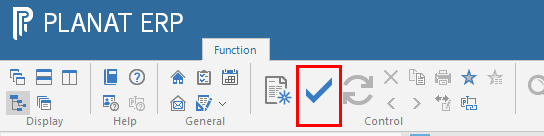
- Then click on the tick in the tool bar. This creates the file for the ASN and within an hour it goes to the EDI server and is sent to the customer.


Attention:
Shipped forwarding orders can no longer be changed afterwards.
If, for whatever reason, the ASN has to be cancelled in order to change the shipment, the customer must always be informed!
Loading equipment and loading units
General
Loading equipment and loading units are always articles in FEPA and are represented by their own article number. For more information on the printing of goods tags, see article Goods tags (labels).
Loading equipment
Loading equipment is an article that represents specific packaging equipment in FEPA. For example, a specific carton or a Euro pallet.
Here are a few examples of loading equipment:


To mark an article as such a loading equipment, the article must be called up in FEPA in the programme Master data > Article > Edit articlesand then marked as such. Only after this marking is the article available as loading equipment in all other FEPA programmes and functions:
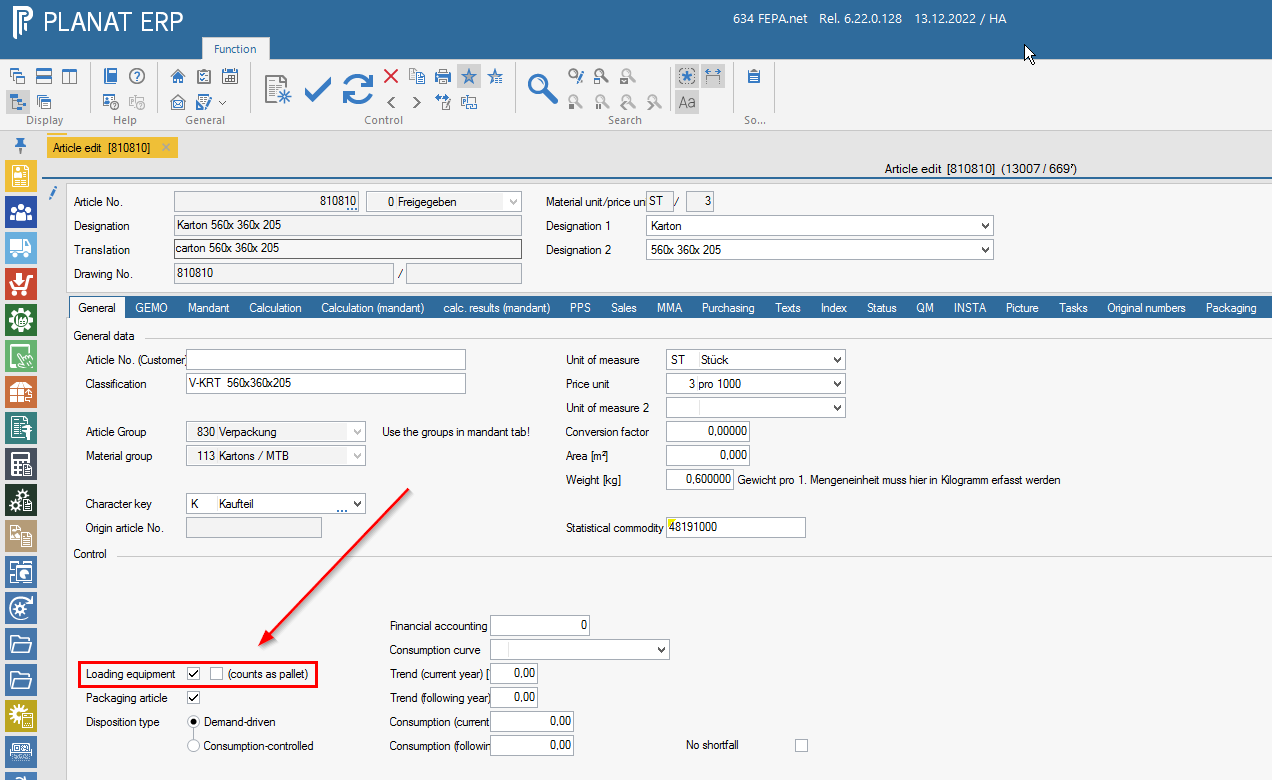
The tick "counts as pallet" only has an effect on the printing of the forwarding order. In the document all loading equipment is listed with the items they contain. Only if the tick is set, the text for the forwarding order item appears.
If the item has been marked as loading equipment, further settings for a loading equipment can be made in the programme Master data > Loading equipment > Edit loading equipment:
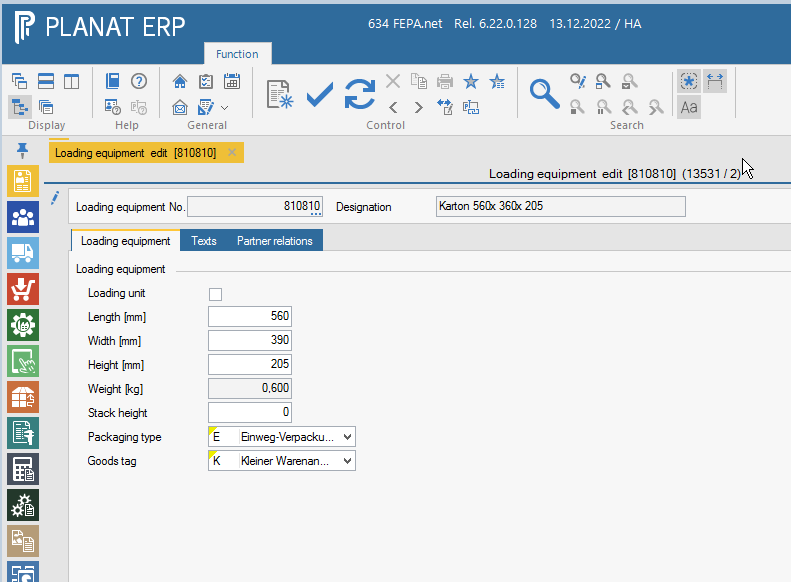
Here are a few explanations of the settings:
- Loading unit:
Marks the loading equipment as a loading unit. Directly after marking, another table appears in the same programme with which the details of the loading unit can be configured. - Length [mm], Width [mm], Height [mm]:
Indicates the dimensions of the loading equipment in the unit millimetres. Has no effect in FEPA and is for information only. - Weight [kg]:
This is the same field as in the article master and can therefore not be edited here. To change the weight, it must be adjusted in the item master (seeMaster data > Article > Edit articles). The weight is used to calculate the gross & net weight of the consignment. - Stack Height:
A purely informative field which indicates the maximum stacking height for loading equipment. You can display the field as information in some functions. - Packing type:
Here you have the option to mark the loading equipment as one-way or reusable packaging. If set as one-way packaging, the item will be consumed (ergo debited) when used in the delivery note. If reusable packaging is selected, the loading equipment is not consumed but transferred to a partner's warehouse (customer, supplier, forwarder) (in this case via posting of issue/consumption to GEMO warehouse and receipt to partner warehouse). The behaviour with reusable packaging can be set even more precisely in the "Partner relations" tab. - Goods tag:
Here you have the option of influencing the printing of the goods tag.
Loading units
Loading units are loading equipment that has been marked as a loading unit in the loading equipment master data (Master data > Loading equipment > Edit loading equipment). These loading units represent a group of several loading equipment and are intended to simplify their handling. You could also say that the complete combination of pallet, cartons, layer pads, cover boards / lids and outer cartons represents a loading unit.
Loading units themselves should not be inventory-managed (Master data > Article > Edit articles, field "MMA-managed") because their components are already booked in the warehouse. For the same reason, loading units should not be assigned their own price and weight.
Here are a few examples of loading units:
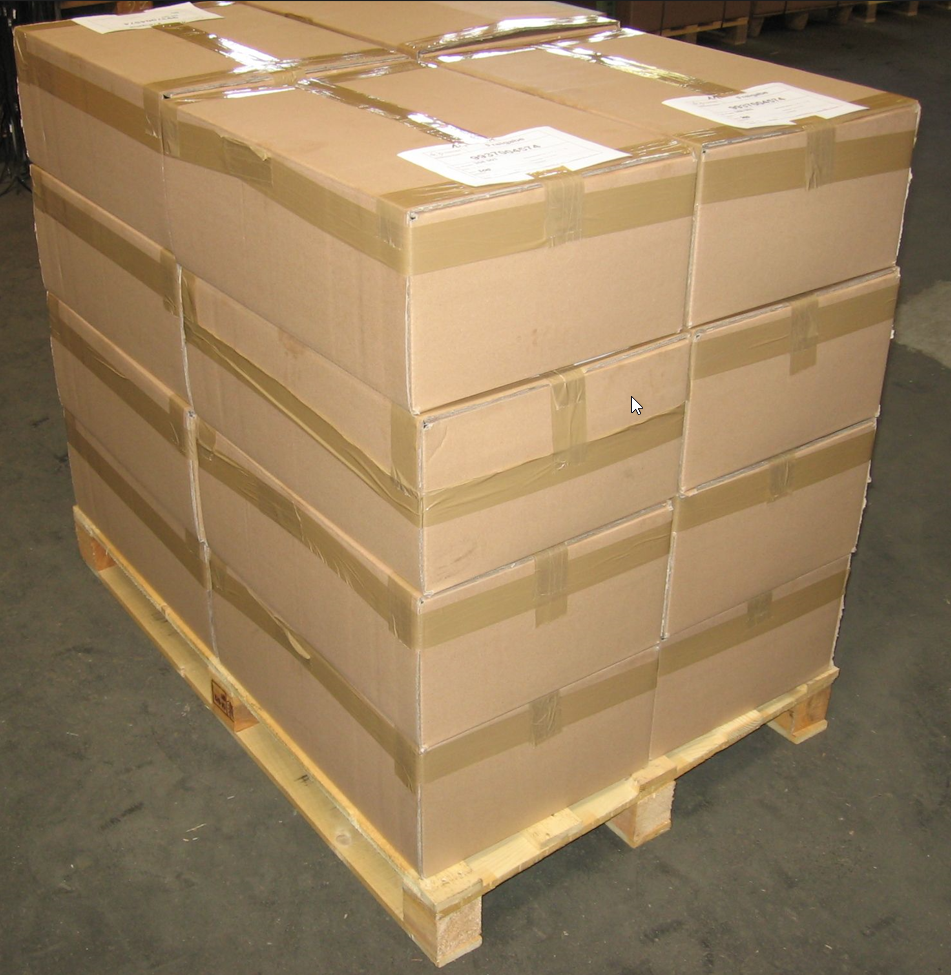
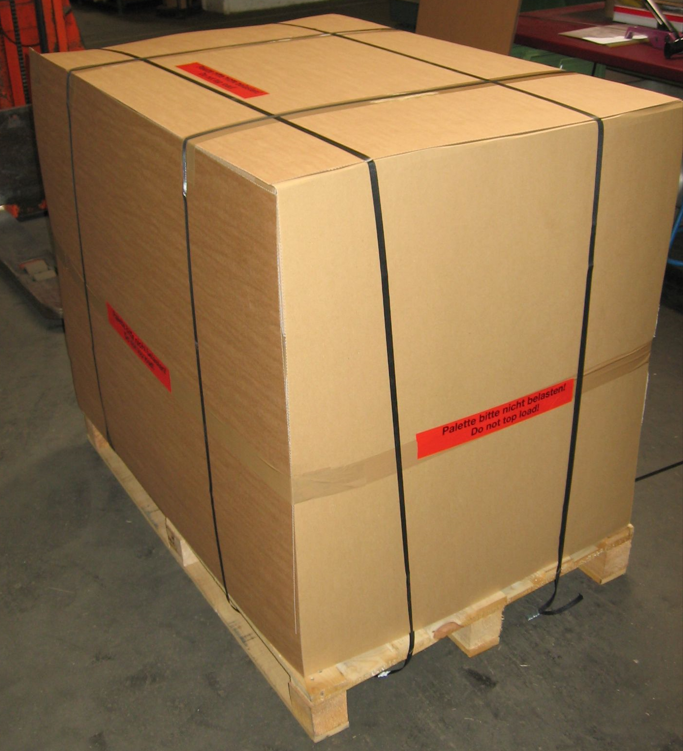
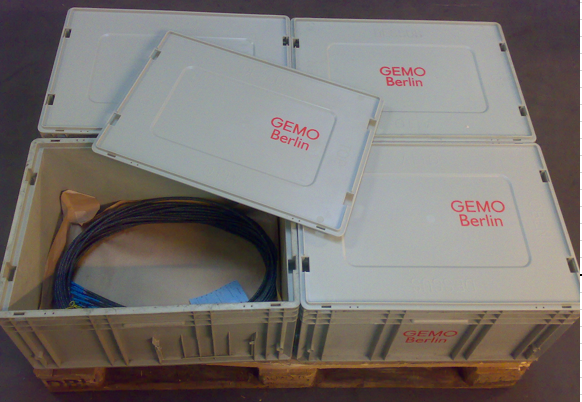
In the programme Master data > Loading equipment > Edit loading equipment a loading equipment can be marked as a loading unit by ticking the box "Loading unit" [1]. A new table appears in which the details of the new loading unit can be configured [2].
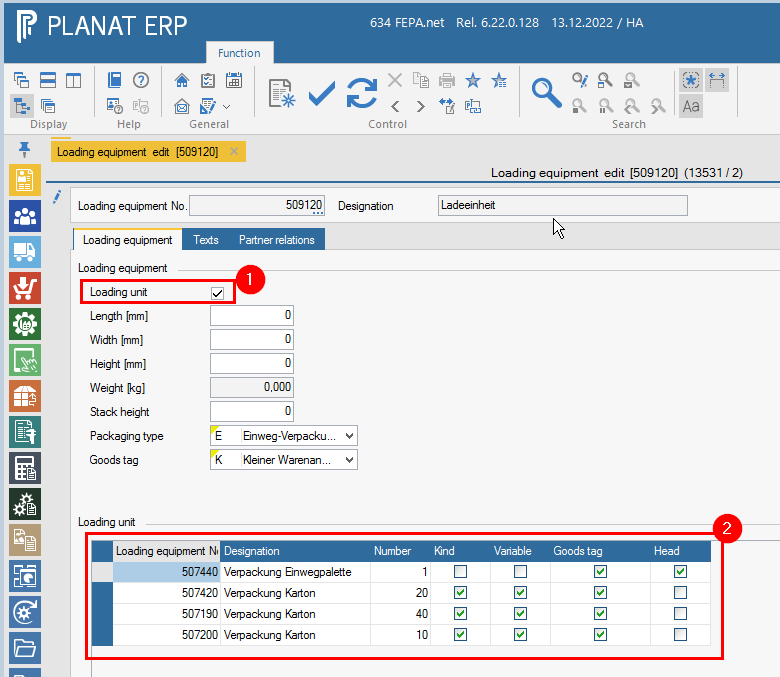
Explanation of the above screenshot:
You can see that this loading unit must always consist of at least one pallet 507440 as this is the only loading equipment that has not been marked as variable. The other loading equipment is all marked as variable and therefore optional. However, these boxes contain the goods to be shipped, i.e. the actual articles (column "Kind"). In this case it is therefore possible to use three different cartons for this loading unit. Due to the different sizes of the individual cartons, they all have a different maximum number. A goods label is to be printed for each of these loading equipment, but the so-called master label for the pallet.
Goods tag (labels)
General
FEPA has the possibility to print goods tags based on the loading equipment used (see also article Loading equipment and loading units). Printing then starts together with the printing of the delivery note. This applies to both EDI delivery notes and non-EDI delivery notes.
Conditions for printing
In order for goods tags to be printed at all, a few precautions must be taken in the delivery note, but these can be automated.
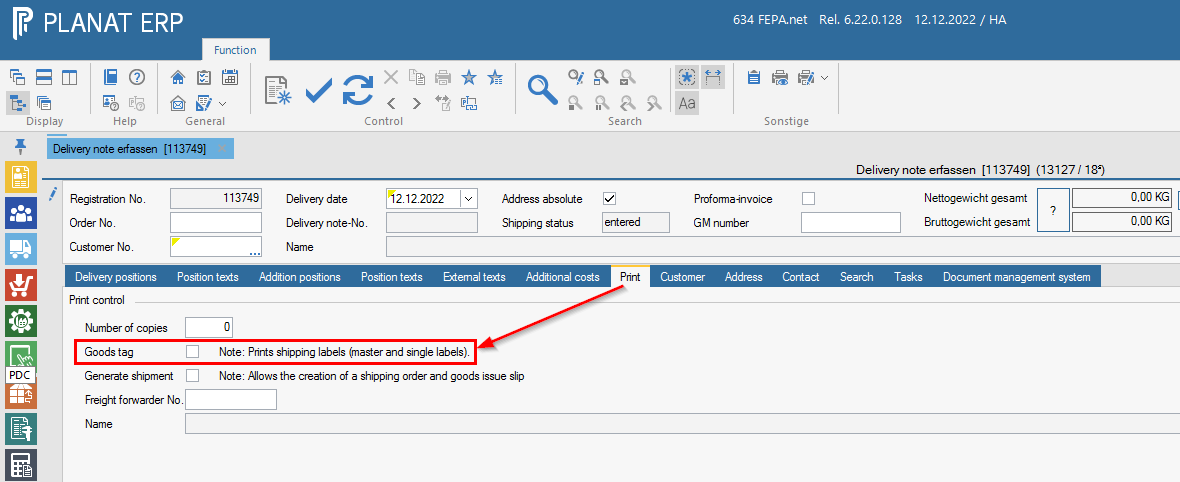
Tab "Print"
In the function Edit delivery note or Edit EDI delivery note there is the tab Print with the option Goods tags. Only if this option is selected will the goods tags be printed together with the delivery note.
Tab Delivery positions
In the function Edit delivery note or Edit EDI delivery note there is the tab Delivery positions. All items to be delivered that have a connection to a customer order are displayed here in table form. For non-EDI delivery notes, there is also the option to enter additional positions, but there is no option to print goods tags for these.
Regardless of the type of delivery note, there is an area with additional tabs below the table with the items to be delivered. These are always dependent on the currently selected delivery note item. To create goods tags, the loading equipment to be used must be entered in the Loading equipment tab. The corresponding table only appears when the Enter loading equipment check mark has been activated.
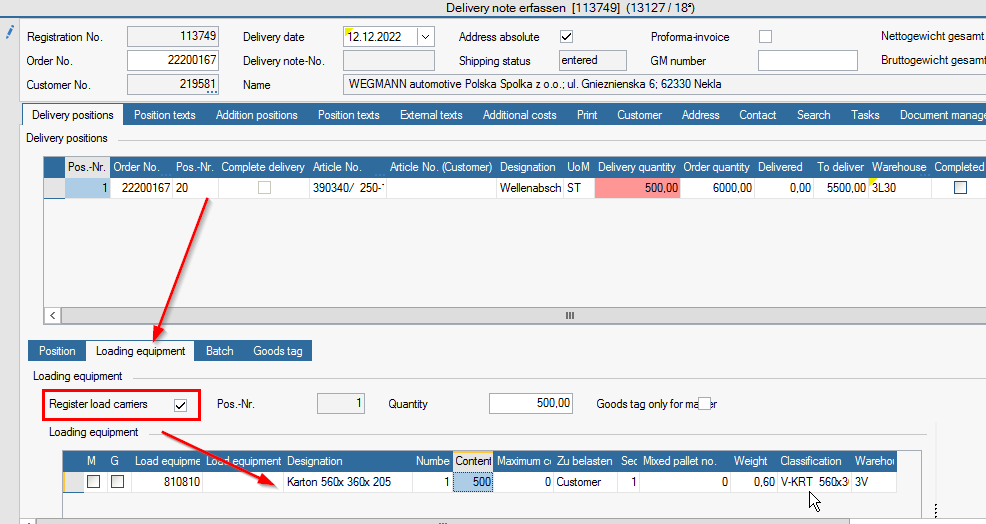
In the screenshot above, you can see the two columns M and G in the loading equipment positions which identify the position as Master, G=Mixed or Single (if neither M nor G is selected). In the following, a Master label, (G=)mixed label or single label is printed accordingly.
It is important to enter the loading equipment in order or to keep an eye on the column "Sequence". All single-label positions always belong to the "previously entered" master-label position. For mixed labels the column "Mixed pallet no." is decisive for the affiliation.
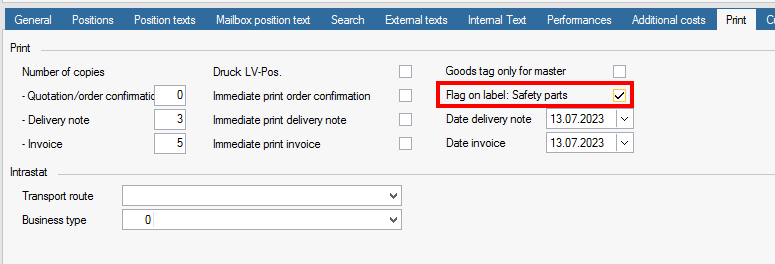
Sales order tab Print
The default setting of the labels for the variant with the "Safety parts" indicator (circle with triangle, "Special features") can be found in the Edit sales order in the Print tab.
Types of goods tags
FEPA recognises several types of tags which are briefly explained below:
- Master
This is usually the goods tag that is printed once per pallet and informs about the entire contents of the pallet. All the goods on the pallet must be of the same article. If it is a pallet with mixed goods, tick "G" (stands for "Mixed") in the loading equipment position and the goods tag "Mixed pallet" is used. - Mixed pallet
Is always printed if the tick in the column "G" is ticked in the loading equipment positions. See also "Master". - Single (small)
The "Single" goods tag is printed per package, usually per box (or loading equipment) containing the actual goods. The "Single" goods tag is available in a large and small version, but we actually only use the "Single (small)". - Single
See also "Single (small)". - Load unit
Goods tags for loading units are only printed if a loading unit is selected in the delivery note item AND in the customer-work relation, in the "Control" tab, no tick has been set in the "Dissolve LE" field (stands for "Dissolve loading unit").
Over time, there has been a need to print these different tags with a different appearance, depending on the agreement with the customer. These agreements are very often based on one of the many standards from the automotive industry, supplemented by various customer requests. The automotive standards VDA or AIAG are common.
So there are several different designs for the goods tags, depending on the standard agreed with the customer. The following table is intended to provide information about this.
The following section contains two different tables. One for goods tags from EDI transactions and the second for goods tags from non-EDI transactions.
The numbers in the cells correspond to FEPA internal document numbers for IT to help locate the labels in case of questions. If a value is missing from the cell, then the standard goods tag (first line) is always printed.
| --- | Master | Mixed | Single | Single (klein) | Loading unit |
| Standard | No. 8044 | No. 8047 | No. 8050 | No. 8053 | No. 8041 |
| VDAv1 | No. 8169 | No. 8515 | No. 8189 / 8190 | ||
| VDAv2 | No. 8173 | No. 8518 | No. 8197 / 8198 | ||
| AIAGv1 | No. 8170 | No. 8516 | No. 8191 / 8192 | ||
| AIAGv2 | No. 8171 | No. 8517 | No. 8193 / 8194 | ||
| CamSlide | No. 8172 | No. 8195 / 8196 |
| --- | Master | Mixed | Single | Single (klein) | Loading unit |
| Standard | No. 8043 | No. 8046 | No. 8049 | No. 8052 | No. 8040 |
| VDAv1 | |||||
| VDAv2 | |||||
| AIAGv1 | |||||
| AIAGv2 | |||||
| CamSlide |
Configuration of the types of goods tags
The selection whether the design "Standard" or the design "AIAGv2" is to be printed for a master goods tag is made in the delivery note itself, see the following screenshot:
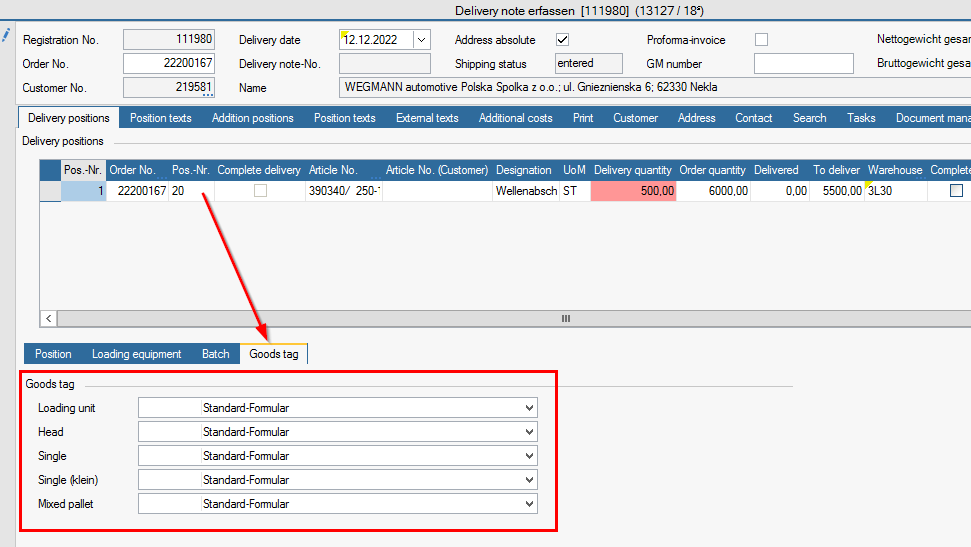
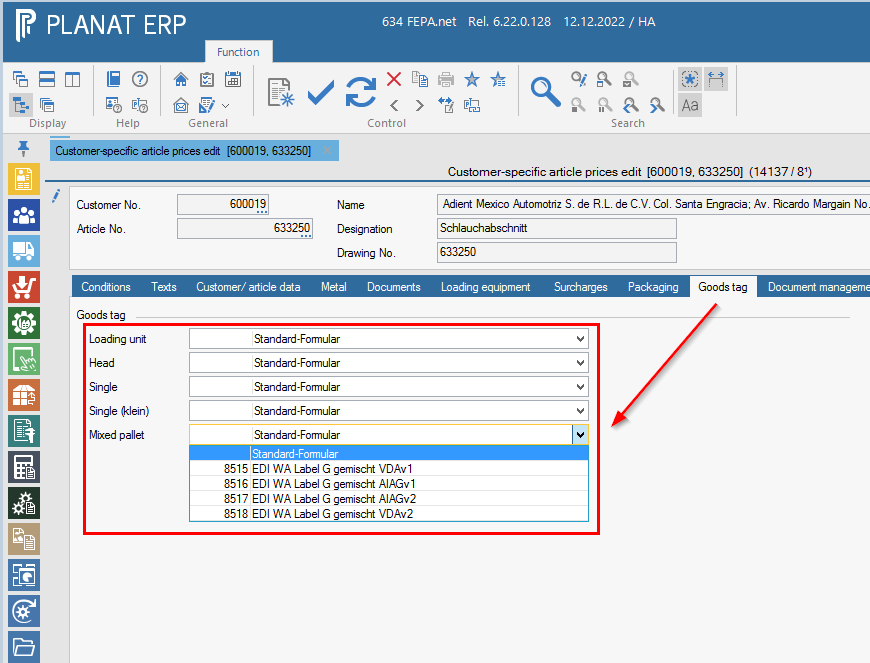
In the case of an EDI delivery note, this setting is loaded from the associated EDI sales order when a new one is created and can thus be preassigned there. The EDI sales order in turn loads the data from the customer conditions when a new order is created (see function Sales > Customer conditions > Edit customer-specific item prices).
In the case of a non-EDI delivery note, the data cannot be stored in the sales order, but can be stored in the customer conditions in order to be preassigned when a new delivery note is created.
Sample goods tags
The following is the section with examples of the different commodity tag designs possible in FEPA.
Non-EDI
Master
Non-EDI, goods tag master, standard: 8043

Mixed
Non-EDI, goods tag mixed, standard: 8046

Single
Non-EDI, goods tag single, standard: 8049

Single (small)
Non-EDI, goods tag single, standard: 8052

EDI
Loading unit
EDI, goods tag, Loading unit: 8041

Master
EDI, goods tag master, standard: 8044
Variant without "safety parts" label (circle with triangle, "special features")

Variant with "safety parts" label (circle with triangle, "special features")
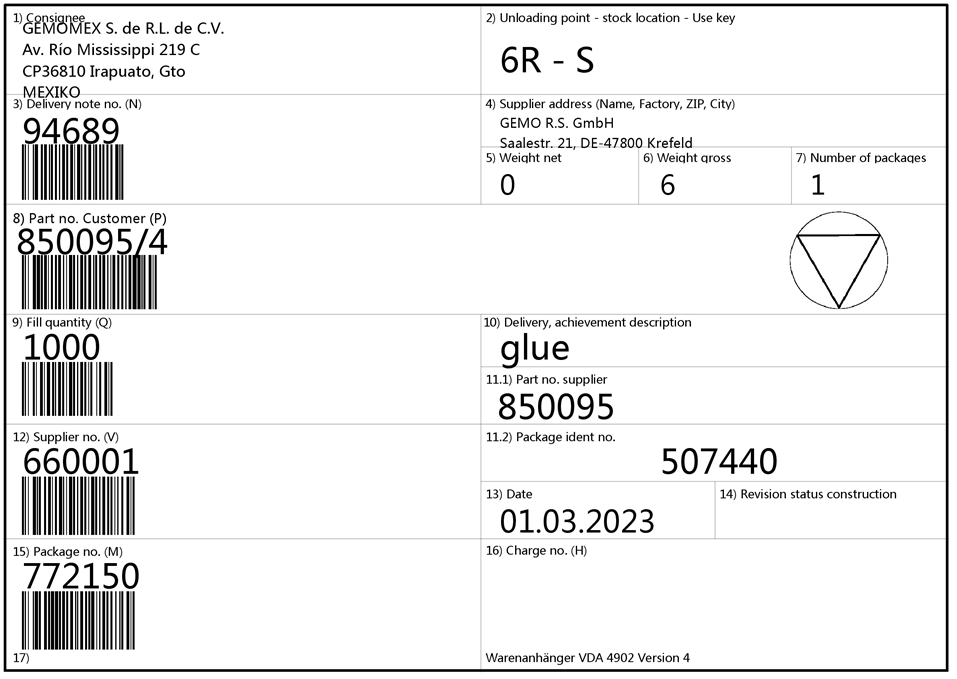
EDI, goods tag, master VDAv1: 8169
Variant without "safety parts" label (circle with triangle, "special features")

Variant with "safety parts" label (circle with triangle, "special features")
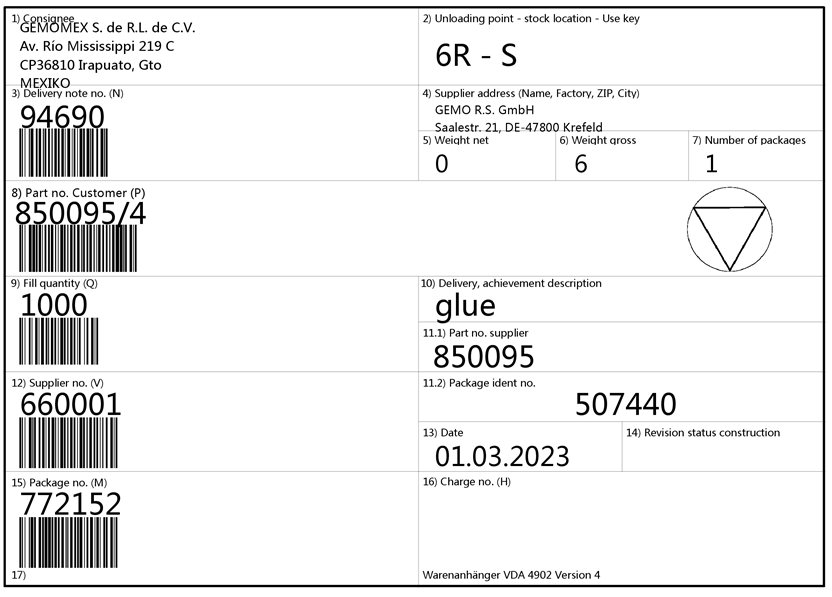
EDI, goods tag, master VDAv2: 8173
Variant without "safety parts" label (circle with triangle, "special features")

Variant with "safety parts" label (circle with triangle, "special features")
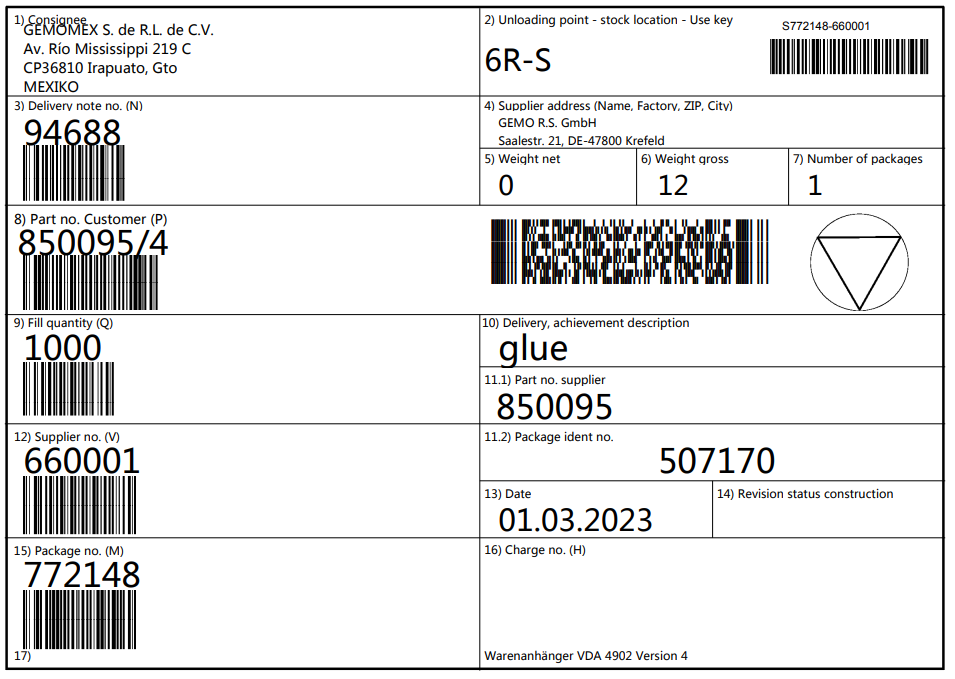
EDI, goods tag, master AIAGv1: 8170

EDI, goods tag, master AIAGv2: 8171

EDI, goods tag, master, CamSlide: 8172

Single
EDI goods tag Single, Standard: 8050

Single (small)
Normally, the product labels of the type "Single (small)" are printed on A4 paper. Usually, three tags fit on one page. However, there are some "Single (small)" tags with an additional "_Single" at the end of the name. The contents of these tags are the same as those without such an appendix, but they are designed for printing on special label printers so that each tag is printed individually.
EDI, goods tag single (small), standard: 8053
Variant without "safety parts" label (circle with triangle, "special features")

Variant with "safety parts" label (circle with triangle, "special features")
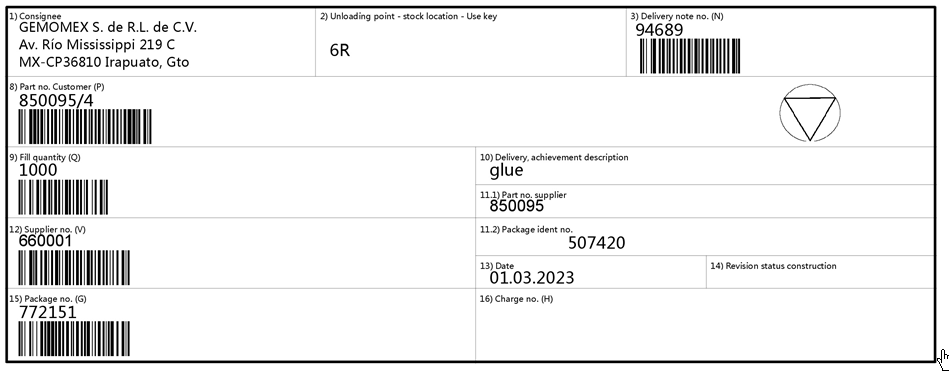
EDI, goods tag single (small), VDAv1: 8189 / 8190
Variant without "safety parts" label (circle with triangle, "special features")

Variant with "safety parts" label (circle with triangle, "special features")
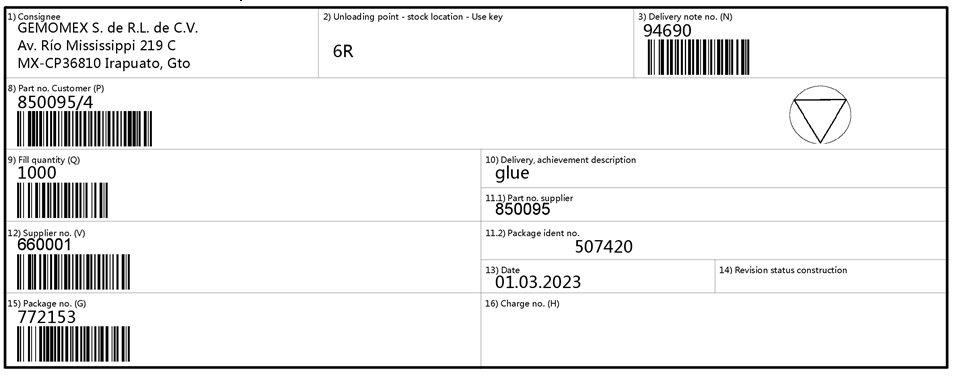
EDI, goods tag single (small), VDAv2: 8197 / 8198
Variant without "safety parts" label (circle with triangle, "special features")

Variant with "safety parts" label (circle with triangle, "special features")
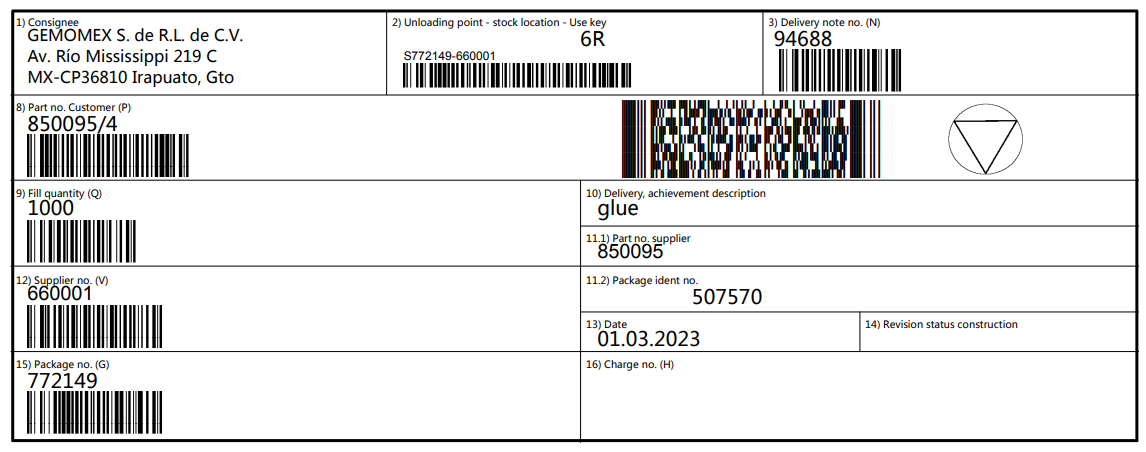
EDI, goods tag single (small), AIAGv1: 8191 / 8192

EDI, goods tag single (small), AIAGv2: 8193 / 8194

EDI, goods tag single (small), CamSlide: 8195 / 8196

Mixed
EDI, goods tag mixed, standard: 8047

EDI, goods tag mixed, VDAv1: 8515

EDI, goods tag mixed, VDAv2: 8518

EDI, goods tag mixed, AIAGv1: 8516

EDI, goods tag mixed, AIAGv2: 8517

Confirmation of entry
Create an entry confirmation
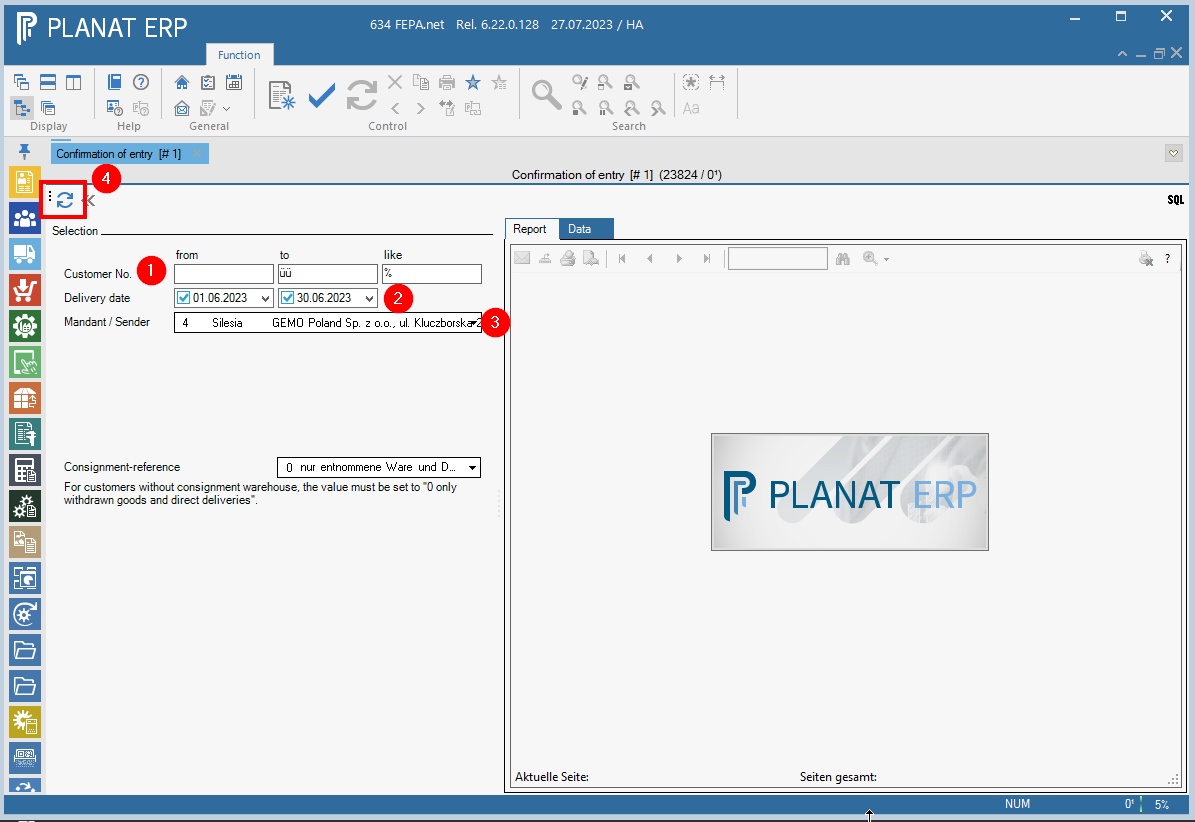
FEPA Function: Sales > Reporting > Collective receipt confirmation
All confirmation of entry requests are output in the selection area. These entry confirmations are generated when calling up delivery notes for customers with the identifier collective receipt confirmation(periodic, on demand) (Setting in Edit customer)
- All customers? then no entries
- Delivery date, check, adjust if necessary
- Check client, adjust if necessary
Check created documents + attachments which Confirmation of entry are missing, then print and send to customers. When exporting, a PDF is created for all documents.
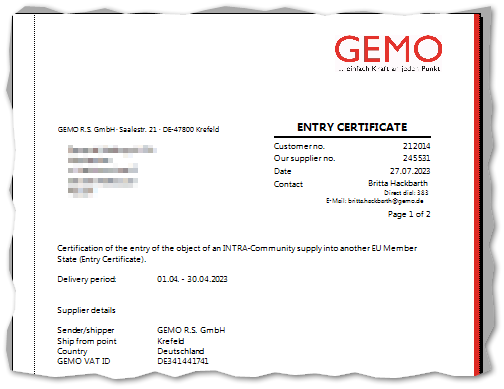
If the Confirmation of entry is to be sent immediately as an email, the Confirmation of entry should be created individually for each customer. Then the email function above the document can be used.
Entering confirmations of entry (GBS)
FEPA function: Sales > Customer documents > Confirmation of entry (GBS)
The purpose of the customer-specific adjustment "confirmation of entry" is to indicate that tax-exempt intra-community supplies from companies within the scope of the German VAT Act have actually arrived in the EU foreign country (cf. WIKIPEDIA - only German version).
For the given selection criteria, it can be noted on the delivery note that a confirmation of receipt has been received from the customer. In addition to the selection criteria, the pre-selection can be
- no confirmation of entry GBS
- confirmation of entry GBS or
- All
can be made. The selection of delivery note types can also be restricted.
Open search, here the delivery date Today (-180 days) is preset as a preselection as well as the main client of the clerk. Further search criteria can be entered. Then click on the magnifying glass and the delivery notes are displayed.
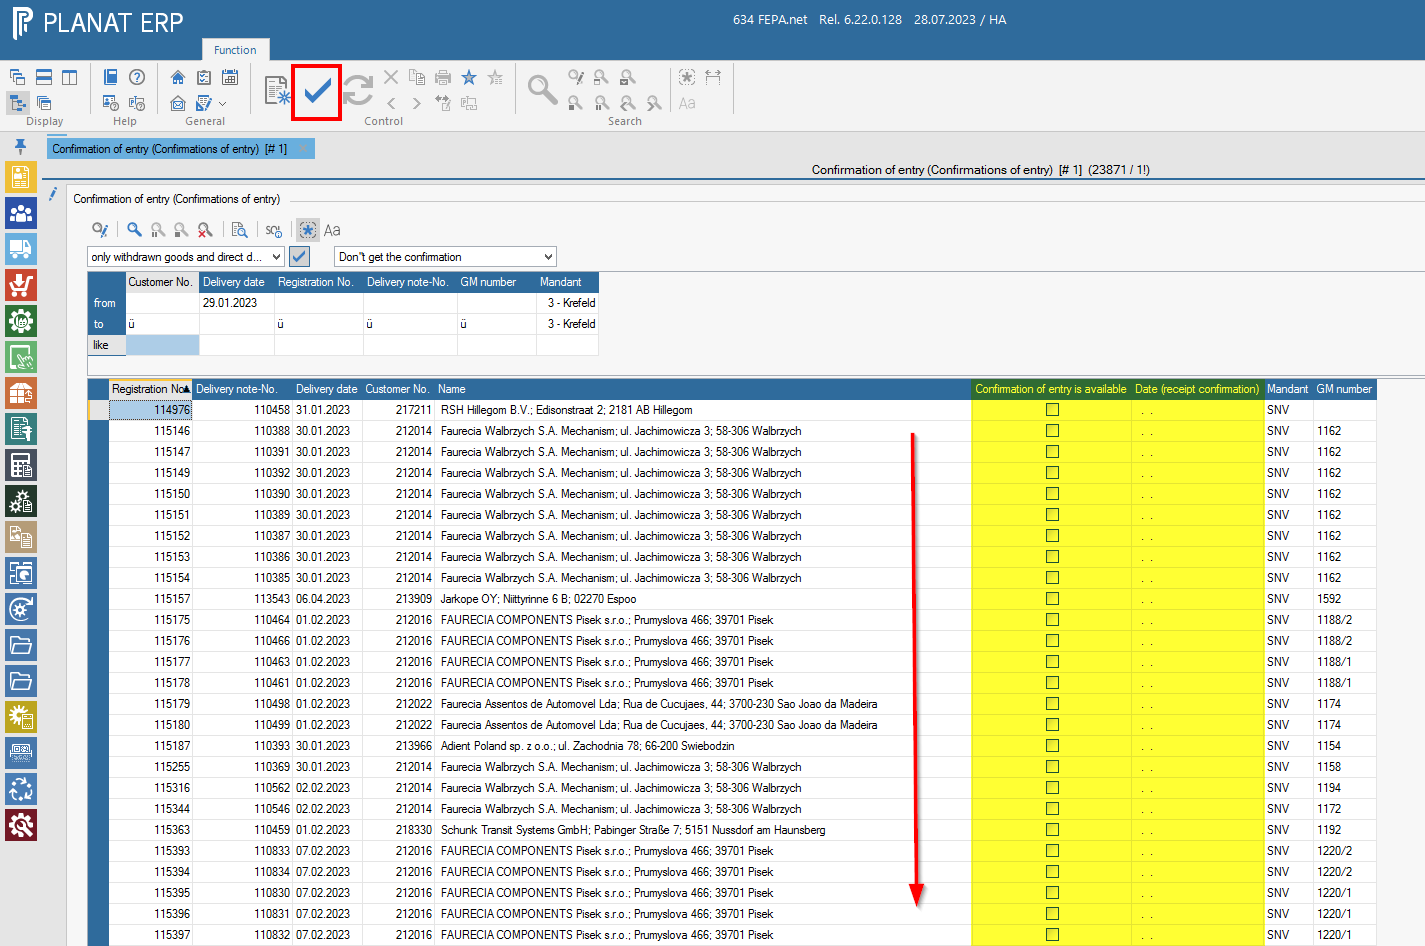
Now tick off the delivery note according to the confirmation of receipt, then today's date is automatically set, and when you have all of them, press the tick in the tool bar to save.
Outgoing invoice journal
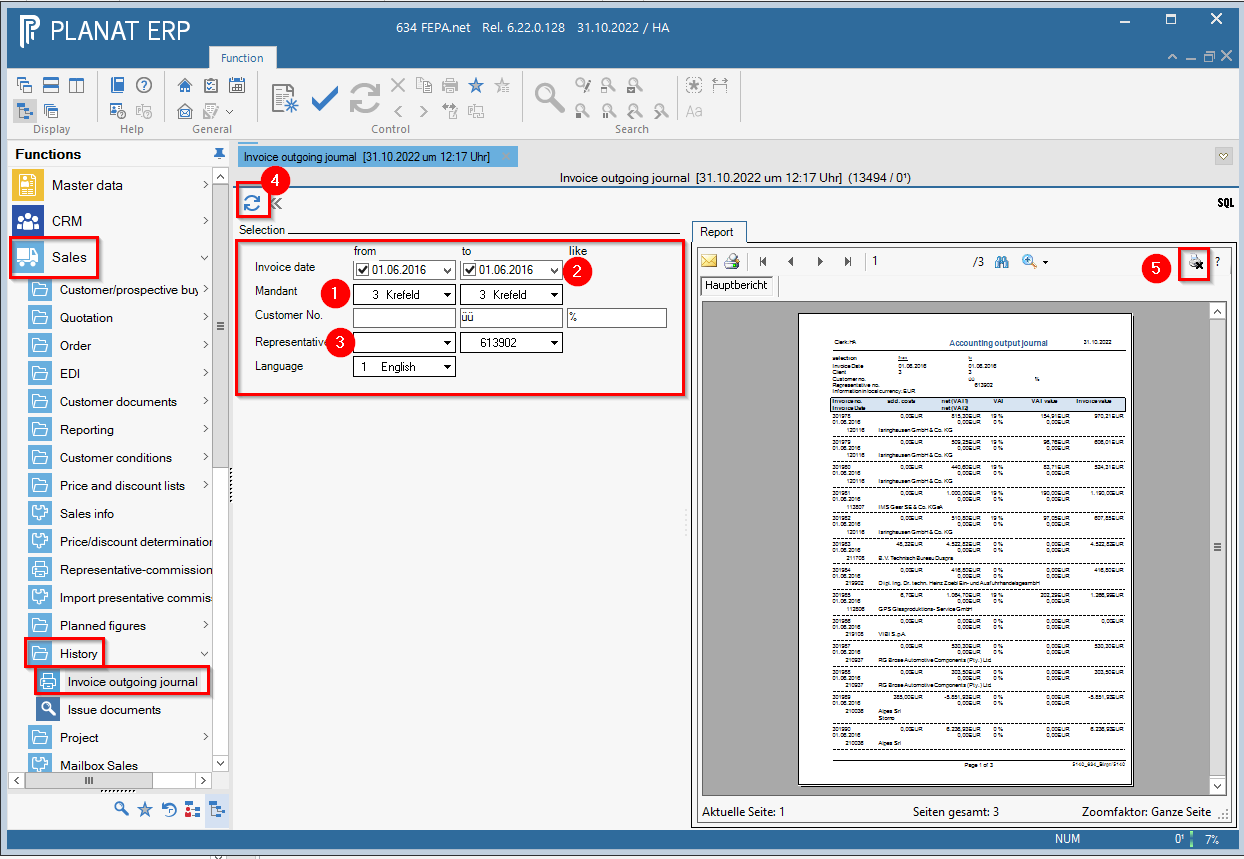
FEPA function: Sales > History > Invoice outgoing journal
1. check Mandant
2. if desired limit the period
3. leave representative no. empty
4. press the button Update and the outgoing journal will be created
Press the printer icon, the journal will be printed and the function will be closed.
Arrange shipping documents
There is a program developed by GEMO with which a user, based on FEPA consignments (See program "Arrange shipment"), can combine and send documents such as shipping documents, invoices and delivery bills in a new e-mail. In addition, further documents of the type "Shipping documents" can be imported into the FEPA DMS (Document Management System).
The program was created at the request of the shipping department in Krefeld, which were confronted with requirements of the carrier "Rauh". For the origin see also ticket #020128 (Link User / Admin).
Sales > Customer documents > Shipping documents > Arrange shipping documents
Starting
When the program has been opened, the client and period of the shipments to be searched for can be selected in the selection area. The period refers to the handover date of the shipment (also pickup date) and not to the delivery dates from the connected delivery notes. By clicking on the magnifying glass symbol "Refresh" the data are loaded and the selection area is hidden.
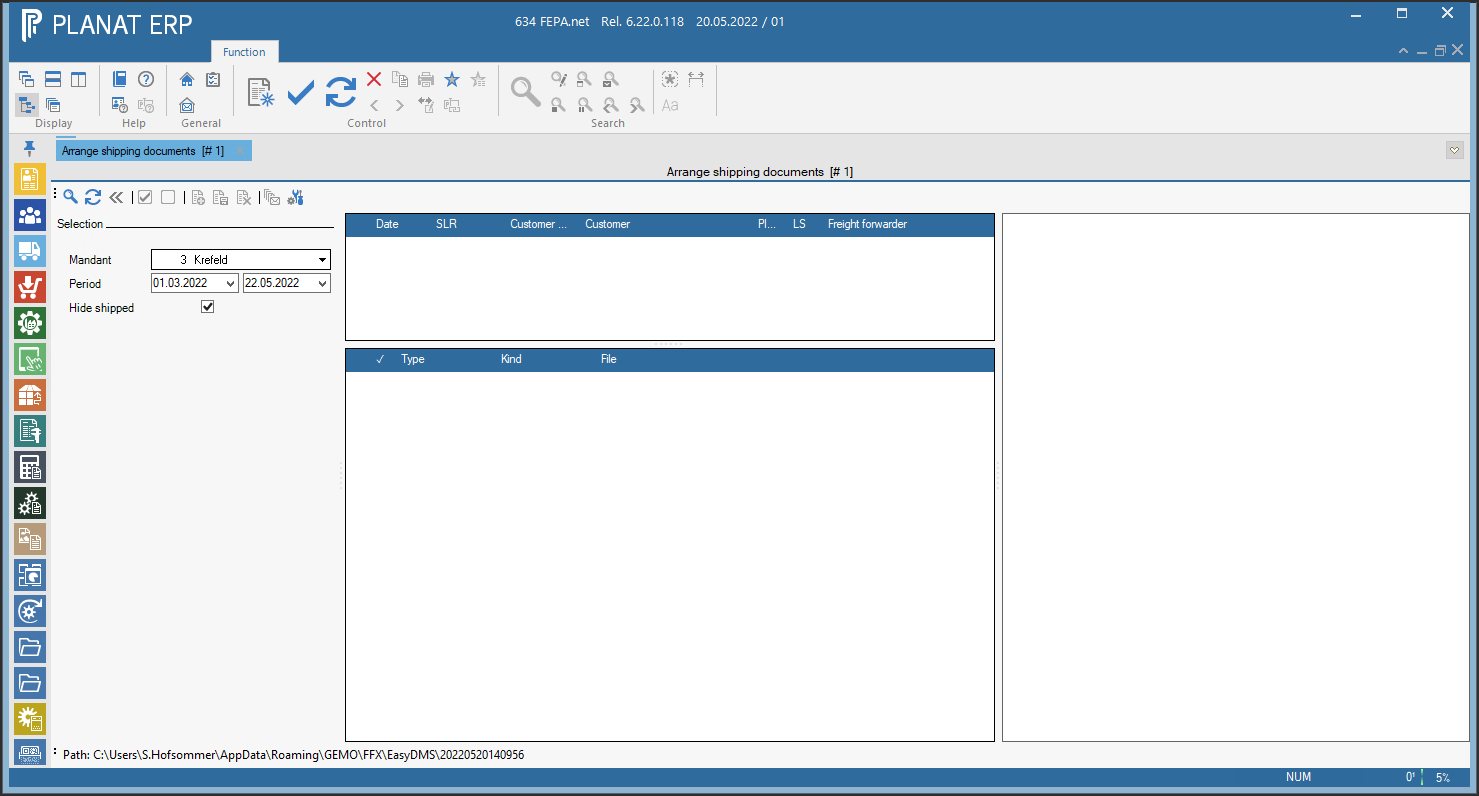
If the "Hide shipped" checkbox is ticked, shipments for which an e-mail has already been generated are no longer displayed. By unchecking the box, these can be made visible again.
Menu

|
No. |
Explanation of the function |
|
1 |
This function starts the search for shipments based on the selection. |
|
2 |
This function reloads only the documents of the current shipment instead of reloading all shipments and their documents. Useful after adding new documents. |
|
3 |
Hides the selection area. Not visible if the selection area is already hidden. |
|
4 |
Displays the selection area. Not visible if the selection area is already visible. |
|
5 |
Adds a check mark to all documents. |
|
6 |
Removes all check marks from the document table. |
|
7 |
Displays the area to add a new document to the selected program. |
|
8 |
Saves the new document to the selected program. |
|
9 |
Cancels adding a new document and hides the input area. |
|
10 |
Creates a new e-mail with the selected settings and documents attached to the e-mail. |
|
11 |
Displays the settings to generate the e-mail subject. |
If you move the mouse over one of the functions, and pause the mouse for a second, then a text is displayed that gives an indication of what will happen when you click.
Load shipments
After clicking the magnifying glass icon, the shipments were loaded based on the selection. In the upper table all shipments are displayed. In addition to the SLR (shipment load reference number), other information is also displayed, such as the number and name of the customer, the customer's plant number, the number of delivery notes and the selected freight forwarder.
In the area to the right of the tables a preview of the selected document is displayed (PDF only).
The plant number corresponds to the plant number transmitted via EDI, but can be overwritten by the so-called plant abbreviation in the program "Edit customer-plant relation".
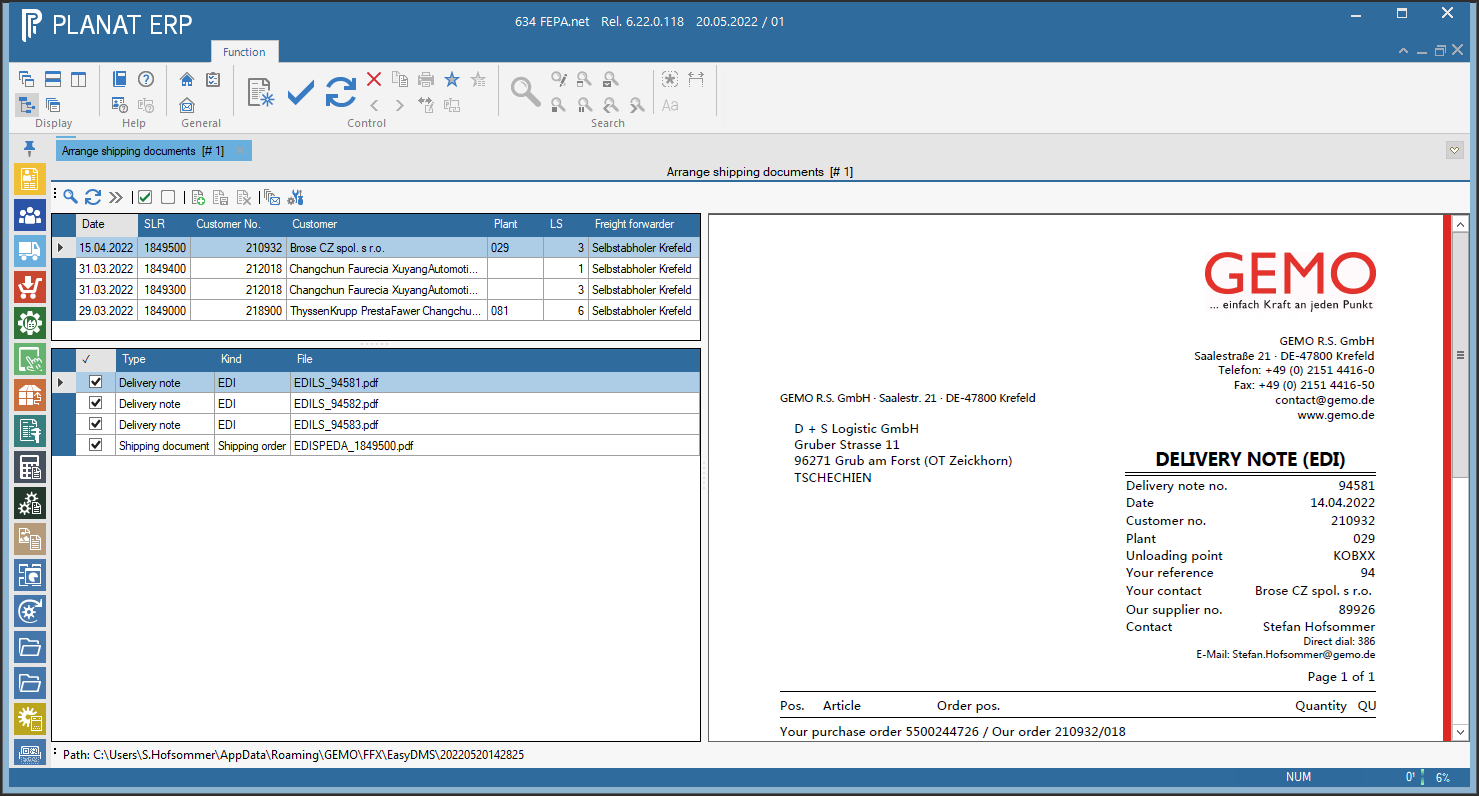
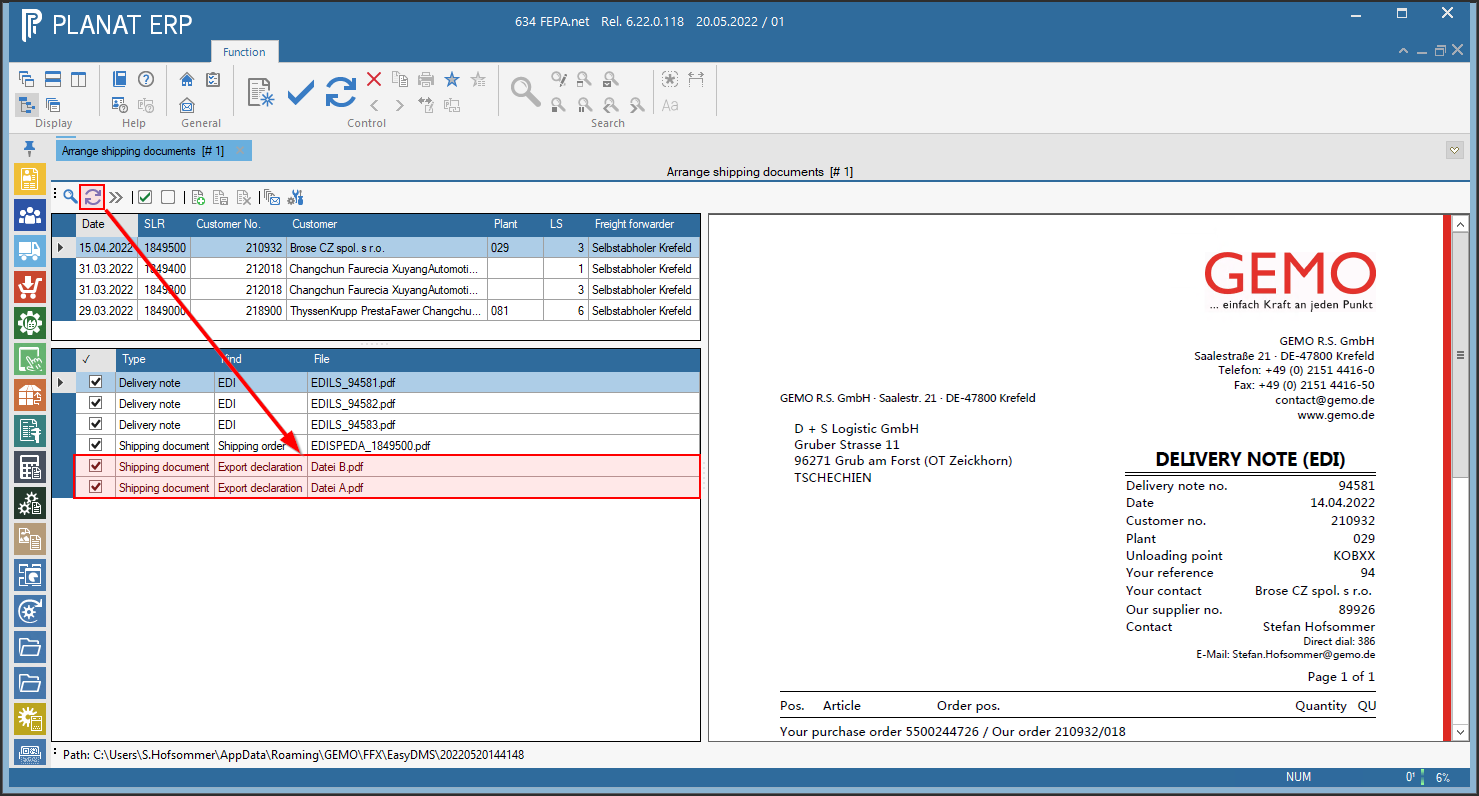
After selecting a shipment (by clicking a row of the upper table), the lower table with the documents belonging to the shipment is displayed. These include delivery notes, invoices and shipping documents.
Add document to shipment
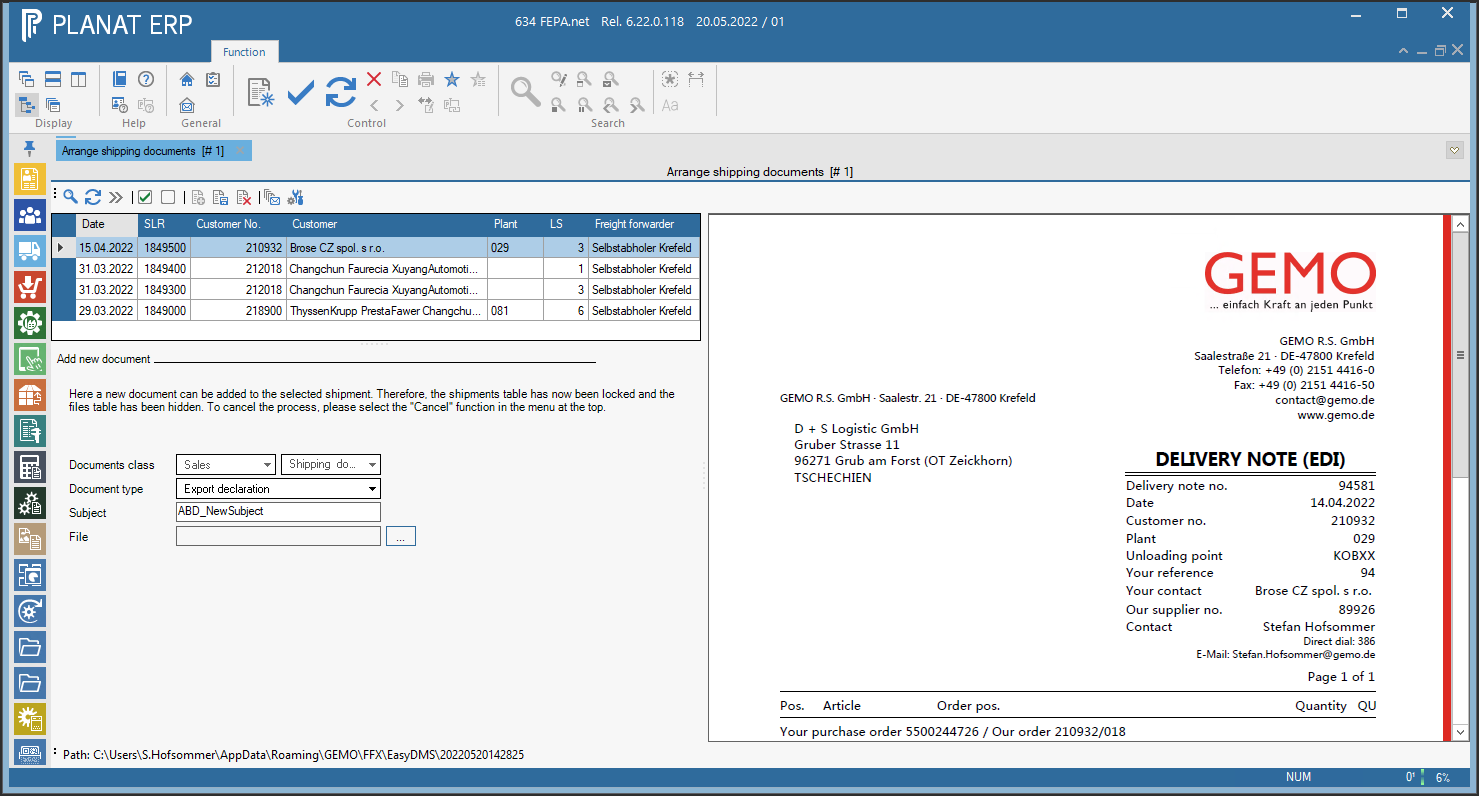
By clicking on "Add document" the upper table is locked and instead of the lower table a new area is displayed. In this area, a new document can be added to the selected shipment. The process can be interrupted at any time by pressing the "Cancel" button. The area will then disappear and the original document table will be displayed again.
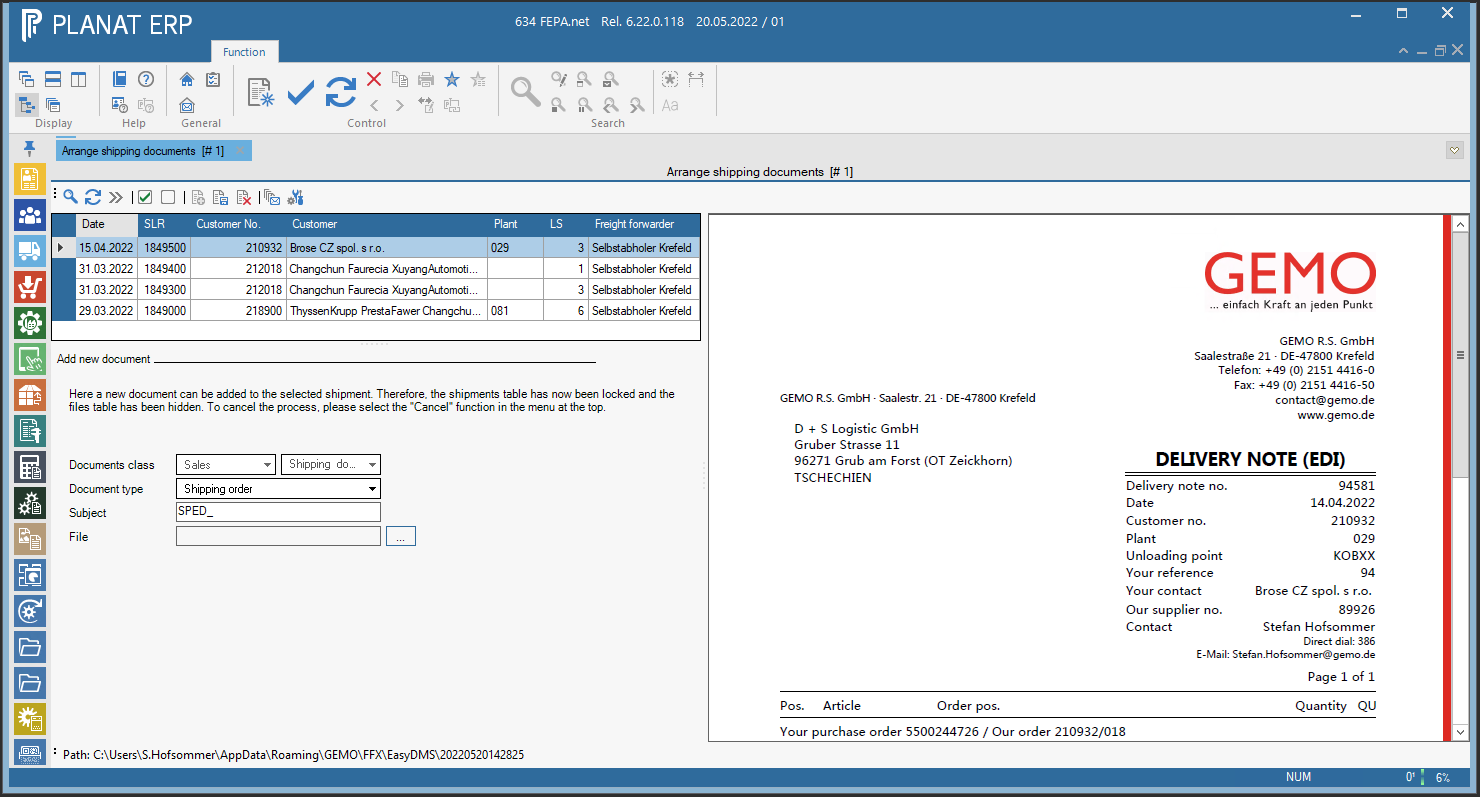
Kind of document
This document must belong to the document class "Sales" and the document type "Shipping document". However, you can select the kind of document. At the moment there is a choice between shipping order, accompanying document, export declaration and freight forwarding waybill.
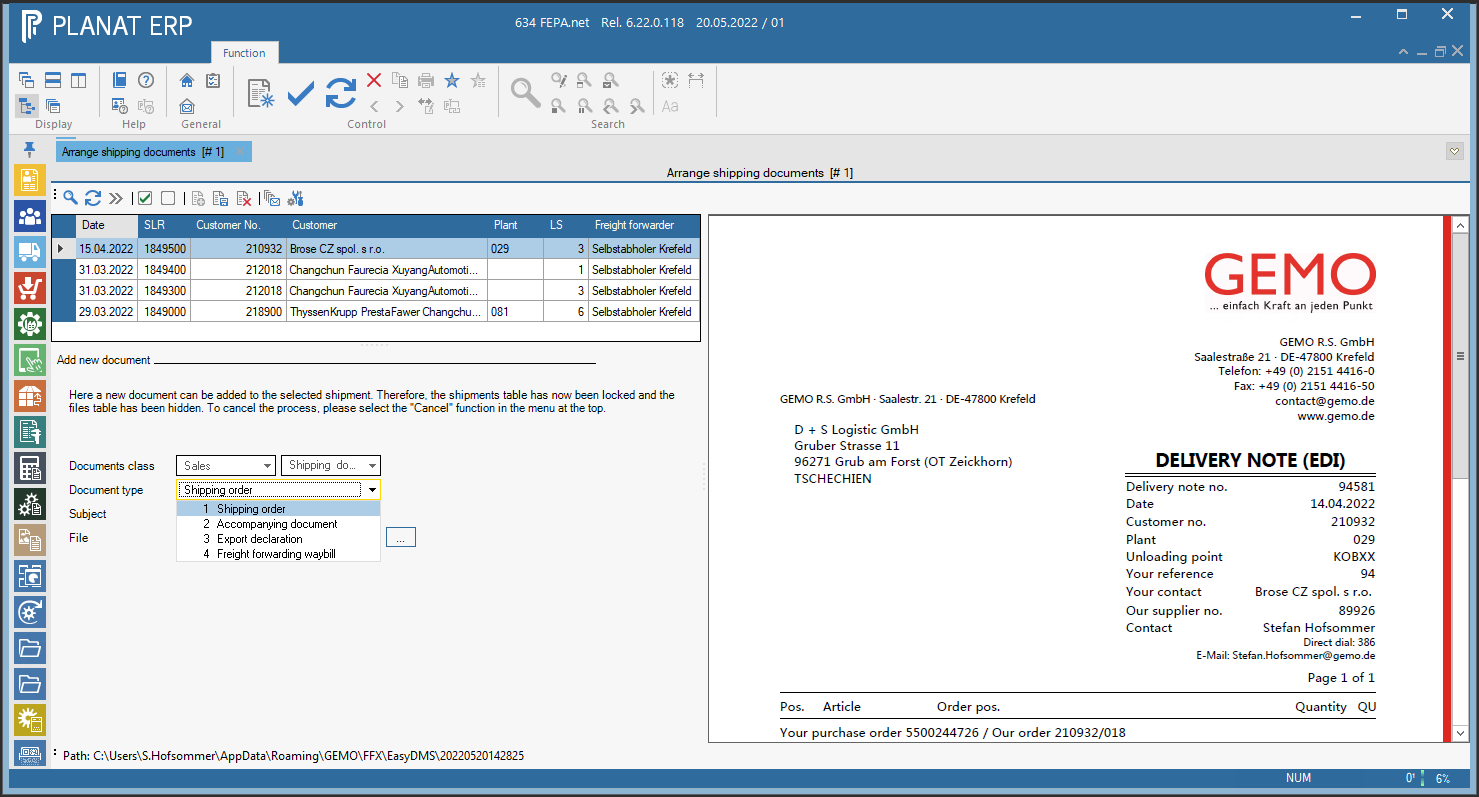
Document subject
The subject is preset based on the selection of the document type, but can be entered completely freely by the user. It should be chosen in such a way that the document can be found again later without major problems.
Select files
Files can be selected from the file system by clicking the "[...]" button - at the moment only files of the "PDF" type are supported.
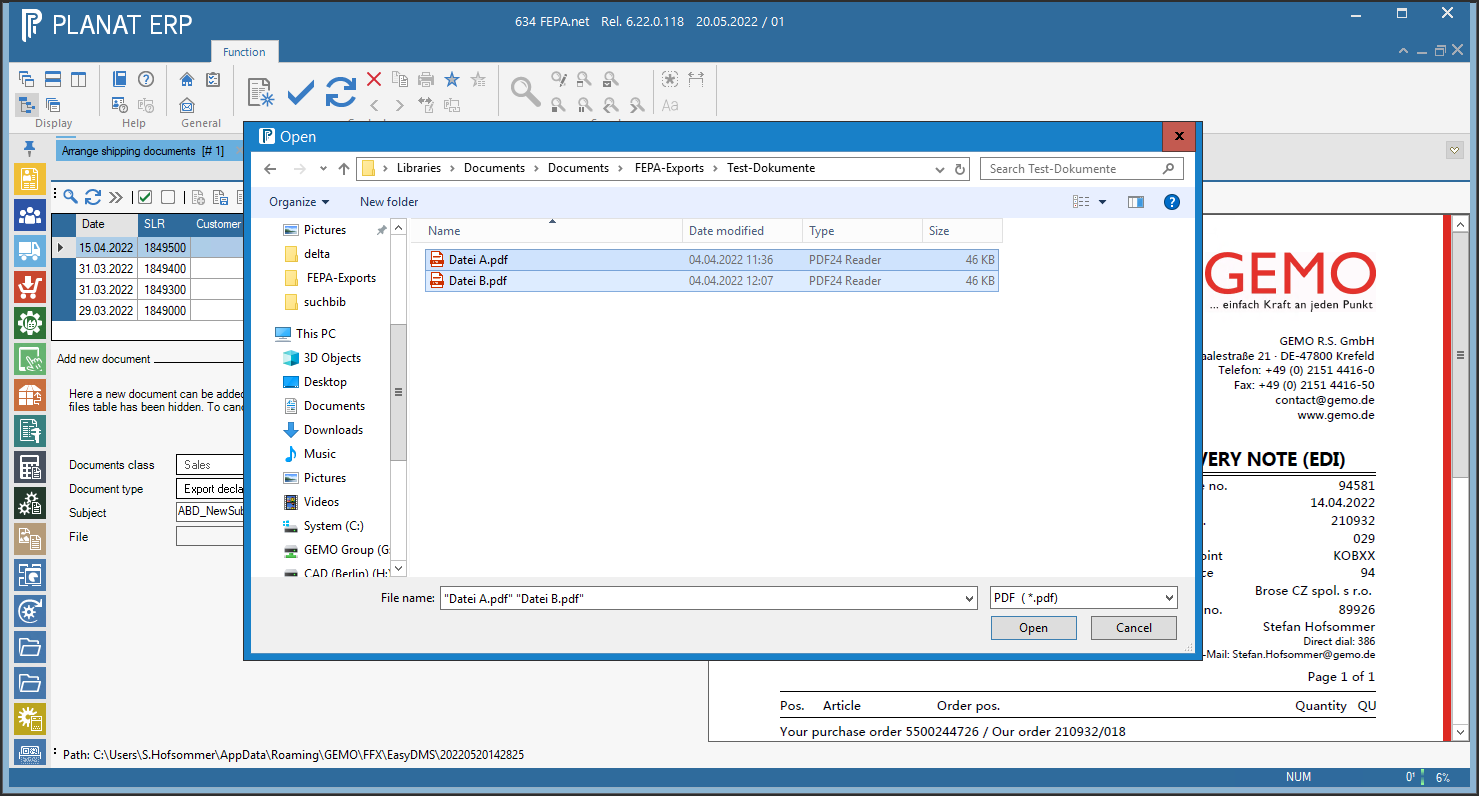
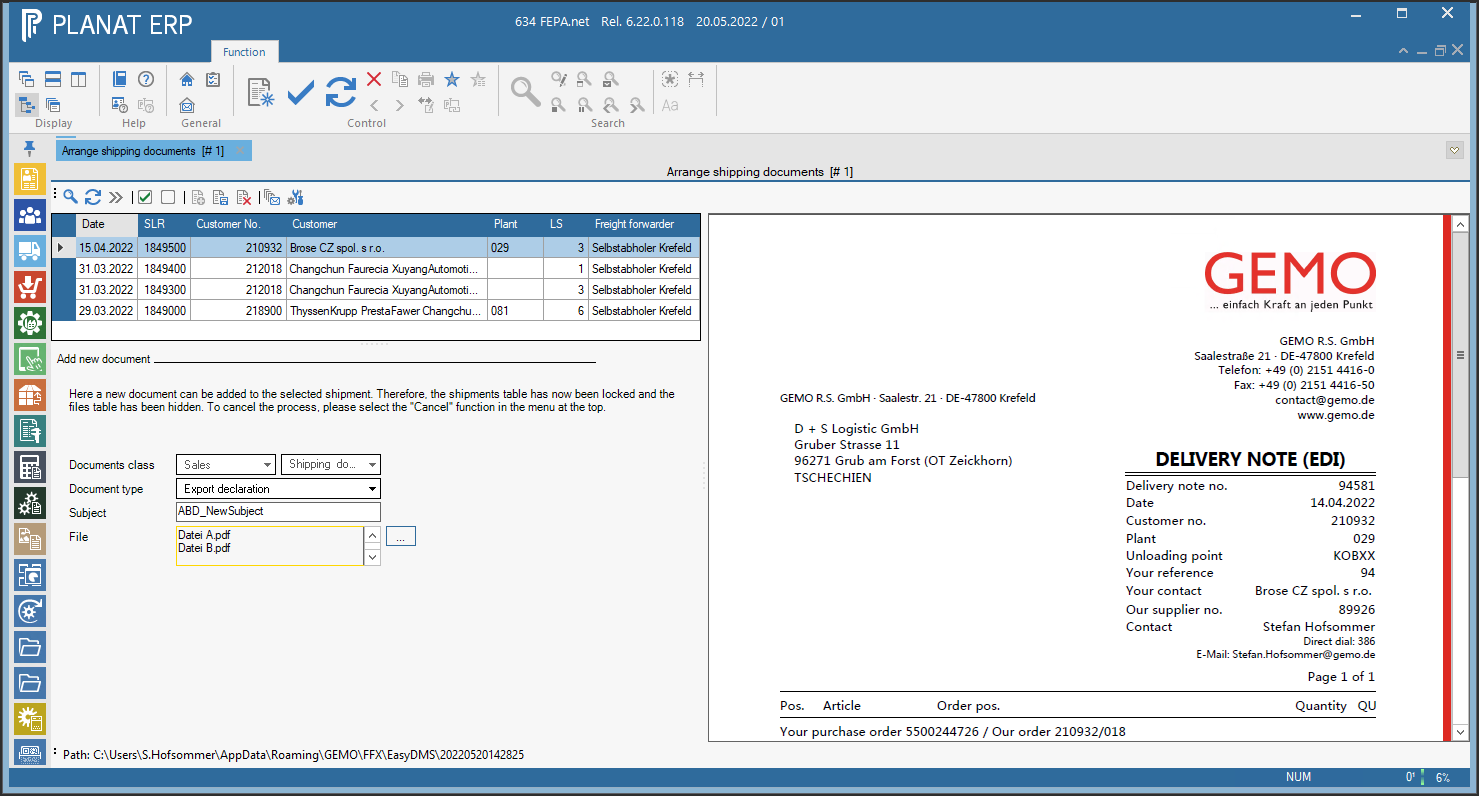
After confirming the file dialog, the selected files are listed in the box next to the "[...]" button.
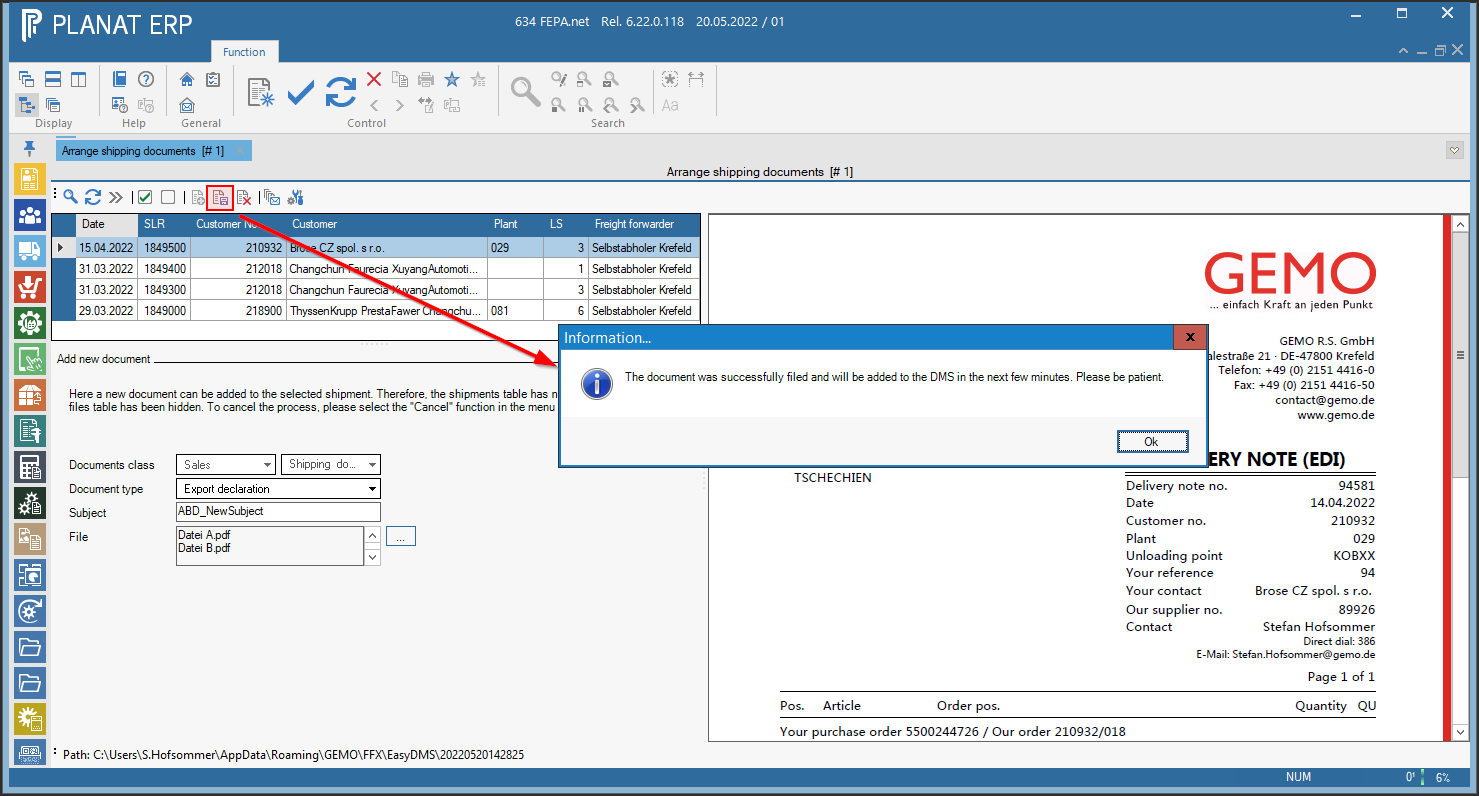
Save the new document
By clicking on the Save button, all files are combined in the new document and sent to the DMS. Depending on server settings and load, it may take up to three minutes for the files to be loaded by the DMS. Usually, however, it should be visible within a few moments.
One can click the "Reload documents" button to reload the documents without having to reload all the data. After a few moments the files will be visible:
Create Email
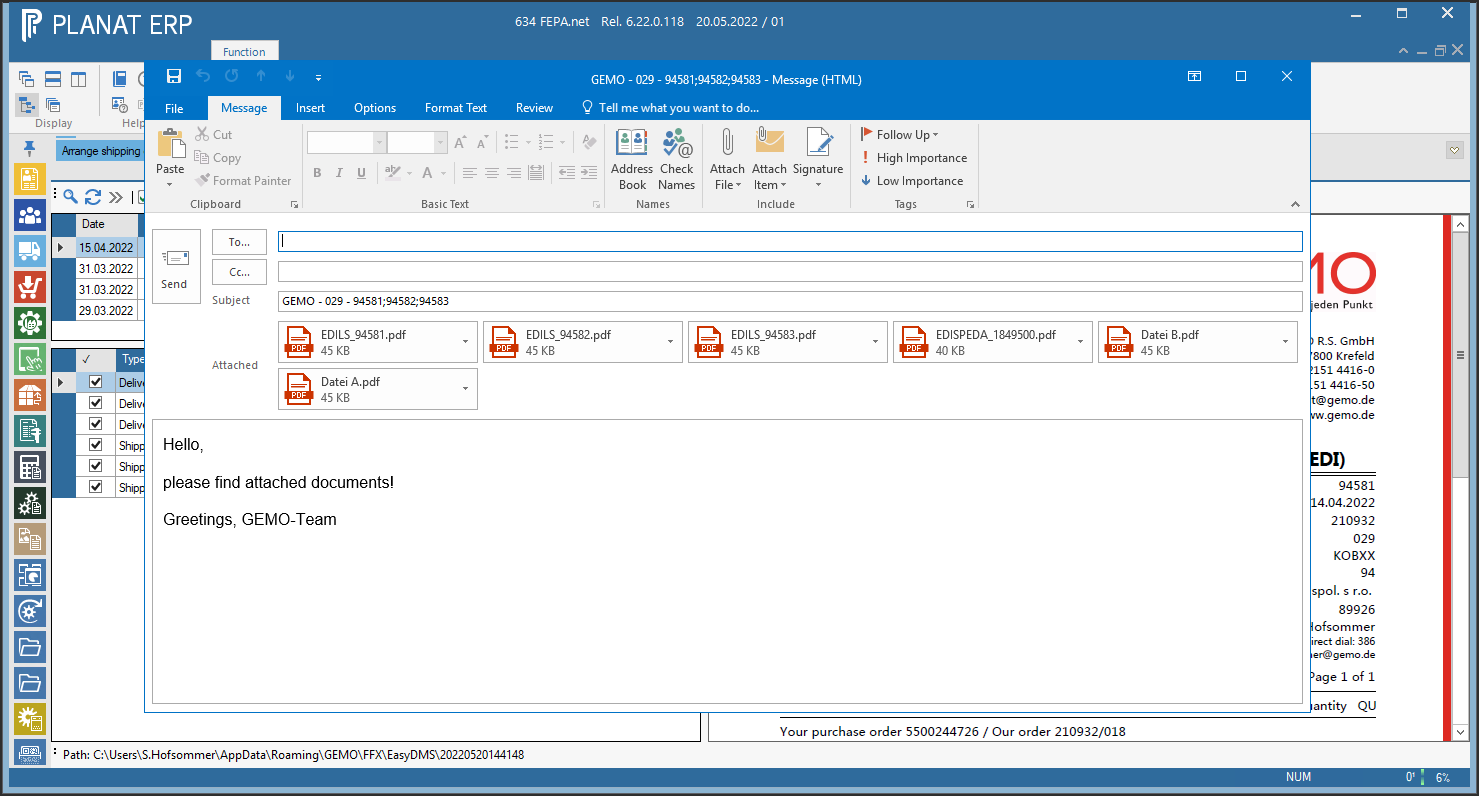
By clicking on "Create e-mail", a new e-mail is created via Outlook based on the selected shipment and displayed to the user. Only if the user clicks on "Send", this e-mail will be sent. The fields of the e-mail will be pre-populated as follows:
- The recipient as well as CC of the e-mail are pre-populated from the invoice or main address of the freight forwarder. These fields must therefore be maintained if they are to be automatically pre-populated.
- The subject of the e-mail is automatically preset from the "Edit Email subject ". See also explanations of the settings options.
- The text of the e-mail consists of a standard text which is stored directly in the code of the program.
- All files that are marked with a check mark (✓) in the file table are collected and attached to the new e-mail.
E-mail subject settings
The subject of the e-mail is suggested automatically. This suggestion can be customized, but is based on the specifications of the freight forwarder Rauh: GEMO - WERK - LS001;LS002;LS003
By clicking on "Edit email subject" the tables disappear and the area to display the email subject appears. There is also a button to preview the subject.
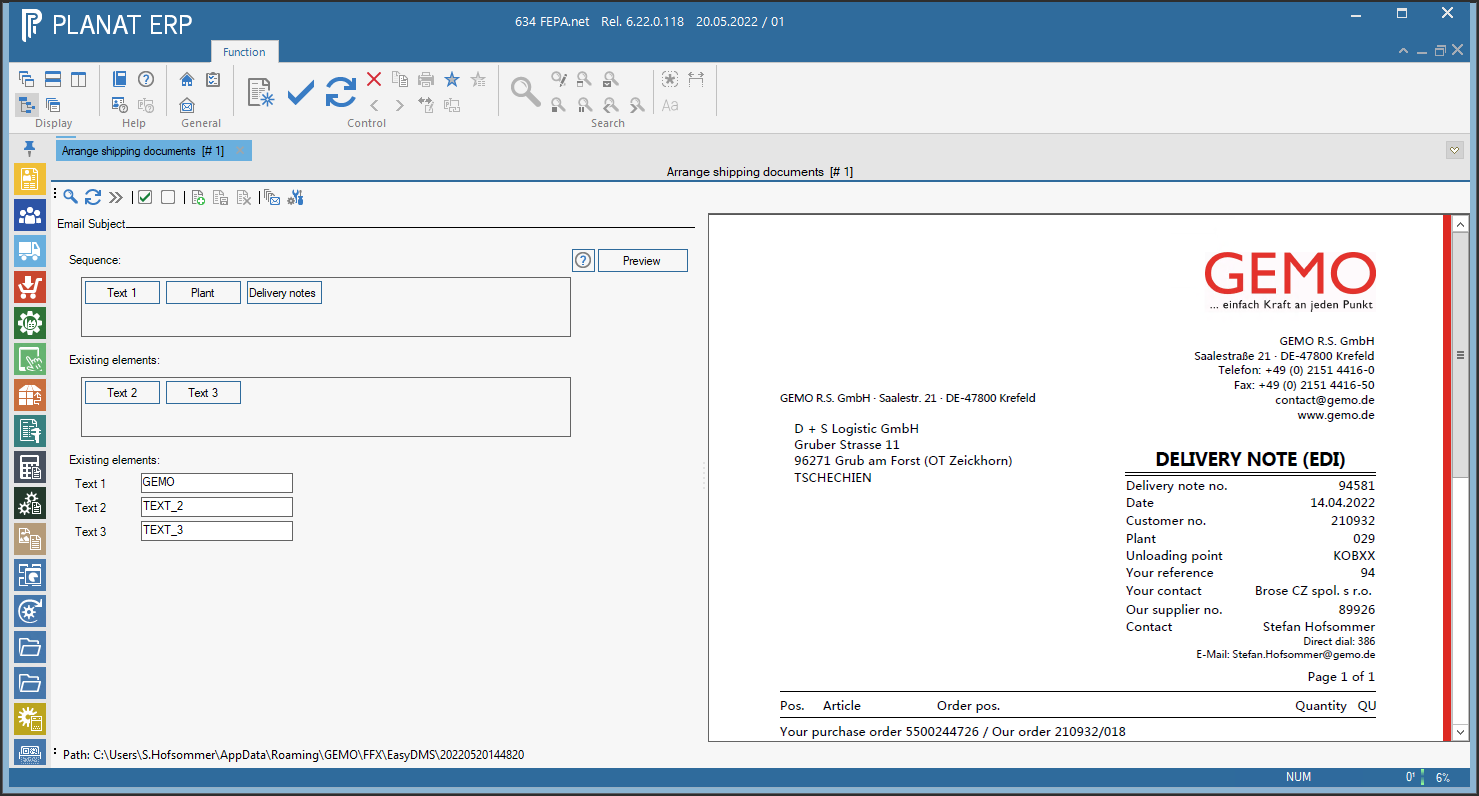
The "Sequence" area contains the elements in exactly the order in which they are then written in the subject. The "Existing elements" area still contains the two elements "Text 2" and "Text 3". By clicking on one of the elements, they are moved to the other area and appended at the end.
Texts from operation data and master data in sales and distribution
EDI Order with Consignment stock
Change to the GEMO item number
Article no. change at GEMO (e.g., new index), but the customer article no. does not change
Problem: The existing stock of the “old” item number is not taken into account for the withdrawal. How can I transfer the open delivery quantities from the old order to the new order, since the customer item number in the old order is altered (e.g., x or XXX) and therefore no further withdrawals can be made against the old order, or the processing of the outbound notification fails due to the two existing customer orders with the same customer item number?
- Confirmation from Logistics: there are no more deliveries with the old GEMO item number
- Process all received EDL and EDI files
- Check the inventory report from the consignment warehouse; does the total match the “open” quantities on the delivery notes to the consignment warehouse (must also include the open invoice quantity in the order and our stock level in the consignment warehouse)
- Cancel open and partially picked delivery notes; note the quantities—they will be posted back from the consignment warehouse to the warehouse!
- Create a new sales order (or if it already exists)
- Create a new delivery note for the new order and specify the cumulative quantity from the canceled delivery notes.
- Use dummy load carriers—e.g., 507510
- Disable the ASN delivery note (General tab)
- Disable printing of shipping documents and cargo tags (Print tab)
- Add an info text to the footer (see example)
Due to a product change at GEMO, delivery notes without linked outbound notifications had to be canceled, and “open delivery notes” (with outbound notifications and remaining quantities) had to be reversed. The cumulative quantity is then delivered to the consignment warehouse with this delivery note. This delivery note was not transferred via delivery note EDI according to VDA 4913 because it serves only to correct inventory.
Old order: 12345678
New order: 12345679
Canceled delivery notes
1234 with X units
Open delivery notes
1234 with X units
- Check inventory in the consignment warehouse; it must match the previous quantity again
- Correct the reversed quantity of the old item number with 2 MMA movements (old item is back in stock, new item is in negative stock)
This should allow future outbound notifications to be generated against this delivery note.